OPERATING MANUAL ba77064e01 Han dyL ab 600 HandyLab 600 DIGITAL METER FOR DIGITAL IDS-pH AND ORP SENSORS 03/2014
HandyLab 600 Copyright 2 © 2014, SI Analytics GmbH Reprinting - even as excerpts - is only allowed with the explicit written authorization of SI Analytics GmbH, Mainz. Printed in Germany.
HandyLab 600 Contents HandyLab 600 - Contents 1 Overview . . . . . . . . . . . . . . . . . . . . . . . . . . . . . . . . . . . . . . . . . . 7 1.1 HandyLab 600 meter . . . . . . . . . . . . . . . . . . . . . . . . . . . . . . . . . 1.2 Sensors . . . . . . . . . . . . . . . . . . . . . . . . . . . . . . . . . . . . . . . . . . . . 1.2.1 IDS sensors . . . . . . . . . . . . . . . . . . . . . . . . . . . . . . . . . . . . 1.2.2 Automatic sensor recognition . . . . . . . . . . . . . . . . . . . . . .
Contents HandyLab 600 5 pH value. . . . . . . . . . . . . . . . . . . . . . . . . . . . . . . . . . . . . . . . . . 22 5.1 Measuring . . . . . . . . . . . . . . . . . . . . . . . . . . . . . . . . . . . . . . . . 5.1.1 Measuring the pH value . . . . . . . . . . . . . . . . . . . . . . . . . 5.1.2 Measuring the temperature . . . . . . . . . . . . . . . . . . . . . . 5.2 pH calibration. . . . . . . . . . . . . . . . . . . . . . . . . . . . . . . . . . . . . . 5.2.1 Why calibrate? . . . . . . . . . . . . .
HandyLab 600 Contents 9 Transmitting data (USB interface). . . . . . . . . . . . . . . . . . . . . 55 9.1 9.2 9.3 9.4 9.5 Outputting current measurement data . . . . . . . . . . . . . . . . . . . Transmitting data (to a PC) . . . . . . . . . . . . . . . . . . . . . . . . . . . Connecting the PC / USB-B interface (USB Device) ..... Options for data storage to a PC . . . . . . . . . . . . . . . . . . . . . . . MultiLab Importer. . . . . . . . . . . . . . . . . . . . . . . . . . . . . . . . . . .
Contents 6 HandyLab 600 ba77064e01 03/2014
HandyLab 600 Overview 1 Overview 1.1 HandyLab 600 meter The HandyLab 600 digital compact precision pH meter enables you to perform pH and ORP measurements rapidly and reliably. The HandyLab 600 provides the maximum degree of operating comfort, reliability and measuring certainty for all applications. The HandyLab 600 supports you in your work with the following functions: Automatic sensor recognition Electronic access control Data transmission via the USB interface (USB-B).
Overview HandyLab 600 process signals in the sensor digitally so that precise and interference-free measurements are enabled even with long cables facilitate to assign a sensor to a measured parameter with differently colored couplings have quick-lock couplings with which to fix the sensors to the meter.
HandyLab 600 Safety 2 Safety 2.1 Safety information 2.1.1 Safety information in the operating manual This operating manual provides important information on the safe operation of the meter. Read this operating manual thoroughly and make yourself familiar with the meter before putting it into operation or working with it. The operating manual must be kept in the vicinity of the meter so you can always find the information you need.
Safety HandyLab 600 2.2 Safe operation 2.2.1 Authorized use This meter is authorized exclusively for pH and ORP measurements in the laboratory. Only the operation and running of the meter according to the instructions and technical specifications given in this operating manual is authorized (see section 12 TECHNICAL DATA, page 62). Any other use is considered unauthorized. 2.2.
HandyLab 600 Commissioning 3 Commissioning 3.1 Scope of delivery Meter HandyLab 600 4 batteries 1.5 V Mignon type AA USB cable (A plug on mini B plug) Short instructions CD-ROM with – USB drivers – detailed operating manual – Software MultiLab Importer 3.2 Power supply The HandyLab 600 is supplied with power in the following ways: Battery operation (4 batteries, 1.5 V Mignon type AA) USB operation via a connected USB-B cable 3.
Commissioning HandyLab 600 3.3.1 Inserting the batteries You can operate the meter either with normal batteries or with rechargeable batteries (Ni-MH). In order to charge the batteries, an external charging device is required. 1. Open the battery compartment (1) on the underside of the meter. 1 2 1 Screws 2 Battery compartment CAUTION Make sure that the poles of the batteries are positioned correctly. The ± signs on the batteries must correspond to the ± signs in the battery compartment. 12 2.
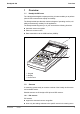
HandyLab 600 Operation 4 Operation 4.1 General operating principles 4.1.1 Keypad In this operating manual, keys are indicated by brackets <..> . The key symbol (e.g. ) generally indicates a short keystroke (under 2 sec) in this operating manual. A long keystroke (approx. 2 sec) is indicated by the underscore behind the key symbol (e.g. ). F1 F2 CAL STO RCL ENTER AR ba77064e01 : : : : Softkeys providing situation dependent functions, e.g.
Operation HandyLab 600 4.1.2 Display 4 3 14 0 pH 7.007 2 25.0 °C 1 HOLD 6 AR Info 5 01.02.2014 08:00 USB output 7 8 1 Status information (sensor) 2 Measured value 3 Measured parameter 4 Continuous measurement control (CMC function) 5 Sensor symbol (calibration evaluation, calibration interval) 6 Measured temperature (with unit) 7 Status information (meter) 8 Softkeys and date + time 4.1.
HandyLab 600 Operation 4.1.4 Connectors 1 3 2 1 Digital sensors (pH and ORP) 2 USB B (device) interface 3 Service interface CAUTION Only connect sensors to the meter that cannot return any voltages or currents that are not allowed (> SELV and > current circuit with current limiting). SI Analytics IDS sensors meet these requirements. 4.1.5 Sensor info You can display the current sensor data and sensor settings of a connected sensor at any time.
Operation HandyLab 600 14 0 pH 7.007 25.0 °C 01.02.2014 BlueLine 24 pH IDS B092500013 08:00 More 2. Display further sensor data (settings) with /[More]. BlueLine 24 pH IDS B092500013 pH resolution mV resolution Buffer Calibration interval Unit for slope QSC: Back 4.2 0.001 0.1 7d mV/pH off 01.02.2014 08:00 Switching on the meter 1. Switch the meter on with . The meter performs a self-test. 2. Connect the sensor. The meter is ready to measure. pH 14 0 7.007 25.0 °C Info 4.
HandyLab 600 Operation 4.4 Navigation 4.4.1 Operating modes Operating mode Explanation Measuring The measurement data of the connected sensor are shown in the measured value display Calibration The course of a calibration with calibration information, functions and settings is displayed Storing in memory The meter stores measuring data automatically or manually Transmitting data The meter transmits measuring data and calibration records to a USB-B interface automatically or manually.
Operation HandyLab 600 Settings Settings are indicated by a colon. The current setting is displayed on the right-hand side. The setting mode is opened with . Subsequently, the setting can be changed with <><> and . Example: General Language: Audio signal: Illumination: Contrast: Shutoff time: Temperature unit: Stability control: Back Deutsch off on 50 % 1h °C on 01.02.2014 08:00 Functions Functions are designated by the name of the function.
HandyLab 600 Operation 4.4.4 Navigation example 1:Setting the language 1. Press the key. The measured value display appears. The instrument is in the measuring mode. pH 14 0 7.007 25.0 °C Info 2. 01.02.2014 08:00 USB output Using , open the Storage & config menu. The instrument is in the setting mode. Storage & config System Data storage Back 01.02.2014 08:00 3. Select the System submenu with <><>. The current selection is displayed with a frame. 4.
Operation HandyLab 600 5. Select the General submenu with <><>. The current selection is displayed with a frame. 6. Open the General submenu with . General Language: Audio signal: Illumination: Contrast: Shutoff time: Temperature unit: Stability control: Back 7. Deutsch off on 50 % 1h °C on 01.02.2014 08:00 Open the setting mode for the Language with .
HandyLab 600 Operation Therefore, check the time at regular intervals. The date and time are reset to default after a fall of the supply voltage (empty batteries). Setting the date, time and date format The date format can be switched from the display of day, month, year (dd.mm.yy) to the display of month, day, year (mm/dd/yy or mm.dd.yy). 1. In the measured value display: Using , open the Storage & config menu. The instrument is in the setting mode. 2.
pH value HandyLab 600 5 pH value 5.1 Measuring 5.1.1 Measuring the pH value NOTE When connecting a grounded PC/printer, measurements cannot be performed in grounded media as the values would be incorrect. The USB interface is not galvanically isolated. 1. Connect the IDS pH sensor to the meter. The pH measuring window is displayed. 2. If necessary, select the measured parameter with . 3.
HandyLab 600 pH value You can terminate the Stability control function and the HOLD function with or at any time. 2. Using , activate the Stability control function manually. The [AR] status indicator appears while the measured value is assessed as not stable. A progress bar is displayed and the display of the measured parameter flashes. The [HOLD][AR] status indicator appears as soon as a stable measured value is recognized.
pH value HandyLab 600 The settings for the temperature are selected in the menu for calibration and measurement settings (see section 7.1.1 SETTINGS FOR PH MEASUREMENTS, page 40). The display of the temperature indicates the active temperature measuring mode: Temperature sensor Resolution of the temp. display Temp. measurement yes 0.1 °C Automatic with temperature sensor 1 °C Manual - 5.2 pH calibration 5.2.1 Why calibrate? pH electrodes age.
HandyLab 600 pH value pH 1 Buffer -180.0 mV 24.8 °C 01.07.2011 08:00 4. Thoroughly rinse the sensor with deionized water. 5. Immerse the sensor in the first buffer solution. 6. For measurements without temperature sensor : Enter the temperature of the buffer with <><>. 7. Start the measurement with . The measured value is checked for stability (stability control). The [AR] status indicator is displayed. The measured parameter flashes. pH Buffer -180.0 mV 24.8 °C AR 01.07.
pH value HandyLab 600 12. Start the measurement with . The measured value is checked for stability (stability control). The [AR] status indicator is displayed. The measured parameter flashes. pH Buffer 0.0 7.000 mV 24.8 °C AR 01.07.2011 08:00 Continuing with three- to five-point calibration 13. Wait for the measurement with stability control to be completed or terminate the stability control and take over the calibration value with .
HandyLab 600 pH value 19. If necessary, use to finish the calibration. The calibration record is displayed. or Switch to calibration with the next buffer with . Calibration is automatically completed after the last buffer of a buffer set has been measured. Then the calibration record is displayed. The calibration line is determined by linear regression. 5.2.
pH value HandyLab 600 pH Buffer 0.0 7.000 mV 24.8 °C ConCal AR 01.07.2011 08:00 7. Wait for the measurement with stability control to be completed or terminate the stability control and take over the calibration value with . The pH value of the buffer solution is displayed. pH Buffer 7.000 1 24.8 °C ConCal 01.07.2011 08:00 8. Set the nominal buffer value for the measured temperature with <><>. 9. Accept the calibration value with .
HandyLab 600 pH value 14. Wait for the measurement with stability control to be completed or terminate the stability control and take over the calibration value with . The pH value of the buffer solution is displayed. pH Buffer 4.035 2 24.8 °C ConCal 01.07.2011 08:00 Continuing with three- to five-point calibration 15. Set the nominal buffer value for the measured temperature with <><>. 16. Accept the calibration value with .
pH value HandyLab 600 22. Set the nominal buffer value for the measured temperature with <><>. 23. Accept the calibration value with . The calibration display for the next buffer appears (voltage display). 24. If necessary, use to finish the calibration. The calibration record is displayed. or Continue calibrating using the next buffer with . After the fifth buffer has been measured the calibration is automatically finished. Then the calibration record is displayed.
HandyLab 600 Displaying the calibration data pH value The calibration record of the last calibration is to be found under the menu item, Calibration / Calibration record. To open it in the measured value display, press the key. The calibration records of the last 10 calibrations are to be found in the menu, Calibration / Calibration data storage / Display. To open the Calibration menu, press the key in the measured value display.
pH value HandyLab 600 Display Calibration record - Zero point [mV] -30 ... <-25 or ->+25 ... +30 Slope [mV/pH] -62.0 ... <-61.0 or >-56.0 ... -50.0 Clean the IDS sensor according to the sensor operating manual Error Error <-30 or >+30 <-62.0 or > -50,0 Error elimination (see section 14 WHAT TO DO IF..., page 88) For pH IDS sensors you can optionally enable a more finely graded calibration evaluation (QSC) (see section 5.2.8 QSC FUNCTION (SENSOR QUALITY CONTROL), page 34).
HandyLab 600 pH value 5.2.7 Continuous measurement control (CMC function) The Continuous Measurement Control (CMC function) facilitates to evaluate the current measured value instantly and definitely. After each successful calibration the scale of the pH measuring range is displayed in the measured value display. Here you can very clearly see whether or not the current measured value is in the calibrated part of the measuring range. The following information is displayed: pH 14 0 1 2 7.007 25.
pH value HandyLab 600 5.2.8 General information on the QSC function QSC function (sensor quality control) The QSC function (Quality Sensor Control) is a new sensor evaluation for digital IDS sensors. It evaluates the condition of an IDS pH sensor individually and with a very fine grading. The QSC scale shows the current sensor evaluation with an indicator on the display. pH 14 0 7.007 1 25.0 °C Info 01.02.
HandyLab 600 pH value Carry out the normal calibrations for your special measuring range with your usual standard solutions as previously done. As soon as the QSC function was enabled for an IDS sensor, it is not possible to return to the sensor evaluation with the sensor symbol for this sensor. Carrying out a QSC initial calibration 1. Open the menu for measurement settings with . 2. In the QSC menu, select First calibration with <><>. The calibration display appears.
pH value HandyLab 600 sor evaluation. pH 14 0 7.007 1 25.0 °C Info 01.02.2014 08:00 USB output 1 QSC scale The double arrow on the QSC scale indicates the current sensor evaluation Carrying out a QSC control calibration A QSC control calibration can, e.g. be useful if the sensor evaluation noticeably changed (after some normal calibrations). You can carry out QSC control calibrations at greater intervals than normal calibrations. 36 1. Open the menu for measurement settings with . 2.
HandyLab 600 ORP 6 ORP 6.1 Measuring 6.1.1 Measuring the ORP NOTE When connecting a grounded PC/printer, measurements cannot be performed in grounded media as the values would be incorrect. The USB interface is not galvanically isolated. IDS ORP sensors are not calibrated. However, you can check IDS ORP sensors using a test solution. 1. Connect the ORP sensor to the meter. The ORP measuring window is displayed. 2. If necessary, check the ORP sensor using a check solution. 3.
ORP HandyLab 600 You can terminate the Stability control function and the HOLD function with or at any time. 2. Using , activate the Stability control function manually. The [AR] status indicator appears while the measured value is assessed as not stable. A progress bar is displayed and the display of the measured parameter flashes. The [HOLD][AR] status indicator appears as soon as a stable measured value is recognized.
HandyLab 600 ORP yes 0.1 °C - 1 °C 6.2 Automatic with temperature sensor Manual ORP calibration ORP electrodes are not calibrated. You can, however, check ORP electrodes by measuring the ORP of a test solution and comparing the value with the nominal value.
Settings HandyLab 600 Settings 7 Settings 7.1 pH measurement settings 7.1.1 Settings for pH measurements The settings are made in the menu for calibration and measurement settings of the pH measurement. To open the settings, display the required measured parameter in the measured value display and press the key. After completing the settings, switch to the measured value display with . Default settings are printed in bold.
HandyLab 600 Settings Menu item Possible setting Setting Explanation pH resolution 0.001 0.01 0.1 Resolution of the pH display mV resolution 0.1 1 Resolution of the mV display Reset - Resets all sensor settings to the delivery condition (see section 7.4.1 RESETTING THE MEASUREMENT SETTINGS, page 47). 7.1.2 Buffer sets for calibration You can use the buffer sets quoted in the table for an automatic calibration. The pH values are valid for the specified temperature values.
Settings 42 HandyLab 600 No. Buffer set * pH values at 9 DIN 19267 1.090 4.650 6.790 9.230 25 °C 10 Mettler Toledo USA * 1.679 4.003 7.002 10.013 25 °C 11 Mettler Toledo EU * 1.995 4.005 7.002 9.208 25 °C 12 Fisher * 2.007 4.002 7.004 10.002 25 °C 13 Fluka BS * 4.006 6.984 8.957 25 °C 14 Radiometer * 1.678 4.005 7.000 9.180 25 °C 15 Baker * 4.006 6.991 10.008 25 °C 16 Metrohm * 3.996 7.003 8.999 25 °C 17 Beckman * 4.005 7.005 10.013 25 °C 18 Hamilton Duracal * 4.
HandyLab 600 Settings * No. Buffer set * pH values at 21 Reagecon 20 * 2.000 4.000 7.000 10.000 13.000 20 °C 22 Reagecon 25 * 2.000 4.000 7.000 10.000 13.000 25 °C 23 Chemsolute * 2.000 4.000 7.000 10.000 20 °C 24 USABlueBook * 4.000 7.000 10.000 25 °C 25 YSI * 4.000 7.,000 10.000 25 °C Brand names or trade names are trademarks of their respective owners protected by law. The buffers are selected in the menu, pH / / Calibration / Buffer (see section 7.1.
Settings HandyLab 600 You can change the interval (1 ... 999 days): 1. Open the menu for measurement settings with . 2. In the Calibration / Calibration interval menu, set the calibration interval with <><>. 3. Confirm the setting with . 4. Quit the menu with . 7.2 ORP measurement settings 7.2.1 Settings for ORP measurements The settings are made in the menu for measuring settings of the ORP measurement.
HandyLab 600 Settings Menu item Possible setting Explanation System / General / Contrast 0 ... 50 ... 100 % Changes the display contrast System / General / Shutoff time 10 min ... 1h ... 24 h Adjusts the switch-off time System / General / Temperature unit °C °F Temperature unit, degrees Celsius or degrees Fahrenheit. All temperature values are displayed with the selected unit.
Settings HandyLab 600 7.3.3 Automatic Stability control The automatic Stability control (AutoRead) function continuously checks the stability of the measurement signal. The stability has a considerable impact on the reproducibility of measured values. You can activate or switch off the automatic Stability control function (see section 7.3 SENSOR-INDEPENDENT SETTINGS, page 44).
HandyLab 600 Settings 7.4 Reset You can reset (initialize) all sensor settings and sensor-independent settings separately from each other. 7.4.1 Resetting the measurement settings The calibration data are reset to the default settings together with the measuring parameters. Recalibrate after performing a reset.
Settings HandyLab 600 7.4.2 Resetting the system settings The following system settings can be reset to the default condition: Setting Default settings Language English Audio signal on Baud rate 4800 Baud Output format ASCII Decimal separator . Contrast 50 % Illumination Auto Shutoff time 1h Temperature unit °C Stability control on The system settings are reset in the menu, Storage & config / System / Reset.
HandyLab 600 Data memory 8 Data memory You can store measured values (datasets) to the data memory: Manual data storage (see section 8.1 MANUAL STORAGE, page 49) Automatic data storage at intervals (see section 8.2 AUTOMATIC DATA STORAGE AT INTERVALS, page 50) Each data storage process transmits the current dataset to the interface at the same time. 8.1 Manual storage You can store a measurement dataset to the data memory as follows. The dataset is at the same time output to the interface: 1.
Data memory HandyLab 600 8.2 Automatic data storage at intervals The storage interval (Interval) determines the time interval between automatic data storage processes. Each data storage process transmits the current dataset to the interface at the same time. Configuring the automatic storage function 1. Press the key. The menu for automatic data storage appears. Automatic data storage ID number Interval Duration continue 1 30 s 180 min 1 2 0d03h00min 0 1d17h33min Back 01.02.
HandyLab 600 Starting the automatic storage function Data memory To start the automatic storage function, select continue with <><> and confirm with . The meter switches to the measured value display. pH 14 0 7.007 1 25.0 °C 0d03h00min 01.02.2014 08:00 2 1 Remaining storage duration 2 Graphical display of the storage duration The active automatic data storage function can be recognized by the progress bar in the status line. The progress bar indicates the remaining storage duration.
Data memory HandyLab 600 8.3 Measurement data memory 8.3.1 Editing the measurement data memory The contents of the manual or automatic measurement data memory can be shown on the display. Each of the measurement data memories has a function to erase the entire contents. Editing the data memory The memory is edited in the menu, Storage & config/ Data storage. To open the Storage & config menu, press the key in the measured value display.
HandyLab 600 Display presentation of a dataset Data memory Manual data storage 3 of 64 01.02.2014 07:43:33 ID number: 1 BlueLine 24 pH IDS B092500013 pH 7.000 24.8 °C AR Sensor: +++ Back Representation of a dataset (USB output) 01.02.2014 08:00 USB output 01.02.2014 07:43:33 HandyLab 600 Ser. no. 11350001 ID number 2 BlueLine 24 pH IDS Ser. no. B092500013 pH 6.012 24.8 °C, AR, S: +++ ________________________________________ 01.02.2014 07:43:53 HandyLab 600 Ser. no.
Data memory HandyLab 600 8.3.3 Measurement dataset A complete dataset consists of: Date/time Meter name, series number Sensor name, series number ID number Measured value of the connected sensor Measured temperature value of the connected sensor AutoRead info: AR appears with the measured value if the AutoRead criterion was met while storing (stable measured value). Otherwise, the AR display is missing. Calibration evaluation: - 4 levels (+++, ++, +, -, or no evaluation) 8.3.
HandyLab 600 Transmitting data (USB interface) 9 Transmitting data (USB interface) 9.1 Outputting current measurement data 1. 9.2 Output the current measurement data to the USB-B interface with [USB output]. Transmitting data (to a PC) The meter has a USB-B interface (USB Device) e.g. to connect a PC. Via the USB-B interface (USB Device) you can store data to a PC or printer and update the meter software. 9.
Transmitting data (USB interface) 9.4 HandyLab 600 Options for data storage to a PC Via the USB-B interface you can store data to a PC. The following table shows which data are transmitted to the interface in which way: Data Control Operation / description Current measured values of all connected sensors Manual With /[USB output]. Simultaneously with every manual data storage process (see section 8.1 MANUAL STORAGE, page 49). Automatic, at intervals With /[USB output].
HandyLab 600 Maintenance, cleaning, disposal 10 Maintenance, cleaning, disposal 10.1 Maintenance 10.1.1 General maintenance activities The only maintenance activity required is replacing the batteries. See the relevant operating manuals of the IDS sensors for instructions on maintenance. 10.1.2 Replacing the batteries You can operate the meter either with normal batteries or with rechargeable batteries (Ni-MH). In order to charge the batteries, an external charging device is required. 1.
Maintenance, cleaning, disposal HandyLab 600 3. Place four batteries (type Mignon AA) in the battery compartment. 4. Close the battery compartment (2) and tighten the screws (1). 5. Set the date and time (see section 4.4.5 EXAMPLE 2 ON NAVIGATION: SETTING THE DATE AND TIME, page 20). Dispose of used batteries according to the local regulations of your country.
HandyLab 600 What to do if... 11 What to do if... 11.1 pH More information and instructions on cleaning and exchange of sensors are given in the documentation of your sensor. Error message OFL, UFL The measured value is outside the measuring range. Cause Remedy IDS pH sensor: Error message, Error – The measured value is outside the measuring range of the meter – Use suitable IDS pH sensor – Air bubble in front of the junction – Remove air bubble (e.g.
What to do if...
HandyLab 600 What to do if... Meter does not react to keystroke Cause Remedy – Operating condition undefined or EMC load unallowed – Processor reset: Press the and key simultaneously You want to know which software version is in the meter or IDS sensor Cause Remedy – E.g., a question by the service department – Switch on the meter. – Open the menu, / Storage & config / System / Service information. The instrument data are displayed. or – Connect the sensor.
Technical data HandyLab 600 12 Technical data 12.1 Measuring ranges, resolution, accuracy The data are given in the documentation of your sensor. 12.2 General data Dimensions HandyLab 600: Approx. 180 x 80 x 55 mm Weight HandyLab 600: Approx. 0.4 kg Mechanical structure Type of protection IP 67 Electrical safety Protective class III Test certificates CE Ambient conditions Storage - 25 °C ... + 65 °C Operation +5 °C ...
HandyLab 600 ba77064e01 03/2014 Technical data Meter safety EC directive 2006/95/EC EN 61010-1 UL 61010-1 CAN/CSA-C22.
Firmware update HandyLab 600 13 Firmware update 13.1 Firmware update for the meter HandyLab 600 You can find available firmware update files for your meter on the Internet. With the "Firmware Update " program and a PC you can update the firmware of the HandyLab 600 to the newest version. For the update you have to connect the meter to a PC.
HandyLab 600 Firmware update 13.2 Firmware-Update for IDS Sensors With the "Firmware Update" program and a PC you can update the firmware of an IDS sensor to the newest version. You can find available firmware update files for your IDS sensor on the Internet. For updating, connect the IDS sensor to the HandyLab 600, and the HandyLab 600 to a PC.
Glossary HandyLab 600 14 Glossary pH/ORP Asymmetry see zero point Junction The junction is a porous body in the housing wall of reference electrodes or electrolyte bridges. It arranges the electrical contact between two solutions and makes the electrolyte exchange more difficult. The expression, junction, is also used for ground or junction-less transitions.
HandyLab 600 Glossary Test sample Designation of the test sample ready to be measured. Normally, a test sample is made by processing the original sample. The test sample and original sample are identical if the test sample was not processed. Measured value The measured value is the special value of a measured parameter to be determined. It is given as a combination of the numerical value and unit (e.g. 3 m; 0.5 s; 5.2 A; 373.15 K).
HandyLab 600 15 Index Index A Automatic switch-off function . . . . . . . . . . . 46 AutoRead ORP . . . . . . . . . . . . . . . . . . . . . . . . . . . 37 pH . . . . . . . . . . . . . . . . . . . . . . . . . . . . 22 B Measuring ORP . . . . . . . . . . . . . . . . . . . . . . . . . . 37 pH . . . . . . . . . . . . . . . . . . . . . . . . . . . . 22 Menu for calibration and measurement settings pH/ORP . . . . . . . . . . . . . . . . . . . . . . . . 40 Menus (navigation) . . . . . . . . . . . . . . . . .
HandyLab 600 ba77064e01 03/2014 Index 69
Index 70 HandyLab 600 ba77064e01 03/2014
Xylem |'zīləm| 1) The tissue in plants that brings water upward from the roots; 2) a leading global water technology company. We're 12,500 people unified in a common purpose: creating innovative solutions to meet our world's water needs. Developing new technologies that will improve the way water is used, conserved, and re-used in the future is central to our work.