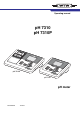
Operating manual pH 7310 pH 7310P Pri nte rmo dul pH 7310P pH 7310 pH meter ba75929e03 12/2011
pH 7310 Copyright © Weilheim 2011, WTW GmbH Reproduction in whole - or even in part - is prohibited without the express written permission of WTW GmbH, Weilheim. Printed in Germany.
pH 7310 Contents pH 7310 - Contents 1 Overview . . . . . . . . . . . . . . . . . . . . . . . . . . . . . . . . . . . . . . . . . . 6 1.1 1.2 1.3 2 pH 7310 meter . . . . . . . . . . . . . . . . . . . . . . . . . . . . . . . . . . . . . . 6 pH 7310P meter with integrated printer . . . . . . . . . . . . . . . . . . . 7 Sensors . . . . . . . . . . . . . . . . . . . . . . . . . . . . . . . . . . . . . . . . . . . . 7 Safety . . . . . . . . . . . . . . . . . . . . . . . . . . . . . . . . . . . . . . . . . .
Contents pH 7310 5 pH value. . . . . . . . . . . . . . . . . . . . . . . . . . . . . . . . . . . . . . . . . . 22 5.1 Measuring . . . . . . . . . . . . . . . . . . . . . . . . . . . . . . . . . . . . . . . . 5.1.1 Measuring the pH value . . . . . . . . . . . . . . . . . . . . . . . . . 5.1.2 Measuring the temperature . . . . . . . . . . . . . . . . . . . . . . 5.2 Calibration . . . . . . . . . . . . . . . . . . . . . . . . . . . . . . . . . . . . . . . . 5.2.1 Why calibrate? . . . . . . . . . . . . . . .
pH 7310 Contents 10.2 Operation / printing . . . . . . . . . . . . . . . . . . . . . . . . . . . . . . . . . 10.3 Printer settings . . . . . . . . . . . . . . . . . . . . . . . . . . . . . . . . . . . . . 10.4 Maintenance . . . . . . . . . . . . . . . . . . . . . . . . . . . . . . . . . . . . . . 10.4.1 Changing the roll of paper . . . . . . . . . . . . . . . . . . . . . . . 10.5 What to do if... / printer . . . . . . . . . . . . . . . . . . . . . . . . . . . . . .
Overview pH 7310 1 Overview 1.1 pH 7310 meter The compact pH 7310 precision pH meter enables you to perform pH measurements rapidly and reliably. The pH 7310 provides the maximum degree of operating comfort, reliability and measuring certainty for all applications. The USB interface can be used for data transmission to a PC and for software updates of the meter.
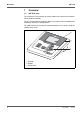
pH 7310 Overview 1.2 pH 7310P meter with integrated printer The integrated printer of the pH 7310P enables to document measurements according to GLP requirements. The information concerning the printer of the pH 7310P is given in a separate chapter (see section 10 PRINTER (ONLY PH 7310P), page 54). 4 5 3 Pri nte rmo 2 dul 1 1 Keypad 2 Display 3 Socket field 4 Printer 5 Control panel of the printer 1.
Safety pH 7310 2 Safety 2.1 Safety information 2.1.1 Safety information in the operating manual This operating manual provides important information on the safe operation of the meter. Read this operating manual thoroughly and make yourself familiar with the meter before putting it into operation or working with it. The operating manual must be kept in the vicinity of the meter so you can always find the information you need. Important safety instructions are highlighted in this operating manual.
pH 7310 Safety 2.2 Safe operation 2.2.1 Authorized use This meter is authorized exclusively for pH and ORP measurements in the laboratory. Only the operation and running of the meter according to the instructions and technical specifications given in this operating manual is authorized (see section 13 TECHNICAL DATA, page 62). Any other use is considered unauthorized. 2.2.
Commissioning pH 7310 3 Commissioning 3.1 Scope of delivery pH meter pH 7310 4 batteries 1.5 V Mignon type AA Power pack USB cable Stand Stand holder Comprehensive operating manual Short instructions CD-ROM with – USB drivers – comprehensive operating manual – software MultiLab Importer 3.
pH 7310 Commissioning 3.3.1 Inserting the batteries You can operate the meter either with normal batteries or with rechargeable batteries (Ni-MH). In order to charge the batteries, an external charging device is required. 1 1 Battery compartment 1. Open the battery compartment (1) on the underside of the meter. CAUTION Make sure that the poles of the batteries are positioned correctly. The ±-signs on the batteries must correspond to the ± signs in the battery compartment. ba75929e03 12/2011 2.
Commissioning pH 7310 3.3.2 Connecting the power pack CAUTION The line voltage at the operating site must lie within the input voltage range of the original power pack (see section 13 TECHNICAL DATA, page 62). CAUTION Use original power packs only (see section 13 TECHNICAL DATA, page 62). 1. Connect the plug of the power pack to the socket for the power pack on the pH 7310. 2. Connect the original power pack to an easily accessible power outlet. 3.3.
pH 7310 Operation 4 Operation 4.1 General operating principles 4.1.1 Keypad In this operating manual, keys are indicated by brackets <..> . The key symbol (e.g. ) generally indicates a short keystroke (under 2 sec) in this operating manual. A long keystroke (approx. 2 sec) is indicated by the underscore behind the key symbol (e.g. ). : : : : Softkeys providing situation dependent functions, e.g.
Operation pH 7310 4.1.2 Display 4 3 pH 2 6.093 25.0 °C 1 AutoCal TEC HOLD AR Menu 01.07.2011 08:00 USB output 5 6 7 8 1 Status information (sensor) 2 Measured value (with unit) 3 Measured parameter 4 Continuous measurement control (CMC function) 5 Sensor symbol (calibration evaluation, calibration interval) 6 Measured temperature (with unit) 7 Status information (meter) 8 Softkeys and date + time 4.1.
pH 7310 Operation 4.1.4 Socket field 1 2 3 4 5 6 1 pH electrode 2 Reference electrode 3 Temperature sensor 4 Mini USB-B interface 5 Power pack 6 Service interface CAUTION Only connect sensors to the meter that cannot return any voltages or currents that are not allowed (> SELV and > current circuit with current limiting). Almost all customary sensors meet these requirements. 4.2 1. Switching on the meter Press the key. The meter performs a self-test.
Operation pH 7310 4.3 1. Automatic switch-off function Switching off Press the key. The instrument has an automatic switch-off function in order to save the batteries (see section 7.3.1 SYSTEM, page 43). The automatic switchoff switches off the measuring instrument if no key is pressed for an adjustable period.
pH 7310 Operation Operating mode Description Measuring The measurement data of the connected sensor are shown in the measured value display Calibration The course of a calibration with calibration information, functions and settings is displayed Storage in memory The meter stores measuring data automatically or manually Transmitting data The meter transmits measurement data and calibration records to the USB interface automatically or manually.
Operation pH 7310 General Language: Beep: Illumination: Contrast: Switchoff time: Back English Off On 50 % 1h 01.07.2011 08:00 Functions Functions are designated by the name of the function. They are immediately carried out by confirming with . Example: Display the Calibration record function. pH Calibration record Calibration data storage Buffer: One point calibration: Calibration interval: Unit for slope: Back TEC Yes 7d mV/pH 01.07.
pH 7310 Operation pH 6.949 25.0 °C Menu 2. 01.07.2011 08:00 USB output Using /[Menu], open the Storage & config menu. The instrument is in the setting mode. Storage & config System Data storage Back 01.07.2011 08:00 3. Select the System submenu with <><>. The current selection is displayed with a frame. 4. Open the System submenu with . System General Interface Clock Service information Reset Back ba75929e03 12/2011 01.07.2011 08:00 5.
Operation pH 7310 General Language: Beep: Illumination: Contrast: Switchoff time: 01.07.2011 08:00 Back 7. English Off On 50 % 1h Open the setting mode for the Language with . General Language: Beep: Illumination: Contrast: Switchoff time: English Off On 50 % 1h 01.07.2011 08:00 Back 8. Select the required language with <><>. 9. Confirm the setting with . The meter switches to the measuring mode. The selected language is active. 4.4.
pH 7310 Operation The date format can be switched from the display of day, month, year (dd.mm.yyyy) to the display of month, day, year (mm/dd/yyyy or mm.dd.yyyy). 1. In the measured value display: Using /[Menu], open the Storage & config menu. The instrument is in the setting mode. 2. Select and confirm the System / Clock menu with <><> and . The setting menu for the date and time opens up. 3. Select and confirm the Time menu with <><> and . The hours are highlighted.
pH value pH 7310 5 pH value 5.1 Measuring 5.1.1 Measuring the pH value When connecting an earthed PC/printer, measurements cannot be performed in earthed media as the values would be incorrect. The USB interface is not galvanically isolated. To ensure the high measurement accuracy of the measuring system, always measure with a calibrated electrode (see section 5.2 CALIBRATION, page 25). 1. Connect the pH electrode to the meter. 2. If necessary, select the measured parameter with . 3.
pH 7310 pH value 1. Freeze the measured value with . The [HOLD] status indicator is displayed. The HOLD function is active. You can terminate the Stability control function and the HOLD function with or at any time. 2. Using , activate the Stability control function manually. The [AR] status indicator appears while the measured value is assessed as not stable. A progress bar is displayed and the display of the measured parameter flashes.
pH value pH 7310 5.1.2 Measuring the temperature For reproducible pH and ORP measurements, it is essential to measure the temperature of the test sample. You have the following options to measure the temperature: Automatic measurement of the temperature with the temperature sensor (NTC 30 or Pt 1000) integrated in the sensor. Measurement with an external temperature sensor. Manual determination and input of the temperature.
pH 7310 pH value 5.2 Calibration 5.2.1 Why calibrate? pH electrodes age. This changes the zero point (asymmetry) and slope of the pH electrode. As a result, an inexact measured value is displayed. Calibration determines and stores the current values of the zero point and slope of the electrode. Thus, you should calibrate at regular intervals. 5.2.
pH value pH 7310 pH Buffer 1 -180.0 mV 24.8 °C AutoCal TEC 01.07.2011 08:00 5. Thoroughly rinse the electrode with deionized water. 6. Immerse the electrode in the first buffer solution. 7. When measuring without temperature sensor: Measure the temperature of the buffer and enter it with <><>. 8. Start the measurement with . The measured value is checked for stability (stability control). The [AR] status indicator is displayed.
pH 7310 pH value 14. Start the measurement with . The measured value is checked for stability (stability control). The [AR] status indicator is displayed. A progress bar is displayed and the display of the measured parameter flashes. pH Buffer 0.0 7.000 mV 24.8 °C AutoCal TEC AR 01.07.2011 08:00 Continuing with three- to five-point calibration 15.
pH value pH 7310 21. Wait for the measurement with stability control to be completed or terminate the stability control and take over the calibration value with . The calibration display for the next buffer appears (voltage display). 22. If necessary, use to finish calibration or Continue calibrating using the next buffer with . Calibration is automatically completed after the last buffer of a buffer set has been measured. Then the calibration record is displayed.
pH 7310 pH value 6. Immerse the electrode in the first buffer solution. 7. When measuring without temperature sensor: Measure the temperature of the buffer and enter it with <><>. 8. Start the measurement with . The measured value is checked for stability (stability control). The [AR] status indicator is displayed. A progress bar is displayed and the display of the measured parameter flashes. pH Buffer 0.0 7.000 mV 24.8 °C ConCal AR 01.07.2011 08:00 9.
pH value pH 7310 14. Immerse the electrode in the second buffer solution. 15. When measuring without temperature sensor: Measure the temperature of the buffer and enter it with <><>. 16. Start the measurement with . The measured value is checked for stability (stability control). The [AR] status indicator is displayed. A progress bar is displayed and the display of the measured parameter flashes. 17.
pH 7310 pH value pH Buffer 9.958 3 24.8 °C ConCal 01.07.2011 08:00 26. Set the nominal buffer value for the measured temperature with <><>. 27. Accept the set calibration value with . The calibration display for the next buffer appears (voltage display). 28. Use to finish calibration or Continue calibrating using the next buffer with . After the fifth buffer has been measured the calibration is automatically finished. Then the calibration record is displayed.
pH value pH 7310 5.2.6 Calibration data The calibration record is automatically transmitted to the interface after calibrating. Displaying the calibration data The calibration record of the last calibration is to be found under the menu item, / [Menu]Calibration / Calibration record. To open it, press the key in the measured value display. Subsequently, you can transmit the displayed calibration data to the interface, e. g. to a PC, with [USB output].
pH 7310 pH value Display Calibration record Zero point [mV] Slope [mV/pH] +++ - 15 ... + 15 -60,5 ... -58,0 ++ - 20 ... <-15 or >+15 ... + 20 >-58,0 ... -57,0 + - 25 ... <- 20 or >+ 20 ... + 25 -61,0 ... <-60,5 or >-57,0 ... -56,0 - - 30 ... <- 25 or ->+25 ... + 30 -62,0 ... <-61,0 or >-56,0 ... -50,0 - 30 ... + 30 -62,0 ... -50,0 Clean the electrode according to the electrode operating manual Error Error Error elimination (see section 12 WHAT TO DO IF...
pH value pH 7310 5.2.7 Continuous measurement control (CMC function) The Continuous Measurement Control (CMC function) facilitates to evaluate the current measured value instantly and definitely. After each successful calibration the scale of the pH measuring range is displayed in the measured value display. Here you can very clearly see whether or not the current measured value is in the calibrated part of the measuring range. The following information is displayed: 1 2 pH 14 0 3 6.093 4 25.
pH 7310 ORP voltage 6 ORP voltage 6.1 Measuring 6.1.1 Measuring the ORP When connecting an earthed PC/printer, measurements cannot be performed in earthed media as the values would be incorrect. The USB interface is not galvanically isolated. 1. Connect the ORP electrode to the meter. 2. If necessary, select the mV display with . 3. When measuring without temperature sensor: Measure the temperature of the test sample and enter it with <> <>. 4.
ORP voltage pH 7310 Measured parameter Time interval Stability in the time interval ORP voltage 15 seconds Δ mV: Better than 0.3 Temperature 15 seconds Δ T (° C): Better than 0.02 The minimum duration until a measured value is assessed as stable is the monitored time interval. The actual duration is mostly longer. Manually starting the stability control You can start the Stability control manually at any time, irrespective of the setting for automatic Stability control (see section 7.1.
pH 7310 ORP voltage 2. Release the frozen measured value again with . The HOLD function is switched off. The [HOLD] status display disappears. 6.1.2 Measuring the temperature For reproducible ORP measurements, it is essential to measure the temperature of the test sample. You have the following options to measure the temperature: Automatic measurement of the temperature by the temperature sensor (NTC 30 or Pt 1000) integrated in electrode. Measurement by an external temperature sensor.
Settings pH 7310 7 Settings 7.1 Measurement settings 7.1.1 Changing the settings for pH measurements The settings are made in the menu for calibration and measurement settings of the pH/ORP measurement. To open the settings, display the required parameter in the measured value display and press the /[menu] or key. After completing the settings, switch to the measured value display with . Default settings are printed in bold.
pH 7310 Settings Menu item Possible setting Description Calibration /Buffer TEC NIST/DIN ConCal ... Buffer sets to be used for pH calibration (see section 5.2 CALIBRATION, page 25). Calibration /One point calibration Yes No Quick calibration with 1 buffer Calibration /Calibration interval 1 ... 7 ... 999 d Calibration interval for the pH electrode (in days). The meter reminds you to calibrate regularly by the flashing sensor symbol in the measuring window.
Settings 40 pH 7310 No. Buffer set * pH values at 1 ConCal Any Any 2 NIST/DIN DIN buffers according to DIN 19266 and NIST Traceable Buffers 1.679 4.006 6.865 9.180 12.454 25 °C 3 TEC WTW Technical buffers 2.000 4.010 7.000 10.011 25 °C 4 Merck 1* 4.000 7.000 9.000 20°C 5 Merck 2 * 1.000 6.000 8.000 13.000 20°C 6 Merck 3 * 4.660 6.880 9.220 20°C 7 Merck 4 * 2.000 4.000 7.000 10.000 20°C 8 Merck 5 * 4.010 7.000 10.000 25 °C 9 DIN 19267 1.090 4.650 6.790 9.
pH 7310 Settings * ba75929e03 12/2011 No. Buffer set * pH values at 13 Fluka BS * 4.006 6.984 8.957 25 °C 14 Radiometer * 1.678 4.005 7.000 9.180 25 °C 15 Baker * 4.006 6.991 10.008 25 °C 16 Metrohm * 3.996 7.003 8.999 25 °C 17 Beckman * 4.005 7.005 10.013 25 °C 18 Hamilton Duracal * 4.005 7.002 10.013 25 °C 19 Precisa * 3.996 7.003 8.999 25 °C 20 Reagecon TEC * 2.000 4.010 7.000 10.000 25 °C 21 Reagecon 20 * 2.000 4.000 7.000 10.000 13.
Settings pH 7310 The buffers are selected in the menu, pH / /[Menu] / Calibration / Buffer (see 7.1.1 CHANGING THE SETTINGS FOR PH MEASUREMENTS, PAGE 38). 7.1.3 Calibration interval The calibration evaluation is displayed as a sensor symbol. The sensor symbol flashes after the adjusted calibration interval has expired. It is still possible to measure. To ensure the high measuring accuracy of the measuring system, calibrate after the calibration interval has expired.
pH 7310 Settings Menu item Possible setting Description Resolution mV 0.1 1 Resolution of the mV display Stability control On Off Switches on or off the automatic stability control during measurement (see section Stability control (AutoRead) & HOLD function, page 22 ) Reset - Resets all sensor settings to the delivery condition (see section 7.4.1 RESETTING THE MEASUREMENT SETTINGS, page 44). 7.3 Sensor-independent settings 7.3.
Settings pH 7310 Menu item Possible setting Description System / Interface / Output header Output of a header for Output format: CSV System / Printer Settings for the integrated printer of the pH 7310 P. For details, see section 10 PRINTER (ONLY PH 7310P), page 54 System /Clock Date format Date Time System /Service information System /Reset 7.3.2 Time and date settings (see section 4.4.
pH 7310 Settings Setting Default settings Measured parameter pH Resolution pH 0.001 Resolution mV 0.1 Asymmetry 0 mV Slope -59.2 mV Man. temperature 25 °C One point calibration No Stability control On Temperature unit °C The sensor settings are reset under the Reset menu item in the menu for calibration and measurement settings. To open it, press the /[Menu] or key in the measured value display. 7.4.
Data storage pH 7310 8 Data storage You can transmit measured values (datasets) to the data storage: Manual storage (see section 8.1 MANUAL STORAGE, page 46) Automatic storage at intervals (see section 8.2 AUTOMATIC STORAGE AT INTERVALS, page 47) Each storage process transmits the current dataset to the interface at the same time. 8.1 Manual storage You can transmit a measurement dataset to the data storage as follows. The dataset is at the same time output to the interface: 1.
pH 7310 Data storage You have the following options: To erase the entire storage, confirm Yes. To cancel the storage process and switch to the measured value display, confirm No. Then you can e.g. transmit the stored data to a PC (see section 8.3.1 EDITING THE MEASURED VALUE STORAGE, page 49) and subsequently erase the storage (see section 8.3.2 ERASING THE MEASUREMENT DATA STORAGE, page 51). 8.
Data storage Settings pH 7310 You can configure the automatic storage function with the following settings: Menu item Possible setting Description ID number 1 ... 10000 ID number for the dataset series. Interval 1 s, 5 s, 10 s, 30 s, 1 min, 5 min, 10 min, 15 min, 30 min, 60 min Storage interval. 1 min ... x min Storage duration. Specifies after which time the automatic storage should be terminated.
pH 7310 Data storage automatic storage of measurement data (such as the display). By pressing any key the energy saving mode is switched off again. Terminating the automatic storage function prematurely Proceed as follows to switch off the automatic storage function before the adjusted storage duration has expired: 1. Press the key. The following window appears. Warning Stop automatic storage? Yes No Back 2. 01.07.2011 08:00 Using <><>, select Yes and confirm with .
Data storage Settings pH 7310 Menu item Setting/ function Description Data storage / Manual data storage / Display - Displays all measurement datasets page by page. Further options: Scroll through the datasets with <><>. Output the displayed dataset to the interface with /[USB output]. Quit the display with / [Back]. Display presentation of a dataset Data storage / Manual data storage / Erase - Erases the entire manual measurement data storage.
pH 7310 Data storage Quitting the display To quit the display of stored measurement datasets, you have the following options: Switch directly to the measured value display with . Quit the display and move to the next higher menu level with /[Back]. 8.3.2 Erasing the measurement data storage Erasing the measurement data storage (see section 8.3.1 EDITING THE MEASURED VALUE STORAGE, page 49). 8.3.
Transmitting data (USB interface) pH 7310 9 Transmitting data (USB interface) 9.1 Options for data transmission Via the USB interface you can transmit data to a PC. The following table shows which data are transmitted to the interface in which way: Data Control Operation / description Current measured values of all connected sensors Manual With /[USB output]. Simultaneously with every manual storage process (see section 8.1 MANUAL STORAGE, page 46).
pH 7310 Transmitting data (USB interface) 9.2 Connecting a PC Connect the pH 7310 to the PC via the USB interface. NOTE When connecting an earthed PC/printer, measurements cannot be performed in earthed media as the values would be incorrect. The USB interface is not galvanically isolated.
Printer (only pH 7310P) pH 7310 10 Printer (only pH 7310P) 2 3 4 1 1 Operating LED – Illuminated: Printer is switched on – Flashing: Printer is switched off 2 Control panel with the keys and 3 Lever to open the paper compartment 4 Lid of the paper compartment 10.1 Switching on the printer 1. Commissioning / switching the printer on or off Connect the power pack to the pH 7310 P. The LED lights up green. The printer is ready for operation.
pH 7310 Printer (only pH 7310P) 10.2 Operation / printing Data are only output to the printer if the following conditions are met Data are transmitted manually or automatically (see section 9.1 OPTIONS FOR DATA TRANSMISSION, page 52) the printer is switched on (LED illuminated) there is no USB connection. 10.3 Printer settings To open the Storage & config menu, press the [Menu] key in the measured value display. After completing the settings, switch to the measured value display with .
Printer (only pH 7310P) pH 7310 Use original WTW rolls of paper only. You will find information on this in the WTW catalog LABORATORY AND FIELD INFORMATION or on the Internet. The thermal paper will remain legible for at least 7 years if stored appropriately. 10.5 What to do if...
pH 7310 Maintenance, cleaning, disposal 11 Maintenance, cleaning, disposal 11.1 Maintenance 11.1.1 General maintenance activities The only maintenance activity required is replacing the batteries. See the relevant operating manuals of the electrodes for instructions on maintenance. 11.1.2 Replacing the batteries You can operate the meter either with normal batteries or with rechargeable batteries (Ni-MH). In order to charge the batteries, an external charging device is required.
Maintenance, cleaning, disposal pH 7310 4. Close the battery compartment (1). The date (day) flashes on the display. 5. Set the date and time (see section 4.4.6 EXAMPLE 2 ON NAVIGATION: SETTING THE DATE AND TIME, page 20) Dispose of used batteries according to the local regulations of your country. End users within the European Union are obligated to return used batteries (even ecologically compatible ones) to a collection point set up for recycling purposes.
pH 7310 What to do if... 12 What to do if... 12.1 pH/ORP More information and instructions on cleaning and exchange of sensors are given in the documentation of your sensor. Error message OFL, UFL The measured value is outside the measuring range.
What to do if...
pH 7310 What to do if... 12.2 Sensor symbol flashes General information Cause – Calibration interval expired Cause Display – Batteries almost empty Instrument does not react to keystroke Cause You want to know which software version is in the meter Cause ba75929e03 12/2011 – Operating condition undefined or EMC load unallowed – E. g., a question by the service department Remedy – Recalibrate the measuring system Remedy – Replace the batteries (see section 11.
Technical data pH 7310 13 13.1 Measuring ranges, resolution Technical data Measuring ranges, resolution, accuracy Parameter Measuring range Resolution pH -2.0 ... +20.0 0.1 -2.00 ... +20.00 0.01 -2.000 ... +19.999 0.001 -1200.0 ... +1200.0 0.1 -2500 ... +2500 1 T [°C] -5.0 ... +105.0 0.1 T [°F] 23.0 ... +221.0 0.1 Parameter Range Increment Tmanual [°C] -25 ... +130 1 Tmanual [°F] -13 ... +266 1 Parameter Accuracy Temperature of the test sample -2.0 ... +20.0 ± 0.
pH 7310 Technical data 13.2 General data pH 7310: Approx. 240 x 190 x 80 mm pH 7310 P: Approx. 290 x 190 x 80 mm pH 7310: Approx. 0.8 kg pH 7310 P: Approx. 1.0 kg Mechanical structure Type of protection IP 43 Electrical safety Protective class III Test certificates CE, cETLus Ambient conditions Storage -25 °C ... +65 °C Operation +5 °C ... +55 °C With the power pack connected: +5 °C ...
Technical data Guidelines and norms used pH 7310 EMC EC directive 2004/108/EC EN 61326-1 EN 61000-3-2 EN 61000-3-3 FCC Class A Meter safety EC directive 2006/95/EC EN 61010-1 IP protection class EN 60529 FCC Class A Equipment Statement Note: This equipment has been tested and found to comply with the limits for a Class A digital device, pursuant to Part 15 of the FCC Rules.
pH 7310 Firmware update 14 Firmware update Available firmware updates are provided on the Internet. With the firmware update program and a PC you can update the firmware of the pH 7310 to the newest version. For the update you have to connect the meter to a PC. For the update via the USB interface, the following is required: a free USB interface (virtual COM port) on the PC the driver for the USB interface (on the enclosed CD-ROM) the USB cable (included in the scope of delivery of the pH 7310).
Firmware update 66 pH 7310 ba75929e03 12/2011
pH 7310 Glossary 15 Glossary pH/ORP Asymmetry see zero point Electromotive force of an electrode The electromotive force U of the combination electrode is the measurable electromotive force of an electrode in a solution. It equals the sum of all the galvanic voltages of the combination electrode. Its dependency on the pH results in the electrode function, which is characterized by the parameters, slope and zero point.
Glossary pH 7310 Measured value The measured value is the special value of a measured parameter to be determined. It is given as a combination of the numerical value and unit (e. g. 3 m; 0.5 s; 5.2 A; 373.15 K). Molality Molality is the quantity (in Mol) of a dissolved substance in 1000 g solvent. Reset Restoring the original condition of all settings of a measuring system.
pH 7310 16 Index Index Automatic switch-off . . . . . . . . . . . . . . . . . . 16 AutoRead ORP . . . . . . . . . . . . . . . . . . . . . . . . . . . 35 pH . . . . . . . . . . . . . . . . . . . . . . . . . . . . 22 Measuring ORP voltage . . . . . . . . . . . . . . . . . . . . pH . . . . . . . . . . . . . . . . . . . . . . . . . . . . Menus (navigation) . . . . . . . . . . . . . . . . . . Messages . . . . . . . . . . . . . . . . . . . . . . . . . B P A Battery compartment . . . . . . . . . . . . . .
Index 70 pH 7310 ba75929e03 12/2011
Wissenschaftlich-Technische Werkstätten GmbH Dr.-Karl-Slevogt-Straße 1 D-82362 Weilheim Germany Tel: Fax: E-Mail: Internet: +49 (0) 881 183-0 +49 (0) 881 183-100 +49 (0) 881 183-420 Info@WTW.com http://www.WTW.