Operating manual Lab 960 53 nLF 25 0 0 °C µ S/ cm La TP b9 60 Laboratory conductivity meter ba75557e05 11/2009 DRAFT: November 13, 2009
Lab 960 Accuracy when going to press Warranty The use of advanced technology and the high quality standard of our instruments are the result of continuous development. This may result in differences between this operating manual and your instrument. Also, we cannot guarantee that there are absolutely no errors in this manual. Therefore, we are sure you will understand that we cannot accept any legal claims resulting from the data, figures or descriptions.
Lab 960 KONFORMITÄTSERKLÄRUNG DECLARATION OF CONFORMITY DÉCLARATION DE CONFORMITÉ Wir erklären in alleiniger Verantwortung, dass das Produkt We declare under our sole responsibility that the product Nous déclarons sous notre seule responsabilité que le produit Konduktometer Lab 960 Conductivity meter Lab 960 Conductimètre Lab 960 auf das sich diese Erklärung bezieht, übereinstimmt mit den Angaben im Kapitel to which this declaration relates is in conformity with the specifications in the chapter a
Lab 960 4 ba75557e05 11/2009
Lab 960 Contents Lab 960 - Contents 1 Overview . . . . . . . . . . . . . . . . . . . . . . . . . . . . . . . . . . . . . 7 1.1 1.2 1.3 2 Safety . . . . . . . . . . . . . . . . . . . . . . . . . . . . . . . . . . . . . . . 11 2.1 2.2 3 4.3 4.4 4.5 4.6 4.7 11/2009 Scope of delivery. . . . . . . . . . . . . . . . . . . . . . . . . . . . . . . 15 Initial commissioning . . . . . . . . . . . . . . . . . . . . . . . . . . . . 15 Operation . . . . . . . . . . . . . . . . . . . . . . . . . . . . . . .
Contents Lab 960 4.8 4.9 5 46 46 47 47 48 49 51 53 54 55 55 56 Maintenance, cleaning, disposal . . . . . . . . . . . . . . . . . 59 5.1 5.2 5.3 5.4 Maintenance . . . . . . . . . . . . . . . . . . . . . . . . . . . . . . . . . . 5.1.1 Replacing the batteries . . . . . . . . . . . . . . . . . . . . Cleaning. . . . . . . . . . . . . . . . . . . . . . . . . . . . . . . . . . . . . . Packing . . . . . . . . . . . . . . . . . . . . . . . . . . . . . . . . . . . . . . Disposal . . . . . . . . . . . . . . .
Lab 960 Overview 1 Overview The Lab 960 compact precision conductivity meter enables you to perform conductivity measurements quickly and reliably. The Lab 960 provides the maximum degree of operating comfort, reliability and measuring certainty for all applications. The proven procedures for determining or adjusting the cell constant support your work with the conductivity meter.
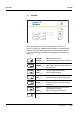
Overview Lab 960 1.1 Keypad MODE CAL STO RCL SC In this operating manual, keys are indicated by brackets <..> . The key symbol (e.g. ) generally indicates a short keystroke (under 2 sec) in this operating manual. A long keystroke (approx. 2 sec) is indicated by the underscore behind the key symbol (e.g. ).
Lab 960 Overview <▼>: Decrement values, scroll : : Confirm entries Open setting menu for system settings _ 1.
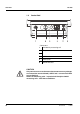
Overview Lab 960 1.3 Socket field Connectors: 1 Conductivity measuring cell 2 Temperature sensor 3 4 USB interface 5 Power pack 6 RS 232 interface CAUTION Only connect sensors to the meter that cannot return any voltages or currents that are not allowed (> SELV and > current circuit with current limiting). Almost all measuring cells - in particular SI Analytics GmbH measuring cells - fulfill these conditions.
Lab 960 Safety 2 Safety This operating manual contains basic instructions that you must follow during the commissioning, operation and maintenance of the meter. Consequently, all responsible personnel must read this operating manual before working with the meter. The operating manual must always be available within the vicinity of the instrument. Target group Safety instructions The meter was developed for work in the laboratory.
Safety Lab 960 2.1 Authorized use Authorized use of the meter consists exclusively of the measurement of conductivity, temperature, salinity and TDS (total dissolved solids) in a laboratory. The technical specifications as given in chapter 7 TECHNICAL DATA (page 63) must be observed. Only the operation and running of the meter according to the instructions given in this operating manual is authorized. Any other use is considered unauthorized. 2.
Lab 960 Safety Safe operation If safe operation is no longer possible, the instrument must be taken out of service and secured against inadvertent operation! Safe operation is no longer possible if the meter: z has been damaged in transport z has been stored under adverse conditions for a lengthy period of time z is visibly damaged z no longer operates as described in this manual. If you are in any doubt, please contact the supplier of the meter.
Safety 14 Lab 960 ba75557e05 11/2009
Lab 960 Commissioning 3 Commissioning 3.1 Scope of delivery z Lab 960 laboratory meter z Power pack z 4 batteries 1.5 V Mignon type AA z Z875 USB cable with A plug on B plug z Transparent cover z Operating manual z CD-ROM with USB driver 3.2 Initial commissioning Perform the following activities: z Insert batteries z Switch on the meter z Set the date and time z Connect the power pack (for line power operation only).
Commissioning Lab 960 CAUTION Make sure that the poles of the batteries are the right way round. The ± signs on the batteries must correspond to the ± signs in the battery compartment. Only use leakproof alkaline manganese batteries. Switching on the meter Setting the date and time Connecting the power pack 1 Switch on the meter with . A display test is briefly displayed. 2 See page 49 You can either operate the measuring instrument with batteries or with the plug-in power supply.
Lab 960 ba75557e05 Commissioning 11/2009 17
Commissioning 18 Lab 960 ba75557e05 11/2009
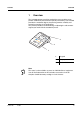
Lab 960 Operation 4 Operation 4.1 Switching on the meter 1 Place the meter on a flat surface and protect it from intense light and heat. 2 Press the key. A display test is briefly displayed. Subsequently, the meter switches to the measuring mode (measured value display). Note The meter has an energy saving feature to avoid unnecessary battery depletion during battery operation.
Operation Lab 960 4.2 General operating principles This section contains basic information of the operation of the Lab 960. 4.2.
Lab 960 Operation 4.3 Preparatory activities Measuring Perform the following preparatory activities when you want to measure: 1 Connect a measuring cell to the meter. 2 Adjust the temperature of the test solutions and measure the current temperature if the measurement is made without a temperature sensor. 3 Calibrate or check the meter with the measuring cell. 4 Select the measured parameter with .
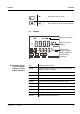
Operation Lab 960 4.3.1 Measuring the conductivity 1 Perform the preparatory activities according to page 21. 2 Immerse the conductivity measuring cell in the test sample. 3 If necessary, scroll with until the measured parameter ӕ with the unit mS/cm or µS/cm is displayed. 4 Wait for a stable measured value. 530 Tref25 µ S/cm 250 °C TP nLF 5 4.3.2 22 Measurement with stability control (see page 25).
Lab 960 Operation 5 4.3.3 Measurement with stability control (see page 25). Measuring the salinity 1 Perform the preparatory activities according to page 21. 2 Immerse the conductivity measuring cell in the test sample. 3 Using , scroll as necessary until the measured parameter Sal is displayed. 4 Wait for a stable measured value. Sal 323 212 °C TP nLF 5 ba75557e05 11/2009 Measurement with stability control (see page 25).
Operation Lab 960 4.3.4 Measuring the total dissolved solids (TDS) 1 Perform the preparatory activities according to page 21. 2 Immerse the conductivity measuring cell in the test sample. 3 Using , scroll as necessary until the measured parameter TDS is displayed. 4 Using <▲><▼>, set the TDS factor (0.40 ... 1.00). TDS 353 Tref25 mg/l 100 nLF 5 Wait for a stable measured value. TDS 313 Tref25 mg/l 087 nLF 6 24 Measurement with stability control (see page 25).
Lab 960 Operation 4.3.5 Measuring with stability control The stability control function (SC) checks the stability of the measurement signal. The stability has a considerable effect on the reproducibility of the measured value. 1 With , activate the stability control function. The AR function display indicator appears. The current measured value is frozen (hold function). 2 Start measurement with stability control with .
Operation Lab 960 4.4 Why determine/set up the cell constant? Determining/setting up the cell constant [C] Due to aging, the cell constant slightly changes. As a result, an inexact measured value is displayed. Calibration determines the current value of the cell constant and stores this value in the instrument. Thus, you should calibrate at regular intervals. The calibration data is stored in the meter. You can determine the cell constant of the conductivity measuring cell in the ranges 0.450 ... 0.
Lab 960 Operation _> to confirm the selection of CAL 2 Press or . The determination of the cell constant with stability control starts. The display indicator flashes until there is a stable signal. The determined cell constant is displayed for 10 seconds. The meter stores the cell constant automatically. After this the meter switches to the measuring mode.
Operation Calibration evaluation Lab 960 After the calibration, the meter automatically evaluates the current status. The evaluation appears on the display. Display Cell constant [cm-1] Status display indicator CAL. in the range 0.450 ... 0.500 cm-1 0.585 ... 0.715 cm-1 0.800 ... 1.200 cm-1 You are working with a correctly calibrated measuring cell. E3 Eliminate the error according to CHAPTER 6 WHAT TO DO IF... (PAGE 61). Calibration record outside the ranges 0.450 ... 0.500 cm-1 0.585 ... 0.
Lab 960 Operation 4.4.2 1 Using the last calibrated cell constant Press repeatedly until CELL is displayed. CEL L ba75557e05 11/2009 _> to confirm the selection of CELL. 2 Press or repeatedly until CAL and the last calibrated cell constant is displayed. 4 Confirm the selection with . The displayed cell constant is used. The meter switches to the measured value display.
Operation Lab 960 4.4.3 Setting the cell constant manually Note The cell constant to be set must either be taken from the operating manual of the measuring cell or is printed on the measuring cell. Range 0.250 ... 2.500 cm-1 1 Press repeatedly until CELL is displayed. CEL L 30 _ 2 Confirm the selection with or . The cell constant that was set last is displayed. 3 Press repeatedly until a cell constant in the range 0.250 ... 2.500 cm-1 is displayed.
Lab 960 Operation 680 Tref25 nLF Range 0.090 ... 0.110 cm-1 µ S/cm 1/cm 06 1 4 ARng 5 Confirm the selection with . The new cell constant is used from now on. The meter switches to the measured value display. 1 Press the key repeatedly until CELL is displayed. CEL L ba75557e05 11/2009 _> . 2 Confirm the selection with or repeatedly until a cell constant in the range 0.090 ... 0.110 cm-1 is displayed.
Operation Lab 960 218 Tref25 1/cm 010 0 ARng nLF 4 µ S/cm Set the cell constant to be used with <▲><▼>, e.g. 0.105 cm-1. 271 Tref25 nLF Selecting the cell constant 0.010 cm-1 µ S/cm 1/cm 010 5 ARng 5 Confirm the selection with . The new cell constant is used from now on. The meter switches to the measured value display. 1 Press the key repeatedly until CELL is displayed.
Lab 960 Operation Confirm the selection with or repeatedly until the cell constant 0.010 cm-1 is displayed. 925 Tref25 nLF 4 ba75557e05 11/2009 _> . 2 µ S/cm 1/cm 001 0 ARng Confirm the selection with . The meter switches to the measured value display.
Operation Lab 960 4.5 Setting the temperature compensation TC The calculation of the temperature compensation is based on the preset reference temperature, Tref 20 or Tref 25 (see page 48). You can select one of the following temperature compensations: z Nonlinear temperature compensation "nLF" according to DIN 38404 or EN 27 888 z Linear temperature compensation "Lin" with adjustable coefficient in the range 0.001 ... 3.
Lab 960 Operation Selecting the nonlinear temperature compensation 1 Press repeatedly until tc is displayed. Tc _ 2 Confirm the selection with or . The temperature compensation that was set last is displayed. 3 Press repeatedly until nLF is displayed. 684 Tref25 nLF 4 ba75557e05 11/2009 µ S/cm NL F ARng Confirm the selection with . The nonlinear temperature compensation is switched on. The meter switches to the measured value display.
Operation Selecting the linear temperature compensation Lab 960 1 Press repeatedly until tc is displayed. Tc _ 2 Confirm the selection with or . The temperature compensation that was set last is displayed. 3 Press repeatedly until the adjustable linear temperature coefficient appears on the display. 1224 Tref25 200 0 Lin 4 36 µ S/cm % /K ARng Set the temperature coefficient with <▲><▼>, e. g. 1.880 %/K.
Lab 960 Operation Switching off the temperature compensation 5 Confirm the selection with . The linear temperature compensation is switched on. The meter switches to the measured value display. The selected temperature compensation appears as the status display. 1 Press repeatedly until tc is displayed. Tc ba75557e05 11/2009 _> . 2 Confirm the selection with or repeatedly until the following display appears. 4 Confirm the selection with .
Operation Lab 960 4.6 Memory The conductivity meter has an internal data memory. It can store up to 800 datasets. A complete dataset consists of: z Date/time z Memory location number z ID number z Measured value z Temperature z Temperature measuring procedure (manual or automatic) You can transmit measured values (datasets) to the data memory in two ways: z Store manually () z Store automatically (). Manual storage 1 Store the measurement dataset with .
Lab 960 Operation Message Sto Full 3 Using <▲><▼>, enter the required ID number (1 ... 9999). 4 Confirm with . The dataset is stored. The meter switches to the measuring mode. This message appears when all of the 800 memory locations are occupied. When the memory is full, you can: ba75557e05 11/2009 z press to store the current measured value.
Operation Lab 960 4.6.2 Automatic storage at intervals In order to store measured values automatically at certain time intervals, set the storage interval (Int.1). Setting the save interval The default setting for the storage interval (Int 1) is OFF. By this, the AutoStore function is switched off. To switch the function on, set an interval (5 s, 10 s, 30 s, 1 min, 5 min, 10 min, 15 min, 30 min, 60 min): Note When the AutoStore function is active, the automatic switchoff function is off.
Lab 960 Operation Note If there are not enough memory locations available for your measurements: z Output and backup the data storage (see page 42) and z clear the memory (see page 43). Switching off the automatic storing function ba75557e05 11/2009 4 Confirm with . Ident and the ID number that was last set is displayed. 5 Set the required ID number with <▲><▼>. 6 Confirm with . The meter switches to the measured value display and starts the measuring and storing procedure.
Operation Lab 960 4.6.3 Downloading the data storage You can download stored measurement datasets: z to the display z to the interface (see page 45) Download to the display 1 Open the storage menu with . 2 If necessary, scroll with until Sto disp (measurement datasets) is displayed. 3 Press to display the dataset that was last stored. The memory location of the dataset is displayed for approx. 2 s, then the respective temperature appears.
Lab 960 Operation 4.6.4 Erasing the data memory You can erase all stored measurement datasets. 1 Open the storage menu with . 2 If necessary, scroll with until Sto disp or Sto prt is displayed. 3 Press to erase the entire contents of the memory. or Return to the measured value display with . The stored data is retained. 4.6.5 _> to display the Clr All function.
Operation Lab 960 While the calibration data is being displayed you can: z press z press to download the calibration data to the interface _ Press to display the calibration data. The calibration date and calibrated cell constant are displayed consecutively for approx. 10 seconds each.
Lab 960 Operation 4.7.1 Options for data transmission Via the USB interface you can transmit data to a PC. Via the RS 232 interface, you can transmit data to a PC or an external printer. The following table shows which data are transmitted to the interface in which way: Data Control Operation / description Current measured values manual z With . z Simultaneously with every automatic storage process (Int.1) (see page 40). automatic, at intervals _ z With .
Operation Lab 960 2 If necessary, set an interval with <▲><▼>. 3 Close the setting with . The download to the interface takes place at the specified interval. 4.7.3 Downloading stored measurement datasets 1 Open the storage menu with . 2 If necessary, scroll with until Sto Prt is displayed. 3 Press to download the calibration data to the interface. 4.7.4 Downloading calibration data 1 Open the storage menu with .
Lab 960 Operation Socket assignment (RS232) 3 4 2 6 5 1 RS 232 4.7.6 1* 2 RxD 3 TxD 4* 5 SGnd 6 CTS * not used USB interface (device) Connect the interface to the PC via the supplied Z875 USB cable. The data output automatically switches to USB. The RS232 interface is deactivated.
Operation Lab 960 4.8 Settings You can adapt the meter to your individual requirements. The settings are done in the following menus: z System settings () – Baud rate (Baud) – Switch-off interval (tOff) – Date (Day.Month) – Date (Year) – Time (Time) z Calibration and measurement settings () – Reference temperature (Tref25 or Tref20) – Temperature unit (°C / °F) – Cleaning interval (Int.C [0 ...
Lab 960 Operation 4.8.1 System settings The default setting is printed in bold. Baud rate (Baud) 1200, 2400, 4800, 9600 Switch-off interval (.OFF) 10, 20, 30, 40, 50 min, 1, 2, 3, 4, 5, 10, 15, 20, 24 h Date (Day.Month) Any Date (Year) Any Time (Time) Any 1 Open the menu for system settings with . Baud rate (Baud) Baud 480 0 2 Set the required baud rate with <▲><▼> . 3 Confirm with . .
Operation Lab 960 4 Set the switch-off interval with <▲><▼>. 5 Confirm with . Day.Month, the setting of the date is displayed. The day display flashes. Date and time Day.Month 50 300 3 6 Set the date of the current day with <▲><▼> . 7 Confirm with . The month display flashes. 8 Set the current month with <▲><▼> . 9 Confirm with . Year, the setting of the year is displayed. 10 Set the year with <▲><▼> . 11 Confirm with . The setting of the time is displayed.
Lab 960 Operation 4.8.2 Measurement settings These settings apply to the determination of the cell constant and measurement (the default condition is printed in bold). Reference temperature Reference temperature t25, t20 Temperature unit (UnI) °C, °F Cleaning interval (Int.C) 0 ... 180 ... 999 d 1 Open the menu for measurement settings with . T 25 Tref25 2 Select the reference temperature with <▲><▼> . 3 Confirm with .
Operation Lab 960 4 Using <▲><▼>, toggle between °C and °F. 5 Confirm with . Int.C, the setting of the cleaning interval is displayed. 6 Set the interval with <▲><▼>. 7 Confirm with . The measurement settings are completed. The meter switches to the measuring mode. Cleaning interval (Int.
Lab 960 Operation 4.8.3 Interval for automatic storing (AutoStore) After setting the interval for automatic storing the current measurement dataset is stored at the specified interval. AutoStore interval (Int.1) 1 OFF, 5 s, 10 s, 30 s, 1 min, 5 min, 10 min, 15 min, 30 min, 60 min _ Press to open the setting for the storage interval. Int.1, the setting of the storage interval is displayed. AutoStore interval Time Int 1 100 Auto Store 2 Press <▲><▼> to select an interval.
Operation Lab 960 4.8.4 Interval for automatic data transmission The interval for automatic data transmission serves to transmit the current measurement dataset to the interface at the specified interval. Data transmission interval (Int.2) 1 OFF, 5 s, 10 s, 30 s, 1 min, 5 min, 10 min, 15 min, 30 min, 60 min _ Press to open the setting for the transmission interval. Int.2, the setting of the transmission interval is displayed.
Lab 960 Operation 4.9 Reset 4.9.1 Resetting the cell constant This function serves to erase the last determined cell constant. Subsequently, the meter uses the last manually adjusted cell constant. All other meter settings are retained. Note The measuring system is possibly not calibrated after a reset. Before measuring, make sure the meter uses the cell constant suitable for the measuring cell. Resetting the cell constant 1 _ Press to open the menu for the reset of the cell constant.
Operation Lab 960 4.9.2 Resetting meter settings This function resets to the default condition meter settings.
Lab 960 Operation 4 Confirm with . The menu is finished. The meter switches to the measuring mode. Note The measuring system is possibly not calibrated after a reset. Before measuring, make sure the meter uses the cell constant suitable for the measuring cell.
Operation 58 Lab 960 ba75557e05 11/2009
Lab 960 Maintenance, cleaning, disposal 5 Maintenance, cleaning, disposal 5.1 Maintenance The only maintenance activity required is replacing the batteries. Note See the relevant operating manuals of the measuring cells for instructions on maintenance. 5.1.1 Replacing the batteries 1 Open the battery compartment (1) on the underside of the meter. 2 Remove the four batteries from the battery compartment. 3 Place four new batteries (type Mignon AA) in the battery compartment.
Maintenance, cleaning, disposal Lab 960 5.2 Cleaning Occasionally wipe the outside of the meter with a damp, lint-free cloth. Disinfect the housing with isopropanol as required. CAUTION The housing is made of synthetic material (ABS). Thus, avoid contact with acetone or similar detergents that contain solvents. Remove any splashes immediately. 5.3 Packing This meter is sent out in a protective transport packing. We recommend: Keep the packing material.
Lab 960 What to do if... 6 Error message E1 Cause Error message, E3 Cause Display of Cln What to do if...
What to do if... Lab 960 You want to know which software version is in the instrument Cause Message StoFull Cause – E. g., a question by the service department – All 800 memory locations are full 62 Remedy – Switch on the meter. During the display test, display the software version with .
Lab 960 Technical data Translation of the legally binding German version Dimensions Weight Mechanical structure Stand October 30, 2009 7 Technical data 7.1 General data approx. 240 x 190 x 80 mm approx. 1.0 kg (without power pack, without stand) Type of protection IP 43 Electrical safety Protective class III Test certificates cETLus Ambient conditions Storage - 25 °C ... + 65 °C Operation 0 °C ... + 55 °C Climatic class 2 Batteries 4 x 1.
Technical data Lab 960 Translation of the legally binding German version Guidelines and norms used Stand October 30, 2009 EMC EC guideline 2004/108/EC EN 61326-1 Class B FCC Class A Instrument safety EC guideline 2006/95/EC EN 61010-1 ANSI/UL 61010-1 CAN/CSA-C22.2 No.
Lab 960 Technical data Translation of the legally binding German version 7.2 Measuring ranges, resolution Stand October 30, 2009 Measuring ranges, resolution, accuracy Variable Measuring range Resolution 0.000 ... 1.999* 0.00 ... 19.99** 0.0 ... 199.9 0 ... 1999 0.001 0.01 0.1 1 0.00 ... 19.99 0.0 ... 199.9 0 ... 500 0.01 0.1 1 Resistivity [MOhm*cm] 0.00 ... 19.99 0.0 ... 199.9 0 ... 1999 0.01 0.1 1 SAL 0.0 ... 70.0 according to the IOT table 0.1 TDS [mg/l] 0 ...
Technical data Lab 960 Translation of the legally binding German version Accuracy (± 1 digit) Variable Stand October 30, 2009 Accuracy Temperature of the test sample ӕ/ Temperature compensation None (Off) ± 0.5 % Nonlinear (nLF) ± 0.5 % 0 °C ... + 35 °C according to EN 27 888 ± 0.5 % + 35 °C ... + 50 °C Extended nLF function according to WTW measurements ± 0.5 % + 10 °C ... + 75 °C ± 0.1 + 5 °C ... + 25 °C ± 0.2 + 25 °C ... + 30 °C Linear (lin) SAL / range 0.0 ... 42.
Lab 960 Lists 8 Lists This chapter provides additional information and orientation aids. Abbreviations Specialist terms Index ba75557e05 11/2009 The list of abbreviations explains abbreviations that appear on the display or when dealing with the instrument. The glossary briefly explains the meaning of the specialist terms. However, terms that should already be familiar to the target group are not described here. The index helps you to find the topics that you are looking for.
Lists Lab 960 Abbreviations Conductivity value 68 °C Temperature unit °Celsius °F Temperature unit, °Fahrenheit AR AutoRead An AutoRead measurement is carried out for stability control (SC). ARng Automatic range switch-over: meter measures with highest possible resolution AutoStore Automatic storage in memory Baud Baud rate C Cell constant cm-1 Cal The measuring system is being calibrated or works with a calibrated cell constant.
Lab 960 ba75557e05 Lists 11/2009 SELV Safety Extra Low Voltage Sto Store (memory) Sto CIr Clearing the memory Sto disp Download data memory to display Sto Full Memory location occupied Sto Prt Download data memory to printer/interface Tauto Automatic temperature measurement TC Temperature coefficient TDS Total dissolved solids TP Temperature Probe; Temperature measurement active Tref 20/T20 Reference temperature 20 °C Tref 25/T25 Reference temperature of 25 °C 69
Lists Lab 960 Glossary Adjusting AutoRange Name of the automatic selection of the measuring range. Calibration Comparing the value from a measuring system (e. g. the displayed value) to the correct value or a value that is regarded as correct. Often, this expression is also used when the measuring system is adjusted at the same time (see adjusting). Cell constant, k Conductivity Measured value Characteristic quantity of a conductivity measuring cell, depending on the geometry.
Lab 960 Lists Standard solution TDS Temperature coefficient The standard solution is a solution where the measured value is known by definition. It is used to calibrate a measuring system. Total dissolved solids Calculation: TDS (mg/l) = conductivity (µS) * TDS factor (mg/l*µS) Value of the slope α of a linear temperature function.
Lists 72 Lab 960 ba75557e05 11/2009
Lab 960 Lists Index A O Authorized use . . . . . . . . . . . . . . . . . . . . . . 12 B Operation location . . . . . . . . . . . . . . . . . . . 19 Operational safety . . . . . . . . . . . . . . . . . . . 12 ORP voltage . . . . . . . . . . . . . . . . . . . . . . . 23 Battery compartment . . . . . . . . . . . . . . 15, 59 Baud rate setting . . . . . . . . . . . . . . . . . . . . 49 P C Precautions . . . . . . . . . . . . . . . . . . . . . . . . 11 Print . . . . . . . . . . . . . . . . . . . . . .
Lists 74 Lab 960 ba75557e05 11/2009
Lab 960 Appendix: Firmware update General information With the "Update_Labxxx_MxxxP" program and a PC you can update the firmware of the Lab 960 to the newest version. For the update you can connect the meter to a PC via the USB or RS232 interface. For the update via the USB interface, the following is required: z a free USB interface (virtual COM port) on your PC z the driver for the USB interface (installation see page 47) z the USB cable Z875 (included in the scope of delivery of the Lab 960).
Lab 960 4 To go on, follow the instruction of the program. During the programming process, a corresponding message and a progress bar (in %) appear. The programming process takes approx. two minutes. A terminatory message is displayed after a successful programming process. The firmware update is now completed. 5 Disconnect the meter from the PC. The instrument is ready for operation.
SI Analytics GmbH Postfach 2443 D-55014 Mainz Hattenbergstr. 10 D-55122 Mainz Telefon +49 (0) 61 31/66 5111 Telefax +49 (0) 61 31/66 5001 Email: support@si-analytics.com Internet: www.si-analytics.