
User Manual
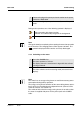
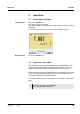
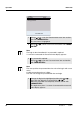
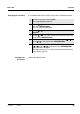
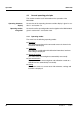
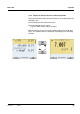

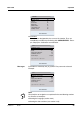
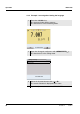
Table Of Contents
- 1 Overview
- 2 Safety
- 3 Commissioning
- 4 Operation
- 4.1 Switching on the meter
- 4.2 Login with a user name
- 4.3 General operating principles
- 4.4 Sensor-independent settings
- 4.5 Sensor info
- 4.6 Channel display
- 4.7 pH value
- 4.7.1 General information
- 4.7.2 Measuring the pH value
- 4.7.3 Settings for pH measurements
- 4.7.4 pH calibration
- 4.7.5 Calibration interval
- 4.7.6 Carrying out an automatic calibration (AutoCal)
- 4.7.7 Carrying out a manual calibration (ConCal)
- 4.7.8 Displaying calibration records
- 4.7.9 Continuous measurement control (CMC function)
- 4.7.10 QSC function (sensor quality control)
- 4.8 ORP voltage
- 4.9 Dissolved oxygen
- 4.10 Conductivity
- 4.11 Data storage
- 4.12 Transmitting data (USB interfaces)
- 4.12.1 Outputting current measurement data
- 4.12.2 Transmitting data (to a PC)
- 4.12.3 Connecting the PC / USB-B interface (USB Device)
- 4.12.4 Options for data transmission to a PC (USB-B interface)
- 4.12.5 Connecting the USB memory device / USB-A interface (USB Host)
- 4.12.6 Data transmission to a USB memory device (USB-A interface)
- 4.13 Reset
- 5 Maintenance, cleaning, disposal
- 6 What to do if...
- 7 Technical data
- 8 Lists
- 9 Appendix: Firmware update

Operation Multi 3430
28
ba75865e11 02/2011
4.3.3 Navigation
Measured value display In the measured value display, you can
z use <S><T> to select one of several connected sensors. The
selected sensor is displayed with a colored background.
The following actions / menus refer to the selected sensor
z open the menu for calibration and measurement settings with
<MENU/ENTER> (short
keystroke)
z open the system menu with the sensor-independent settings by
pressing <MENU/ENTER>Storage & config for a <MENU/
ENTER
_>long keystroke, approx. 2 s).
z change the display in the selected measuring window (e. g. pH ><−
mV) by pressing <M>.
Menus and dialogs The menus for settings and dialogs in procedures contain further sub-
menus. The selection is made with the <S><T> keys. The current
selection is displayed with a frame.
z Submenus
The name of the submenu is displayed at the upper edge of the
frame. Submenus are opened by confirming with <MENU/ENTER>.
Example:
z Settings
Settings are indicated by a colon. The current setting is displayed on
the right-hand side. The setting mode is opened with <MENU/
ENTER>. Subsequently, the setting can be changed with <S><T>
and <MENU/ENTER>. Example:
General
Interface
Clock function
Service information
Reset
System
22.09.2009 08:00