
Owner's manual


Table Of Contents
- 1 Overview
- 2 Safety instructions
- 3 Commissioning
- 4 Operation
- 4.1 Switching on or off the photometer
- 4.2 General operating principles
- 4.3 Photometer settings and system administration
- 4.4 Zero adjustment
- 4.5 Measuring in Concentration mode
- 4.5.1 Measuring cell tests with barcode
- 4.5.2 Measuring reagent tests with AutoSelector
- 4.5.3 Measuring reagent-free tests and user-defined methods
- 4.5.4 Exceeding the upper or lower limits of the measuring range
- 4.5.5 Selecting a method manually
- 4.5.6 Settings for Concentration mode
- 4.5.7 Measuring diluted samples
- 4.5.8 Sample blank value
- 4.5.9 Reagent blank value
- 4.5.10 Automatic Turbidity correction
- 4.5.11 Programming / modifying user-defined methods
- 4.5.12 The IQ LabLink procedure
- 4.6 Measuring the Absorbance / % Transmission
- 4.7 Multi wavelengths methods
- 4.8 Spectrum
- 4.9 Kinetics
- 4.10 Timer
- 4.11 Memory
- 4.11.1 Overview
- 4.11.2 Instructions on using USB memory devices
- 4.11.3 Measurement datasets
- 4.11.4 Saving measurement datasets manually
- 4.11.5 Saving measurement datasets automatically
- 4.11.6 Displaying measurement data memory
- 4.11.7 Filtering measurement datasets
- 4.11.8 Inverting filters
- 4.11.9 Erasing stored measurement datasets
- 4.12 Copying files
- 4.13 Transmitting data
- 4.14 Analytical quality assurance (AQA)
- 4.15 User management
- 4.16 Reset
- 4.17 Photometer information ([Info])
- 4.18 Lamp counter
- 4.19 Software and methods update
- 5 Maintenance and cleaning
- 6 What to do if ...
- 7 Technical data
- 8 Accessories and options
- Appendix
photoLab
®
6100 VIS Operation
125
ba75847e01 08/2009
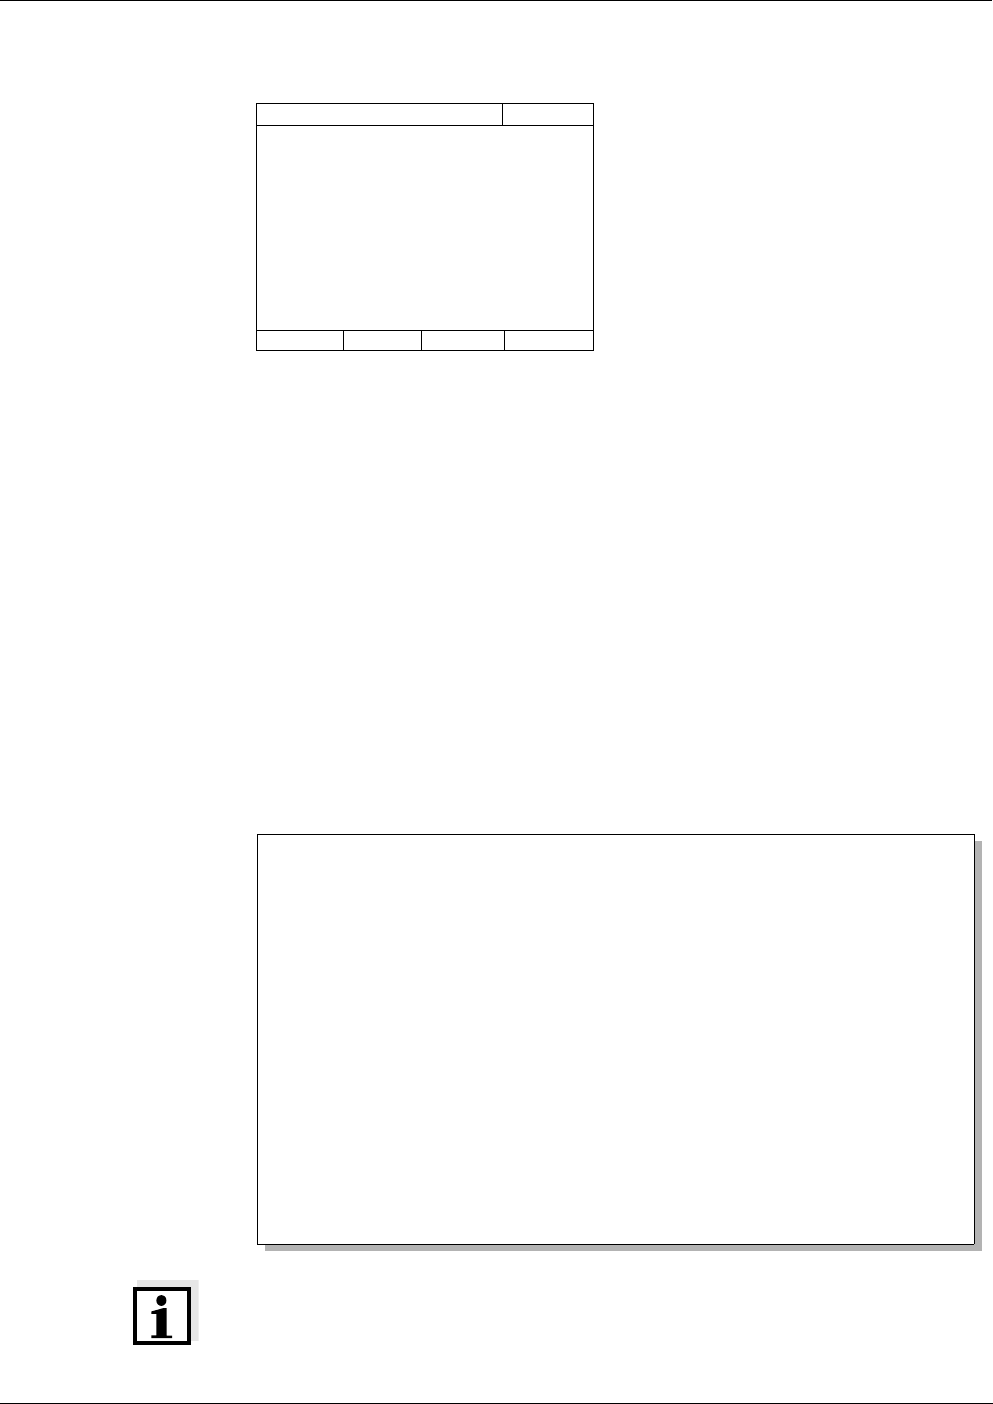
Test record A test record is displayed after the check. It can be printed and stored as a
file (in the internal DataB folder or USB memory device at the USB-A
connection, see section 4.11.1).
Sample printout:
Note
Afterwards you can view the last AQA1 test record under AQA1 info.
2 Insert the cell.
The cuvette is automatically
recognized and the measurement
started.
After measuring, the
measurement result, Target value,
Tolerance and an evaluation (OK
or failed) are displayed.
The photometer offers to repeat
the measurement if the check
failed.
If the check was successful, the
measurement of the next
PhotoCheck test standard, e.g.
445/2, appears on the display.
3 Measure all test standards in the
same way.
After all test standards are
successfully measured, the check
is passed.
PhotoCheck 445/1
04/16/07 9:52
Please insert PhotoCheck 445/1
SpectroFlex 6100 09130512 1.30-WTW-1.60 Administrator
AQA1 OK
Protocol ID 9
Executed by: Administrator
Executed 22.05.2007
Valid until: 26.06.2007
PhotoCheck OC479094 OK
445-1 0.200 +- 100 0.192
445-2 0.500 +- 200 0.511
445-3 1.000 +- 200 1.006
445-4 1.500 +- 200 1.526
525-1 0.200 +- 200 0.247
..... ............ .....
..... ............ .....
(etc.)