
Instruction Manual


23
English Français
1340 – 5210– 1007
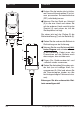
u Now turn the two visible recessed
head screws (2) using an appropriate
screwdriver (PZ1) until they have been
released completely.
u Take hold of the device in your hand
by its bottom part (3) and pull the up-
per part (4) carefully upwards with your
other hand until the device circuit
board is can be seen.
You will now be able to see the battery
holder fixture (7) with the battery (6) on
the circuit board (5).
u Pull the used battery out of the fixture
in the direction of the arrow.
u Take up the new battery
with
grease-free fingers and push it into
the fixture. The plus sign on the bat-
tery must point upwards in the pro-
cess and thus be visible.
u Fix the housing upper and lower parts
together again.
u Tighten the two screws again (with
moderate force only, moment of torque
0.4 Nm) and set the rubber stopper
back in place (with the slightly be-
velled edge pointing outwards).
Dispose of the used batteries without
damaging the environment!
u Dévissez ensuite entièrement les deux
vis cruciformes (2) à l’aide d’un tour-
nevis adéquat (PZ1).
u Tenez alors la partie inférieure (3) de
l’appareil dans une main, et, de
l’autre, retirez doucement la partie
supérieure (4) par le haut jusqu’à ce
que la platine soit dégagée.
Vous voyez maintenant le support de la
pile (7) avec la pile (6) sur la platine (5).
u Retirez la pile usagée du support en sui-
vant la direction indiquée par la flèche.
u Prenez la nouvelle pile avec des mains
propres et insérez-la dans le support.
Le signe plus de la pile doit être diri-
gé vers le haut et donc être visible.
u Réunissez à nouveau les parties infé-
rieure et supérieure du boîtier.
u Revissez les deux vis (sans trop
forcer, couple de serrage de 0,4 Nm)
et replacez les bouchons en plastique
(avec la partie légèrement biseautée
vers l’extérieur).
Disposez de la pile de matière appro-
priée !