
UPGRADE

UPGRADE TO STORM
INSTALLATION INSTRUCTIONS
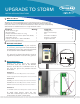
Take a picture of the inside of your enclosure
for reference, put on your anti-static wristband
and attach the clip to the ground lug located
on the bottom of the EcoNet enclosure.
The ground lug should already be wired to
a ground rod, which is buried in the ground.
Bottom of Enclosure
1
3
Green Connectors
What You Need
1
Required Quantity
Storm 3 Data Logger 1
Mounting plate 1
Phillips screwdriver that is 9.5” long 1
Small flat blade screw driver (2mm wide blade) 1
Adjustable wrench 1
Laptop / Smart Phone / Tablet with Wi-Fi 1
Storm Central Registration ID 1
Suggested Quantity
Safety glasses 1
White electrical tape 1
Pen 1
Anti-static wristband 1
Camera or notepad 1
Digital multimeter 1
*Activate your stormcentral.waterlog.com account and log in prior to going out to your
equipment site. Contact WaterLOG Technical Support at 435.227.1767 for further ques-
tions, and to obtain access to the Storm Central Service. Refer to the ‘Storm Central Getting
Started Guide’ for detailed instruction on set up with Storm Central.
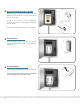
2
Remove the three green five position
connectors from the side of the EcoNet.
Remove and label the individual wires as
A-F, from the green five position Phoenix
connectors:
To avoid short circuits, cover the wire
ends with electrical tape until it is time for
reconnection in Storm 3 connectors.
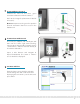
Connector 1
A. GND black wire from 4th position of 1st connetor.
B. SDI-12 purple wire from 5th position of 1st connector.
Connector 2
C. GND green wire from 3rd position of 2nd connector
D. GND black wire from 4th position of 2nd connector
E. VBATT red wire from 5th position of 2nd connector
Connector 3
F. +12V Out red wire from 5th position of 3rd connector
Anti-static wrist band