
Owner's manual


Logging WQL-Cond
140
ba75822e01 03/2011
8 Logging
Listed below are the typical operating steps with which to set up and carry out
a logging job. The chapters where the operating steps are described in detail
are also mentioned.
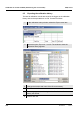
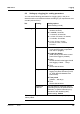
8.1 Typical sequence of a logging job (checklist)
1 Connect the logger to the PC with the USB cable.
2 Start the WQL-Log program (see section 3.6 S
TARTING THE WQL-LOG
PROGRAM).
3 Register the logger (see section 3.6 STARTING THE WQL-LOG
PROGRAM ).
4 If a logging job is running, terminate or interrupt it (see section
8.8 M
ANAGING THE LOGGING JOBS).
5 Erase the logger memory if necessary (see section 8.8 MANAGING THE
LOGGING JOBS).
6 Calibrate the logger (see chapter 6 C
ALIBRATION IN CONTROL
STANDARD (DETERMINING THE CELL CONSTANT)
7 Set up the logging job and send it (see section 8.3 SETTING THE
PARAMETERS AND STARTING THE LOGGING JOB).
8 Disconnect the USB cable from the logger.
9 If necessary, start the logger with the key button.
10 Check the operation of the logger based on the behavior of the signal
LED (see section 8.5 S
IGNAL LED AND LOGGER KEY BUTTON).
11 Tightly close the logger with the cap.
12 Install the logger at the measuring location.
13 After completion of the logging job: Connect the logger to the PC with
the USB cable (see step 1 etc.).