
User Manual


P 26 V.1.1
da Vinci 1.0 Pro 3in1
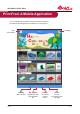
Once basic editing has been completed, select this "Engrave" icon.
Select “Import” on the device to select the graphic le you wish to engrave.
Alternatively, select this "Advanced Engraving Settings" icon to
complete advanced settings before engraving.
Function Description
:
Select "Edit". The software screen shall display the laser engraver settings.
For more details on laser engraving settings and methods,
please refer to the "Laser Engraving Module User Manual".
Pause and cancel the laser sculpting
●
●
●
"Language" and "Automatic Feedback" (feedback laser
engraving settings) settings.
Click once to hide the imported le.
Click on this icon again to show it.
Delete the imported le.
The user may choose between Vector / Pixel engraving modes (default software setting is
Vector mode).
Set engraving speed, number of engraving layers, contour detection sensitivity, or color depth
detection sensitivity.
PAUSE:Select “PAUSE” to pause the laser engraving process.
RESUME:To cancel the pause and resume the printing, select “RESUME”.A screen will appear to con rm whether
to resume the engraving process. Select “YES” to continue the laser engraving process.
CANCEL: To cancel the laser engraving job, select “CANCEL”. A screen will appear to confirm
whether to cancel the engraving process. Select “YES” to cancel the laser engraving process.
Laser Specication
●
Laser
Wavelength
450nm+5nm/-10nm InGaN
Laser Power
350mW ± 10%
Laser Power for
Classi cation
Class 3B
Beam Diameter
≦
1mm
Engraving area
20 x 20 cm File Types JPG / PNG / GIF / BMP
Mode of
Operation
CW (Continuous Wave)