Electric Fireplace Instruction Manual Wall Hanging Electric Fireplace Packing List 1 Electric Fireplace 1 Glass Face 1 Remote Control 2 AAA Batteries 1 Instruction Manual 1 Wall Fixing Plate 1 Fastener Package
INSTALLATION INSTRUCTIONS Location 1. The fireplace must not come in contact with any combustible materials. 2. The heater, which is located at the base of the fireplace, must be a minimum of 16 inches away from any combustible material. 3. It is important that the wall on to which the fireplace is to be installed is of sound construction. It is recommended that the brackets are installed directly into beams for support. 4.
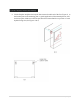
Fireplace Installation – Wall Mount Figure 1 1. Select the position of the fireplace on the wall to w hich it is to be mounted. Draw a level horizontal line on the wall at the required height. This line will correspond to the top of the fireplace so it is important to allow for the ext ra height of the glass face. 2. Mark the center line of the fireplace on to the hori zontal line. 3. Place the Installation Plate along the horizontal l ine and line up the center “V” cut out with the center line.
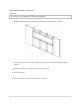
8. Lift the fireplace and place the keyhole slots situated on the back of the fire (Figure 2) to the location pins on the mounting plate. A gentle appli cation of downward pressure will lock it into place. Make sure all of the pins have been located into the top section o f each keyhole fixing slot.
Electrical Work This fireplace must be grounded 9. A standard electrical outlet must be close to the fireplace. If the electric outlet is required to be concealed, it can be located above or on the right hand side of the fire and behind the glass face. 10. DO NOT INSTALL THE FIREPLACE WHERE THE HEATER IS DIRECTLY ABOVE AN OUTLET The fireplace’s vent is located in the center of the fireplace base. 11. If the power supply cable becomes damaged in any manner it MUST be replaced. 12.
Fireplace Installation – Recessed CAUTION Two people may be needed to perform this installation 1. Prepare a frame opening according to the dimension of the fire unit. Figure 6 2. Lift fireplace and insert into opening. Adjust the unit to achieve the desired amount of depth. Figure 7 3. Make sure that the power supply port is not behind the wall. 4. Level the fireplace. 5. Drive mounting screws into mounting brackets.
| Page
Attaching The Face Two people may be required to carry out this lation instal 1. On each side of the fireplace are two locating studs (Figure 5). 2. On the back of the face there are two brackets whic h hook over these studs. 3. Lift the face up to the fireplace. Then lower the face into place so that the brackets on the rear of the face locate either side of the studs on the fireplace. Once in place firmly tighten the locking bolt.
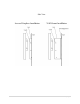
Side View 9 |P a g e
OPERATING INSTRUCTIONS CAUTIONS: 1. When the fireplace is in operation certain areas of t he fireplace surface will get hot. Caution must be taken to avoid being burned. Take c are not to touch hot surfaces. 2. The fireplace must not be switched on if volatile vapors are present in the room 3. Children must be supervised around the fireplace. 4. Do not obstruct the air flow around the fireplace. 5.
Fireplace Control Panel The control panel is located on the right hand side of the fireplace (Figure 7 ).
Remote Control DIMMER A B C D E ON/OFF HIGH HIGH\LO W Infrared Window On/Off Switch Flame Effect Dimmer Heater Maximum Heat Heater Low Heat 1. Prior to use, the remote control handset requires i nstallation of the two included AAA batteries (Figure 8 ). 2. Remove the cover on the rear of the remote control by sliding backwards. Install the batteries as shown and then slide the cover back in to the original position. 3.
D Heater Maximum Heat (1500 W) Press this once to switch to high heat. The indicator light will come on as well as the fan. Press again to turn off. (The fan will continue to run for a few moments until sensors indicate cool condition) E Heater Low Heat (750 W ) Press this once to switch to high heat. The indic ator light will come on as well as the fan. Press again to turn off.
MAINTENANCE INSTRUCTIONS Changing Light Bulbs Disconnect power supply before beginning any mainte nance. 1. Light bulbs need to be replaced when you notice a da rk section of the flame or when clarity and detail of the coal effect disappears. 2. Unscrew the locking nut on the side of the brackets and then remove the face. This is done by lifting the face up and swinging the face clear of the fire. Care should be taken not to damage the face. Removal of the face may require two people. 3.