
User's Manual


VX-920/-970 SERIES OPERATING MANUAL
8
BEFORE YOU BEGIN
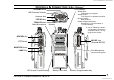
Battery Pack Installation and Removal
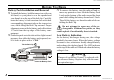
To install the battery, hold the transceiver with your
left hand, so your palm is over the speaker and
your thumb is on the top of the belt clip. Carefully
mate the battery’s four insertion slots with their
corresponding alignment tabs on the transceiver
case, while tilting the Belt Clip outward. Proper
alignment occurs with the battery pack offset about
1/2 inch from the top edge of the battery com-
partment.
Guide the pack on to the tabs with a slight inward
pressure, then slide the battery pack upward, un-
til it locks in place with a “Click.”
To remove the battery, turn the radio off and re-
move any protective cases. Slide the Battery Pack
Latch on the bottom of the radio toward the front
panel while sliding the battery down about 1/2 inch.
Then lift the battery out from the radio while un-
folding the Belt Clip.
Do not attempt to open any of the re-
chargeable Lithium-Ion packs, as they
could explode if accidentally short-circuited.
Low Battery Indication
As the battery discharges during use, the voltage
gradually becomes lower. When the battery voltage
becomes to low, substitute a freshly charged battery
and recharge the depleted pack. The LED indicator
on the top of the radio will blink red when the battery
voltage is low.
Caution
Danger of explosion if battery is replaced with
an incorrect battery. Replace only with the same
or equivalent type.
Tilt the Belt Clip
Insert the Battery Pack
Vertex Standard Co., Ltd.
FCC ID: K6610334620/IC ID: 511B-10334620