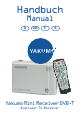
Handbuch Manual D GB F E Yakumo Mini Receiver DVB-T Digitaler TV-Receiver
Preface About the User Manual This manual is designed to help you familiarize yourself with the operation of the Yakumo Mini Receiver DVB-T. It also describes the features of the product and the remote control. Please read this manual carefully before using the Yakumo Mini Receiver DVB-T. Note Check that you can receive DVB-T in your region. Also check whether you need a roof-mounted aerial to receive the TV signals or if you can also receive them via an indoor aerial.
9. Protect the power cable from being walked on or pinched particularly at plugs, convenience receptacles, and the point where they exit from the apparatus. 10. Only use attachments/accessories/cables specifie by the manufacturer. 11. Connect only with attachments/accessories/cables in accordance with the manufacturer’s instructions. 12. Do not use the power cable during lightning storms. 13. Unplug all power cables when unused for long periods of time. 14.
Contents Overview Product Features 1 1 Package Contents About the Yakumo Mini Receiver DVB-T Front View Rear View About the Remote Control 1 2 2 2 3 Start Connection Cables Power Cable Antenna Cable TV Cable and PC Monitor Cable Quick Start Activate the Yakumo Mini Receiver DVB-T Initial Setup Browse Menus Advanced Operation Main Menu Function Guide Program List Program Search System Setting Accessory Personal Style Appendix 4 4 4 4 5 6 6 6 7 9 9 9 11 12 14 14 Specifications Glossary Troubleshooting
Overview Product Features 1. 2. 3. 4. Complies with the international specificatio (DVB-T ETS 300 744) Uses an MPEG-2 video decoder and delivers the same quality as DVDs Compact design and easy to move Designed to receive a DVB-T system and all digital TV programs of 6/7/8MHz channel bandwidth 5. Electronic Program Guide (EPG) support for the latest program information 6. Teletext support for the real-time information in pure text format.
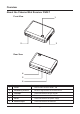
Overview About the Yakumo Mini Receiver DVB-T Front View 1 2 3 Rear View 4 5 6 Name Descriptions 1 Power Yakumo Mini Receiver DVB-T ON 2 Infrared ray receiver Receives signals from the remote control 3 VGA OUT To be connected to the PC monitor 4 AV OUT To be connected to the TV or PC speaker 5 DC IN To be connected to the power supply 6 Antenna Input To be connected to the antenna 2
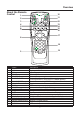
Overview About the Remote Control 1 10 2 11 3 12 4 5 6 7 13 14 15 16 17 8 18 19 9 1 2 3 4 5 6 Name MUTE MENU VOL ▲ / ▼ EPG TELETEXT DIGEST/GREEN 7 8 9 10 11 12 13 14 15 16 17 18 19 FAVORITE/RED VGA OUT / AV OUT EXIT POWER VIDEO MODE CH ▲ / ▼ INFO MTS EDIT/YELLOW DVB RADIO/BLUE DIRECTIONS/ ENTER 0-9 RETURN Descriptions Mutes during playback Displays the main menu Adjusts the volume levels Enables EPG Teletext (European regions only) Displays a 9-grid screen for you to review the live programs
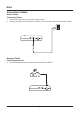
Start Connection Cables Power Cable Connecting Power: 1. Connect the power plug to the power supply socket. 2. Connect the other end of the power converter to DC IN on the Yakumo Mini Receiver DVB-T. Antenna Cable Connecting Antenna: 1. Connect the antenna cable to the Yakumo Mini Receiver DVB-T.
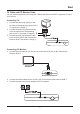
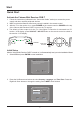
Start TV Cable and PC Monitor Cable You can watch programs by connecting the Yakumo Mini Receiver DVB-T to a general TV set or a PC monitor. Connecting TV: 1. Connect the video plug (yellow) of the AV cable to the AV IN jack (yellow) on the TV (as shown in image 1). 2. Connect the audio plug (white and red) of the AV cable to the corresponding jack on the TV (as shown in image 2). 2 3. Connect the other end of the AV cable to the AV OUT jack on the Yakumo Mini Receiver DVB-T (as shown in image 3).
Start Quick Start Activate the Yakumo Mini Receiver DVB-T 1. Follow the instructions (indicated in the “Connection Cable” section) to connect the power supply and other required peripheral devices. 2. Make sure that the batteries have been properly installed in the remote control. 3. After the TV or the monitor is on, press POWER on the remote control or POWER on the top of the Yakumo Mini Receiver DVB-T to turn on the TV receiver. 4. The default of video output is for the TV.
Start 3. Select YES to start an automatic channel scan. First Time Installation (2) Do you want to start Auto Search ? Previous channel list will be replaced. YES BACK NO The Yakumo Mini Receiver DVB-T will start searching for the available digital TV channels. Automatic Search Progress 05% Channel No 17 Frequency 491.
Start * Enter Submenu: ▼ ▼ Use ▲ ▼ buttons to select the menu setup option. Press ENTER to go into the submenu, or press button on the remote control as shown on the menu option to enter the submenu. * Select Setup Options: ▼ After entering the setup option (as shown below), use ▲ ▼ buttons on the remote control to select the desired setting content. Press ENTER to finis setup and go back to the previous page automatically. To abort setup, press EXIT or button to go back to the previous page.
Advanced Operation Main Menu Function Guide Press MENU on the remote control to enter the “Main Menu”: Main Menu Program List Program Search System Setting Accessory Personal Style You can perform the following setup tasks after entering the “Main Menu”: [Program List] TV Program List 1. 2. Select TV Program List from the Program List and press ENTER. You can start editing after entering the “Program edit table”. * Set Favorite Programs: 1.
Advanced Operation * Move Programs 1. Use the directional buttons to move the color block to defin certain programs you wish to move. 2. In “Move”, press ENTER and a “ ” icon appears. Use the directional buttons again to move the programs to a new location. Program edit table No. Program Name 1 CTV 2 CTV News 3 CTV Life 4 CH26-1 5 CH26-2 6 FTV 1 7 FTV 2 8 FTV 3 9 TTV 10 Favor Move Del TTV Home * Delete Programs 1.
Advanced Operation [Program Search] After installing the Yakumo DVB-T Receiver mini, follow the “Initial Setup” instruction and it will automatically lead you to the Installation Wizard. However, if you need to rescan the channels, the Yakumo DVB-T Receiver mini provides you with two channel rescan methods: Automatic Search Automatic TV Channel Scan: 1. Select Automatic Search from the Program Search and press ENTER. 2. Select OK to start automatic search. 3.
Advanced Operation [System Setting] TV Standard Change TV Standard Settings: 1. Select TV Standard from the System Setting. 2. Select the correct TV type. Main Menu System Setting TV Standard PAL NTSC Service ID AUTO Regional Setting If you travel to another country, you may need to change certain regional setting. To change the regional setting: 1. Select Regional Setting from the System Setting and press ENTER. 2. Change Country to the country where you are currently located.
Advanced Operation Time Setting The Time Setting enables you to set the date and time. There are two ways of setting the time: GMT Usage ON 1. Select Time Setting from the System Setting and press ENTER. 2. Switch the GMT usage ON. 3. Change Time Zone to the time zone where you are located. Time Setting GMT usage ON Time Zone GMT + 00:00 GMT Usage OFF 1. Select Time Setting from the System Setting and press ENTER. 2. Switch the GMT usage OFF. 3.
Advanced Operation [Accessory] System Information The System Information displays the current system software version information. To view the current version number: 1. Select Accessory and then select System Information. Main Menu Accessory System Information System Version: 1.05 Factory Default To reset the menu to the factory default settings: 1. Select Factory Default from the Accessory menu. Select YES and then OK.
Appendixes Specification Item COFDM & FEC Features DVB-T Compliant FFT: 2K / 8K Bandwidth: 6 / 7 / 8 MHz Tuner Receiving Frequency: 48.25-863.
Appendixes Glossary DVB: The Digital Video Broadcasting Project (DVB) is an industry-led consortium of over 260 broadcasters, manufacturers, network operators, software developers, regulatory bodies and others in over 35 countries committed to designing global standards for the global delivery of digital television and data services. NTSC: (National TV Standards Committee) A color TV standard that was developed in the U.S.
Appendixes Question Possible Reasons Blurred Weak signal. and grainy picture with message "Bad signal". How can I No / bad reception. re-orientate the aerial? Sporadic bad reception. Q&A Solutions Re-orientate or re-adjust your aerial. Check the signal cable and connectors. A signal strength of approx. 30 - 38 dBµV should reach the RF input.
91M-0005-V50-00
www.yakumo.