U Blu-ray Disc Player BD-A1060 EN Owner’s Manual PURE DIRECT CD MODE USB 5V 0.
IMPORTANT SAFETY INSTRUCTIONS Read these operating instructions carefully before using the unit. Follow the safety instructions on the unit and the applicable safety instructions listed below. Keep these operating instructions handy for future reference. 1 2 3 4 5 6 7 8 9 10 11 12 13 14 Read these instructions. Keep these instructions. Heed all warnings. Follow all instructions. Do not use this apparatus near water. Clean only with dry cloth. Do not block any ventilation openings.
FCC INFORMATION (for US customers) 1 IMPORTANT NOTICE: DO NOT MODIFY THIS UNIT! This product, when installed as indicated in the instructions contained in this manual, meets FCC requirements. Modifications not expressly approved by Yamaha may void your authority, granted by the FCC, to use the product. 2 IMPORTANT: When connecting this product to accessories and/or another product use only high quality shielded cables. Cable/s supplied with this product MUST be used. Follow all installation instructions.
FCC WARNING Change or modifications not expressly approved by the party responsible for compliance could void the user’s authority to operate the equipment. NOTICE This equipment has been tested and found to comply with the limits for a Class B digital device, pursuant to part 15 of the FCC Rules. These limits are designed to provide reasonable protection against harmful interference in a residential installation.
Caution: Read this before operating your unit. 1 2 3 4 5 6 7 8 9 10 11 12 13 14 15 16 17 To assure the finest performance, please read this manual carefully. Keep it in a safe place for future reference. Install this sound system in a well ventilated, cool, dry, clean place-away from direct sunlight, heat sources, vibration, dust, moisture, and/or cold. For proper ventilation, allow the following minimum clearances.
Contents 1. Introduction What you can do with this Player ..................... 2 1 Display Setting.............................................................. 40 Audio Setting ................................................................ 42 System Information....................................................... 43 2 2 2 2 Video/audio output formats............................. 44 Supplied parts .................................................... 2 About discs and files .........................
INTRODUCTION What you can do with this Player Various discs Network streaming contents Wireless network (WPS supported) USB contents PC/NAS contents (DLNA) Smartphone contents (Miracast) Mobile device contents (Wi-Fi Direct) ■ Wide variety of supported discs and file formats – Blu-ray Disc™, DVDs, SA-CDs and CDs (p. 30) – Blu-ray 3D™ (p. 12), BONUSVIEW™ and BD-Live™ (p. 32) – Video, music and photo files on DVD-R/RW discs, CD-R/RW discs and USB memory devices (p.
■ Types of discs/files that can be used with this Player – 12 cm (5”) and 8 cm (3”) discs can be played back in this Player. Do not use an 8 cm (3”) to 12 cm (5”) adapter. – Use discs that conform to compatible standards as indicated by the presence of official logos on the disc label. Playback of discs not complying with these standards is not guaranteed. In addition, the image quality or sound quality is not guaranteed even if the discs can be played back.
About discs and files Region management information Destination Russia BD-Video Region code “C” or “ABC” DVD-Video Region number “5” or “ALL” 5 ALL Notes About Super Audio CD (SA-CD) – Audio format based upon the current CD standards but includes a greater amount of information that provides higher quality sound. There are three types of discs: single layer, dual layer and hybrid discs.
About discs and files Be careful of scratches and dust – Blu-ray Disc, DVD and CD discs are sensitive to dust, fingerprints and especially scratches. A scratched disc may not be able to be played back. Handle discs with care and store them in a safe place. Proper disc storage Place the disc in the center of the disc case and store the case and disc upright. Avoid storing discs in locations subject to direct sunlight, close to heating appliances or in locations of high humidity.
Controls and functions ■ Front panel PURE DIRECT CD MODE CD MODE USB 5V SA-CD 0.5A 1 2 3 4 5 6 1 p (On/Standby) Turns this Player on/Sets to standby mode. Press and hold p on the front panel for more than 5 seconds to reset this Player (system reset). 2 USB connector (p. 19) 3 CD MODE indicator Lights up when the CD mode is enabled (p. 26). 4 CD MODE Enables/disables the CD mode (p. 26). 5 SA-CD indicator Lights up when an SA-CD is loaded and the SA-CD layer (p. 4) is selected.
Controls and functions ■ Rear panel Introduction 1 AC IN COAXIAL NETWORK OPTICAL HDMI OUT IN REMOTE CONTROL BALANCED OUT ANALOG OUT 5 6 7 BALANCED OUT USB DIGITAL OUT 1 2 3 4 8 1 HDMI (p. 12) 5 REMOTE CONTROL (IN/OUT) (p. 18) 2 DIGITAL OUT (COAXIAL/OPTICAL) (p. 14) 6 BALANCED OUT (L/R) (p. 15) 3 USB (p. 19) 7 ANALOG OUT (L/R) (p. 14) 4 NETWORK (p. 16) 8 AC IN (p.
Controls and functions ■ Remote control Note 1 Infrared signal transmitter: Outputs infrared signal. Aim this window to the remote control sensor (p. 11). – 2 p: Turns this Player on or sets it to standby mode. will appear on the top left corner of the screen when the pressed button is not available. 5 SUBTITLE BD DVD VIDEO : Changes subtitle languages (p. 52) if available. You can also select this item from On Screen menu (p. 30).
Controls and functions BD DVD CD VIDEO MUSIC PHOTO : Stops playback. : Pauses playback. : Plays back contents. / L SHUFFLE DVD CD VIDEO MUSIC Selects shuffle play mode (p. 30). : Skips backward/forward. / BD DVD CD VIDEO K PROGRAM DVD CD : Sets the order of playback (p. 32). You can set up to 15 tracks (for an audio disc) or titles/chapters (DVD-Video). MUSIC : Searches backward/forward. The search speed will change each time you press the button (search backward/forward: 5 steps each).
Controls and functions V REPEAT BD 1 2 5 6 7 8 9 : A B C RED GREEN YELLOW MUSIC : Repeats the chapter being played back. BLUE : Repeats the folder being played back. SUBTITTLE N AUDIO : Repeats all tracks/files on the disc. : Repeats the track/file being played back. ANGLE ZOOM SETUP CLEAR SEARCH MIRACAST PURE DIRECT HOME CD MODE TOP MENU POP-UP MENU O P Q R S ENTER A/B BD DVD CD VIDEO MUSIC : Plays back a specific part you want to repeat.
Controls and functions 1 3 2 Notes – Change both batteries when the operation range of the remote control decreases. – Use AAA, R03, UM-4 batteries. – Make sure that the polarities are correct. Refer to the illustration inside the battery compartment. – Remove the batteries if the remote control is not to be used for an extended period of time. – Do not use old batteries together with new ones. – Do not use different types of batteries (such as alkaline and manganese batteries) together.
CONNECTION Video/audio connections Make the corresponding video/audio cable connections depending on the equipment you want to use. Hints – See page p. 44 for information on the video/audio output formats. – Prepare commercially available cables required for connections. The type and number of cables you need vary depending on the equipment to be connected. Enjoying video/audio using a TV and an AV receiver Refer to “Connecting to a TV via an AV receiver” (p. 13).
Video/audio connections ■ Connecting to a TV directly Connect this Player to the TV with an HDMI cable. Connect this Player to the AV receiver and the AV receiver to the TV with HDMI cables. For details on speaker connections, refer to the owner’s manuals of the AV receiver and speakers. 2 Caution! Caution! Do not connect the power cable of this Player until all connections are completed. Do not connect the power cable of this Player until all connections are completed.
Video/audio connections ■ Connecting to a TV and audio equipment Connect this Player to the TV with an HDMI cable, and this Player to the audio equipment with an audio cable (digital optical, digital coaxial or stereo pin cable). Caution! Do not connect the power cable of this Player until all connections are completed.
Video/audio connections XLR balanced connection If your audio equipment is equipped with the XLR balanced input jacks, you can connect this player to the audio equipment (such as an AV receiver) with an XLR balanced cable. For details on speaker connections, refer to the owner's manual of the audio equipment and speakers.
Network connection By connecting this Player to the network (wireless or wired), you can use the following features. – Playing back DLNA server (PC or NAS) contents (p. 22) – Playing BD-Live compatible discs (p. 32) – Operating this Player from mobile devices (AV CONTROLLER) (p. 29) Notes – To use the network services or BD-Live feature, a broadband internet connection is required.
Network connection ■ DLNA server setup Notes – To use DLNA features, all the devices must be connected to the same network. – To use a NAS as a DLNA server, the NAS must be compatible with DLNA. DLNA This Player DLNA server (PC or NAS) Remote control Controller (mobile device) Media sharing setting on DLNA server To play back multimedia contents stored on your DLNA server (PC or NAS), first you need to configure the media sharing setting on the DLNA server software installed on the DLNA server.
Other connections ■ Connecting Yamaha components that support remote connections If you are using Yamaha components that support remote connections, you can transmit remote control signals by connecting the REMOTE CONTROL (IN/OUT) jacks with monaural 3.5 mm mini-plug cables. Caution! Do not connect the power cable of this Player until all connections are completed.
USB connection Notes – Yamaha cannot guarantee that all brands’ USB memory devices will operate with this Player. – Connect a USB memory device to one of the USB connectors (front/rear) of this Player when using BD-Live feature (p. 33). This Player This Player CD MODE COAXIAL NETWORK CD MODE USB 5V 0.
Connecting the power cable After all connections are completed, plug the supplied power cable into the AC IN on the rear of the Player. Then plug into AC outlet.
PLAYBACK Initial settings ■ Setting with the Easy Setup 3 Press 2/3 to select Yes, then press ENTER. Easy Setup allows you to set language, resolution, and screen aspect ratio easily. Easy Setup screen is displayed when you turn this Player on for the first time after purchase. Same setting can be performed from SETUP menu = System = Easy Setup. 3 Playback 1 When Easy Setup screen is displayed, press ENTER to start Easy Setup. 4 Press 2/3 to select one of the following setup methods, then press ENTER.
Playing back video/music/photo ■ Playing back commercially available discs You can enjoy commercially available Blu-ray discs, DVDs, and CDs. 1 Open the disc tray and load the disc. Playback starts automatically. Remote control buttons used for CD playback Remote control buttons Function Stops playback. Pauses playback. Hints Starts playback. – If playback does not start automatically, press 3 (playback). – The top menu screen may be displayed when a Bluray disc or a DVD is loaded.
Playing back video/music/photo 2 Press HOME. The HOME menu screen is displayed. 5 Use the cursor buttons (5/a) to select the desired file and press ENTER. Playback of the file starts. Remote control buttons used for file playback 3 Function Stops playback. Pauses playback. Starts playback. Hint – You cannot display the HOME menu screen during playback of a commercially available disc, DVD, or video files. To display the HOME menu screen, first stop playback.
Playing back video/music/photo 3 Use the cursor buttons (5/a) to select the desired photo and press ENTER. Slide show playback starts from the selected photo. ■ Viewing VUDU contents You can enjoy VUDU contents on this Player. Notes Hints – If you select photos during playback of a CD or a music file, you can enjoy slide show while listening to music. – You can use the slide show as the screen saver.
Playing back video/music/photo About VUDU™ VUDU is an online streaming movie service that allows you to rent or purchase individual movies or TV shows in either standard definition or high definition without a subscription, More information at www.vudu.com Note 3 Playback – To deactivate the VUDU service, refer to “VUDU” (p. 38).
Enjoying high-quality sound The CD mode and Pure Direct mode allow you to enjoy better quality sounds. The CD mode allows you to play back music CDs or SA-CDs with accurate and high quality sound. The Pure Direct mode allows you to enjoy pure high fidelity sound on any sources.
Enjoying DLNA playback of mobile device contents via Wi-Fi Direct ♪ ♪ 㽈 This Player TV 4 Perform the following operation to make a Wi-Fi Direct connection. If your device is Wi-Fi Direct compliant: 1 Within 2 minutes, operate your device to make a connection. If your device is not Wi-Fi Direct compliant: 1 Press RED to enter the manual connection mode. The SSID information appears on the screen. 2 On your device, open the Wi-Fi setup screen and enter the SSID information.
Enjoying smartphone pictures and videos on the TV screen (Miracast™) By using the Miracast function, you can view the images displayed in the screen of your Miracast-compatible device (such as smartphone) on the TV screen like mirroring. Notes – To check if your device is Miracast compliant, refer to the owner’s manual of the device. – When Miracast is enabled on this Player, other network functions (such as DLNA) are not available.
Operating this Player from mobile devices By using the following applications on your mobile device, you can use the mobile device as a remote control and operate this Player from it. AV CONTROLLER 29 En Playback 3 – You can control the basic functions of this Player such as Play, Pause, Skip, Power and cursor navigations. – The application “AV CONTROLLER” is available in many languages. – For more information about “AV CONTROLLER”, visit the Yamaha website.
Advanced playback operation This chapter explains playback of commercially available Blu-ray Discs, DVDs, SA-CDs, CDs, and recorded DVDRW/R discs. Note – For the basic playback operation, see page 8. ■ On Screen menu To display On Screen menu, press ON SCREEN. After that, press 5/a/2/3 to select an item, then press ENTER to operate the desired function.
Advanced playback operation ■ Status menu This shows various settings, such as subtitles, angle settings and the title/chapter/track number currently played back. To display status menu, press STATUS. Status menu contains following menus.
Advanced playback operation ■ Program play DVD ■ Using Search CD This allows you to program playback order of audio disc tracks or DVD chapters. Press PROGRAM during playback to display the PROGRAM window to program playback order. You can program up to 15 tracks/chapters. BD DVD CD VIDEO MUSIC PHOTO This allows you to jump to the specified point during playback. 1 Press SEARCH during playback. Status bar appears. 2 Press 5/a/2/3 to select one of the item below, then press ENTER.
Advanced playback operation ■ Using Picture in Picture function (secondary audio/video playback) BD-Video that includes secondary audio and video compatible with Picture in Picture can be played back with secondary audio and video simultaneously as a small video in the corner. Primary video Secondary video Notes – Yamaha cannot guarantee that all brands’ USB memory devices will operate with this Player.
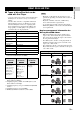
SETTINGS SETUP menu The SETUP menu enables various audio/visual settings and adjustments for functions using the remote control unit. Menu/Submenu System Item Playback Security Network 34 En Page Auto Power Standby Sets the power-saving function to on/off. HDMI Control Sets this Player to receive control signal from the remote control of your TV/AV receiver. 37 Load Default Resets all settings to the default setting except Security setting. 37 Upgrade Performs upgrade of this Player.
SETUP menu TV Display Setting Video Process Screen Saver Item Function Page 3D Output Selects 3D or 2D videos. 40 TV Screen Sets the screen aspect ratio of the connected TV, and adjust the video output. 40 4K Upscaling Enables/disables 4K upscaling for HDMI video output. 40 HDMI Resolution Selects the HDMI video output resolution. 40 TV System Selects the TV System from NTSC/PAL/Multi. 40 Color Space Selects Color Space from YCbCr 4:4:4/YCbCr 4:2:2/Full RGB/RGB.
SETUP menu ■ Example of SETUP menu operation You need to call up the SETUP menu screen to perform settings for this Player. The following is the explanation for basic operations of the SETUP menu. 3. Select a menu item. Press 5/a to select Disc Auto Playback, then press ENTER or cursor 3. SUBTITTLE AUDIO ANGLE ZOOM CLEAR SEARCH PURE DIRECT MIRACAST SETUP CD MODE HOME TOP MENU POP-UP MENU 4. Select a desired setting. Press 5/a to select On or Off, then press ENTER.
SETUP menu Load Default You can reset all settings of this Player to default setting except Security setting (p. 38). For details on default settings, see pages 34-43. System Upgrade You can upgrade the software manually from USB Storage or Network. For details on software upgrade, refer to “Software upgrade” (p. 46). Auto Power Standby Sets the power-saving function to on/off. When set to on, this Player will turn to standby mode after 20 minutes from the last operation without any playback.
SETUP menu Language OSD You can select the language for On Screen Display which is the messages or menu displayed on the screen such as SETUP menu. English, Français, Español, Deutsch, Italiano, Svenska, Nederlandse, Polski, Русский, 中文 Menu You can prioritize the language for disc menu.
SETUP menu Connection setting You can select a network connection method. Wired* Connects the network using Ethernet. Wireless Connects the network using a wireless LAN. You can select settings for a wireless LAN connection. Follow the on-screen instructions to proceed. Scan Searches for an access point. You can connect the access point that is found. Manual You can manually set information for an access point.
SETUP menu ■ Display Setting The default settings are marked with “ * ”. TV 3D Output You can select 3D or 2D video output from this Player. Auto* This Player automatically selects 3D or 2D videos. Off This Player always selects 2D videos. Note – Even if you set “3D Output” to “Auto” and play back a Blu-ray 3D Disc, this Player selects 2D images depending on the setting of TV, etc. TV Screen You can set the screen aspect ratio of the connected TV, and adjust the video output.
SETUP menu HDMI 1080p 24Hz This outputs the BD-Video encoded in 24Hz frame rate in HDMI 1080p 24Hz. Smoother video playback may be available with this function. This function is available when your TV/AV receiver support this function. For more details on output formats, refer to “Video output formats” (p. 44). Transition You can select the transition type for the screen saver (slide show). Auto*, Off Closed Caption – This setting is disabled when output resolution is other than 1080p.
SETUP menu ■ Audio Setting The default settings are marked with “ * ”. CD Mode HDMI You can select whether to restrict HDMI output during the CD mode (p. 26). Off Disables all the HDMI circuitries during the CD mode. Audio Only* Disables HDMI video output (the black screen is displayed) and outputs audio only from the HDMI jack during the CD mode. DRC You can set the DRC (Dynamic Range Control) (p. 51) to On/Off/Auto.
SETUP menu Post Process UpMix You can multi-channelize the 2-channel audio signal. To multi-channelize, select DTS NEO:6, then select Cinema or Music mode. ■ System Information Software version and MAC address (p. 52) are displayed.
Video/audio output formats ■ Video output formats When TV System is set to NTSC Contents HDMI Resolution (p.
Video/audio output formats ■ Audio output formats PCM 2ch DIGITAL OUT (COAXIAL / OPTICAL) jacks Bitstream (*1) PCM (*1) Reencode (*1) Bitstream (*1) PCM (*1) Reencode (*1) Analog (ANALOG OUT/ BALANCED OUT) jacks PCM 2ch PCM 2ch PCM 2ch *2 PCM 2ch PCM 2ch PCM 2ch *2 2ch PCM 2ch PCM 2ch PCM 2ch *2 2ch HDMI jack PCM 5.1ch PCM 5.1ch PCM 5.1ch PCM 5.1ch *2 PCM 7.1ch PCM 7.1ch PCM 7.1ch PCM 7.1ch *2 PCM 2ch PCM 2ch PCM 2ch *2 2ch Dolby Digital Dolby Digital PCM up to 5.
Software upgrade New software that provides additional features or product improvements will be released as needed. We recommend upgrading the software of this Player to the latest version periodically. To check for the availability of a software upgrade, visit http://download.yamaha.com/ Note – Do not remove the USB memory device, set this Player to standby mode or unplug the power cable/network cable while the software upgrade is being performed. ■ Upgrading the software 1.
ADDITIONAL INFORMATION Troubleshooting Refer to the table below when this Player does not function properly. If the problem you are experiencing is not listed below or if the instruction below does not help, turn off this Player, disconnect the power cable, and contact the nearest authorized Yamaha dealer or service center. ■ Power Problem Possible causes and solutions No power. – Connect the AC power cable properly. – Press p on the front panel to turn on the power. The Player power is turned off.
Troubleshooting ■ Picture Problem Possible causes and solutions No picture. – Make sure that the cables are connected correctly (p. 12). – Make sure that the connected TV or the AV receiver is set to the correct input. – With no disc inserted, or playback stopped, press and hold and on the front panel simultaneously to set video resolution to the default value. If a picture is still not output, press and hold on the front panel for approximately 5 seconds to switch NTSC/PAL.
Troubleshooting ■ Network Possible causes and solutions Cannot connect to the Internet. – When connecting to the Internet by selecting Wired in Connection setting, connect the Network cable properly (p. 39). – Turn on the connected equipment, such as broadband router or modem. – Connect the broadband router and/or modem properly. – If Wireless is selected in Connection setting, and when you want to connect to the Internet using Ethernet, select Wired properly (p. 39).
Troubleshooting ■ Messages on the screen – The following messages appear on the TV screen in case the disc you tried to play back is not appropriate or the operation is not correct. Error message Possible causes and solutions Unsupported File – The file is not supported with this Player. See “Types of discs/files that can be used with this Player” (p. 3). Wrong region code! – The disc is an incompatible region code. See “Region management information for Blu-ray Disc/ DVD videos” (p. 3).
Glossary AVCHD is a new format (standard) for high definition video cameras that can be used to record and play highresolution HD images. BD-Live™ BD-Live is a Blu-ray Disc standard that utilizes a network connection, enabling this Player to go online to download promotional videos and other data. BDMV BDMV (Blu-ray Disc Movie) refers to one of the application formats used for BD-ROM which is one of the Blu-ray Disc specifications.
Glossary FLAC FLAC (Free Lossless Audio Codec) is an open file format for lossless audio data compression. While inferior in compression rate to other lossy compressed audio formats, it can often provide higher audio quality. HDMI HDMI (High-Definition Multimedia Interface) is an interface that supports both video and audio on a single digital connection.
Specifications Power supply [U.S.A. and Canada models].......................................... AC 120 V, 60 Hz [Europe, Russia and Australia models] ................................................................................ AC 110–240 V, 50 Hz [Korea model] ........................................................ AC 110–240 V, 60 Hz Power consumption .............................................................................. 20 W Standby power consumption HDMI Control Off, Network Standby Off...
Specifications Java is a registered trademark of Oracle and/or its affiliates. DLNA™ and DLNA CERTIFIED™ are trademarks or registered trademarks of Digital Living Network Alliance. All rights reserved. Unauthorized use is strictly prohibited. The Wi-Fi CERTIFIED Logo is a certification mark of the Wi-Fi Alliance. The Wi-Fi Protected Setup Identifier Mark is a mark of the Wi-Fi Alliance. “Wi-Fi”, “Wi-Fi Protected Setup”, “Wi-Fi Direct” and “Miracast” are marks or registered marks of the Wi-Fi Alliance.
ADDITIONAL INFORMATION Index Numerics 2ch Downmix, SETUP menu ...............42 2ND AUDIO, remote control ................9 3D Output, SETUP menu ....................40 3D Playback Message, SETUP menu ...................................37 ■ A A/B, remote control .............................10 Angle Mark, SETUP menu ..................38 Angle, On Screen menu .......................30 ANGLE, remote control ........................8 Audio Output, SETUP menu ...............42 Audio Setting, SETUP menu ...
The laser component in this product is capable of emitting radiation exceeding the limit for Class 1. LASER Specification: Class 1 LASER Product Wave length: 790 nm (CDs)/658 nm (DVDs)/405 nm (BDs) Laser output: max. 1 mW CAUTION Use of controls or adjustments or performance of procedures other than those specified herein may result in hazardous radiation exposure. CAUTION: INVISIBLE LASER RADIATION WHEN OPEN. DO NOT STARE INTO BEAM. DANGER: INVISIBLE LASER RADIATION WHEN OPEN.
Yamaha Global Site http://www.yamaha.com/ Yamaha Downloads http://download.yamaha.