SAFETY INSTRUCTIONS Read instructions — All the safety and operating instructions should be read before the unit is operated. 10 Power Sources — The unit should be connected o a power supply only of the type described in the operating instructions or as marked on the unit. 2 Retain Instructions — The safety and operating instructions should be retained for future reference.
WARNING DANGER invisible laser radiation when open and interlock failed or defeated. Avoid direct exposure to beam. CAUTION Use of controls or adjustments or performance of procedures other than those specified herein may result in hazardous radiation exposure. As the laser beam used in this compact disc player is harmful to the eyes, do not attempt to disassemble the cabinet, Refer servicing to qualified personnel only, To avid electrical shock, do not open the unit.
» Before making any connections, switch OFF the power to the unit and the amplifier or other component, + Connections should be made to the correct input terminals of the amplifier or other component. s 1f the placement of this unit causes noise to other equipment, such as a tuner, separate them each other.
FRONT PANEL POWER switch Remote control sensor STOP button OPEN/CLOSE button PLAY/PAUSE button SEARCH button Disc tray SKIP button RANDOM button REPEAT button Display panel VMR somnolence ove dhehfca PRIG button Numeric buttons TAPE button CLEAR button TIME display mo deselect button FILE button PHONES jack INDEX button CUTOUT LEVEL control REMOTE CONTROL TRANSMITTER * The control functions on the main unit and on the remote control transmitter are virtually identical, with the exceptions below.
1 POWER Label side 2 OPEN/CLOSE & DFEN/GLOSE play, ea Use @ Shows the track number to be played @ Shows the time displays. (Refer to “Selecting time displays” on page 8} @ Displays the numbers that correspond to the numbers of tracks {as high as number 20) on the disc. After each frack is played, its corresponding number disappears so the number of remaining tracks {and their numbers) can be seen at a glance.
LAY/ D pals E " To resume play, press the PLAY/PAUSE button again (or press the PLAY or PAUSE button on the remote control transmitter}. DIRECT PLAY Select a desired frack using the numeric button. (EEm e number is displayed Example: To select track 28 Press 4 twice, then immediately press @ once. * You will find more convenience to select a higher track number by using the remote control transmitter. For example, rack number “32” can be selected by pressing “420°, “+10" and “2" continuously.
Automatic spacing When you are recording a disc onion tape, and if the tracks on the disc are recorded with an insufficient time space between than, the tape recorder will not be able to perform blank search operations correctly. In this case, a recorder search mistake can be prevented by pressing the auto-SPACE button to insert spaces of about 4 seconds between the recorded tunes.
When you listen with headphones Connect the headphones to the PHONES jack and adjust the volume by using the OUTPUT LEVEL control, * if the VARIABLE (LINE QUT) terminals on the rear of this unit are connected to the amplifier etc., note that the use of the OUTPUT LEVEL control will also vary the level of the signal output to the amplifier. EONS CUTEST Level Open/close the control door When it is not necessary to operate controls inside the control door, close the door.
You can have the unit play the tracks on a disc in a random sequence selected by the unit's microcomputer. To perform random-sequence play ANTHEM To cancel random-sequence play o st Or o L pan con Notes = This feature will pot function during programming, or during programmed play. » 1f the POWER switch is set off when the random-sequence play mode is functioning, when the POWER switch is steno again, the unit will begin the random-sequence play automatically. (This feature is available for the timer play.
You can enjoy listening to your favorite tracks in any desired order using programmed play. As many as 25 tracks can be programmed for a disc. 1 Stop the unit. 1 st Or Flashes on and off, PR 3 Select the desired track. EQUATE * Repeat step & to set more programs. You can select the same track again. BELAY, BIPARTITE L O Shows the program number for the track to be set next. @ Shows the selected track number. @ Shows the total time of the tracks currently programmed.
To stop program play Press the STOP bunion, The first track number programmed will be displayed. To resume play, press the PLAY/PAUSE button, Play will begin from the beginning of the program. To cancel a programmed setting There are several methods, as described below. s Press the CLEAR bunion (after programming is completed, or while the units in the stop mode). @ Open the disc tray. o Switch off the power. To check programmed data 1. 1t the units in the play mode, press the STIR button. 2.
To play with program data SAVE 3 i “FILE PROGRAM® is not illuminated in the display, press the FILE button. 4 —_ Pals E Notes @ I, in step 2, “SAVE" does not appear in the display, the disc doss not have its program data in the memory's file. = To stop the play of the filed program data and change to ordinary play of the disc, press the FILE button.
If the disc includes index numbers, play can be started from any desired index number, 1 Elect a track which has index numbers. 2 e 3 Select the desired index number. é@?‘ Notes s Not all discs have index numbers. The index systems a method for sub-dividing tracks inch smaller divisions {such as, for example, the movements within classical symphonies) for sassier location of those parts. The liner notes with the disc usually tell if such index numbers are included.
This convenient feature can be used to program tracks on a disc for recording to tape. By only memorizing the tape's total possible recording time, the unit will automatically program tracks or help you to program tracks so they will fit onto the tape with the least amount of unrecorded space remaining at each end of the tape. Automatic tape-programming This is useful for recording a disc onto tape with the order of tracks unchanged. Stop the unit.
B Manual tape programming This is useful for recording desired tracks in any desired order info tape. 2— 3,5 1 Follow steps page 15. 2 PRIDE Flashes on and off. Select the track numbers {to be recorded on side A) in the desired order. Topees Programmed track numbers are illuminated on the display.
B Random sequential tape programming The unit will automatically program tracks in random sequential order for recording to tape. 1 Follow steps page 15. 2 s The unit will automatically program tracks for side A and side B separately considering the tape's total time. 3 Begin recording on the taps deck and press the PLAY/ PAUSE button on this unit at the same time. 4 The unit will pause at the end of side A of the tape. Tum the tape over to side B.
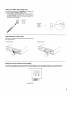
NOTES ABOUT THE REMOTE CONTROL TRANSMITTER Battery installation Battery replacement if you find that the remote control transmitter must be used closer to the main unit, the batteries are weak. Replace goth batteries with new ones. Notes + Use only "AA” (RS) batteries for replacement. » Be sure the polarities are correct. (See the illustration inside the battery compartment.
TROUBLESHOOTING #f the unit falls to operate normally, check the following points to determine whether the fault can be corrected by the simple measures suggested. If it cannot be corrected, of if the fault is not listed in the SYMPTOM column, disconnected the power cord and contact your authorized YAMAHA dealer or service center for help. The payer does not switch ON when the POWER switch is pressed. “The parer cord is nat connected of ot completely connected. Securely conned the power cord.