
Owner's Manual


Installation Examples
L!:,
CAUTION
• Before doing any instal lation or construction work, consult with your Yamaha deale
r.
• For optimum safety. the installation should be checked thoroughly at regular intervals. Some fittings may deteriorate over
extended periods of time due to wear and/or corrosion
• When choos
in
g the installation l
oca
ti
on. suspension wire and mounting hardware, make sure all are strong enough to
support the weight of the speaker
• Make sure to take measures to prevent the speaker from falling down
in
the event of a installation fai lure.
• W
hen
installing the safety wire to the wall, install
it
higher than the wire
's
attachment po
in
t on the speaker, with as little
slack as possible.
If the wi
re
is
too long, and the speaker
happens
to fall, the wire may snap as a result of too
much
strain.
Yamaha
cannot be held responsible for damage or i
nj
ury caused by insufficient strength of the support
structure
or
improper installation
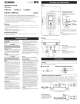
Installation
using
separately
sold
Yamaha
speaker
brackets
A
tt
ach the bracket to two screw hol
es
at
the bottom of the
un
it
using commercia
ll
y available screws
(M8
x 16 mm) or eye b
ol
ts (M8 x 15
mm
). For deta
il
s on installing the bracket,
re
fer
to
the corresponding
manual.
I Using the 8WS251-300
or
8WS251-400 wall mounting bracket
Maximum tilt
angle
The tilt angle depends on the position
re
l
at
ion between the speaker
and the
wall. The maximum downward
til
t angle is shown
in
the
following chart.
Maximum
tilt angle
B
WS251
-300
BWS251-400
CBR15
8'
17.
5'
CBR12 11'
23'
CB
R10 20'
35'
I Using the 8CS251 ceiling bracket
0
I Using the 88S251 baton bracket
L!:,CAUTION
In
order to prevent the unit from falling down, attach the safety wire as shown in the
illustration.
No sound.
Howling sound
is
produced
(
fe
edback).
The
am
plifier
shuts down.
Troubleshooting
The cable
is
not connected properly. • Connect the cable all the way in so that it
is
firmly
in place.
•
If
the speakON connector is used, connect to "1+"
and "1
-"
and turn the plug to be locked.
A microphone
is
directed toward the Aim the speaker away f
rom
the area where the
speaker. microphone picks up sound.
The sound is amplified too much.
The tot
al
impedance
of
the
speakers
is
less
th
an
the minimum
load impedance of the amplif
ier.
Example: More than two speakers
(eight ohms) are connected to a
power
amplifier, the load impedance
of which is s
ix
ohms.
Lower the
volume
of
in
put device and locate the
microphone more
closely to the sound source.
Check the minimum load impedance
of
the power
amp
li
fier, and lower the number of speakers
connected in
parallel n
ot
to
be less than the
impedance.
High f
req
uency The protection circu
it
is operating in Refer to "
Pr
otection circuit" in the NOTICE.
range is the
HF
un
it.
attenuated.
If
any sp
ec
ific problem should persist, however. please contact your Yamaha dealer.
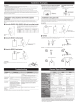
Pullback
point
(only
for
CBR15 and CBR12)
• When the unit
is
sh
ipped from the factory, a seal
is
stuck on the pu
ll
back point (screw hole). Make sure to
peel off the seal when using the
pu
ll
back point.
• The C
BR
10 does not have a pullback
po
in
t.
Upper rear of the unit
Pullback point
(M8 screw
hole)
!Installation
using
eye
bolts
Securing
the
screws and eye
bolts
• Insert the screw or eye bolt through the
washer to attach them.
Attach commercially-available
eye bolts (M8 x
15
mm
) to the screw holes located
at
the bottom (two
loc
at
ions)
an
d on the upper rear (one location, only for CBR15
an
d CBR12). Keep in mind that
yo
u will
need two points at the bottom to suspend the unit.
L!';CAUTION
Make sure to use eye bolts according to the standards and safety regulations in your area
I NOTICE
The strength of an eye bolt di
ff
ers depend
in
g
on
the suspension
an
g
le.
Make sure to use eye bolts within
a range of
0
to
45
degrees from a right angle (as shown).
Corre<:l:
Within
45
" from a right angle
oo
··
n
············
fri?
·
~5
°
uu
Incorrect:
Do not suspend the eye bolts
as
shown in the illustrations below.
Only
one suspension point
More than
45
" from a right angle
General
Specifications
~
The
contents
of
this man
ual
app
ly
to
the latest specifications
as
of the printing da
te
. Since
Yama
ha makes
continuous improvements to t
he
product,
th
is
manual may not apply to the specifications
of
your particular
pr
oduct.
To
obta
in
the
la
test ma
nu
al,
access the
Ya
maha website then download the manual file. Since
specifications, equip
me
nt
or
se
parat
el
y sold accessori
es
may not be the same in
ev
ery local
e,
please
ch
ec
k with your Yamaha deale
r.