
Specifications


WWW.AUDIOHOLICS.COM 5
Item
Name
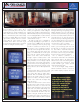
review
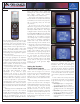
that the simple two-color button theme plus
clever spacing ergonomics play such a subtle,
yet vital roll. To the left in soft-white are the +
and - TV Volume rocker-style buttons for the TV
speakers. On the remote's right side the two +
and - charcoal gray buttons simply called
Volume. A soft-white TV Mute is in the center
between these two rocker-style volume controls
and matching charcoal gray Mute to quiet the
YSP-1 is above that.
To me, the remote and its design are one of
the surest signs signaling the care with which
an electronic piece of gear has been designed.
If system's remote functions well; if it is both
intuitive in layout and labeling, and smooth and
quick in operation, the end result is increased
satisfaction with the system as a whole.
If you hold it down, the volume control on the
YSP-1 goes from -99.5dB to 0dB in less than
10 seconds. That's 199 points of volume
adjustability! To my mind the speed,
smoothness and accuracy of this volume
control are perfect. The mute threshold for the
YSP-1 is adjustable in the menu, so you can
have the volume cut off completely, or mute it to
a level more appropriate to your preference.
Using the YSP-1's remote to control my eight-
year-old Mitsubishi TV's volume, the action of
this new remote was much smoother than with
the remote that came with the TV. Now that's
cool...
Situated just below the Standby/On and AV
Power buttons at the top is the numerical
keypad. The numerical buttons will probably be
used most times for setting up the initial remote
codes for non-Yamaha devices. In my case,
looking up the code for my Mitsubishi TV in the
back of the YSP-1's owner's manual and
punching in the code took all of 30 seconds
total. Bingo, instant and seamless
interoperability from the Yamaha remote.
The best part of this simplicity of operation is
that the Yamaha remote button named TV Input
now handled, for the first time in my experience
with a second party remote, the TV's input
select function.
The top section of the remote also has a
standard set of grey transport control buttons:
Play, Pause, Stop, Fast Forward and Reverse
and Chapter Advance/Reverse. These larger
rectangular buttons functioned perfectly with
the Yamaha DVD S1500 which I also had under
review at the time. Toward the end of the review
I did drag out one of my VCR's to check the
code learning acuity on a device that might be
fairly common in installations containing the
Yamaha YSP-1. My Toshiba VCR had no
problem functioning from the Yamaha remote
so I'd give the code research team kudos here.
A single nit-pick: the remote control feature
most of us Audioholics immediately look for...
backlighting, is not included. Normally, in a
product of this ambitious caliber I'd express
disappointment. I'm guessing though that in
most instances there'll be adequate lighting in
the room anyway. So while I'll give the
engineers a pass on this first version, at the
same time I'd humbly request a fully backlit
remote, (with the same great control layout
please!) in your second generation Digital
Sound Projector.
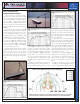
Setting Up Yamaha's
Digital Sound Projector
One of the most outstanding aspects of the
YSP1's all-in-one design IS its all-in-one
design. As long as you mount the Digital Sound
Projector either above or below your video
display all other room and imaginary speaker
placement locations can be input into the unit's
DSP.
Even after having an absolute ball with this
system for the last two weeks I still laugh in
dumbfounded amazement every time I try a new
set-up. After working so many years carefully
figuring out front and surround speaker
placement in dozens of rooms, it's hard to
describe the feeling of being able to simply plop
a single box on top of my TV, hook-up five or six
interconnects and having immersive home
theater like I've never experienced -
all in less
than 30 minutes.
For basic hook-up to the TV, DVD, etc, the
directions are well-written with clear, simple
illustrations. Once all the hard-wiring is
complete the on-screen set-up menu system
will need to be utilized. Yamaha has anticipated
that most people will not want to read too far
into the set-up before they actually hear sound
so the first Set Menu screen has only three
choices: Memory, Easy Set-up and Manual Set-
up.
A word of advice? Choose Easy Set-up and
go through the two-minute, four-step program
to get sound coming out of your magic box. It's
simple. Select >
• Room Type: Square or rectangle? Got
an L-shaped room? Choose rectangle.
• Speaker Position: Square has 4 choices
including offset and corner. Rectangle has
8.
• Room Size: 3 general dimensions given.
Pick the closest dimensions to your room.
• Set-up Okay? Say yes and input your
first program into one of the three preset
memories.