
Specifications


Sound comes out of the magic box.
Surround sound floating in space.
Center vocal
sound that is up front, natural and clear.
The
initial audio impact of the YSP-1 will likely be far
different than you've ever experienced.
Enjoy the
sound while you read a bit about Manual Set-
up...
Phil Shea, has been Yamaha's point man for
training on new products for longer than he'll
care to admit. After seeing the reviewer/factory
rep version of the YSP-1's owner's manual with
its very succinct set-up instructions I decided to
give Phil a call to see what he'd learned about
the YSP-1.
It turns out that Phil had received his first unit
in November '04 so he had spent quite a bit of
time with the Yamaha magic box. He alerted me
to a couple of labeling mistakes in the YSP-1's
Manual set-up sequence which I'll cover in a
couple of minutes. Phil's main suggestion to
bear in mind when setting up, for instance, 3-
Beam Mode (which I needed to use for my
initial corner YSP-1/TV position) was to go
through the entire set-up in the order in which
they are presented in the menu. Deviate from
that order by jumping to the end of the menu to
change a parameter and you may wind up
changing a parameter further upstream. Do that
and you'll probably have to start over.
A screen I'd like to see added is a User-
memory Table of Contents which shows all the
settings that exist for that preset. As it is, unless
a table is hand-written for each of the
parameters to be input you'll have no way of
remembering what you have engaged that
works. If, on the other hand, you take some
hard measurements of your room ahead of
time, and you make a little top-view sketch of
your room beforehand, you'll have a much
easier time getting your first manual set-up in
the ballpark sound-wise.
Once you've got that first program input into
one of the three User program memories (I'd
suggest memory 3) then you can go back
through the exercise again and tweak your
settings from there.
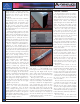
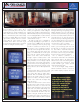
Here's are left-center-right shots of my open
and very irregularly laid-out living room from the
viewpoint of the YSP-1, looking out over it's
top.
To the right, my living room is 25.5 feet long.
To the left, toward the front door, it measures
21 feet. The loveseat, whose top cushions are
just visible looking over the YSP-1, is 8 feet out
and 15º down. In this corner placement there
are only two beam modes available, Stereo and
3 Beam Mode. Be sure to press the 3 Beam
Mode button first. Then, starting with the "a)
Subwoofer Set" screen here's how to set up
the YSP-1...
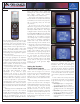
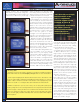
In this author's opinion, the YSP-1
must
have a subwoofer added to consider it a true
home theater system. For my tests I used two
high power subwoofers from my standard home
theater rig. For "Bass Out" the choices are
SWFR, FRONT or BOTH. I chose SWFR and
tried the 3 available frequencies, 80Hz, 100Hz
and 120Hz. The 100Hz frequency seemed to
give the subwoofer-to-YSP-1 the most open,
unstrained sound.
Next, when the "b) Speaker Level" screen is
selected, the YSP-1's pink noise is heard. And
it is here that the first bit of screen confusion
comes in. When the arrow is on "FR" the pink
noise alternates between right and left. These
channel levels are tied to each other. So when
you think you are setting FR you're actually
setting FR and FL. There is one bar for both.
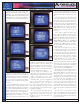
When you set the arrow to Center you get
pick noise which alternates between FL and C.
On the YSP-1 this screen is done correctly and
syncs up with the sound heard. I used my Radio
Shack SPL meter (C-weighting, slow) to set
the levels when listening at 75dB SPL.
On the next screen of this sequence, with the
arrow pointing to SL you'll see *OUT: FL > SL.
What actually happens is that the pink noise
alternates between C and SL, center and
surround left. Once you get that figured out (by
letting your ears tell you what you're hearing)
you can set your levels accordingly. I set my
levels with SL about 3dB higher than C
because my listening position was much closer
to the YSP-1 and I reasoned that SL or SR
signals would have to travel much further in my
room, bounce, and come back to the listening
position. As it turned out, that decision worked
well.
The final screen of the sequence shown
above on the right adjusts the two rear surround
levels to each other. This one's easy. Again just
use the Radio Shack SPL meter and set SR to
the same level as SL.
WWW.AUDIOHOLICS.COM
6
review