
Specifications


The subwoofer level was one that I had to go
back and tweak a couple of times. This is
because you basically don't have any other
signal with which to compare and balance your
sub(s). And because the sub's sound, properly
done, is omni-directional you'll need to actually
hear how your 3 Beam Mode's left, center and
right channels articulate and form "sound in
space". Only the center channel is actually
localizable to the YSP-1. You'll have to get
accustomed to this 3D effect before you'll have
a handle on setting the sub level properly.
Dynamic range. Parents take note! If this
system is for some very lucky Sponge Bob
fanatics you might want to consider setting the
dynamic range to MIN or STD instead of the
MAX which floated my boat in my main listening
area. I‘m betting that 99% of readers intend to
keep the Dynamic Range at Max so let's
continue with the set-up...
The YSP-1's mute level is configurable in
several ways depending upon your needs. I set
my mute level to -20dB because my TV mute
goes to completely off. This way I keep using
the YSP-1's sound most of the time. The "e)
Tone Control" screen I completely missed the
first couple of times through the menu because
it's on another page all by itself. At first I was
going to recommend that this overall system
tone control be somehow moved forward to
another screen. That is, until I learned that,
through a sequence of button pushes I could
access this single screen via the YSP-1's blue
display window (no onscreen display required)
and thus make overall sound system balance
decisions while a movie was playing. One you
get the hang of how to do this on-the-fly sound-
tweak you'll use it often for differently balanced
movies.
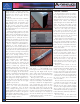
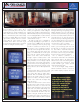
Reasoning that YSP-1's tiny drivers might
work better if the sound were bounced off a
close surface rather than one further away I
measured 14.5' at a 55º-60º angle from the
YSP-1 to the 8" wide column you see in the
left-most room photo. (The half-open shade is
in front of the column and an antique lamp
hangs out from it.)
On the left side there was no surface nearer
than the front door (with coat rack seen in the
right-most room photo) so I set the left room
distance (under "Parameters") at 21' (the entire
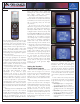
width of the room) and the "b) Beam Adj" sub-
menu "a) Horiz. Angle" to 65º. That 65º is the
angle I estimated from the YSP-1 center zero
position, looking out, toward the vicinity of the
door. What you're trying to accomplish here is
figure the angle at which the YSP-1's beamed
sound will go out, hit a hard surface and bounce
back to the listening area. As I discovered, the
initial guesstimate is good for getting you in the
ballpark. And that's all you are really trying to
accomplish at this point. Once you go through
the menu a second time, with the pink noise on,
you'll find that you can hear the pink noise
volume increase at your listening position. Keep
your first settings wherever you first hear the
volume increase. Once you're within ±15º or so
you won't hear too much of a change.
Here’s a trick that worked for me: If, for
instance, you are listening to pink noise from
the right side, you can plug your left ear and
vice versa. With so much wide band noise
bouncing off so many surfaces the finger-in-
the-ear trick seems to help your brain localize
the proper pink noise direction a bit better.
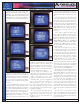
The "c) Distance" parameter is a
measurement of the distance the sound beam
travels from the YSP-1 to the wall, bounces,
and back to the center of the listening position.
I found getting these dimensions pretty
accurate seemed to give a better surround
effect at the listening position.
The "d) Focal Length" setting: Yamaha's
manual recommends a Center = -1.5 feet to
give a similar frequency response across the
“That my fiancee could
immediately enjoy such
a scene, for the first time
ever, is a tribute to the
enhanced, palpable
realism of the YSP-1's
immersive and believable
3D soundstage.”
Patrick Hart
WWW.AUDIOHOLICS.COM 7
Item
Name
review