
User Manual


English
MSP7 STUDIO/MSP5 STUDIO/SW10 STUDIO Owner’s Manual
11
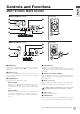
Controls and Functions
MSP7 STUDIO, MSP5 STUDIO
1 POWER switch
Tur ns power to the speaker on or off. When the power is
turned on the POWER indicator (8) on the front panel will
light green.
2 AC IN Connector
Connect the supplied power cable here. First connect the
power cord to the speaker, then insert the power cord plug
into the AC outlet.
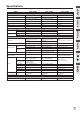
3 LOW TRIM switch
Adjusts the level of low-frequency range.
MSP7 STUDIO:
With the "+1.5" setting, low frequencies around 45 Hz are
boosted by 1.5 dB. With the "-1.5" and "-3" settings the
same frequency range is cut by 1.5 dB or 3 dB, respec-
tively.
MSP5 STUDIO:
With the "+1.5" setting, low frequencies around 60 Hz are
boosted by 1.5 dB. With the "-1.5" and "-3" settings, the
same frequency range is cut by 1.5 dB and 3 dB, respec-
tively.
4 HIGH TRIM switch
Adjusts the level of high-frequency range.
With the "+1.5" setting, the range around 15 kHz is boosted by
1.5 dB. With the "-1.5" setting, the range around 15 kHz is cut
by 1.5 dB.
5 LOW CUT switch (MSP7 STUDIO)
Cuts the low-frequency range. With the "80 Hz" setting the
range below 80 Hz is cut. With the "100 Hz" setting the range
below 100 Hz is cut.
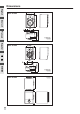
6 INPUT 1/2 connector
These are balanced XLR-type and phone type input connec-
tors.
The MSP7 STUDIO only has an XLR-type input connector.
Do NOT use both the XLR and Phone type connector at the
same time. Please connect to only one of these connectors.
7 LEVEL control
Adjusts the overall output level.
8 POWER indicator
When the power is turned on the POWER indicator will light
green. The power indicator will flash red to indicate clipping.
1
2
4
1
2
3
6
6
3
7
MSP5 STUDIO (Rear Panel)
4
5
8
(Front Panel)
MSP7 STUDIO (Rear Panel)
(Front Panel)
7
8