Manuale di istruzioni IT
Il numero di modello e quello di serie, i requisiti di alimentazione e altre informazioni del prodotto si trovano sulla piastrina o vicino alla stessa. La piastrina del prodotto si trova nella parte inferiore dell'unità. Annotare il numero di serie nello spazio indicato di seguito e conservare il manuale come documento di comprovazione dell'acquisto; in tal modo, in caso di furto, l'identificazione sarà più semplice.
Informazioni per gli utenti sulla raccolta e lo smaltimento di vecchia attrezzatura Questo simbolo sui prodotti, sull'imballaggio e/o sui documenti che li accompagnano significa che i prodotti elettrici ed elettronici non dovrebbero essere mischiati con i rifiuti domestici generici. Per il trattamento, recupero e riciclaggio appropriati di vecchi prodotti, li porti, prego, ai punti di raccolta appropriati, in accordo con la Sua legislazione nazionale e le direttive 2002/96/CE.
PRECAUZIONI LEGGERE ATTENTAMENTE PRIMA DI CONTINUARE Conservare questo manuale in un luogo sicuro e accessibile per future consultazioni AVVERTENZA Attenersi sempre alle precauzioni di base indicate di seguito per evitare il rischio di lesioni gravi o addirittura di morte conseguente a scosse elettriche, cortocircuiti, danni, incendi o altri pericoli.
Precauzioni di utilizzo • Non inserire o introdurre carta, oggetti metallici o di altro tipo nelle fessure presenti sul pannello o sulla tastiera. Ciò potrebbe causare lesioni personali, danni allo strumento o ad altri oggetti o problemi nel funzionamento. • Non appoggiarsi allo strumento, né posizionarvi sopra oggetti pesanti. Non esercitare eccessiva forza su pulsanti, interruttori o connettori.
Messaggio dal team di sviluppo di MOXF6/MOXF8 Grazie per avere acquistato un sintetizzatore Yamaha MOXF6/MOXF8. Il team di sviluppo ha progettato questo strumento in modo che i musicisti di qualsiasi livello e genere musicale possano ottenere un sound di altissimo livello e funzioni avanzate per creare ed eseguire la propria musica.
Accessori • Adattatore CA* • Cavo USB • Manuale di istruzioni (questa guida) • 1 x Online Manual CD-ROM (Manuale di riferimento, Manuale dei parametri del sintetizzatore ed Elenco dati) • CUBASE AI DOWNLOAD INFORMATION * Potrebbe non essere incluso nel paese in cui si è acquistato lo strumento. Per ulteriori informazioni, contattare il rivenditore Yamaha.
Caratteristiche principali del sintetizzatore MOXF6/MOXF8 Funzione Sound Engine MOTIF XF Questo strumento include la gamma completa di waveform dinamiche e autentiche di MOTIF XF, come i suoni realistici di pianoforte acustico, piano elettrico, sintetizzatore, archi, strumenti a fiato e percussioni. È disponibile anche la funzione avanzata XA (Expanded Articulation, articolazione estesa), che fornisce maggiore flessibilità nelle esecuzioni e realismo acustico.
Sommario Messaggio dal team di sviluppo di MOXF6/MOXF8 .................. 6 Accessori .................................................................................... 7 Uso dei manuali di MOXF6/MOXF8........................................... 7 Caratteristiche principali del sintetizzatore MOXF6/MOXF8...... 8 Controlli e funzioni 10 Pannello superiore.................................................................... 10 Pannello posteriore.............................................................
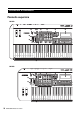
Controlli e funzioni Pannello superiore MOXF8 6 78 ) @ ^ B 5 2 3 & *( 4 9! A-1 B-1 C0 D0 E0 # $ F0 G0 A0 B0 C1 % A C2 C D C3 1 MOXF6 6 78 ) @ ^ B 5 & *( 4 9! 2 E1 1 MOXF6/MOXF8 Manuale di istruzioni $ % A C 3 C1 D1 10 # F1 G1 A1 B1 C2 C3 D
Controlli e funzioni E F G N H Q ST M C4 C5 F G E P R I J K L O N H I O C6 P C7 Q ST R J K L C4 M C5 C6 MOXF6/MOXF8 Manuale di istruzioni 11
Controlli e funzioni 1 Tastiera 9 Indicatore [LEVEL] (pagina 39) MOXF8 dispone di una tastiera a 88 tasti, mentre MOXF6 ha 61 tasti. Tutti sono dotati della funzione di risposta al tocco (initial touch). Grazie alla funzione initial touch, la forza con cui vengono suonate le note influenza il suono in vari modi, a seconda della voce selezionata. Indica il livello di segnale specificato mediante il pulsante indicatore [LEVEL]. ) @ ^ 2 Rotella Pitch Bend Controlla l'effetto di pitch bend.
Controlli e funzioni % Pulsanti TRANSPOSE [-] e [+] (pagina 27) Pulsante [F] (riproduzione) Utilizzare questi pulsanti per aumentare o diminuire di un semitono il pitch della nota. Per ripristinare l'impostazione normale delle ottave, premere simultaneamente entrambi i pulsanti. Premere questo pulsante per avviare la riproduzione o la registrazione dal punto corrente della song o del pattern. Durante la registrazione e la riproduzione, l'indicatore lampeggia al tempo corrente.
Controlli e funzioni F Pulsante [FAVORITE] Questa comoda funzione consente di memorizzare le voci e le performance preferite e più usate in un'unica posizione di facile accesso, con la possibilità di richiamarle mediante il pulsante [FAVORITE]. È possibile aggiungere il programma corrente a una categoria preferita tenendo premuto il pulsante [SHIFT] e premendo allo stesso tempo questo pulsante.
Controlli e funzioni S T T Pulsante [TRACK] Attivando questo pulsante in modalità Song/Pattern, vengono abilitati i pulsanti numerici [1] – [16] per la selezione delle tracce song/pattern corrispondenti. In modalità Voice/Performance, questo pulsante consente di utilizzare i pulsanti numerici per selezionare il canale di trasmissione della tastiera. S Pulsante [PATTERN SECTION/ PERFORMANCE CONTROL] Pulsante [MUTE] (pagina 41) Questo pulsante è disponibile solo in modalità Performance, Pattern e Master.
Controlli e funzioni Pannello posteriore 3 1 4 5 6 7 8 9 2 1 P Interruttore Standby/On (pagina 17) Premere per accendere (O) o mettere in standby (N) lo strumento. 2 Connettore DC IN (pagina 17) Collegare a questo connettore l'adattatore di alimentazione in dotazione. 3 Terminali USB Esistono due tipi diversi di terminali USB, entrambi presenti sul pannello posteriore dello strumento.
Installazione Alimentazione Eseguire i collegamenti dell'adattatore di alimentazione in dotazione (pagina 73) nel seguente ordine. Prima di collegare l'adattatore di alimentazione, assicurarsi che lo strumento sia in stato Standby. 1 Collegare lo spinotto dell'adattatore di alimentazione in dotazione al terminale DC IN sul pannello posteriore. 2 Collegare l'altra estremità dell'adattatore di alimentazione a una presa CA.
Installazione Funzione Auto Power Off (Spegnimento automatico) Per prevenire un consumo energetico non necessario, lo strumento dispone di una funzione di spegnimento automatico che si attiva quando questo non viene utilizzato per un periodo di tempo specificato. Impostazione della funzione di spegnimento automatico È possibile impostare il tempo che deve trascorrere prima dello spegnimento automatico dello strumento.
Installazione Operazioni preliminari Il sintetizzatore MOXF6/MOXF8 consente di riprodurre numerosi timbri strumentali estremamente realistici e ricchi di dinamica. Al momento dell'accensione verrà visualizzata la schermata sottostante. Nome del programma Numero del programma master Riproduzione delle song demo Il sintetizzatore MOXF6/MOXF8 è dotato di una serie di song demo che offrono una dimostrazione del suono dinamico e delle funzioni sofisticate di cui dispone.
Installazione Ripristino delle impostazioni iniziali di fabbrica della memoria utente Le impostazioni di fabbrica originali della memoria utente del sintetizzatore possono essere ripristinati nel seguente modo. AVVISO Quando vengono ripristinate le impostazioni di fabbrica, tutte le impostazioni Voice, Performance, Song, Pattern e di sistema create in modalità Utility saranno cancellate. Accertarsi quindi di non sovrascrivere dati importanti.
Funzionamento di base Spostamento del cursore L'impiego di questi quattro pulsanti consente di spostarsi nella schermata e portare il cursore sui vari elementi e parametri selezionabili sullo schermo. Quando è selezionato, il relativo elemento viene evidenziato (il cursore è visualizzato come un blocco scuro con i caratteri in negativo). A questo punto è possibile modificare il valore dell'elemento (parametro) evidenziato mediante il dial [DATA] e i pulsanti [INC] e [DEC].
Funzionamento di base Assegnazione di nomi (immissione dei caratteri) È possibile assegnare liberamente i nomi ai dati creati, quali voci, performance, song, pattern e file salvati su un dispositivo di memoria flash USB. Quando il cursore è posizionato su un parametro di assegnazione del nome, viene visualizzata l'icona "CHAR" nell'angolo inferiore destro del display. Se si preme il pulsante [SF6] in questo stato, viene visualizzata la finestra Input Character come illustrato di seguito.
Guida rapida Modalità Questo strumento dispone di varie modalità operative che possono essere selezionate mediante dieci pulsanti (1 – )). Inoltre, sono disponibili tre modalità "globali" (Edit, Job e Store) comuni a tutte le altre modalità e che possono essere selezionate mediante i pulsanti ! – #. N.
Guida rapida Istruzioni di base Voci: gli elementi basilari del sintetizzatore MOXF6/MOXF8 Selezione di un timbro preset ...........................................................................................pagina 25 Modifica di una voce .........................................................................................................
Guida rapida Uso della tastiera in modalità Voice batteria GM). Ciascuno di questi banchi contiene le voci correlate al tipo di voce. Nella schermata Voice Play è possibile selezionare dai vari banchi la voce desiderata e riprodurla. Nella schermata Voice Play (la schermata superiore della modalità Voice), è possibile selezionare e riprodurre una singola voce.
Guida rapida Uso della funzione Category Search Le voci sono suddivise in pratiche e specifiche categorie, indipendentemente dal banco in cui si trovano. Le categorie sono divise, a loro volta, in base al tipo di strumento generale o alle caratteristiche del suono. La funzione Category Search permette di accedere rapidamente ai suoni desiderati.
Guida rapida Selezione di una voce dalla categoria Favorite 1 Premere il pulsante [FAVORITE] nella schermata Voice Play. Viene visualizzato l'elenco delle voci registrate nella categoria dei preferiti. 2 Selezionare la voce mediante i pulsanti cursore [u]/[d] o tramite il dial [DATA]. 3 Per richiamare la voce, premere il pulsante [ENTER].
Guida rapida NOTA Questo parametro è identico a "Octave" e "Transpose" nella Funzione della manopola attualmente in uso Valore corrente schermata GENERAL della modalità Utility. Questa impostazione cambia automaticamente anche quella del parametro. Modifica delle qualità timbriche delle voci Le manopole 1 - 8 consentono di regolare i parametri delle voci, come la profondità dell'effetto, le caratteristiche di attack/release (attacco/rilascio), il timbro e così via.
Guida rapida NOTA Per annullare la memorizzazione, premere il pulsante [EXIT] Procedura di base per Voice Edit 1 2 prima di premere il pulsante [ENTER]. AVVISO Premere il pulsante [EDIT] nella modalità voce. Modificare la voce corrente. I Se è selezionata una voce normale: Per modificare i parametri comuni, premere il pulsante [COMMON]. Per modificare i parametri degli elementi, premere il pulsante numerico da [1] a [8] per l'elemento desiderato.
Guida rapida 3 4 Selezionare la categoria di effetti e il tipo di effetto Insertion B seguendo le stesse istruzioni descritte al passo 2. Selezionare la connessione di effetti Insertion A e B. Spostare il cursore sulla posizione indicata in basso e utilizzare i pulsanti [INC]/[DEC] o il dial [DATA].
Guida rapida Modifica dell'assegnazione del tipo di arpeggio Provare a modificare i tipi di arpeggio assegnati ai pulsanti [SF1] – [SF6] del timbro preset. 1 Premere il pulsante ARP [EDIT]. Compare la schermata Arpeggio Edit. 2 Premere il pulsante Arpeggio desiderato ([SF1] ARP1 – [SF6] ARP6). 3 Premere il pulsante [F2] TYPE per richiamare la schermata TYPE. 4 Selezionare il tipo di arpeggio che si desidera assegnare.
Guida rapida 4 Selezionare la voce desiderata dall'elenco, quindi premere [ENTER]. 2 Premere il pulsante [SPLIT] sul pannello. Viene visualizzata la schermata Category Search. Verrà visualizzata la schermata Performance Play. La voce selezionata in modalità Voice verrà assegnata alla parte 1, mentre quella selezionata dopo aver premuto il pulsante [LAYER] verrà assegnata alla parte 2. Queste due voci vengono suonate contemporaneamente in un layer come "performance".
Guida rapida 7 Selezionare la voce desiderata dall'elenco, quindi premere [ENTER]. 3 Premere il pulsante cursore [>]. Viene visualizzato l'elenco delle voci. Verrà visualizzata la schermata Performance Play. La voce selezionata in modalità Voice verrà assegnata alla parte 1, mentre quella selezionata dopo aver premuto il pulsante [SPLIT] verrà assegnata alla parte 2. Queste due voci vengono suonate in aree diverse della tastiera suddivisa come "performance".
Guida rapida Suonare la tastiera in modalità Performance Assolo di una parte specifica Un programma in cui più voci (parti) sono combinate in un layer o in altre configurazioni viene detto "performance". Questo strumento contiene 128 performance in ogni banco utente (1 – 2) ed è possibile riprodurle premendo il pulsante [PERFORM]. La funzione Solo (Assolo) è l'opposto della funzione Mute (Muto) e consente di attivare istantaneamente l'assolo di una parte specifica, escludendo tutte le altre.
Guida rapida Attivazione o disattivazione della riproduzione dell'arpeggio per ciascuna parte È possibile attivare o disattivare la riproduzione dell'arpeggio per ogni parte della performance come descritto di seguito. 2 1 Modifica del timbro della voce Come nella modalità Voice, il suono della performance (costituito da un massimo di quattro parti o voci) può essere modificato mediante le manopole in modalità Performance.
Guida rapida SUGGERIMENTO È possibile utilizzare la seguente operazione per regolare il volume e le impostazioni di pan delle parti 1 – 4: 1 Premere contemporaneamente il pulsante funzione manopola 1 (a sinistra delle manopole 1 – 4) e il pulsante funzione manopola 2 (a sinistra delle manopole 5 – 8). Le sei spie si accendono e verrà visualizzata la finestra a comparsa KNOB FUNCTION.
Guida rapida 3 7 "CopyPerfParam" = "on" Impostare questa opzione su "on" se si desidera copiare le impostazioni dei parametri per le parti 1 – 4 nelle parti di destinazione della song. 8 "MoveToRecMode" = "on" Impostare questa opzione su "on" se si desidera passare in modalità Song (specificata mediante SeqMode) al termine della registrazione. Premere il pulsante [REC] per richiamare la modalità Performance Record.
Guida rapida Section Selezionare la sezione che comprende il pattern scegliendola da A a P. Se si creano più sezioni, è possibile utilizzarle come variazioni ritmiche all'interno di una singola song. Connessione di un microfono o un dispositivo audio Section Length Impostare la lunghezza della sezione selezionata. Impostare il valore su 1 – 4, in base alla lunghezza dei tipi di arpeggio correnti.
Guida rapida 5 Premere [UTILITY] [F3] VCE A/D [SF1] OUTPUT e impostare il parametro "Mono/Stereo". 8 Questo parametro determina la configurazione del segnale audio trasmesso dai jack A/D INPUT [L]/[R] oppure la modalità di instradamento del segnale (stereo o mono). Quando si collega un dispositivo audio come indicato al passo 2, impostare questo parametro su "stereo" o "LRMono". Quando si collega un microfono come indicato al passo 2, impostare questo parametro su "LMono".
Guida rapida 3 Premere [EDIT] [COMMON] [F6] EFFECT [SF1] CONNECT, quindi impostare il parametro "InsEF Connect" su "vocoder". Creazione di una song originale NOTA Il parametro "InsEF Connect" viene impostato Questo strumento dispone di un sequencer multitraccia integrato per la registrazione dell'esecuzione strumentale come dati MIDI. Grazie a questa funzione è possibile creare arrangiamenti multistrumentali complessi e completi e song complete.
Guida rapida Riproduzione delle song A pagina 19 è già stato spiegato come riprodurre le song. Questa sezione spiega come utilizzare le funzioni Mute/Solo durante la riproduzione. Creazione di una parte di batteria mediante la registrazione Step Ora si può provare a creare una song. Registrare, anzitutto, una frase di batteria di quattro battute (come descritto di seguito) nella traccia 1 mediante la registrazione Step.
Guida rapida 5 Premere il pulsante [F] (Play) per accedere alla modalità Step Record. La spia del pulsante [F] si accende e viene visualizzata la schermata Step Record. 6 Impostare "Step Time" su "480". Il parametro "Step Time" determina la posizione nella quale avanzerà il puntatore dopo che è stata immessa una nota. In questo caso, il puntatore avanza con intervalli di semiminima. 7 Premere il pulsante [P] (inizio) per tornare all'inizio della song, quindi premere il tasto B0 quattro volte.
Guida rapida Creazione di una parte di basso mediante la registrazione in tempo reale 7 Non appena termina la battuta iniziale di conteggio (una misura), suonare la seguente notazione. Registrare, quindi, la linea di basso sulla traccia 2 con la registrazione in tempo reale. 1 In modalità Song Play, selezionare la song creata in precedenza, nella quale è già stata registrata la parte di batteria.
Guida rapida Punto Punch In La riproduzione della traccia di registrazione è disattivata a partire da questo punto e la performance sulla tastiera sarà registrata sulla traccia. 3 Premere il pulsante [REC], quindi il pulsante [F1] SETUP e impostare i parametri come descritto di seguito. • "Type" = "replace" • "Quantize" = "off" • "RecTr" = "3" 4 Punto Punch Out La registrazione termina in questo punto e comincia la riproduzione della traccia di registrazione.
Guida rapida 7 Premere il pulsante [REC] per tornare alla schermata Song Record. 8 Premere il pulsante [P] (inizio) per andare all'inizio della song, quindi premere il pulsante [F] (Play) per iniziare la registrazione. La spia del pulsante [F] (Play) si accende e nella parte superiore della schermata compare il messaggio "RECORDING", a indicare che è iniziata la registrazione. Non appena termina la battuta iniziale di conteggio, suonare la seguente notazione.
Guida rapida 3 Premere il pulsante [EDIT] per accedere alla modalità Mixing Edit. 2 Selezionare "04:Song Name", premere il pulsante [ENTER] per richiamare la schermata Song Name e immettere il nome della song. Spostare il cursore nella posizione desiderata per immettere il carattere tenendo premuto il pulsante [SF6] CHAR. Ripetere questa operazione tutte le volte necessarie per creare il nome. 4 Richiamare la schermata Common Edit o Part Edit.
Guida rapida Creazione di un pattern originale Creazione di un pattern (sezione A) mediante l'arpeggio La modalità Pattern consente inoltre di registrare i riff o i pattern ritmici in diverse sezioni, in base alle necessità e all'ispirazione e di combinarle in sequenze di pattern per creare una song completa.
Guida rapida 7 Premere il pulsante [F2] TYPE e selezionare il tipo di arpeggio desiderato assegnato ai pulsanti [SF1] - [SF6]. 13 Premere [STORE] [F1] SEQ [ENTER] per memorizzare le frasi registrate come pattern. Questa operazione consente di memorizzare tutte le song e tutti i pattern. Dopo aver registrato la sezione A, proseguire con la creazione della sezione B utilizzando l'operazione Pattern Copy Job con le frasi utente già registrate.
Guida rapida 5 Premere il pulsante [EXIT] varie volte per tornare alla schermata Pattern Play. 6 Premere il pulsante [PATTERN SECTION] in modo che la rispettiva spia si accenda, quindi premere il pulsante numerico [2]. Verrà selezionata la sezione B. Premere il pulsante [F] (Play) per ascoltare la sezione B e verificare che i dati di questa sezione siano stati copiati dalla sezione A.
Guida rapida 3 Premere il pulsante [REC] per accedere alla modalità Pattern Chain Record, quindi impostare Recording Track (traccia di registrazione) e tempo del pattern. e modificare il tempo come si desidera mediante il dial [DATA] o i pulsanti [INC]/[DEC]. La modifica al tempo verrà registrata in tempo reale sulla traccia Tempo. Sono disponibili tre tipi di tracce per la sequenza di pattern.
Guida rapida Conversione di una sequenza di pattern in song 1 In modalità Pattern Play, selezionare il pattern creato nella sezione precedente. 2 Premere il pulsante [F6] CHAIN [EDIT] per accedere alla modalità Pattern Chain. 3 Premere il pulsante [F3] Song per richiamare la schermata "Convert to Song", quindi selezionare una song vuota e la misura iniziale come destinazione. Per la destinazione, selezionare la song e la prima misura.
Guida rapida SUGGERIMENTO SUGGERIMENTO Canale di trasmissione e ricezione MIDI. Accertarsi che il canale di trasmissione MIDI dello strumento MIDI esterno corrisponda al canale di ricezione MIDI di MOXF6/MOXF8. Per ulteriori informazioni sull'impostazione del canale di trasmissione MIDI dello strumento esterno, fare riferimento al manuale di istruzioni dello strumento stesso.
Guida rapida Integrazione con il computer 3 Premere il pulsante [UTILITY] per richiamare la modalità Utility, quindi premere il pulsante [F6] MIDI e il pulsante [SF4] OTHER per richiamare la schermata OTHER. Impostare il parametro "MIDI IN/OUT" su "USB". Connettendo il sintetizzatore MOXF6/MOXF8 al computer tramite USB, è possibile utilizzare un software DAW sul computer per creare le proprie song originali.
Guida rapida Canali e porte MIDI I dati MIDI sono assegnati a uno dei sedici canali e il sintetizzatore è in grado di sfruttare questa caratteristica per riprodurre contemporaneamente fino a sedici diverse parti tramite i sedici canali MIDI. Tuttavia, il limite di sedici canali può essere superato mediante l'utilizzo di "porte" MIDI separate, ognuna delle quali supporta sedici canali.
Guida rapida 4 In modalità Performance/Song/Pattern, impostare il canale di uscita del segnale audio per ogni parte. 2 Selezionare la song o il pattern da modificare. Se si imposta il valore di uscita per il segnale audio (parametro "Mode") su "2StereoRec" nel passo 1, è possibile cambiare il canale dell'uscita audio per ogni parte. In modalità Performance, questo parametro può essere impostato nella schermata [F4] USB I/O di Common Edit.
Guida rapida Configurazione del software DAW sul computer È possibile scaricare MOXF6/MOXF8 Remote Tools dal seguente sito Web di Yamaha. Per ulteriori informazioni su come utilizzare MOXF6/MOXF8 Remote Editor, consultare il manuale PDF in dotazione con MOXF6/MOXF8 Remote Editor. Questa sezione spiega come configurare ciascuna applicazione dopo l'avvio.
Guida rapida 4 Impostare la porta di uscita MIDI su "Yamaha MOXF6/ MOXF8 Port2". 5 Impostare la porta di ingresso MIDI su "Yamaha MOXF6/ MOXF8 Port2". NOTA Mackie Control è un marchio di Mackie Designs, Inc. Per ulteriori informazioni sulle operazioni e sulle funzioni dei pulsanti, vedere il documento PDF "Manuale di riferimento".
Guida rapida Impostazione per l'uso come tastiera master Quando si utilizzano generatori di suoni MIDI esterni, è consigliabile memorizzare le funzioni della Master keyboard nel master. È possibile cambiare i programmi all'interno dei generatori di suoni MIDI esterni collegati semplicemente selezionando un master diverso. Di seguito viene descritta la procedura per realizzare quanto detto. 1 Premere il pulsante [MASTER] per accedere alla relativa modalità. 2 Selezionare il master da modificare.
Guida rapida Inversione dello stato LCD (Display a cristalli liquidi) Impostazioni di Master Effect/ Master EQ in modalità Voice [F1] GENERAL [SF6] OTHER Pulsante cursore [<] "LCD Mode" [F2] VOICE [SF1] MFX, [SF2] MEQ Questo parametro determina lo stato del monitor LCD. Determina in che misura l'elaborazione Effect ed EQ viene applicata all'uscita master.
Guida rapida Salvataggio/caricamento di dati (modalità File) Premere il pulsante [SF6] per assegnare il nome nella schermata Character List (Elenco caratteri). Premendo il pulsante [SF2] SET NAME, il nome del file o della directory selezionato nella casella di selezione del file o della directory verrà copiato nel campo del nome file.
Guida rapida 4 Premere il pulsante [SF1] EXEC per caricare il file. AVVISO L'operazione di caricamento sovrascrive i dati già esistenti nella memoria interna di destinazione specificata. Si consiglia di salvare i dati importanti in un dispositivo di memoria flash USB collegato al terminale USB [TO DEVICE]. Precauzioni nell'uso del terminale USB [TO DEVICE] Lo strumento dispone di un terminale USB [TO DEVICE] incorporato.
Appendice Elenco di funzioni Shift Alcune importanti funzioni e operazioni dello strumento si possono eseguire mediante utili scorciatoie dal pannello di controllo. Basta tenere premuto il pulsante [SHIFT] e premere un pulsante specifico, come descritto di seguito.
Appendice Messaggi sul display Indicazione LCD Descrizione All remote templates stored. Compare quando si memorizza il Control Template (modello di controllo) in modalità remota. Are you sure? Richiede conferma per l'esecuzione di una determinata operazione. Arpeggio memory full. La memoria interna per i dati di arpeggio è satura. Arpeggio type copied. I tipi di arpeggio vengono copiati nei pulsanti [SF1] - [SF6]. Bad USB device.
Appendice Indicazione LCD 64 Descrizione No sample data. Questo messaggio viene visualizzato quando si tenta di caricare i dati di waveform con il segno di spunta "with sample" rimosso, anche quando il campione corrispondente non è disponibile sul modulo di espansione della memoria Flash. Not empty folder Si è tentato di eliminare una cartella che contiene dei dati. Not empty waveform. Si è tentato di caricare i dati di waveform in una waveform che contiene già dei dati.
Appendice Risoluzione dei problemi Se non viene emesso alcun suono o il suono emesso non è di buona qualità, controllare i punti riportati di seguito prima di ritenere che il prodotto presenti dei problemi. È possibile risolvere molti problemi eseguendo l'operazione Factory Set (pagina 20) dopo aver effettuato il backup dei dati in un dispositivo di memoria flash USB (pagina 60). Se il problema persiste, contattare un rivenditore Yamaha. Non viene emesso alcun suono.
Appendice Se durante l'utilizzo della tastiera in modalità Performance/Song/Pattern non viene emesso alcun suono, verificare che a ogni parte sia assegnata una voce. [PERFORM] [F2] VOICE [SONG]/[PATTERN] [MIXING] [F2] VOICE Se la riproduzione di Song/Pattern non produce suono, controllare che il canale di output di ciascuna traccia nel modo play e il canale di ricezione di ciascuna parte nel modo Mixing siano impostati in modo appropriato.
Appendice Le impostazioni del filtro sono corrette? Valori troppo alti della risonanza del filtro possono causare distorsione.
Appendice Qualcuno dei parametri (o tutti i parametri) Insertion Effect Output (Uscita effetto Insertion) degli elementi è stato impostato su "thru" nella schermata di impostazione degli effetti della modalità Voice Edit? [VOICE] [F6] EFFECT [SF1] CONNECT "EL: OUT 1-8" Alcuni o tutti i tipi di effetto sono stati impostati su "thru" o "No Effect"? Se ciò si verifica in modalità Performance/Song/Pattern, verificare che i parametri Insertion Switch (INS SW) siano impostati correttamente.
Appendice Non è possibile registrare la song o il pattern (frase). C'è abbastanza memoria libera per la registrazione? La capacità di memoria totale determina il numero di song/pattern (frasi) che è possibile registrare. Ad esempio, se la memoria contiene song/pattern (frasi) che utilizzano una gran quantità di memoria, quest'ultima può saturarsi anche se non vengono usati tutti i numeri di pattern o song disponibili.
Appendice Installazione di hardware opzionale Dispositivi disponibili Sul MOXF possono essere installati i seguenti dispositivi opzionali. FL512M/FL1024M (Modulo di espansione della memoria flash) Posizioni di installazione MOXF6 Precauzioni durante l'installazione Prima di installare l'hardware opzionale, munirsi di un giravite a stella e assicurarsi di avere ampio spazio per muoversi.
Appendice Installazione di hardware opzionale FL512M/FL1024M 3 Con il pannello posteriore del sintetizzatore MOXF rivolto verso di sé, rimuovere le viti del coperchio superiore utilizzando un giravite a stella. Una volta rimosse le viti, far scorrere il coperchio per rimuoverlo. Configurazione Esistono due tipi di moduli di espansione della memoria Flash: FL512M Rimuovere il coperchio inferiore.
Appendice 4-2 Premere sulla parte superiore del connettore come Rimozione del modulo illustrato, quindi spingere il connettore affinché sia ben installato nello slot. 1 Allentare entrambe le viti. Premere leggermente ma con decisione su questa sezione Sigillo del numero di serie 4-3 Avvitare le viti del modulo di memoria nei relativi fori di ingresso sul sintetizzatore MOXF con le mani, come illustrato di seguito.
Appendice Specifiche tecniche Tastiere Blocco generatore di suoni Blocco sequencer MOXF8 Tastiera GHS con 88 tasti (Initial Touch) MOXF6 Tastiera semipesata con 61 tasti (Initial Touch) Generatore di suoni AWM2 con articolazione estesa Polifonia 128 note Capacità multitimbrica 16 parti (interne), parte A/D Input Wave 741 MB (se convertita in formato lineare a 16 bit), 3.977 waveform Voci Preset: 1.
Appendice Indice A Esclusione dell'audio................................................................34 A/D INPUT [GAIN] ................................................................... 12 [EXIT]........................................................................................14 A/D INPUT [L] .................................................................... 16, 38 A/D INPUT [ON/OFF] ............................................................... 12 F Alimentazione .....................
Appendice N T NUM......................................................................................... 21 Tastiera.....................................................................................12 Numero [1]............................................................................... 15 Traccia .....................................................................................40 [TRACK] ...................................................................................
Note 76 MOXF6/MOXF8 Manuale di istruzioni
Note MOXF6/MOXF8 Manuale di istruzioni 77
For details of products, please contact your nearest Yamaha representative or the authorized distributor listed below. Per ulteriori dettagli sui prodotti, rivolgersi al più vicino rappresentante Yamaha oppure a uno dei distributori autorizzati elencati di seguito. NORTH AMERICA CANADA Yamaha Canada Music Ltd. 135 Milner Avenue, Toronto, Ontario, M1S 3R1, Canada Tel: 416-298-1311 U.S.A. Yamaha Corporation of America 6600 Orangethorpe Avenue, Buena Park, CA 90620, U.S.A.
Yamaha Web Site (English) http://www.yamahasynth.com/ Yamaha Downloads http://download.yamaha.com/ C.S.G., Digital Musical Instruments Division © 2013 Yamaha Corporation 305MWTY*.