
User`s manual


2-6
CHAPTER 2 Installation
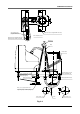
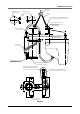
5) Prepare 4 looped ropes with the same length to allow a good lifting balance,
then pass each rope through each eyebolt and catch it on the hoist hook.
6) Slightly lift the hoist so that each rope has light tension to hold the robot. In
this state, remove the bolts securing the robot base to the pallet supplied or
installation base (if robot is to be moved to another installation base).
7) Using caution to keep the balance of the robot and avoid subjecting it to any
strong vibrations and shocks, operate the hoist carefully to move to the in-
stallation base. The angle between each rope and the arm surface should be
kept at 45 degrees or more.
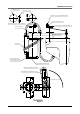
8) Temporarily secure the robot to the installation base by tightening the bolts.
(Use the same tightening torque as specified to secure the standard model
robots.)
9) Remove the ropes and carrying jigs, then reattach the X-axis and Y-axis un-
der covers. Be sure to keep the carrying jigs, eyebolts, arm clamping stay,
bolts and pallet for future use in case the robot needs to be moved or trans-
ported.