For details of products, please contact your nearest Yamaha representative or the authorized distributor listed below. Per ulteriori dettagli sui prodotti, rivolgersi al più vicino rappresentante Yamaha oppure a uno dei distributori autorizzati elencati di seguito. Para obter detalhes de produtos, entre em contato com o representante mais próximo da Yamaha ou com o distribuidor autorizado relacionado a seguir.
MX49/MX61 Manuale di istruzioni
Il numero di modello e quello di serie, i requisiti di alimentazione e altre informazioni del prodotto si trovano sulla piastrina o vicino alla stessa. La piastrina del prodotto si trova nella parte inferiore dell'unità. Annotare il numero di serie nello spazio indicato di seguito e conservare il manuale come documento di comprovazione dell'acquisto; in tal modo, in caso di furto, l'identificazione sarà più semplice.
PRECAUZIONI LEGGERE ATTENTAMENTE PRIMA DI CONTINUARE Conservare questo manuale in un luogo sicuro e accessibile per future consultazioni. AVVERTENZA Attenersi sempre alle precauzioni di base indicate di seguito per evitare il rischio di lesioni gravi o addirittura di morte conseguente a scosse elettriche, cortocircuiti, danni, incendi o altri pericoli.
Handling caution Yamaha declina qualsiasi responsabilità per i danni derivanti da un utilizzo non corretto o dalle modifiche apportate allo strumento, nonché per la perdita o la distruzione di dati. • Non introdurre le dita o le mani nelle fessure presenti sullo strumento. • Non introdurre né lasciare cadere carta, oggetti metallici o di altro tipo nelle fessure presenti sul pannello. Ciò potrebbe causare lesioni personali, danni allo strumento o ad altri oggetti o problemi nel funzionamento.
Introduzione Grazie per avere acquistato un sintetizzatore musicale Yamaha MX49/MX61. Leggere attentamente il presente manuale di istruzioni prima di utilizzare lo strumento, per sfruttarne appieno i vantaggi offerti dalle varie funzioni. Dopo aver letto il manuale, si consiglia di conservarlo in un luogo sicuro e facilmente accessibile, per farvi riferimento nei casi in cui risulti necessario documentarsi meglio su un'operazione o una funzione.
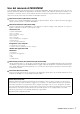
Uso del manuale di MX49/MX61 Sono disponibili quattro guide di riferimento per il sintetizzatore MX49/MX61: Manuale di istruzioni (questo documento), Manuale di riferimento, Manuale dei parametri del sintetizzatore ed Elenco dati. Il Manuale di istruzioni in dotazione con il sintetizzatore è in formato cartaceo, mentre Manuale di riferimento, Manuale dei parametri del sintetizzatore ed Elenco dati sono forniti sotto forma di documenti PDF nel CD-ROM in dotazione.
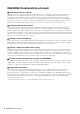
MX49/MX61Caratteristiche principali Suoni dinamici basati su MOTIF MX49/MX61 contiene la gamma completa di waveform dinamiche e autentiche derivate direttamente dal famosissimo di MOTIF, inclusi suoni realistici di pianoforte acustico, piano elettrico, sintetizzatore, percussioni e altro ancora. Ciò garantisce una resa audio di altissima qualità per suonare e registrare vari generi musicali.
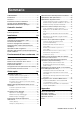
Sommario PRECAUZIONI........................................................4 Introduzione ............................................................6 Accessori.................................................................6 Informazioni sul disco in dotazione .........................6 Uso del manuale di MX49/MX61.............................7 MX49/MX61Caratteristiche principali ......................8 Controlli e funzioni 10 Pannello frontale ..................................................
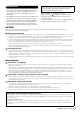
Controlli e funzioni Pannello frontale L'immagine si riferisce al modello MX49, tuttavia i controlli e i terminali del modello MX61 sono gli stessi. 1 2 4 5 8 9 ! @ 6 7 ) # %$ G2 A2 B2 C3 ^ * & 3 C2 D2 E2 F2 1 Manopola [MASTER VOLUME] (pagina 14) Regola il volume del suono generale. 2 Rotella del pitch bend (pagina 21) Consente di glissare le note riprodotte sulla tastiera verso l'alto o verso il basso. 3 Modulation wheel (pagina 21) Controlla il vibrato applicato al suono.
Controlli e funzioni ( B F A D C G H I J K C5 & Pulsante [SELECT] (pagina 24) Richiama la schermata dalla quale è possibile selezionare una performance. * LCD (display a cristalli liquidi) (pagina 14) Il display LCD retroilluminato mostra i parametri e i valori relativi all'operazione o alla funzione attualmente selezionata. ( Dial [DATA] (pagina 16) Modifica il valore selezionato nella schermata.
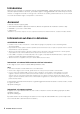
Controlli e funzioni Pannello posteriore 1 2 3 1 Jack DC IN (pagina 13) Collegare a questo connettore l'adattatore di alimentazione in dotazione. 2 P Interruttore (Standby/On) (pagina 13) Premere per accendere (O) o mettere in standby (N) lo strumento. 3 Terminali MIDI [IN]/[OUT] (pagina 37) MIDI [IN] serve a ricevere i dati di controllo o della performance da un altro dispositivo MIDI.
Installazione Alimentazione Eseguire i collegamenti dell'adattatore di alimentazione in dotazione (pagina 44) nel seguente ordine. Prima di collegare l'adattatore di alimentazione, assicurarsi che lo strumento sia in stato Standby (N). 1 Avvolgere il cavo di uscita CC dell'adattatore di alimentazione intorno al fermacavi (come mostrato in basso), quindi collegare la spina dell'adattatore al jack DC IN sul pannello posteriore.
Installazione Funzione di spegnimento automatico Regolazione del volume e della luminosità del display Per prevenire un consumo energetico non necessario, lo strumento dispone di una funzione di spegnimento automatico che si attiva quando questo non viene utilizzato per un periodo di tempo specificato. Secondo le impostazioni predefinite, lo strumento si spegne se non viene utilizzato per 30 minuti. Regolare il livello di volume dello strumento e del sistema amplificatore/altoparlante collegato.
Installazione Ripristino della memoria utente alle impostazioni iniziali di fabbrica Le impostazioni di fabbrica originali della memoria utente del sintetizzatore possono essere ripristinate come descritto di seguito. Le performance, le voci utente e le impostazioni Utility della memoria utente verranno riportate sulle impostazioni di fabbrica iniziali. Questa operazione è particolarmente utile se sono state eliminate o sovrascritte per errore performance o impostazioni Utility.
Funzionamento di base e schermate Spostamento del cursore Il cursore nella schermata indica l'elemento selezionato ed ha tre tipi di forme. Freccia Elemento selezionato AP c001:CncrtGrand STR:081:Amb*Pizza Questo cursore triangolare lampeggiante indica la linea dell'elemento selezionato. È possibile spostare il cursore in alto o in basso mediante gli appositi pulsanti [u]/[d].
Funzionamento di base e schermate Selezione di una pagina La schermata da modificare potrebbe essere composta da più pagine. In questo caso, in basso a sinistra nella schermata sono visualizzate le icone (s) e (a). È possibile selezionare una pagina utilizzando i pulsanti cursore [u]/[d]. Chiusura della schermata corrente Se si desidera tornare alla schermata precedente rispetto a quella corrente, premere [EXIT]. Per tornare alla schermata principale, premere [EXIT] più volte.
Guida rapida Riproduzione delle voci Selezione di una voce per la parte 1 MX49/MX61 dispone di 16 parti. A ogni parte sono assegnate le voci, che sono i suoni di base e gli elementi fondamentali di MX49/MX61. Quando si accende lo strumento, la schermata principale che compare mostra le voci solo per le parti 1 e 2. Con le impostazioni predefinite, se si suona la tastiera verrà emesso solo il suono della voce per la parte 1. Selezionare la voce desiderata tra quelle preset per suonarla.
Guida rapida Selezione di una voce per la parte 2 Combinazione delle voci (Layer) Di seguito viene descritto come selezionare una voce per la parte 2 e anche per la parte 1. Impostando le voci per le due parti nella schermata principale, è possibile alternarle mentre si suona, senza che l'audio venga troncato in modo innaturale. È possibile selezionare voci diverse per le parti 1 e 2 e suonarle contemporaneamente in layer.
Guida rapida 4 Per annullare la funzione Layer, premere di nuovo [LAYER]. 1 Premere [SPLIT]. Le voci per la parte 1 e la parte 2 vengono suddivise sulla parte per la mano sinistra e su quella per la mano destra e viene selezionata la parte 2. La spia [LAYER] si spegne e viene riprodotto solo l'audio della voce per la parte 1.
Guida rapida Modifica delle qualità timbriche delle voci con i controller MX49/MX61 dispone di vari controller che consentono di modificare il suono dello strumento in tempo reale. Sono disponibili manopole, rotella del pitch bend e modulation wheel. È possibile anche controllare le varie funzioni mediante controller esterni collegati ai jack corrispondenti sul pannello posteriore.
Guida rapida Uso della funzione Arpeggio Controller esterni Con la funzione Arpeggio è sufficiente suonare le note appropriate sulla tastiera per creare degli arpeggi. Ad esempio, è possibile suonare le note di una triade (nota fondamentale, terza e quinta) e creare in modo automatico con la funzione Arpeggio una serie di interessanti frasi arpeggiate. È possibile impostare vari tipi di arpeggio per ogni parte e applicare la funzione Arpeggio a massimo due parti contemporaneamente.
Guida rapida 3 Selezionare "03:Arp Select" con i pulsanti cursore [u]/[d], quindi premere [ENTER]. Modifica del tempo dell'arpeggio Viene richiamata la schermata Edit relativa all'arpeggio per la parte. 1 Premere [TEMPO]. 2 Quando si riproduce l'arpeggio dalla tastiera, è possibile modificare il tempo con il dial [DATA]. Part01 d 03:Arp*Select 4 Premere [PIANO] (1). Viene richiamata la schermata Edit per la parte 1.
Guida rapida Impostazioni di ottava/ trasposizione della tastiera Octave (Ottava) Il pulsante OCTAVE [-]/[+] permette di regolare il pitch della tastiera a intervalli di ottave, fino a un massimo di tre. Si potrà ad esempio ridurre il pitch per ottenere note molto basse, oppure aumentarlo per ottenere voci soliste. Premere contemporaneamente i pulsanti [-] e [+] per tornare all'impostazione del valore iniziale (0).
Guida rapida NOTA Per un elenco dettagliato di tutte le performance, vedere l'elenco delle performance nel documento PDF "Elenco dati". NOTA Le 128 performance sono divise in otto gruppi (A - H), ognuno dei quali è composto da 16 performance. Per selezionare questi gruppi di performance, tenere premuto [SHIFT] e utilizzare contemporaneamente il dial [DATA] o i pulsanti [INC/YES]/[DEC/NO]. 3 Suonare la tastiera.
Guida rapida Modifica del tempo del pattern di batteria + 1 Premere [TEMPO]. 2 Premere [R/K] (Play/Pause) per riprodurre il pattern ritmico, quindi ruotare il dial [DATA] per modificare il tempo. NOTA Se si desidera annullare lo stato di standby, premere [J] (Stop). 2 Suonare la tastiera. Il pattern ritmico viene avviato automaticamente. 3 Per arrestare il pattern ritmico, premere [J] (Stop).
Guida rapida Suonare la tastiera a tempo con le song 3 Premere [EXT. SONG]. 4 Premere il pulsante cursore [u] ripetutamente, se necessario, per richiamare la prima pagina, quindi ruotare il dial [DATA] per selezionare i dati MIDI desiderati. I dati MIDI e audio salvati contenuti nella memoria flash USB possono essere riprodotti sul MX49/MX61 come "song". Dati MIDI e audio I dati MIDI includono informazioni della performance sulla tastiera e non sono una registrazione del suono vero e proprio.
Guida rapida 9 Per arrestare i dati MIDI, premere [J] (Stop). 6 Suonare la tastiera a tempo con i dati audio. 7 Per mettere in pausa i dati audio, premere [R/K] (Play/Pause). Per riprendere la riproduzione, premere di nuovo [R/K] (Play/Pause). 8 Per arrestare i dati audio, premere [J] (Stop). Riproduzione dei dati audio nella memoria flash USB 1 Collegare la memoria flash USB in cui sono memorizzati i dati audio.
Guida rapida Utilizzo di memorie flash USB 2 Collegando lo strumento a una memoria flash USB è possibile salvare i dati creati nel dispositivo collegato, nonché leggere i dati in esso contenuti. I dati di song del lettore musicale vengono riprodotti dallo strumento. NOTA Utilizzare il controllo del volume del dispositivo esterno Numero di memorie flash USB utilizzabili Al terminale [USB TO DEVICE] è possibile collegare una sola memoria flash USB alla volta.
Guida rapida 3 per selezionare un'impostazione preset per i parametri del tipo di effetto selezionato. Premere il pulsante cursore [u], se necessario, per selezionare "01:Chorus Eff", quindi premere [ENTER]. NOTA È possibile anche modificare ogni parametro dell'effetto nella terza pagina o in quelle successive. Per ulteriori informazioni su ogni parametro, vedere il documento PDF "Manuale dei parametri del sintetizzatore". Verrà visualizzata la schermata di impostazione dell'effetto chorus.
Guida rapida Modifica dell'effetto Insertion della voce (Voice Edit) 6 Viene visualizzata la schermata dell'effetto Insertion per Voice Edit. È possibile modificare i parametri della voce assegnata a ciascuna parte. I parametri della voce si trovano nelle schermate Voice Edit, ovvero quelle con l'indicazione "Voice" o "DrumKit" nel nome visualizzato. In questo esempio, verranno modificate le impostazioni dell'effetto Insertion.
Guida rapida Modifica del Controller Set per la voce (Voice Edit) A ogni voce è possibile assegnare varie funzioni per i controller (manopole, modulation wheel ecc.). Ogni voce può avere fino a sei set che determinano i controller disponibili per la voce e le rispettive funzioni. L'assegnazione dei controller è detta "Controller Set". In questo esempio verrà modificato il Controller Set della voce assegnata alla parte.
Guida rapida Memorizzazione di una voce (Voice Store) Memorizzare una performance (Performance Store) I parametri modificati della voce possono essere memorizzati come voce utente a parte rispetto alla performance. Inoltre, le voci utente memorizzate possono essere assegnate a un'altra parte o performance. Se si è soddisfatti della performance creata, memorizzare le nuove impostazioni nella memoria interna sotto forma di performance.
Guida rapida Modifica senza interruzioni delle voci durante l'esecuzione sulla tastiera 6 Quando si cambia una voce assegnata a una parte o si seleziona un'altra performance, l'audio della voce o della performance precedente verrà tagliato e sostituito all'improvviso dalla nuova voce o performance. Nelle performance dal vivo conviene evitare questo comportamento.
Guida rapida Configurazione delle impostazioni generali del sistema (impostazioni Utility) 3 Premere [STORE]. Tutte le impostazioni Utility vengono memorizzate. NOTA Regolazione della luminosità del display Per regolare la luminosità del display, tenere premuto [UTILITY] e premere contemporaneamente [INC/YES]/ [DEC/NO]. Per ulteriori informazioni sulle impostazioni Utility, consultare il documento PDF "Manuale di riferimento".
Guida rapida Salvataggio delle impostazioni in una memoria flash USB Caricamento delle impostazioni da una memoria flash USB È possibile salvare su una memoria flash USB tutti i dati della memoria utente, contenente le performance, le voci utente create e le impostazioni Utility, sotto forma di file "All" (estensione: .X5A). 1 Collegare una memoria flash USB al terminale USB [TO DEVICE]. 2 Premere [FILE]. 3 Collegare la memoria flash USB al terminale USB [TO DEVICE]. 2 Premere [FILE].
Guida rapida 6 Se al punto 5 il parametro "Type" è stato impostato su "Performance", selezionare il numero di performance desiderato, quindi premere [ENTER]. Se al punto 5 il parametro "Type" è stato impostato su un valore diverso da "Performance", passare al punto 8. 2 Src*Performance 001(A01):MXCategory 7 Selezionare il numero di performance di destinazione per il caricamento, quindi premere [ENTER]. Dst*Performance 003(A03):Sirius 8 2 Premere [INC/YES].
Guida rapida Suggerimento Canali di trasmissione e ricezione MIDI: modifica in remoto delle performance. I canali di ricezione MIDI per le parti da 1 a 16 di MX49/ MX61 sono fissi su 1 - 16. Accertarsi che il canale di trasmissione MIDI dello strumento MIDI esterno corrisponda ai canali di ricezione MIDI di MX49/MX61. Per ulteriori informazioni sull'impostazione dei canali di trasmissione MIDI dello strumento esterno, fare riferimento al manuale di istruzioni dello strumento stesso.
Appendice Elenco di funzioni Shift Alcune importanti funzioni e operazioni dello strumento si possono eseguire mediante utili scorciatoie dal pannello di controllo. Basta tenere premuto il pulsante [SHIFT] e premere un pulsante specifico, come descritto di seguito.
Appendice Indicazione LCD 40 Descrizione Illegal file name. Il nome file specificato non è valido. Provare a immettere un nome differente. Illegal file. Non è possibile utilizzare il file specificato per il caricamento sullo strumento oppure non è possibile il caricamento nello stato corrente. Illegal format. Il formato del file specificato per la riproduzione è SMF 1 o è un formato di dati audio diverso da WAV. Utilizzare dati MIDI SMF in formato 0 o dati audio in formato WAV.
Appendice Risoluzione dei problemi Se non viene emesso alcun suono o il suono emesso non è di buona qualità, controllare i punti riportati di seguito prima di ritenere che il prodotto presenti dei problemi. È possibile risolvere molti problemi eseguendo l'operazione Factory Set (pagina 15) dopo aver effettuato il backup dei dati in una memoria flash USB (pagina 36). Se il problema persiste, contattare un rivenditore Yamaha. Non viene emesso alcun suono.
Appendice Il suono è distorto. Le impostazioni degli effetti sono corrette? L'utilizzo di determinati effetti con impostazioni specifiche può causare distorsione. [EDIT] Selezionare "02:Part" [ENTER] Selezionare "05:Voice Insert Eff"/"05:DrumKit Insert Eff" [ENTER] Le impostazioni del filtro sono corrette? Valori troppo alti della risonanza del filtro possono causare distorsione.
Appendice Non è possibile avviare l'arpeggio. Controllare se [ARP] è attivato o disattivato.
Appendice Specifiche tecniche Controller Blocco generatore di suoni Blocco sequencer Altri MX49 49 tasti (Initial Touch) MX61 61 tasti (Initial Touch) Generatore di suoni AWM2 Polifonia 128 note Capacità multitimbrica 16 parti (Internal) Wave Circa 166 MB (se convertita in formato lineare a 16 bit) Voce Preset: 1.
Appendice Indice A Alimentazione .......................................................................... 13 Altoparlante.............................................................................. 13 Indicatore di modifica........................................................ 30, 32 Insertion, effetto........................................................................31 Invert, funzione .........................................................................39 [ARP]...........................
Appendice S Salvataggio .............................................................................. 36 Schermata Performance Select ............................................... 24 [SELECT] ...........................................................................11, 24 [SHIFT]...............................................................................11, 39 SMF.......................................................................................... 27 Song........................................
For details of products, please contact your nearest Yamaha representative or the authorized distributor listed below. Per ulteriori dettagli sui prodotti, rivolgersi al più vicino rappresentante Yamaha oppure a uno dei distributori autorizzati elencati di seguito. Para obter detalhes de produtos, entre em contato com o representante mais próximo da Yamaha ou com o distribuidor autorizado relacionado a seguir.