EN
About the Manuals About the Manuals The TENORI-ON is provided with the four manuals listed below. Quick Guide The Quick Guide provides instructions on setup and basic operation that will get you started as quickly as possible. TENORI-ON Manual (This manual; PDF) The manual is provided as an electronic document on the supplied CD-ROM, and it provides detailed descriptions and procedures that will help you take full advantage of the TENORION's many advanced features.
Contents Contents The TENORI-ON Is … . . . . . . . . . . . . . . 4 ■ Edit Menu . . . . . . . . . . . . . . . . . . . . . . . . . . . . . . . . . . 54 Layers and Performance Modes . . . . . . . . . . . . . . . . . . . . . 4 Layers and Blocks . . . . . . . . . . . . . . . . . . . . . . . . . . . . . . . . 5 Voices . . . . . . . . . . . . . . . . . . . . . . . . . . . . . . . . . . . . . . . . . . 6 Connecting to Second TENORI-ON or Computer . . . . . . . 7 Song Recording and Playback . . . . . . . . . . .
The TENORI-ON Is … Layers and Performance Modes The TENORI-ON Is … The TENORI-ON is a new type of musical interface that combines control and display functions in matrix of 256 LED buttons. The 16 x 16 TENORI-ON matrix can be operated easily and intuitively, so that anyone can begin playing the instrument right away. Light animation is generated in synchronization with the performance and sound.
The TENORI-ON Is … Layers and Blocks Layers and Blocks The TENORI-ON handles a complete set of 16 layers as a "block." You can have up to 16 blocks, each with up to 16 layers. You can switch between blocks instantaneously to create varied performances with plenty of musical interest. Parameters that apply to individual layers (voice, pitch, note entry position, etc.) are internally managed separately from parameters that apply to individual blocks (master tempo, master transpose, master scale, etc.).
The TENORI-ON Is … Voices Voices The various sounds that can be played by the TENORI-ON are called "voices." The TENORION can use up to 256 voices, 253 of which are built in and play via the internal MIDI tone generator. A wide range of voices including piano, strings, drums, percussion, sound effects, and voices developed specifically for use with the TENORI-ON are provided. The remaining three voice numbers are reserved for voice samples provided by the user.
The TENORI-ON Is … Connecting to Second TENORI-ON or Computer ❊ Panning (Stereo Positioning) . . . . . . . . . . . . . . . . Panpot ➝ Page 53 ❊ Effects (Reverb and Chorus) . . . . . . . . . . . . . . . . Effect Menu ➝ Page 99 ❊ Loading Samples. . . . . . . . . . . . . . . . . . . . . . . . . Samplings ➝ Page 88 The supplied "TENORI-ON User Voice manager" software installation guide.
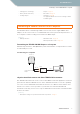
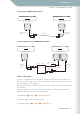
The TENORI-ON Is … Connecting to Second TENORI-ON or Computer Connecting Two TENORI-ON Instruments Synchronize ∞ Synchronize MASTER SLAVE MASTER TENORI-ON SLAVE TENORI-ON MIDI Supplied MIDI Cable Adaptor ∞ MIDI MIDI Cable MIDI OUT MIDI OUT MIDI IN Supplied MIDI Cable Adaptor MIDI IN Connecting More than Two TENORI-ON Instruments Synchronize ∞ Synchronize MASTER SLAVE MASTER TENORI-ON SLAVE TENORI-ON MIDI MIDI MIDI IN Supplied MIDI Cable Adaptor ∞ MIDI OUT MIDI Cable MIDI O
The TENORI-ON Is … Song Recording and Playback Song Recording and Playback Performance operations carried out on the TENORI-ON can be recorded in real time and saved to an SD Memory Card as a Song File. Song Files contain all performance operations (note entry, etc.), settings (voice selection, tempo, etc.) and other user operations carried out in all layers and blocks in real time.
The TENORI-ON Is … Non-performance Functions (Interior and Power Save Modes) Non-performance Functions (Interior and Power Save Modes) When set to the Interior Mode the TENORI-ON will function as a clock and/or play back songs automatically. There’s also a Power Save Mode that automatically puts the TENORION to "sleep" if it isn’t operated for a specified period of time. Interior Mode You can set up the TENORI-ON to function as a clock and play back songs automatically.
The TENORI-ON Is … Non-performance Functions (Interior and Power Save Modes) Example: 15:39:18 (three thirty-nine PM and eighteen seconds) Hour 1 15 Interior Type 16 60 Second Indicator Animation Clock+Song(DEMO) "DEMO Yamaha 15:39:18 Time Display Minute 30 46 45 ∞ " Owner name 31 TENORI-ON Manual 11
The TENORI-ON Is … Performance Modes Basic Operation Performance Modes This section describes the 6 TENORI-ON performance modes that are assigned to the 16 layers. A thorough understanding of the modes will help you to create more interesting, unique performances. Basic Operation The basic settings and operations used for TENORI-ON performance are described below. ● The Display When the TENORI-ON is turned on layer 1 and the Score mode will be selected.
The TENORI-ON Is … Performance Modes Basic Operation Basic Settings and Editing During Performance ● [CLEAR] button Press the [CLEAR] button to clear all active notes from the layer. Clear All Active Notes from the Layer Press the [CLEAR] button briefly. Clear All Active Notes from All Layers and Blocks Press and hold the [CLEAR] button.
The TENORI-ON Is … Performance Modes Basic Operation • Menu Settings/Edits Detailed TENORI-ON settings can be accessed and edited by using the jog dial to select menu items on the LCD display. File save and load operations can also be accessed this way. [Reference] ❊ Using the Menus . . . . . . . . . . . . . . . . . . . . . . . . . Setting Parameters with the Jog Dial ➝ Page 36 Stop Playback Press the [OK] button at the point you want to stop playback while the Status Display is shown.
The TENORI-ON Is … Performance Modes Score Mode Score Mode The Score Mode is assigned to TENORI-ON layers 1 — 7. The Score Mode is selected by default when the power is turned on. Score Mode Operation In this mode the TENORI-ON interface functions like a musical "score" on which you can write the notes to be played in one musical measure via the 16 x 16 LED button matrix.
The TENORI-ON Is … Performance Modes Loop Indicator Active Notes Loop Indicator Motion Score Mode Sound/Light High Pitch Low Time Light Animation TENORI-ON Manual 16
The TENORI-ON Is … Performance Modes Random Mode Random Mode The Random Mode is assigned to layers 8 — 11. Random Mode Operation If you press an LED button long enough to enter an active note in the Random Mode, the active note will play back repeatedly. If you then enter a few more active notes, the lights will "travel" from note to note, in the order entered, and the active notes will sound when the traveling light passes over them.
The TENORI-ON Is … Performance Modes Draw Mode Draw Mode The Draw Mode is assigned to layers 12 and 13. Draw Mode Operation In this mode you can press individual LED buttons or draw lines or curves on the matrix, and those actions will be played back and repeated. You can keep adding to your "composition" during playback to build up thick sonic textures. [Reference] ❊ Recording and playback of LED button operations loops in 16th-beat increments in the Score mode.
The TENORI-ON Is … Performance Modes Bounce Mode Bounce Mode The Bounce Mode is assigned to layer 14. Bounce Mode Operation Press an LED button and the light will "drop" from that button, bounce back from the bottom of the matrix, and repeat. The corresponding note will sound when the light bounces at the bottom row. The higher the entry point, the longer the interval between the sound. By choosing appropriate entry points you can set the repeat interval as required.
The TENORI-ON Is … Performance Modes Push Mode Push Mode The Push Mode is assigned to layer 15. Push Mode Operation In this mode if you press and hold an LED button the sound of the corresponding note will begin to change gradually. The way the note changes will depend on the voice used (this feature will only work with sustained voices that have a time-based tonal change in the sustained portion of the voice’s envelope).
The TENORI-ON Is … Performance Modes Solo Mode Solo Mode The Solo Mode is assigned to layer 16. Solo Mode Operation Press an LED button and the corresponding note will repeat until the button is released. The LEDs in a column in which an LED button is pressed will flash upwards. In the solo mode the pitches are arranged horizontally, like a piano.
Parameter Settings Performance Modes Solo Mode Parameter Settings The TENORI-ON provides the following two methods for setting parameters such as voice and tempo. ■ The Function Buttons (➝ Page 23) The function buttons are used in conjunction with the LED buttons to provide fast, easy access to functions such as voice switching, layer switching, block switching, and more. Visual feedback from the LED button matrix makes settings intuitive and easy.
Parameter Settings Setting Parameters with the Function Buttons Solo Mode Setting Parameters with the Function Buttons Settings can be made by holding one of the ten function buttons located on either side of the TENORI-ON ([L1] — [L5], [R1] — [R5]) and operating the LED buttons. When a function button is pressed the current setting for that button will appear on the LED button matrix, and the setting can be changed by pressing the appropriate LED button(s).
Parameter Settings Setting Parameters with the Function Buttons [L1] Instrument [L1] Instrument Selects the voice for the current layer. When you press and hold the [L1] button vertical and horizontal lines will light on the matrix, and the button at their intersection corresponds to the currently selected voice. If you press a different LED button while these crossed lines are showing the intersection will move to that button and the corresponding voice will be selected.
Parameter Settings Setting Parameters with the Function Buttons [L2] Sound Length [L2] Sound Length Sets the note length (gate time) for all active notes in the current layer. While holding the [L2] button slide your finger horizontally over the matrix to move the lit vertical line to the desired setting, or simply press an LED button at the appropriate column. Moving the line to the right increases the note length. The LED buttons adjust the Sound Length in the increments listed below.
Parameter Settings Setting Parameters with the Function Buttons [L3] Octave [L3] Octave Sets the octave for all active notes in the current layer. While holding the [L3] button slide your finger vertically over the matrix to move the lit horizontal line to the desired octave, or simply press an LED button in the appropriate row. The eighth row from the bottom produces no octave shift (a "0" setting).
Parameter Settings Setting Parameters with the Function Buttons [L4] Score Mode Loop Point [L4] Score Mode Loop Point Sets the loop playback range for the current Score Mode layer. While holding the [L4] button slide your finger horizontally over upper half of the matrix to move the loop TOP point indicator to the desired point, and slide your finger horizontally over lower half of the matrix to move the loop END point indicator to the desired point, as required.
Parameter Settings Setting Parameters with the Function Buttons [L4] Random Mode Rotation [L4] Random Mode Rotation When a Random Mode layer is selected you can spin loop-shapes by holding the [L4] button and running a finger around the matrix in the direction and at the speed of the desired spin. ● Rotation direction and speed settings apply to the same layer in all blocks. ● To stop rotation, press and hold the LED button, or press the same LED button twice while holding the [L4] button.
Parameter Settings Setting Parameters with the Function Buttons [L5] Loop Speed [L5] Loop Speed Sets the loop playback speed (the duration of the beats). When the [L5] buttons is pressed the LED button column corresponding to the current setting will light. Four settings are available, set via the leftmost four columns on the matrix: quarter notes, eighth notes, sixteenth notes, and thirty-second notes. While holding the [L5] button press a button in the corresponding column.
Parameter Settings Setting Parameters with the Function Buttons [R1] Layer No. [R1] Layer No. Switches to a different layer. When the [R1] button is pressed the LED button row corresponding to the currently selected layer will light. The lowest row corresponds to layer 1 and the highest row corresponds to layer 16. While holding the [R1] button slide your finger vertically over the matrix or simply press an LED button in the appropriate row to select the desired layer.
Parameter Settings Setting Parameters with the Function Buttons [R2] Master Tempo [R2] Master Tempo Sets the playback tempo for all layers and all blocks. When the [R2] button is pressed the LED button column corresponding to the current tempo setting will light. While holding the [R2] button slide your finger horizontally over the matrix or simply press an LED button in the appropriate column to select the desired tempo setting. Moving the line to the right produces faster tempos.
Parameter Settings Setting Parameters with the Function Buttons [R3] Master Transpose [R3] Master Transpose Adjusts the playback pitch in semitone increments for all layers and all blocks. When the [R3] button is pressed the LED button row corresponding to the currently selected transpose value will light. While holding the [R3] button slide your finger vertically over the matrix or simply press an LED button in the appropriate row to select the desired degree of transposition.
Parameter Settings Setting Parameters with the Function Buttons [R4] Volume [R4] Volume Layer Volume Allows the volume of each layer to be adjusted as required (layer volume common to all blocks). When the [R4] button is pressed the current volume settings for all 16 layers are displayed on the LED button matrix. Each row of LED buttons corresponds to layer, beginning with layer 01 at the bottom row.
Parameter Settings Setting Parameters with the Function Buttons [R5] Block Number [R5] Block Number Switches to a different block. When the [R5] button is pressed the LED button column corresponding to the currently selected bock will light. The leftmost column corresponds to block 1 and the rightmost column corresponds to block 16. While holding the [R5] button slide your finger horizontally over the matrix or simply press an LED button in the appropriate column to select the desired block.
Parameter Settings Setting Parameters with the Function Buttons [R5] Block Number Using the [R5] Button to Copy Layers By holding the [R5] button and performing the operations described below you can copy either a single layer or all layers from the current block to another block. 1. If the current block is not the block containing the layers you want to copy, hold the [R5] button and press the LED button corresponding to the desired "source" Block (the LEDs in that column will light dimly). 2.
Parameter Settings Setting Parameters with the Jog Dial Basic Operation Setting Parameters with the Jog Dial In addition to using the function buttons described in the preceding section, parameters can be accessed by using the jog dial and menus shown on the LCD display, and edited by using the jog dial or LED buttons. Basic Operation 1 When the power is turned on the status display will appear on the LCD following the initial startup display. Startup Display ÅÍÎÏ ∞ TOSHIO IWAI & YAMAHA Ver x.
Parameter Settings Setting Parameters with the Jog Dial 3 Basic Operation Rotate the jog dial to select the desired menu item, and then press the [OK] button to go to the related submenu. [Main menu] ∞ 1 Play menu 2 Layer menu The Play Menu Submenu [Play menu] ∞ Hardware Volume Master Tempo 4 Select a parameter from the submenu and press the [OK] button to go to the related parameter edit display.
Parameter Settings Setting Parameters with the Jog Dial 6 Basic Operation Press the [OK] button to apply the edit and return to the previous menu layer. Press the [CANCEL] button to return to the previous menu layer without making any changes. ● If a parameter edit display includes multiple parameters, pressing the [OK] button after editing one parameter will apply that edit and highlight the next parameter in the display.
Parameter Settings Setting Parameters with the Jog Dial Data Storage and Initialization Data Storage and Initialization Data that is Erased When the Power is Turned Off ■ All block set All active notes and settings for all layers and blocks are not retained in memory when the power is turned off, so if you want to keep any active notes data you have created you will need to use the Save All Blocks function described on Page 69 to save it to an SD Memory Card.
Parameter Settings Setting Parameters with the Jog Dial Parameter Backup Layer Menu Instrument Data Storage and Initialization Factory Default Layer 1 01/01 Layer 2 02/15 Layer 3 03/01 Layer 4 04/08 Layer 5 05/03 Layer 6 06/10 Layer 7 07/10 Layer 8 08/05 Layer 9 09/01 Layer 10 10/13 Layer 11 11/12 Layer 12 12/01 Layer 13 13/01 Layer 14 14/04 Layer 15 15/02 Layer 16 16/02 Volume Layer 1 — 16 96 Loop Speed Layer 1 — 16 4 (The layer 14 default is 8) Sound Length L
Parameter Settings Setting Parameters with the Jog Dial Parameter Backup Layer Menu Expand/Shrink Layer 14 Animation Circle Size Layer 15 3→4→5 Save As Default Preference Menu Vertical Line Size Layer 16 1 – None – ON Push Sensitivity 120 Automatic Backup Local Control Synchronize File Menu 0 ON MASTER Loop Indicator ON – – Reverb Type – HALL1 Reverb Param Automatic Backup Chorus Type Chorus Param Interior Menu – Quantize Master Tuning Effect Menu Expand/Shrink Type Layer
Parameter Settings Setting Parameters with the Jog Dial ■ Play Menu ■ Play Menu The Play menu provides access to performance parameters that apply all layers and all blocks. The Play menu submenu includes the following 8 items. 1. Hardware Volume Page 43 2. Master Tempo Page 43 3. Master Scale Page 44 4. Master Transpose Page 45 5. Master Loop Speed Page 45 6. Master Loop Point Page 46 7. Reset Loop Timing Page 46 8.
Parameter Settings Setting Parameters with the Jog Dial ■ Play Menu 1. Hardware Volume Hardware Volume ∞ 96 Sets the hardware volume. ■ Range . . . . . . . . . . . . 0 — 127 ■ Default . . . . . . . . . . . 96 ■ LED Buttons . . . . . . . No display [Reference] ❊ Layer menu/Volume (➝ Page 50) 2. Master Tempo Master Tempo ∞ BPM: 75 Sets the master tempo for all layers and blocks. This display also appears when the [R2] button is pressed.
Parameter Settings Setting Parameters with the Jog Dial ■ Play Menu 3. Master Scale Master Scale ∞ Ionian Sets the master scale for all layers and blocks. ● Changes will not be applied to notes that are already playing in the Push or Solo modes, or currently playing notes if a long Sound length has been specified. ■ Range . . . . . . . . . . . . Ionian, Dorian, Phrygian, Lydian, Mixolydian, Aeolian, Locrian, Chromatic, OKINAWA ■ Default . . . . . . . . . . . Ionian ■ LED Buttons . . . . . . .
Parameter Settings Setting Parameters with the Jog Dial ■ Play Menu 4. Master Transpose Master Transpose ∞ +1 Sets transposition for all layers and blocks. This display also appears when the [R3] button is pressed. ● Changes will not be applied to notes that are already playing in the Push or Solo modes, or currently playing notes if a long Sound length has been specified. ■ Range . . . . . . . . . . . . -7 — +8 (semitone increments) ■ Default . . . . . . . . . . . 0 ■ LED Buttons . . . . . . .
Parameter Settings Setting Parameters with the Jog Dial ■ Play Menu 6. Master Loop Point Master Loop Point ∞ TOP: 5 / END:15 TOP Position END Position Sets the loop points (TOP and END) for all layers and blocks. The loop includes the TOP and END points. The TOP and END points are set via the LED buttons, and the jog dial moves the entire loop range backward or forward. ● The END point cannot be moved to a position before (to the left of) the TOP point.
Parameter Settings Setting Parameters with the Jog Dial ■ Play Menu 8. Mute Mute ∞ OFF All sound output is muted when this function is turned ON. ■ Range . . . . . . . . . . . . ON, OFF ■ Default . . . . . . . . . . . OFF ■ LED Buttons . . . . . . .
Parameter Settings Setting Parameters with the Jog Dial ■ Layer Menu ■ Layer Menu The Layer menu provides access to parameters that apply to individual layers. The currently selected layer will be affected by the Layer menu parameters. The Layer menu submenu includes the following 6 items. 1. Instrument Page 49 2. Volume Page 50 3. Loop Speed Page 51 4. Sound Length Page 52 5. Panpot Page 53 6.
Parameter Settings Setting Parameters with the Jog Dial ■ Layer Menu 1. Instrument Instrument Layer[01] 01/01:Photon Voice Number ∞ Current Layer Number Voice Name Selects the voice that will be played in the current layer. This display also appears when the [R1] button is pressed. Refer to the Voice List on Page 119 for a complete list of voice numbers and names. Voice numbers <01/16>, <02/16>, and <03/16> are user voices.
Parameter Settings Setting Parameters with the Jog Dial ■ Layer Menu 2. Volume Volume Layer[01] 96 ∞ Current Layer Number Volume Sets the volume of individual layers (layer volume common to all blocks). LED button matrix display and operation are the same as for the [R4] button. The LED buttons can be used to set the volume of all 16 layers. The LED buttons adjust the volume in the increments shown below, while the jog dial can be used for fine adjustment. ■ Range . . . . . . . . . . . .
Parameter Settings Setting Parameters with the Jog Dial ■ Layer Menu 3. Loop Speed Loop Speed Layer[01] 4 ∞ Current Layer Number Loop Speed Sets the loop playback speed (the duration of the beats). This display also appears when the [L5] button is pressed. ● This setting will be changed if the Master Loop Speed (all layers) parameter in the Play menu is changed. ■ Range . . . . . . . . . . . . 1 (quarter note), 2 (eighth note), 4 (sixteenth note), 8 (thirty-second note) ■ Default . . . . . . . . . .
Parameter Settings Setting Parameters with the Jog Dial ■ Layer Menu 4. Sound Length Sound Length Layer[01] 100msec ∞ Current Layer Number Gate Time Sets the note length (gate time). This setting applies to all active notes in the current layer. The LED buttons adjust the Sound Length in the increments listed below. You can also use the jog dial for finer adjustment in +/-10 millisecond increments. This display also appears when the [L2] button is pressed.
Parameter Settings Setting Parameters with the Jog Dial ■ Layer Menu 5. Panpot Panpot Layer[01] CENTER ∞ Current Layer Number Panpot Sets the stereo pan position for the current layer. ■ Range . . . . . . . . . . . . L64 — L01, CENTER, R01 — R63 ■ Default . . . . . . . . . . . CENTER (all layers) ■ LED Buttons . . . . . . . No display 6.
Parameter Settings Setting Parameters with the Jog Dial ■ Edit Menu ■ Edit Menu The Edit menu provides access to data editing functions such as copy, clear, and reset. The Edit menu submenu includes the following 6 items. 1. Copy this Block Page 55 2. Clear this Block Page 55 3. Copy this Layer Page 56 4. Clear this Layer Page 57 5. Clear All Blocks Page 57 6.
Parameter Settings Setting Parameters with the Jog Dial ■ Edit Menu 1. Copy this Block Copy this Block Block[01] Dest. Block: 02 ∞ Current Block Number (the copy source) Copy Destination Block Number Copy all active notes from all layers in the current block to a different block. Specify the destination block number and then press the [OK] button. Press the [CANCEL] button to cancel the copy operation. ■ Range . . . . . . . . . . . . 1 — 16 ■ LED Buttons . . . . . . .
Parameter Settings Setting Parameters with the Jog Dial ■ Edit Menu 3. Copy this Layer Current Block Number Current Layer Number (the copy source) Copy this Layer ∞ Block[01] Layer[01] Dest. Block: 02 Dest. Layer: 01 Copy Destination Block Number Copy Destination Layer Number Copies all active notes from the current layer in the current block to a layer in a different block. This function will only work between layers that have the same performance mode.
Parameter Settings Setting Parameters with the Jog Dial ■ Edit Menu 4. Clear this Layer Current Block Number Current Layer Number (the layer to be cleared) Clear this Layer ∞ Block[01] Layer[01] OK Clears all active notes from the current block and layer. This produces the same result as briefly pressing the [CLEAR] button. Rotate the jog dial to display "OK" if it isn’t already showing, then press the [OK] button.
Parameter Settings Setting Parameters with the Jog Dial ■ Edit Menu 6. Reset All Blocks Reset All Blocks ∞ OK Clears all active notes and initializes all settings for all blocks and layers. Rotate the jog dial to display "OK" if it isn’t already showing, then press the [OK] button. To cancel the clear operation either press the [CANCEL] button or rotate the jog dial to display "CANCEL" and press the [OK] button. ■ Range . . . . . . . . . . . . OK, CANCEL ■ Default . . . . . . . . . . .
Parameter Settings Setting Parameters with the Jog Dial ■ Preference Menu ■ Preference Menu The Preference menu provides access to initial settings that apply to the entire instrument. The Preference menu submenu includes the following 6 items. 1. Quantize Page 60 2. Push Sensitivity Page 60 3. Master Tuning Page 60 4. Local Control Page 61 5. Synchronize Page 61 6.
Parameter Settings Setting Parameters with the Jog Dial ■ Preference Menu 1. Quantize Quantize ∞ ON This setting applies to layer 16 (Solo Mode). When ON the repeat timing of notes played in the Solo Mode is synchronized with playback timing in the Score Mode (layers 1 — 7). ■ Range . . . . . . . . . . . . ON, OFF ■ Default . . . . . . . . . . . ON ■ LED Buttons . . . . . . . No display 2. Push Sensitivity Push Sensitivity ∞ 150msec Sets the long-press time for the LED buttons.
Parameter Settings Setting Parameters with the Jog Dial ■ Preference Menu 4. Local Control Local Control ∞ ON Determines whether TENORI-ON performance input (data) controls the internal MIDI tone generator (ON) or not (OFF). When set to "OFF" no sound will be output from the TENORI-ON speakers or headphone jack, but performance data will still be transmitted via the MIDI connector. Also, the LED buttons will produce no sound when operated if this parameter is set to "OFF." ■ Range . . . . . . . . . .
Parameter Settings Setting Parameters with the Jog Dial ■ File Menu ■ File Menu The File menu provides access to functions that allow you to save data to an SD Memory Card, load sample files, and more. The File menu submenu includes the following 6 items. 1. Song Page 64 2. All Blocks Page 68 3. Current Block Page 73 4. Current Layer Page 78 5. All Settings Page 83 6.
Parameter Settings Setting Parameters with the Jog Dial ■ File Menu Handling SD™ Memory Cards *SD Memory Card is a registered trademark of the SD Card Association. This instrument features a built-in SD Memory Card slot. It lets you save original data you’ve created on the instrument to a SD Memory Card, and allows you to load data from a card to the instrument. Be sure to handle SD Memory Cards with care. Follow the important precautions below.
Parameter Settings Setting Parameters with the Jog Dial ■ File Menu 1. Song Provides access to song file operations. "Song" files are files created by the TENORI-ON song recording function (➝ Page 109). In addition to performance data (active notes and settings such as voice, tempo, etc.) for all layers and blocks, all button and jog dial operations are recorded in real time.
Parameter Settings Setting Parameters with the Jog Dial 6 ■ File Menu When the Song file has been loaded the display shown below will appear, and playback will begin. Press the [OK] button when you want to stop playback. Song: ∞ "0302E-SONG-02 " TENORI-ON-MASTER µ00:03:21 ≥ Composer Name ● The composer name that appears on the third line of the display is the registered "Owner Name" for the TENORI-ON on which the Song file was recorded (➝ Page 107).
Parameter Settings Setting Parameters with the Jog Dial 5 ■ File Menu Press the [OK] button to go to the file name entry display. The name of the currently selected file will be displayed, and you can enter a new file name as required.
Parameter Settings Setting Parameters with the Jog Dial ● Delete ■ File Menu Song Deletes a specified Song from an SD Memory Card. 1 Insert the SD Memory Card containing the file you want to delete into the TENORI-ON card slot. 2 Use the jog dial and [OK] button to navigate to the Song function menu as follows: "Main menu" ➝ "File menu" ➝ "Song" Song ∞ Operation: Load 3 Use the jog dial to highlight the "Delete" function, then press the [OK] button.
Parameter Settings Setting Parameters with the Jog Dial ■ File Menu 2. All Blocks Provides access to All Blocks file operations. "All Blocks" files include active notes and settings such as voice, tempo, etc., for all layers and blocks. The following 4 All Blocks file functions are provided: Load All Blocks Page 68 Save All Blocks Page 69 Rename All Blocks Page 70 Delete All Blocks Page 71 ● Load All Blocks Loads an All Blocks file that has been saved to an SD Memory Card into the TENORI-ON.
Parameter Settings Setting Parameters with the Jog Dial 6 ■ File Menu When the All Blocks file has been loaded the display shown in step 2, above, will appear, and playback of the All Blocks file will begin. Press the [OK] button in the status display when you want to stop playback. ● Save All Blocks Saves an All Blocks file containing all active notes and settings such as voice, tempo, etc., for all layers and blocks to an SD Memory Card.
Parameter Settings Setting Parameters with the Jog Dial ■ File Menu ● If a file with the same name exists on the SD Memory Card an overwrite confirmation display like the one shown below will appear. Blocks: ∞ "1-BLOCKS1020-01 " Already Exists! Overwrite? OK ● Press the [OK] button if it’s OK to overwrite the file. Press the [CANCEL] button (or use the jog dial to select "CANCEL" on the LCD and then press the [OK] button) to cancel the operation and leave the original file unaltered.
Parameter Settings Setting Parameters with the Jog Dial 5 ■ File Menu Press the [OK] button to go to the file name entry display. The name of the currently selected All Blocks file will be displayed, and you can enter a new file name as required. File name entry procedure is described in the Rename Song section on Page 65. ● File names can be up to 16 characters in length. The file extension will be added automatically.
Parameter Settings Setting Parameters with the Jog Dial 4 ■ File Menu All Blocks files on the card will appear as a list on the LCD display (with no file extension). Use the jog dial to select the file you want to delete. Blocks: Delete ∞ 0302E-BLOCKS-01 0302E-BLOCKS-01 0302G-BLOCKS-01 ● Only files that are in All Blocks format will be displayed. 5 Press the [OK] button to delete the selected file. A confirmation display like the one shown below will appear.
Parameter Settings Setting Parameters with the Jog Dial ■ File Menu 3. Current Block Provides access to Current Block file operations. "Current Block" files include active notes and settings such as voice, tempo, etc., for all layers in the current block.
Parameter Settings Setting Parameters with the Jog Dial ■ File Menu Current Block Number Block[01]: "0302E-BLOCK-02 Loading... 7 ∞ " The name of the Current Block file being loaded. CANCEL When the Current Block file has been loaded the display shown in step 3, above, will appear, and playback of the Current Block file will begin. Press the [OK] button in the status display when you want to stop playback.
Parameter Settings Setting Parameters with the Jog Dial 5 ■ File Menu When the file name has been entered as required use the jog dial to highlight the "§" symbol in the lower right corner of the display and press the [OK] button. The file name will be entered and the save function will be executed. A display like the one shown below will appear while the Current Block file is being saved. You can cancel the operation by pressing the [OK] or [CANCEL] button. Block[01]: "1-BLOCK1020-01 Saving...
Parameter Settings Setting Parameters with the Jog Dial 4 ■ File Menu Current Block files on the card will appear as a list on the LCD display (with no file extension). Use the jog dial to select the file you want to rename. Block[01]: Load 0302E-BLOCK-01 0302E-BLOCK-02 0302G-BLOCK-01 ∞ ● Only files that are in Current Block format will be displayed. Press the [OK] button to go to the file name entry display.
Parameter Settings Setting Parameters with the Jog Dial ● Delete ■ File Menu Current Block Deletes a specified Current Block file from an SD Memory Card. 1 Insert the SD Memory Card containing the file you want to delete into the TENORI-ON card slot.
Parameter Settings Setting Parameters with the Jog Dial ■ File Menu 4. Current Layer Provides access to Current Layer file operations. "Current Layer" files include active notes and settings such as voice, tempo, etc., for the current layer in the current block.
Parameter Settings Setting Parameters with the Jog Dial 6 ■ File Menu Press the [OK] button to load the selected file. The display shown below will appear while the file is being loaded. Press the [OK] or [CANCEL] button to cancel the load operation. Current Layer Number Layer[01]: "0302E-LAYER-02 Loading... 7 ∞ " The name of the Current Layer file being loaded.
Parameter Settings Setting Parameters with the Jog Dial 5 ■ File Menu When the file name has been entered as required use the jog dial to highlight the "§" symbol in the lower right corner of the display and press the [OK] button. The file name will be entered and the save function will be executed. A display like the one shown below will appear while the Current Layer file is being saved. You can cancel the operation by pressing the [OK] or [CANCEL] button. Layer[01]: "1-LAYER1020-01 Saving...
Parameter Settings Setting Parameters with the Jog Dial 4 ■ File Menu Current Layer files on the card will appear as a list on the LCD display (with no file extension). Use the jog dial to select the file you want to rename. Layer[01]: Rename ∞ 0302E-LAYER-01 0302E-LAYER-02 0302G-LAYER-01 ● Only files that are in Current Layer format will be displayed. Press the [OK] button to go to the file name entry display.
Parameter Settings Setting Parameters with the Jog Dial ● Delete ■ File Menu Current Layer Deletes a specified Current Layer file from an SD Memory Card. 1 Insert the SD Memory Card containing the file you want to delete into the TENORI-ON card slot.
Parameter Settings Setting Parameters with the Jog Dial ■ File Menu 5. All Settings Provides access to All Settings file operations. "All Settings" files include all settings such as voice, tempo, etc., for all layers and blocks. Active notes are not included.
Parameter Settings Setting Parameters with the Jog Dial 6 ■ File Menu When the All Settings file has been loaded the display shown in step 2, above, will appear, and playback of the existing active notes will begin using the All Settings data just loaded. Press the [OK] button in the status display when you want to stop playback. ● Save All Settings Saves an All Settings file containing all settings such as voice, tempo, etc., for all layers and blocks to an SD Memory Card.
Parameter Settings Setting Parameters with the Jog Dial ■ File Menu A display like the one shown below will appear while the All Settings file is being saved. You can cancel the operation by pressing the [OK] or [CANCEL] button. Settings: "1-SET1020-01 Saving... ∞ " The All Settings file being saved. CANCEL File data may be irreparably corrupted if you turn off the power or remove the SD Memory Card while the "Saving…" display is showing.
Parameter Settings Setting Parameters with the Jog Dial 5 ■ File Menu Press the [OK] button to go to the file name entry display. The name of the currently selected All Settings file will be displayed, and you can enter a new file name as required. File name entry procedure is described in the Rename Song section on Page 65. ● File names can be up to 16 characters in length. The file extension will be added automatically.
Parameter Settings Setting Parameters with the Jog Dial 4 ■ File Menu All Settings files on the card will appear as a list on the LCD display (with no file extension). Use the jog dial to select the file you want to delete. Settings: Delete 0302E-SET-01 0302E-SET-02 0302G-SET-01 ∞ ● Only files that are in All Settings format will be displayed. 5 Press the [OK] button to delete the selected file. A confirmation display like the one shown below will appear.
Parameter Settings Setting Parameters with the Jog Dial ■ File Menu 6. Samplings Provides access to Samplings file operations. The TENORI-ON provides three user voices: <01/16,> <02/16,> and <03/16.> Audio samples can be loaded into the TENORI-ON and played via these voices. Audio samples can be converted to the sample format used by the TENORI-ON (.tnw file extension) using the TENORI-ON User Voice Manager software provided on the supplied CD-ROM.
Parameter Settings Setting Parameters with the Jog Dial ■ ■ File Menu Creating User Voices (Sampling Files) Audio files that have been recorded using a computer or downloaded from the Internet must be converted to the TENORI-ON user voice file format ("sampling" file format with a ".tnw" file name extension) before they can be loaded into the TENORI-ON user voice numbers and played.
Parameter Settings Setting Parameters with the Jog Dial 2 ■ File Menu Launch the TENORI-ON User Voice Manager software. Use the TENORI-ON User Voice Manager software included on the supplied CDROM to convert your files to the TENORI-ON format and assign them to the appropriate LED buttons. 2-1 Install the TENORI-ON User Voice Manager on your computer following the procedure outlined in the separate "TENORI-ON User Voice Manager Installation Guide" document. 2-2 Double click the "TNR_UserVoiceMgr.
Parameter Settings Setting Parameters with the Jog Dial 3 ■ File Menu Load the audio files. A dialog window that allows you to select and load an audio file into the TENORI-ON User Voice Manager will appear when you click one of the [LOAD] buttons. Select the audio file you want to load and assign to the corresponding button. The first 0.97 seconds of the selected WAVE or AIFF file will be used.
Parameter Settings Setting Parameters with the Jog Dial ■ File Menu 5 Click the [EXIT] button to quit the software. 6 Insert the SD Memory Card to which the file was saved in step 4, above, into the TENORI-ON card slot. 7 Load the file from the SD Memory Card into a user memory. Refer to "Load Samplings" on Page 93 for details. User voice setup is now complete. 8 Play the user voice.
Parameter Settings Setting Parameters with the Jog Dial ● Load ■ File Menu Samplings Loads a Samplings file that has been saved to an SD Memory Card into the TENORI-ON. 1 Insert the SD Memory Card containing the file you want to load into the TENORI-ON card slot.
Parameter Settings Setting Parameters with the Jog Dial ● Save ■ File Menu Samplings Saves a Samplings file currently loaded in a user memory to an SD Memory Card in ".tnw" format. 1 Insert an SD Memory Card that has sufficient free space for the file to be saved into the TENORI-ON card slot.
Parameter Settings Setting Parameters with the Jog Dial 6 ■ File Menu When the file name has been entered as required use the jog dial to highlight the "§" symbol in the lower right corner of the display and press the [OK] button. The file name will be entered and the save function will be executed. A display like the one shown below will appear while the All Settings file is being saved. You can cancel the operation by pressing the [OK] or [CANCEL] button. Samplings: ∞ "SAMPLE071020-01 " Saving...
Parameter Settings Setting Parameters with the Jog Dial 4 ■ File Menu Samplings files on the card will appear as a list on the LCD display (with no file extension). Use the jog dial to select the file you want to rename. Samplings: Rename ∞ SAMPLE071006-02 SAMPLE071001-01 SAMPLE071013-01 ● Only files that are in ".tnw" format will be displayed. Press the [OK] button to go to the file name entry display.
Parameter Settings Setting Parameters with the Jog Dial ● Delete ■ File Menu Samplings Deletes a specified Samplings file from an SD Memory Card. 1 Insert the SD Memory Card containing the file you want to delete into the TENORI-ON card slot. 2 Use the jog dial and [OK] button to navigate to the Samplings function menu as follows: "Main menu" ➝ "File menu" ➝ "Samplings" Samplings: ∞ Operation: Load 3 Use the jog dial to highlight the "Delete" function, then press the [OK] button.
Parameter Settings Setting Parameters with the Jog Dial ● Samplings ■ File Menu Info Displays the name of the sample files currently loaded in the TENORI-ON user memories. 1 Use the jog dial and [OK] button to navigate to the Samplings function menu as follows: "Main menu" ➝ "File menu" ➝ "Samplings" Samplings: ∞ Operation: Load 2 Use the jog dial to highlight the "Info" function, then press the [OK] button.
Parameter Settings Setting Parameters with the Jog Dial ■ Effect Menu ■ Effect Menu The Effect menu provides access to functions that allow you to apply reverb and chorus effects to the TENORI-ON voices. The Effect menu submenu includes the following 4 items. 1. Reverb Type Page 99 2. Reverb Param Page 100 3. Chorus Type Page 100 4. Chorus Param Page 100 Use the jog dial to highlight a submenu item, then press the [OK] button to go to the corresponding parameter edit display.
Parameter Settings Setting Parameters with the Jog Dial ■ Effect Menu 2. Reverb Param Reverb:HALL1 Param ∞ 40 Adjusts the depth of the reverb effect. Higher values produce greater reverb depth. ■ Range . . . . . . . . . . . . 0 — 127 ■ Default . . . . . . . . . . . 40 ■ LED Buttons . . . . . . . No display 3. Chorus Type Chorus Type ∞ CHORUS1 Selects the chorus effect type. • NO EFFECT . . . . . . . . . . . . . . . . . . . . .No chorus effect. • CHORUS1, CHORUS2 . . . . . . . . . . . .
Parameter Settings Setting Parameters with the Jog Dial ■ Interior Menu ■ Interior Menu The Interior menu provides access to functions that allow you to set up the TENORI-ON to function as a clock or automatically play back songs (Interior Mode) or to "sleep" if not activated for a specified period of time (Power Save Mode). The Interior menu submenu includes the following 10 items. 1. Interior START Page 101 2. Interior Type Page 102 3. Saver Type Page 102 4. Saver Time Page 103 5.
Parameter Settings Setting Parameters with the Jog Dial ■ Interior Menu 2. Interior Type Interior Type ∞ Song(DEMO) Specifies the type of function that will begin operation when the Interior Mode is started. • Song (DEMO) . . . . . . . . . . . . . . . . . . .Plays the pre-programmed TENORI-ON demo song. • SONG (SD) . . . . . . . . . . . . . . . . . . . . .Randomly plays Song Files from an SD Memory Card. • Clock . . . . . . . . . . . . . . . . . . . . . . . . . .
Parameter Settings Setting Parameters with the Jog Dial ■ Interior Menu 4. Saver Time Saver Time ∞ 10 min Sets the amount of time that must elapse before saver operation begins. If the TENORI-ON is not operated for the time specified here, the type of operation specified by the Saver Type item will begin. ■ Range . . . . . . . . . . . . OFF, 1 — 1440 (minutes) ■ Default . . . . . . . . . . . 10 (minutes) ■ LED Buttons . . . . . . . No display 5.
Parameter Settings Setting Parameters with the Jog Dial ■ Interior Menu 7. Set Alarm Set Alarm ∞ 06:30 Sets the time at which the alarm will sound during Interior Mode operation. ● If the hourly chime and alarm are set to the same time (the alarm minutes are set to "00"), only the alarm will sound. ■ Range . . . . . . . . . . . . 00:00 — 23:59 ■ Default . . . . . . . . . . . 00:00 ■ LED Buttons . . . . . . . No display 8.
Parameter Settings Setting Parameters with the Jog Dial ■ Interior Menu 9. Save As Alarm SaveAs Alarm ∞ OK Saves the performance data (active notes and settings) in the current block for use as the alarm that will play during Interior Mode operation. ● If you use this function to change the alarm, the original default alarm will be erased. To restore the original alarm use the Factory Reset function.
Parameter Settings Setting Parameters with the Jog Dial ■ System Menu ■ System Menu The System menu provides access to functions related to basic system operation, such as factory reset, SD Memory Card formatting, and others. The System menu submenu includes the following 5 items. 1. Save As Default Page 106 2. SD Format Page 107 3. Owner Name Page 107 4. Version Check Page 108 5.
Parameter Settings Setting Parameters with the Jog Dial ■ System Menu 2. SD Format Before using SD Memory Cards with the TENORI-ON, be sure to read “Handling SD™ Memory Cards” on Page 63. SD Format ∞ OK Formats an SD Memory Card for use with the TENORI-ON. ● SD cards with a capacity greater than 32 MB will be formatted using FAT32 format, while SD cards with a capacity of 32 MB or less will be formatted using FAT16 format.
Parameter Settings Setting Parameters with the Jog Dial ■ System Menu The name entry procedure is described in the Rename Song section on Page 65. ● Owner names can be up to 16 characters in length.
Parameter Settings Setting Parameters with the Jog Dial ■ Recording Menu ■ Recording Menu This menu provides access to the TENORI-ON real-time recording function. Before using SD Memory Cards with the TENORI-ON, be sure to read “Handling SD™ Memory Cards” on Page 63. 1 Insert an SD Memory Card that has been properly formatted by the TENORI-ON into the card slot. 2 Use the jog dial select "Main Menu" ➝ "Recording menu," then press the [OK] button to the Recording menu START display.
Parameter Settings Setting Parameters with the Jog Dial 5 ■ Recording Menu The Song File name entry display will appear. A default file name will be displayed, which you can either use as-is or replace with a different name. File name entry procedure is described in the Rename Song section on Page 65. ● File names can be up to 16 characters in length. The file extension will be added automatically.
Appendix Display Message List Appendix Display Message List Power Save... Power Save mode in operation. Mode different. Can't Copy! This message will appear if you attempt to use the CopythisLayer function (➝ page 56) to copy between layers that have different performance modes. Data cannot be copied between layers that have different mode. UNDO? This message will appear after you execute a copy, clear, or reset function from the Edit menu.
Appendix Display Message List Clear Layer Block[**] Layer[**] All active notes have been cleared from the current layer/block. Clear All All active notes have been cleared from all layers and blocks. Song Already Exists! Overwrite? This display will appear when a song file with the same name already exists. Press the [OK] button if it’s OK to overwrite the file. Press the [CANCEL] button to cancel the overwrite operation.
Appendix Troubleshooting Troubleshooting Symptom Possible Cause & Solution Page Clicks and pops occur occasionally. Noise can be produced by nearby electronic devices being turned on or off, electrical motors, or similar sources. Try to use an electrical output as far away from the suspected noise source as possible. If no cause can be found, contact your Yamaha service center. – Interference from mobile phones, radios, television sets, and similar devices.
Appendix Troubleshooting Symptom Possible Cause & Solution Page SD Memory Card The SD Memory Card is write-protected. Set the card’s write-protect switch to the OFF position. page 63 Too much performance data. Performances that exceed 39KB (About 1000 operations) cannot be recorded. – Not enough remaining SD Memory Card capacity. Use a different SD Memory Card.
Appendix MIDI Data Format TENORI-ON MIDI Transmit/Receive Event Specifications MIDI Data Format TENORI-ON MIDI Transmit/Receive Event Specifications 1. Transmittable/Receivable System Messages The TENORI-ON transmits MIDI messages corresponding to operations performed on it, and received MIDI messages can be used to control the TENORI-ON tone generator. System messages that can be transmitted and received by the TENORI-ON are listed below. Refer to the MIDI Implementation Chart for other message types.
Appendix MIDI Data Format TENORI-ON MIDI Transmit/Receive Event Specifications Data1 B7 B6 B5 B4 B3 B2 B1 B0 0 0 0 TYPE1 TYPE0 0 STAT1 STAT0 TYPE [1:0] Controller Types TYPE1 TYPE0 Controller 0 0 Frame Button 0 1 Panel Button 1 0 Dial STAT [1:0] Controller Status STAT1 STAT0 Status 0 0 Button OFF or Dial Down 0 1 Button ON or Dial Up 1 1 Dial Stop B7 B6 B5 B4 B3 B2 B1 B0 0 0 0 X4 X3 X2 X1 X0 Data2 X [4:0] When TYPE [1:0] is 00 (Frame Button): Fr
Appendix MIDI Data Format TENORI-ON MIDI Transmit/Receive Event Specifications Data3 B7 B6 B5 B4 B3 B2 B1 B0 0 0 0 0 Y3 Y2 Y1 Y0 Y [3:0] When TYPE [1:0] is 01 (Panel Button): Panel Button Vertical Axis (0, 1, 2, … 15, from top to bottom). Y3 Y2 Y1 Y0 Panel Button Vertical Axis (0-15) When TYPE [1:0] is 00 (Frame Button) or 10 (Dial): All 0.
Appendix YAMAHA [ TENORI-ON ] Date :13-Feb-2007 MIDI Implementation Chart TENORI-ON MIDI Transmit/Receive Event Specifications Version : 1.0 Model TNR-W MIDI Implementation Chart Function...
Appendix Voice List Voice List When you specify a program change as a number in the range of 0 — 127, specify a number that is one less than the program number listed below.
Appendix Voice List Voice # Category Layer 7 Layer 8 Layer 9 MSB # LSB # Prog # Displayed Voice Number (Vertical/ Horizontal) Voice # Voice Name Category Layer 10 MSB # LSB # Prog # Displayed Voice Number (Vertical/ Horizontal) Voice Name 63 1 94 07/01 HighKit 63 2 17 10/01 Marble 63 1 95 07/02 BumpKit 63 2 18 10/02 PinBall 63 1 96 07/03 StompKit 63 2 19 10/03 TinToy 63 1 97 07/04 BangKit 63 2 20 10/04 Chick 63 1 98 07/05 ScrubKit 63 2 21 10/
Appendix Voice List Voice # Category Layer 13 Layer 14 Layer 15 MSB # LSB # Prog # Displayed Voice Number (Vertical/ Horizontal) Voice # Voice Name Category Layer 16 MSB # LSB # Prog # Displayed Voice Number (Vertical/ Horizontal) Voice Name 63 2 65 13/01 Children 63 2 113 16/01 SlowFlux 63 2 66 13/02 Aqua 63 2 114 16/02 AirFlow 63 2 67 13/03 Pierrot 63 2 115 16/03 Dynamo 63 2 68 13/04 Musicbox 63 2 116 16/04 Field 63 2 69 13/05 Fairy 63 2 117
Appendix Index Index A J Active Notes . . . . . . . . . . . . . . . 16 Alarm ON/OFF . . . . . . . . . . . . 103 All Block Set . . . . . . . . . . . . . . . 39 All Blocks . . . . . . . . . . . . . . . . . . 68 All Settings . . . . . . . . . . . . . . . . 83 Animation . . . . . . . . . . . . . . . . . 53 Jog Dial . . . . . . . . . . . . . . . . . . .36 B Backup . . . . . . . . . . . . . . . . . . . 39 Block . . . . . . . . . . . . . . . . . . . 5, 34 Bounce Mode . . . . . . . . . . . . . .
http://www.global.yamaha.com/tenori-on Yamaha Home Keyboards Home Page (English only) http://music.yamaha.com/homekeyboard Yamaha Manual Library http://www.yamaha.co.jp/manual/ U.R.G., Pro Audio & Digital Musical Instrument Division © 2007 Yamaha Corporation 123 701MW0.