U6M81BMC 06.2.9 16:00 ページ 1 8 OWNER’S MANUAL U.S.A.
U6M81BMC 06.2.9 16:00 ページ 2 EMU25060 ZMU01690 Read this owner’s manual carefully before operating your outboard motor.
Important manual information EMU31280 To the owner Thank you for choosing a Yamaha outboard motor. This Owner’s Manual contains information needed for proper operation, maintenance and care. A thorough understanding of these simple instructions will help you obtain maximum enjoyment from your new Yamaha. If you have any question about the operation or maintenance of your outboard motor, please consult a Yamaha dealer.
Table of contents General information .......................... 1 Identification numbers record.......... 1 Breaking in engine ........................ 18 Emission control information ........... 1 Gasoline and engine oil mixing chart (25:1).................................... 18 Procedure for pre-mixed models ..... 18 North American models..................... 1 Preoperation checks ..................... 19 Safety information ........................... 2 Important labels.............................
Table of contents models) ......................................... 34 Cleaning and anticorrosion measures ...................................... 34 Cleaning the outboard motor .......... 34 Checking painted surface of motor............................................. 34 Periodic maintenance.................... 34 Replacement parts .......................... 35 Maintenance chart .......................... 36 Greasing ......................................... 37 Cleaning and adjusting spark plug ..........
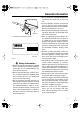
General information EMU25170 EMU30390 Identification numbers record EMU25183 Outboard motor serial number The outboard motor serial number is stamped on the label attached to the port side of the clamp bracket. Record your outboard motor serial number in the spaces provided to assist you in ordering spare parts from your Yamaha dealer or for reference in case your outboard motor is stolen. Approval label of emission control certificate This label is attached to the bottom cowling.
General information ● ● 1 ● ZMU02838 ● 1. Manufactured date label location Manufactured: ● ZMU04346 EMU25362 ● Safety information ● ● ● Before mounting or operating the outboard motor, read this entire manual. Reading it should give you an understanding of the motor and its operation. Before operating the boat, read any owner’s or operator’s manuals supplied with it and all labels. Be sure you understand each item before operating. Do not overpower the boat with this outboard motor.
General information Stay informed about the weather. Check weather forecasts before boating. Avoid boating in hazardous weather. ● Tell someone where you are going: leave a Float Plan with a responsible person. Be sure to cancel the Float Plan when you return. ● Use common sense and good judgment when boating. Know your abilities, and be sure you understand how your boat handles under the different boating conditions you may encounter. Operate within your limits, and the limits of your boat.
General information ● ● starting engine. (except 2HP) Do not touch or remove electrical parts when starting or during operation. Keep hands, hair, and clothes away from flywheel and other rotating parts while engine is running. EMU25431 Label EWM01300 WARNING ● ● This engine is equipped with a neutral starting device. The engine will not start unless the shift control is in neutral position.
General information could lead to a collision unless the Steering Rules are followed: Meeting: (you are approaching another vessel head-on) Crossing: (you are traveling across the other vessel’s path) Overtaking: (you are passing or being passed by another vessel) In the following illustration, your boat is in the center. You should give the right-of-way to any vessels shown in white area (you are the Give-Way vessel). Any vessels in the shaded area must yield to you (they are the GiveWay vessels).
General information EMU25530 Other special situations There are three other rules you should be aware of when driving your boat around other vessels. Narrow channels and bends When navigating in narrow channels, you should keep to the right when it is safe and practical to do so. If the operator of a powerdriven vessel is preparing to go around a bend that may obstruct the view of other water vessels, the operator should sound a prolonged blast on the whistle (4 to 6 seconds).
General information ZMU01708 EMU25540 Fueling instructions EWM00010 WARNING GASOLINE AND ITS VAPORS ARE HIGHLY FLAMMABLE AND EXPLOSIVE! ● Do not smoke when refueling, and keep 7 ● ● ● away from sparks, flames, or other sources of ignition. Stop engine before refueling. Refuel in a well-ventilated area. Refuel portable fuel tanks off the boat. Take care not to spill gasoline.
General information ● ● ● ● ● dry rags. Do not overfill the fuel tank. Tighten the filler cap securely after refueling. If you should swallow some gasoline, inhale a lot of gasoline vapor, or get gasoline in your eyes, get immediate medical attention. If any gasoline spills onto your skin, immediately wash with soap and water. Change clothing if gasoline spills on it. Touch the fuel nozzle to the filler opening or funnel to help prevent electrostatic sparks.
General information x 1 2 3 ZMU04605 1. Propeller diameter in inches 2. Propeller pitch in inches 3. Type of propeller (propeller mark) NOTE: Select a propeller which will allow the engine to reach the middle or upper half of the operating range at full throttle with the maximum boat load. If operating conditions such as light boat loads then allow the engine r/min to rise above the maximum recommended range, reduce the throttle setting to maintain the engine in the proper operating range.
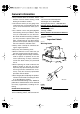
Basic components EMU25797 Main components NOTE: * May not be exactly as shown; also may not be included as standard equipment on all models. 8 15 1 3 14 13 12 11 10 9 4 5 2 6 16 8 7 1. Manual starter handle 2. Engine stop button/Engine stop lanyard switch 3. Choke knob 4. Throttle grip 5. Throttle friction adjuster 6. Clamp screw 7. Cooling water inlet 8. Anti-cavitation plate 9. Trim rod 10. Shallow water lever 11. Rope attachment 12. Tilt support knob 13. Cooling water pilot hole 14.
Basic components tions. 3 4 1 2 ZMU02846 ZMU01992 EMU25922 Gear shift lever 1. Air vent screw 2. Fuel gauge 3. Fuel joint 4. Fuel tank cap EMU25830 Fuel joint This joint is used to connect the fuel line. EMU25841 Pulling the gear shift lever towards you puts the engine in forward gear so that the boat moves ahead. Pushing the lever away from you puts the engine in reverse gear so that the boat moves astern.
Basic components there is too much resistance, it could be difficult to move the remote control lever or throttle grip, which could result in an accident. ZMU02848 EMU25961 Throttle indicator The fuel consumption curve on the throttle indicator shows the relative amount of fuel consumed for each throttle position. Choose the setting that offers the best performance and fuel economy for the desired operation.
Basic components power, the boat could slow rapidly. This could cause people and objects in the boat to be thrown forward. NOTE: The engine cannot be started with the lock plate removed. ZMU02860 1 EMU26070 2 To start the engine, first gently pull the handle out until resistance is felt. From that position, then pull the handle straight out quickly to crank the engine. Manual starter handle ZMU02851 1. Lock plate 2.
Basic components ZMU04508 To increase resistance, turn the adjuster clockwise. To decrease resistance, turn the adjuster counterclockwise. EWM00040 ZMU02854 EMU26320 Tilt support knob To keep the outboard motor in the tilted up position, push the tilt support knob under the swivel bracket. WARNING Do not overtighten the friction adjuster. If there is too much resistance, it could be difficult to steer, which could result in an accident.
Basic components 1 ZMU02862 1.
Operation EMU26901 Installation ECM00110 CAUTION: Incorrect engine height or obstructions to smooth water flow (such as the design or condition of the boat, or accessories such as transom ladders or depth finder transducers) can create airborne water spray while the boat is cruising. Severe engine damage may result if the motor is operated continuously in the presence of airborne water spray. NOTE: During water testing check the buoyancy of the boat, at rest, with its maximum load.
Operation motor greatly affects the water resistance. If the mounting height is too high, cavitation tends to occur, thus reducing the propulsion; and if the propeller tips cut the air, the engine speed will rise abnormally and cause the engine to overheat. If the mounting height is too low, the water resistance will increase and thereby reduce engine efficiency. Mount the outboard motor so that the anti-cavitation plate is between the bottom of the boat and a level 25 mm (1 in.) below it. 0–25mm (0–1in.
Operation board (if packed). For details, consult your Yamaha dealer. EWM00650 EMU27050 Gasoline and engine oil mixing chart (25:1) WARNING Avoid using bolts, nuts or washers other than those contained in the engine packaging. If used, they must be of at least the same quality of material and strength and must be tightened securely. After tightening, test run the engine and check their tightness. 1. : Gasoline 2.
Operation cool. Remaining seven hours: Run the engine at any speed. However, avoid operating at full throttle for more than 5 minutes at a time. After the first 10 hours: Operate the engine normally. Use the standard premix ratio of gasoline and oil. For details on mixing fuel and oil, see page 19. 4. 5. your trip.
Operation 1. Pour oil into the portable fuel tank, and then add gasoline. built-in fuel tank. ECM00810 CAUTION: ● ● ● ● Avoid using any oil other than the specified type. Use a thoroughly blended fuel-oil mixture. If the mixture is not thoroughly mixed, or if the mixing ratio is incorrect, the following problems could occur. Low oil ratio: Lack of oil could cause major engine trouble, such as piston seizure.
Operation brain damage or death when inhaled. Symptoms include nausea, dizziness, and drowsiness. Keep cockpit and cabin areas well ventilated. Avoid blocking exhaust outlets. 1. If there is an air vent screw on the fuel tank cap, loosen it 2 or 3 turns. 3. NOTE: During engine operation place the tank horizontally, otherwise fuel cannot be drawn from the fuel tank. 4. 2. If there is a fuel joint on the motor, firmly connect the fuel line to the joint.
Operation arm or leg. Then install the lock plate on the other end of the lanyard into the engine stop switch. 4. Pull out / turn the choke knob fully. After the engine starts, replace / return the knob to the home position. EWM00120 WARNING ● ● ● 3. Attach the engine stop switch lanyard to a secure place on your clothing, or your arm or leg while operating. Do not attach the lanyard to clothing that could tear loose.
Operation age could occur. Stop the engine and check whether the cooling water inlet on the lower case or the cooling water pilot hole is blocked. Consult your Yamaha dealer if the problem cannot be located and corrected. ZMU02030 NOTE: ● ● When the engine is cold, it needs to be warmed up. For further information, see page 23. If the engine does not start on the first try, repeat the procedure.
Operation ZMU02030 2. Move the gear shift lever quickly and firmly from neutral to forward. ZMU02030 2. 3. N F On models equipped with a tilt lock lever, check that it is in the lock/down position. Move the gear shift lever quickly and firmly from neutral to reverse. N R ZMU02866 Remote control models 1. Pull up the neutral interlock trigger (if equipped) and move the remote control lever quickly and firmly from neutral to forward.
Operation until the engine comes to a complete stop. be stopped by pulling the lanyard and removing the lock plate from the engine stop switch. EMU27861 Trimming outboard motor 2. After stopping the engine, tighten the air vent screw on the fuel tank cap and set the fuel cock lever or knob to the closed position, if equipped. The trim angle of the outboard motor helps determine the position of the bow of the boat in the water.
Operation 1 ZMU02859 1. Trim rod 1 ZMU02858 1. Trim operating angle 3. Reposition the rod in the desired hole. To raise the bow (“trim-out”), move the rod away from the transom. To lower the bow (“trim-in”), move the rod toward the transom. Make test runs with the trim set to different angles to find the position that works best for your boat and operating conditions.
Operation the boat is up about 3 to 5 degrees. With the bow up, the boat may have a greater tendency to steer to one side or the other. Compensate for this as you steer. The trim tab can also be adjusted to help offset this effect. When the bow of the boat is down, it is easier to accelerate from a standing start onto plane. and making it hard to increase speed. Operating with excessive trim-in at higher speeds also makes the boat unstable.
Operation will be tilted for more than a few minutes. Otherwise fuel may leak. ECM00231 CAUTION: ● ● ● ● Before tilting the outboard motor, follow the procedure under “Stopping engine” in this chapter. Never tilt the outboard motor while the engine is running. Severe damage from overheating can result. Do not tilt up the engine by pushing the tiller handle because this could break the handle. Keep the power unit higher than the propeller at all times.
Operation EMU28013 Procedure for tilting down (manual tilt models) 1. 2. Slightly tilt the engine up. On models equipped with a tilt support knob, pull it out. ● verse. Too much reverse thrust can cause the outboard motor to lift out of the water, increasing the chance of accident and personal injury. Return the outboard motor to its normal position as soon as the boat is back in deeper water. ECM00260 CAUTION: ZMU02888 3.
Operation ZMU02854 3. 4. The shallow water lever will lock, supporting the outboard motor in a partially raised position. When lowering the outboard motor, slightly tilt it up and push the shallow water lever down. Slowly lower the outboard motor to the normal position. EMU28192 Cruising in other conditions Cruising in salt water After operating in salt water, flush the cooling water passages with fresh water to prevent them from becoming clogged with salt deposits.
Maintenance EMU31480 Specifications NOTE: “(AL)” stated in the specification data below represents the numerical value for the aluminum propeller installed. Likewise, “(SUS)” represents the value for stainless steel propeller installed and “(PL)” for plastic propeller installed. EMU28218 Dimension: Overall length: 802 mm (31.6 in) Overall width: 343 mm (13.5 in) Overall height S: 977 mm (38.5 in) Transom height S: 436 mm (17.2 in) Weight (AL) S: 27.
Maintenance EMU28222 Transporting and storing outboard motor EWM00690 WARNING ● ● ● Leaking fuel is a fire hazard. When transporting and storing the outboard motor, close the air vent screw and fuel cock to prevent fuel from leaking. USE CARE when transporting fuel tank, whether in a boat or car. DO NOT fill fuel container to maximum capacity. Gasoline will expand considerably as it warms up and can build up pressure in the fuel container. This can cause fuel leakage and a potential fire hazard.
Maintenance lowing procedures. ECM01411 CAUTION: ● ● Do not place the outboard motor on its side before the cooling water has drained from it completely, otherwise water may enter the cylinder through the exhaust port and cause engine trouble. Store the outboard motor in a dry, wellventilated place, not in direct sunlight. EMU28302 1 2 ZMU02051 1. Water surface 2. Lowest water level Procedure EMU28372 Flushing in a test tank 1. Wash the outboard motor body using fresh water.
Maintenance ● when starting or during operation. Keep hands, hair, and clothes away from the flywheel and other rotating parts while the engine is running. 7. Run the engine at a fast idle for 10–15 minutes in neutral position. 8. Just prior to turning off the engine, quickly spray “Yamaha Stor-Rite Engine Fogging Oil” (Part No. LUB-STRRT-1200) alternately into each carburetor or the fogging hole of the silencer cover, if equipped. When properly done, the engine will smoke excessively and almost stall.
Maintenance Maintenance, replacement, or repair of the emission control devices and systems may be performed by any marine engine repair establishment or individual. All warranty repairs, however, including those to the emission control system, must be performed by an authorized Yamaha marine dealership.
Maintenance EMU28522 Maintenance chart Frequency of maintenance operations may be adjusted according to the operating conditions, but the following table gives general guidelines. Refer to the sections in this chapter for explanations of each owner-specific action. NOTE: When operating in salt water, turbid or muddy water, the engine should be flushed with clean water after each use. The “ The “ ” symbol indicates the check-ups which you may carry out yourself.
Maintenance EMU28931 Greasing Yamaha marine grease (Water resistant grease) 8 ZMU02872 EMU28952 Cleaning and adjusting spark plug EWM00560 WARNING When removing or installing a spark plug, be careful not to damage the insulator. A damaged insulator could allow external sparks, which could lead to explosion or 37 fire. The spark plug is an important engine component and is easy to inspect. The condition of the spark plug can indicate something about the condition of the engine.
Maintenance attempt to diagnose any problems yourself. Instead, take the outboard motor to a Yamaha dealer. You should periodically remove and inspect the spark plug because heat and deposits will cause the spark plug to slowly break down and erode. If electrode erosion becomes excessive, or if carbon and other deposits are excessive, you should replace the spark plug with another of the correct type.
Maintenance EMU29041 Inspecting idling speed EWM00451 WARNING ● ● Do not touch or remove electrical parts when starting or during operation. Keep hands, hair, and clothes away from the flywheel and other rotating parts while the engine is running. ECM00490 CAUTION: This procedure must be performed while the outboard motor is in the water. A flushing attachment or test tank can be used.
Maintenance turning. ZMU02875 EMU29120 ZMU02876 Exhaust leakage Start the engine and check that no exhaust leaks from the joints between the exhaust cover, cylinder head, and body cylinder. EMU29130 Water leakage Start the engine and check that no water leaks from the joints between the exhaust cover, cylinder head, and body cylinder. EMU29171 Checking propeller ZMU01897 EWM00321 WARNING You could be seriously injured if the engine accidentally starts when you are near the propeller.
Maintenance ● Check the propeller shaft oil seal for damage. NOTE: If the shear pin equipped: it is designed to break if the propeller hits a hard underwater obstacle to help protect the propeller and drive mechanism. The propeller will then spin freely on the shaft. If this happens, the shear pin must be replaced. ● 1. EMU30660 Removing the propeller 2. EMU29194 Spline models 1. Straighten the cotter pin and pull it out using a pair of pliers. 2.
Maintenance ● 1. 2. 3. stand. You could be severely injured if the outboard motor falls on you. Never get under the lower unit while it is tilted, even when the tilt support lever or knob is locked. Severe injury could occur if the outboard motor accidentally falls. damage. Consult a Yamaha dealer for repair of the lower unit seals. NOTE: For disposal of used oil, consult your Yamaha dealer. 5. Tilt the outboard motor so that the gear oil drain screw is at the lowest point possible.
Maintenance ● ● ● ● ● Yamaha dealer. Keep away from sparks, cigarettes, flames, or other sources of ignition when cleaning the fuel tank. Remove the fuel tank from the boat before cleaning it. Work only outdoors in an area with good ventilation. Wipe up any spilled fuel immediately. Reassemble the fuel tank carefully. Improper assembly can result in a fuel leak, which could result in a fire or explosion hazard. Dispose of old gasoline according to local regulations. 1. 2. 3.
Maintenance EMU29400 Coating the boat bottom A clean hull improves boat performance. The boat bottom should be kept as clean of marine growth as possible. If necessary, the boat bottom can be coated with an anti-fouling paint approved for your area to inhibit marine growth. Do not use anti-fouling paint which includes copper or graphite. These paints can cause more rapid engine corrosion.
Trouble Recovery EMU29424 Troubleshooting A problem in the fuel, compression, or ignition systems can cause poor starting, loss of power, or other problems. This section describes basic checks and possible remedies, and covers all Yamaha outboard motors. Therefore some items may not apply to your model. If your outboard motor requires repair, bring it to your Yamaha dealer. If the engine trouble warning indicator is flashing, consult your Yamaha dealer. Starter will not operate. Q.
Trouble Recovery Q. Is fuel system obstructed? A. Check for pinched or kinked fuel line or other obstructions in fuel system. Q. Is fuel contaminated or stale? A. Fill tank with clean, fresh fuel. Q. Is fuel filter clogged? A. Clean or replace filter. Q. Have ignition parts failed? A. Have serviced by a Yamaha dealer. Q. Has warning system activated? A. Find and correct cause of warning. Q. Is spark plug gap incorrect? A. Inspect and adjust as specified. Q. Is ignition wiring damaged or poorly connected? A.
Trouble Recovery A. Have serviced by a Yamaha dealer. Q. Is load on boat improperly distributed? A. Distribute load to place boat on an even plane. Q. Are weeds or other foreign matter tangled on gear housing? A. Remove foreign matter and clean lower unit. Q. Is water pump or thermostat faulty? A. Have serviced by a Yamaha dealer. Q. Is fuel system obstructed? A. Check for pinched or kinked fuel line or other obstructions in fuel system. Q. Is there excess water in fuel filter cup? A. Drain filter cup.
Trouble Recovery Q. Is fuel joint connection incorrect? A. Connect correctly. Q. Is heat range of spark plug incorrect? A. Inspect spark plug and replace it with recommended type. damaged by a collision while operating or trailering. Damage could make the outboard motor unsafe to operate. If the outboard motor hits an object in the water, follow the procedure below. Q. Is high pressure fuel pump drive belt broken? A. Have serviced by a Yamaha dealer. Q.
Trouble Recovery ● ● ● ● ● ● could result in an accident. Attach the engine stop switch lanyard to a secure place on your clothing, or your arm or leg while operating the boat. Do not attach the lanyard to clothing that could tear loose. Do not route the cord where it could become entangled, preventing it from functioning. Avoid accidentally pulling the lanyard during normal operation. Loss of engine power means the loss of most steering control.
Trouble Recovery up. weed, and so on, with fresh water. ZMU02860 6. Insert the knotted end of the emergency starter rope into the notch in the flywheel rotor and wind the rope several turns around the flywheel clockwise. ZMU01909 2. Remove the spark plugs and face the spark plug holes downward to allow any water, mud, or contaminants to drain. ZMU01910 ZMU02885 3. 7. Give a strong pull straight out to crank and start the engine. Repeat if necessary. EMU29760 Treatment of submerged motor 4.
Trouble Recovery 5. Take the outboard motor to a Yamaha dealer as soon as possible. ECM00400 CAUTION: Do not attempt to run the outboard motor until it has been completely inspected.
Consumer information EMU29811 Important warranty information for U.S.A.
Consumer information 53
Consumer information EMU29820 YAMAHA MOTOR CORPORATION, U.S.A.
Consumer information 55
Consumer information 56
Consumer information EMU29841 IMPORTANT WARRANTY INFORMATION IF YOU USE YOUR YAMAHA OUTSIDE THE USA OR CANADA 57
U6M81BMC 06.2.
U6M81BMC 06.2.9 16:00 ページ 4 Printed in France April 2006–0.
Warranty card 12/6/01 7:40 PM Page 1
Warranty card 12/6/01 7:40 PM Page 2