
Installation manual


2
1. Installation
Congratulations on having purchased an accessory which, we believe, will change the
way you use your keyboard, and will open a new world of creative possibilities and
ease of use. We have done our best to produce a reliable product, which will give
you many years of satisfaction. We hope you enjoy it.
1.1 How to Install the USB Interface Board
With power turned off and the A/C cord disconnected, place the 9000
Pro
upside
down on a stable padded work surface, such as blanket spread on a large table.
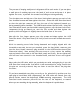
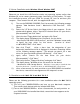
Facing the rear vertical face of the keyboard, on which input and output connectors
are located, unscrew only the eight retaining screws from around the outer edge of
the Plug-in board/Hard disk cover. Do not remove the other four hard disk
mounting screws yet. (See illustration below.)
Black
screws
Harddisk
cover
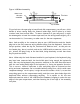
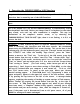
Carefully lift off the cover, with the hard disk still attached, but only far enough
to remove the cable plug from the keyboard’s flat wire bundle to the disk. Pull only
on the plug, not the wiring, and be careful not to damage or distort connector pins
on the hard disk. Then remove the four remaining hard disk mounting screws. Set
them and the hard disk aside.
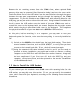
Using a pair of tweezers or a similar grasping tool, pull the small USB cable plug
from its socket on the USB Interface board and set this cable aside.
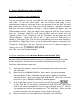
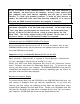
Your kit includes four short, black, tubular plastic screw spacers (with holes in
them) and four longer ones, plus four long screws which will hold both the hard disk
and the USB Interface board onto the inside of the cover. Looking down at the
outside (bottom) of the cover, place each of the four long screws into one of the
holes previously used to mount the hard disk.