
Installation manual


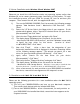
3
The process of keeping small parts in alignment will be much easier if you now place
a small piece of masking tape over the head of each screw and press it in place
against the cover, to prevent the screws from falling out during assembly.
Turn the plate over and slip one of the short, black plastic spacers over each of the
four threaded screws and down against the cover. Orient the USB Interface board
so that the multi-pin connector will face the rear of the keyboard (toward you,
during assembly) when installed. The USB Interface board has six holes. Using the
four holes which match your hard disk’s mounting pattern, slip the board, electronic
components facing up toward you, onto the four screws and down against the
spacers, which will support it slightly above the inside face of the cover.
Now slip the four longer spacers over the screws and down against the USB
Interface board. Only about 1mm (1/16 inch) of each screw will extend above each
spacer.
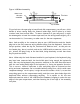
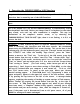
With its mounting screw holes facing downward and roughly aligned with the
threaded screw ends, but not yet attached, press the hard disk’s connector pins
into the short female connector plug attached to the USB Interface board (See
illustration below.). Now, working with one screw at a time, remove the masking
tape and attach the screws to the hard disk, evenly and firmly. Do not tighten any
until all have been started in the threaded holes, and then do not over-tighten
them.
Next take the USB cable, which you previously set aside, and again plug it into the
USB Interface board socket from which it was removed earlier, being careful that
the pins are correctly oriented; they are closer to one flat side of the plug than
the other.
If you have assembled everything correctly so far, when held in position over the
open plug-in board/hard disk compartment, the USB cable will extend from the
board’s socket toward the keyboard’s SIMM mounting compartment. The USB
Interface’s male connector pins will face the rear of the keyboard, or toward
where you are standing during assembly, when the keyboard is upside down.