
Installation manual


4
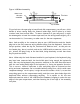
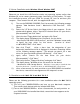
Figure: USB Board assembly:
Metal cover
HD-cable
9000PRO
Flat cable
Harddisk
If you look into the open plug-in board/hard disk compartment, you will see a thick
bundle of wires running along the forward inside edge, held in place by a black
retainer band, bent around them. To assure clearance of your new parts, it might
be advantageous to bend the retainer open and free the wiring bundle slightly, so it
can be moved a bit, if necessary, to make room for the new components.
Next, look carefully at the connector pins on your USB Interface and the female
plug end on the flat connector wiring bundle coming from the keyboard. Note that
one pin position, called the Key Pin, has been left blank on both. At this point on
the female plug, there is no hole, and on the USB Interface connector, there is no
pin. Attach the plug firmly to the hard disk, being absolutely certain that these
Key Pin positions match.
Note: When only the hard disk was installed in your keyboard, the keyboard’s plug
may have been connected with the hard disk’s pins facing toward the keyboard’s
keys. But now, the keyboard’s plug connector attaches to the USB Interface board
near the rear inside (back) edge of the keyboard, i.e. facing the opposite direction.
This is correct. What is important is that everything must be oriented so that
wiring and new components can be installed without using force, which could cause
component damage. At this point, it might be useful to make a trial fit, to see that
everything goes into the compartment easily, and that cover plate holes align with
keyboard holes, without compressing anything. It is easiest to tilt the rear
keyboard connector side of the USB Interface downward, slipping it under the rear
edge of the open compartment, and then lowering the front edge of the assembly
into place.