
Installation manual


5
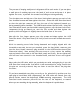
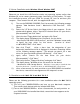
Remove the six retaining screws from the SIMM Cover, where optional RAM
memory chips may be mounted (See illustration below.) and set the cover aside.
Feed the socket end of the USB cable from the new Interface through the space
between the two open compartments and out through the opening of the SIMM
compartment. If your kit includes a new SIMM cover, with mounting holes for the
USB plug, you may set aside or discard the old cover. Using hardware included with
the kit, mount the USB socket onto the inside of the new SIMM cover and re-
attach the cover to the keyboard with six screws. Replace also the eight screws
which attach the plug-in board/hard disk cover to the keyboard. This completes
the physical installation of your new Musitronics 9000
Pro
USB Interface.
At this point, before attaching it to a computer, you may want to test your
keyboard system for function, to be sure that everything is correctly installed so
far:
1.) Switch on the 9000
Pro
. You should hear the hard disk running. Then check
several standard functions, such as DISK DIRECT, to verify that you have
access to the internal hard disk. If not, check all connections again.
2.)
Using the standard USB cable included in the kit, and if you are ready to
proceed to driver installation, you would now be able to connect a running
computer to the 9000 Pro’s new USB Interface socket. However, things may
be less complicated if you first turn off both the 9000 Pro and your
computer, review instructions, and then proceed to the section “Installation
of the Windows Drivers”.
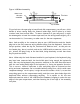
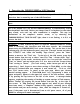
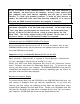
1.2 How to Install the USB Socket:
If you ordered your kit included a new SIMM cover with mounting holes for the
USB socket, you may skip over this section. If not, you can modify the standard
cover, which came with your keyboard, according to the following instructions and
dimensions.