BLACK DIC 2181s* RTL Stereo Amplifier OWNER’S MANUAL MANUAL DE INSTRUCCIONES
HiFi Began with Yamaha Yamaha’s involvement with and passion for music goes back more than a century, to when we built our first reed organ in 1887. Now we are the world’s leading producer of pianos and other musical instruments, and are involved with music in many other ways as well. We manufacture professional recording equipment, we design concert halls and we assist artists at concerts with set up and sound tuning. This knowledge and experience benefits our production of audio components in many ways.
Excellence in Audio Achievement First HiFi System introduced in 1920 We introduced numerous HiFi components (turntables, FM/AM tuners, integrated amplifiers, preamplifiers, power amplifiers and speakers) in 1955 - 1965. Natural Sound Speaker Series introduced in 1967 NS-20 Monitor Speaker CA-1000 Integrated Amplifier Featuring A-Class operation, the CA-1000 set the standard for integrated amplifiers.
◆ Full floating and balanced circuit design achieves for the first time the full potential of analogue amplification An entirely new floating and balanced power amp achieves complete symmetry and permits full balanced transmission (amplification) from the input jack to just before the speaker jack ◆ Full-stage balanced signal transmission The world’s first integrated amp to offer full stage balanced transmission, combining high power output with good sound texture and outstanding S/N performance ◆ Floatin
Controls and functions In this chapter, you will learn the controls and functions of A-S2000.
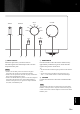
Controls and functions ■ Front panel (left side) BASS - POWER PHONES TRIM ON -6 0 SPEAKERS +6 OFF A B A+B BI-WIRING +12 dB OFF 1 + 2 3 1 POWER Press upward or downward to turn on or off this unit. y The POWER indicator above lights up when this unit is turned on. 4 5 2 Remote control sensor Receives signals from the remote control. The remote control transmits a directional infrared beam.
INPUT TREBLE BALANCE VOLUME CD BAL LINE 1 CD LINE 2 MAIN DIRECT - + L TUNER PHONO R PHONO MM AUDIO MUTE MC 3 PHONES jack Outputs audio for private listening with headphones. Note When headphones are plugged in: – Both speaker sets connected to the SPEAKERS L/R CH A and B terminals are turned off. – No signals are output at the PRE OUT jacks, while signals are output at the REC jacks. – You cannot select MAIN DIRECT as the input source.
Controls and functions ■ Front panel (right side) BASS - POWER PHONES ON TRIM -6 0 SPEAKERS +6 OFF +12 OFF + A B A+B BI-WIRING dB 6 6 BASS Increases or decreases the low frequency response. The 0 position produces a flat response. Control range: –10 dB to +10 dB 7 TREBLE Increases or decreases the high frequency response. The 0 position produces a flat response.
INPUT TREBLE BALANCE VOLUME CD BAL CD LINE 1 TUNER LINE 2 MAIN DIRECT - + L PHONO R PHONO MM AUDIO MUTE MC 7 8 9 0 0 INPUT selector Selects the input source you want to listen to. The audio signals of the selected input source are also output at the REC jacks. Notes • Switch to the CD BAL position to select the CD player connected to the CD BAL jacks (balanced XLR jacks). • Switch to the CD position to select the CD player connected to the CD jacks (unbalanced RCA jacks).
Controls and functions ■ Rear panel 1 2 3 SPEAKERS R CH INPUT LINE2 A CD BAL TUNER LINE 1 PB REC L L R CD R B R L GND PHONO See page 14 for connection information. 1 SPEAKERS L/R CH terminals 2 INPUT jacks 3 LINE2 jacks 4 MAIN IN jacks Note Adjust the volume level using the volume control on the external amplifier connected to the MAIN DIRECT jacks when you select MAIN DIRECT as the input source.
4 5 1 6 SPEAKERS L CH MAIN IN PRE OUT 7 VOLTAGE SELECTOR A 230240V L R AC IN B 8 6 AC IN Use this inlet to plug in the supplied power cable. 7 VOLTAGE SELECTOR (Asia and General models only) The VOLTAGE SELECTOR on the rear panel of this unit must be set for your local main voltage BEFORE plugging the AC power cable into the AC wall outlet. Improper setting of the VOLTAGE SELECTOR may cause damage to this unit and create a potential fire hazard.
Controls and functions ■ Remote control 4 Amplifier control buttons 1 INPUT / Selects the input source you want to listen to. A/B/C/D/E Notes • When MAIN DIRECT is selected as the input source, no signals are output at the PRE OUT and REC jacks. • If headphones are plugged into the PHONES jack while MAIN DIRECT is selected as the input source, no audio is output at the PHONES jack. 2 PRESET VOL +/– Controls the volume level.
Connections In this section, you will make connections between A-S2000, speakers, and source components.
Connections Speakers A (R channel) CD player with RCA jacks CD player with XLR jacks Tuner + - SPEAKERS R CH A LINE2 INPUT CD BAL TUNER LINE 1 PB MAIN IN REC PRE OUT L L R CD R B R L GND PHONO + Ground Speakers B (R channel) Turntable DVD player, etc. Caution • Do not let the bare speaker wires touch each other or do not let them touch any metal part of this unit. This could damage this unit and/or the speakers.
External amplifier or active subwoofer Preamplifier, AV receiver, etc. Speakers A (L channel) - SPEAKERS L CH LINE2 INPUT TUNER LINE 1 PB + MAIN IN REC PRE OUT A L L R AC IN B L GND – + Speakers B (L channel) CD recorder, tape deck, etc. Caution Fig. 1 Fig. 2 + + L L – – – English – R R + + • Because the power amplifier of A-S2000 is of the floating balanced type, the following types of connections are not possible.
Connections ■ Connecting the speakers ■ Connecting the banana plug (Except for Europe models) 1 Remove approximately 10 mm (0.4 in) of insulation from the end of each speaker cable and twist the exposed wires of the cable together to prevent short circuits. First, tighten the knob and then insert the banana plug into the end of the corresponding terminal. 10 mm (0.4 in) Banana plug 2 Unscrew the knob and then insert the bare wire into the hole.
■ Bi-wire connection ■ Connecting to the CD BAL jacks The bi-wire connection separates the woofer from the combined midrange and tweeter section. A bi-wire compatible speaker has four binding post terminals. These two sets of terminals allow the speaker to be split into two independent sections. This split connects the mid and high frequency drivers to one set of terminals and the low frequency driver to the other pair. Connect your CD player with the XLR balanced output jacks.
Connections ■ VOLTAGE SELECTOR (Asia and General models only) Caution The VOLTAGE SELECTOR on the rear panel of this unit must be set for your local voltage BEFORE plugging the power cable into the AC wall outlet. Improper setting of the VOLTAGE SELECTOR may cause damage to this unit and create a potential fire hazard. Rotate the VOLTAGE SELECTOR clockwise or counterclockwise to the correct position using a straight slot screwdriver. Voltages are as follows: ........................
Specifications In this section, you will find technical specifications for A-S2000.
01EN_03_Add_A-S2000_RTL.fm Page 20 Wednesday, August 6, 2008 1:22 PM Specifications POWER SECTION CONTROL SECTION • Minimum RMS Output Power (8 Ω , 20 Hz to 20 kHz, 0.02% THD) ...................... 90 W + 90 W (4 Ω , 20 Hz to 20 kHz, 0.02% THD) .................. 150 W + 150 W • Input Sensitivity/Input Impedance CD, etc. .................................................................. 150 mV/47 kΩ MM ......................................................................... 2.5 mV/47 kΩ MC ...........
■ Block diagram CD BAL PHONO CD HOT (POSITIVE PHASE) COLD (NEGATIVE PHASE) EQ AMP MC HEAD AMP MM/MC BUFFER AMP INPUT SELECTOR HOT COLD for LINE AMP2 for VOLUME1 TONE CONTROL DEVICES FLAT TONE CONTROL DEVICES FLAT TONE CONTROL/FLAT SUB TRANSFORMER (for POWER AMP / VOLTAGE AMP STAGE) POWER SWITCH HOT COLD BALANCE ⇐⇒ UNBALANCE CONVERTER MAIN TRANSFORMER MAIN DIRECT FLOATING BALANCE POWER AMPLIFIER SPEAKER DRIVER HOT (POSITIVE PHASE) SIDE for COLD R CH for HOT R CH for COLD L C
Specifications ■ Tone control characteristics +15 +12.5 +10 Response (dB) +7.5 +5 +2.5 0 –2.5 –5 –7.5 –10 –12.5 –15 10 20 50 100 200 500 1k 2k 5k 10k 20k 50k 100k Frequency (Hz) ■ Total harmonic distortion 1 0.5 THD + N Ratio (%) 0.2 0.1 0.05 0.02 20kHz 0.01 20Hz 0.005 1kHz 0.002 0.
■ Total harmonic distortion (PHONO) 10 5 THD + N Ratio (%) 2 1 0.5 0.2 0.1 0.05 20Hz 1kHz 20kHz 0.02 0.01 0.005 0.002 0.001 0.0005 0.0002 0.
Troubleshooting Refer to the chart below if this unit does not function properly. If the problem you are experiencing is not listed below or if the instructions below do not help, turn off this unit, disconnect the AC power cable, and contact the nearest authorized Yamaha dealer or service center. Problem Cause Remedy See page The AC power cable is not connected to the AC IN inlet on the rear panel or not plugged in the AC wall outlet. Connect the AC power cable firmly.
Problem Cause Remedy See page — The volume level is low while playing a record. Incorrect setting for the PHONO switch on the front panel. Switch the PHONO switch to the MM or MC position according to the type of magnetic cartridge of the turntable. The sound is degraded when listening with the headphones connected to the CD player connected to this unit. The power of this unit is turned off. Turn on the power of this unit. The remote control does not work or function properly.
HiFi empezó con Yamaha La relación de Yamaha con la música y su pasión por la misma se remonta a más de un siglo, cuando fabricamos nuestro primer órgano de lengüetas en 1887. Ahora somos líderes mundiales en la fabricación de pianos y otros instrumentos musicales, y también estamos relacionados con la música de muchas otras formas. Fabricamos equipos de grabación profesionales, diseñamos salas de conciertos y ayudamos a los artistas en la preparación de sus conciertos y en la afinación del sonido.
Excelencia en audio Primer sistema HiFi presentado en 1920 En 1955 – 1965 hemos presentado numerosos componentes HiFi (tocadiscos, sintonizadores de FM/AM, amplificadores integrados, preamplificadotes, amplificadores de potencia, y altavoces). Serie de Altavoces Natural Sound presentada en 1967 Altavoz monitor NS-20 Amplificador integrado CA-1000 Con funcionamiento Clase A, el CA-1000 estableció la norma para amplificadores integrados.
◆ Diseño de circuito completamente flotante y equilibrado que logra por primera vez el potencial pleno de la amplificación analógica Un amplificador de potencia flotante y equilibrado completamente nuevo que logra la simetría completa y permite la transmisión (amplificación) completamente equilibrada desde el jack de entrada hasta justo antes del jack del altavoz ◆ Transmisión de señal equilibrada de etapa completa El primer amplificador integrado del mundo en ofrecer transmisión equilibrada de etapa compl
Controles y funciones En este capítulo aprenderá los controles y funciones del A-S2000.
Controles y funciones ■ Panel delantero (lado izquierdo) BASS - POWER PHONES TRIM ON -6 0 SPEAKERS +6 OFF A B A+B BI-WIRING +12 dB OFF 1 + 2 3 1 POWER Pulse hacia arriba o hacia abajo para encender o apagar esta unidad. y El indicador POWER de arriba se enciende cuando se enciende esta unidad. 4 5 2 Sensor de mando a distancia Recibe señales del mando a distancia. El mando a distancia transmite una rayo infrarrojo direccional.
INPUT TREBLE BALANCE VOLUME CD BAL LINE 1 CD LINE 2 MAIN DIRECT - + L TUNER PHONO R PHONO MM AUDIO MUTE MC 3 Jack PHONES Da salida a sonido para escuchar en privado con auriculares. Nota Cuando están enchufados los auriculares: – Ambos juegos de altavoces conectados a los terminales SPEAKERS L/R CH A y B están apagados. – No salen señales por los jacks PRE OUT, pero si salen por los jacks REC. – No puede seleccionar MAIN DIRECT como fuente de entrada.
Controles y funciones ■ Panel delantero (lado derecho) BASS - POWER PHONES ON TRIM -6 0 SPEAKERS +6 OFF +12 OFF + A B A+B BI-WIRING dB 6 6 BASS Aumenta o disminuye la respuesta de baja frecuencia. La posición 0 produce una respuesta plana. Margen de control: –10 dB a +10 dB 7 TREBLE Aumenta o disminuye la respuesta de alta frecuencia La posición 0 produce una respuesta plana.
INPUT TREBLE BALANCE VOLUME CD BAL CD LINE 1 TUNER LINE 2 MAIN DIRECT - + L PHONO R PHONO MM AUDIO MUTE MC 7 8 9 0 0 Selector INPUT Selecciona la fuente de entrada que usted quiere escuchar. Las señales de audio de la fuente de entrada seleccionada salen también por los jacks REC. Notas • Cambie a la posición CD BAL para seleccionar el reproductor CD conectado a los jacks CD BAL (jacks XLR equilibrados).
Controles y funciones ■ Panel trasero 1 2 3 SPEAKERS R CH INPUT LINE2 A CD BAL TUNER LINE 1 PB REC L L R CD R B R L GND PHONO Vea la página 14 para conocer información de conexión. 1 Terminales SPEAKERS L/R CH 2 Jacks INPUT 3 Jacks LINE2 4 Jacks MAIN IN Nota Ajuste el nivel del sonido con el control de volumen del amplificador externo conectado a los jacks MAIN DIRECT cuando selecciona MAIN DIRECT como fuente de entrada.
4 5 1 6 SPEAKERS L CH MAIN IN PRE OUT 7 VOLTAGE SELECTOR A 230240V L R AC IN B 8 6 AC IN Use esta entrada para conectar el cable de alimentación suministrado. 7 VOLTAGE SELECTOR (Modelos de Asia y generales solamente) El VOLTAGE SELECTOR del panel trasero de esta unidad deberá ponerse en la posición correspondiente a la tensión de su localidad ANTES de enchufar el cable de alimentación de CA a la toma de CA.
Controles y funciones ■ Mando a distancia 4 Botones de control del amplificador 1 INPUT / Seleccione la fuente de entrada que usted quiere escuchar. A/B/C/D/E Notas • Cuando se selecciona MAIN DIRECT como fuente de entrada no salen señales por los jacks PRE OUT y REC. • Si los auriculares están enchufados en el jack PHONES mientras MAIN DIRECT está seleccionado como fuente de entrada, no sale audio por el jack PHONES. 2 PRESET VOL +/– Controla el nivel del sonido.
Conexiones En esta sección hará las conexiones entre el A-S2000, los altavoces y los componentes fuente.
Conexiones Altavoces A (Canal R) Reproductor CD con jacks RCA Reproductor CD con jacks XLR Sintonizador + - SPEAKERS R CH A LINE2 INPUT CD BAL TUNER LINE 1 PB MAIN IN REC PRE OUT L L R CD R B R L GND PHONO + Tierra Altavoces B (Canal R) Giradiscos Reproductor DVD, etc. Precaución • No deje que los cables desnudos de los altavoces se toquen entre sí o toquen cualquier parte metálica de esta unidad. Esto podría dañar esta unidad y/o los altavoces.
Preamplificador, receptor AV, etc. Amplificador externo o altavoz de subgraves activo Altavoces A (Canal L) - SPEAKERS L CH LINE2 INPUT TUNER LINE 1 PB + MAIN IN REC PRE OUT A L L R AC IN B L GND – + Altavoces B (Canal L) Grabadora de CD, platina de casete, etc. Precaución Fig. 1 Fig. 2 + + L L – – – Español – R R + + • Como el amplificador de potencia de A-S2000 es de tipo equilibrado flotante, no son posibles los tipos de conexiones siguientes.
Conexiones ■ Conexión de altavoces ■ Conexión de la clavija tipo banana (Excepto los modelos para Europa) 1 Quite aproximadamente 10 mm de aislamiento del extremo de cada cable de altavoz y luego retuerza juntos los hilos expuestos del cable para evitar cortocircuitos. Primero apriete la perilla y luego inserte la clavija tipo banana en el extremo del terminal correspondiente. 10 mm Clavija tipo banana 2 Desatornille la perilla y luego inserte el cable pelado en el agujero.
■ Conexión bicable ■ Conexión a los jacks CD BAL La conexión bicable separa el altavoz de subgraves de la sección combinada de altavoz de gama central y altavoz de agudos. Un altavoz compatible con bicable tiene cuatro terminales tipo borne. Estos dos juegos de terminales permiten dividir el altavoz en dos secciones independientes. Con esta división se conectan las bocinas de frecuencia media y alta a un juego de terminales y la bobina de baja frecuencia al otro par.
Conexiones ■ VOLTAGE SELECTOR (Modelos de Asia y generales solamente) Precaución El VOLTAGE SELECTOR del panel trasero de esta unidad debe ajustarse para la tensión de la red eléctrica local ANTES de conectar el cable de alimentación a la toma de CA. Un ajuste incorrecto del VOLTAGE SELECTOR puede ser la causa de que esta unidad se convierta en un posible peligro de incendio. Gire el VOLTAGE SELECTOR a derecha o izquierda a la posición correcta usando un destornillador de punta plana.
Especificaciones En esta sección encontrará las especificaciones técnicas para A-S2000.
02ES_03_Add_A-S2000_RTL.fm Page 20 Wednesday, August 6, 2008 1:23 PM Especificaciones SECCIÓN DE ALIMENTACIÓN SECCIÓN DE CONTROL • Potencia de salida RMS mínima (8 Ω , 20 Hz a 20 kHz, THD de 0,02%) ................... 90 W + 90 W (4 Ω , 20 Hz a 20 kHz, THD de 0,02%) ............... 150 W + 150 W • Sensibilidad de entrada/Impedancia de entrada CD, etc. .................................................................. 150 mV/47 kΩ MM .......................................................................
■ Diagrama en bloques CD BAL PHONO CD HOT (POSITIVE PHASE) COLD (NEGATIVE PHASE) EQ AMP MC HEAD AMP MM/MC BUFFER AMP INPUT SELECTOR HOT COLD for LINE AMP2 for VOLUME1 TONE CONTROL DEVICES FLAT TONE CONTROL DEVICES FLAT TONE CONTROL/FLAT SUB TRANSFORMER (for POWER AMP / VOLTAGE AMP STAGE) POWER SWITCH HOT COLD BALANCE ⇐⇒ UNBALANCE CONVERTER MAIN TRANSFORMER MAIN DIRECT FLOATING BALANCE POWER AMPLIFIER SPEAKER DRIVER HOT (POSITIVE PHASE) SIDE for COLD R CH for HOT R CH for COL
Especificaciones ■ Características de control de tono +15 +12.5 +10 Response (dB) +7.5 +5 +2.5 0 –2.5 –5 –7.5 –10 –12.5 –15 10 20 50 100 200 500 1k 2k 5k 10k 20k 50k 100k Frequency (Hz) ■ Distorsión armónica total 1 0.5 THD + N Ratio (%) 0.2 0.1 0.05 0.02 20kHz 0.01 20Hz 0.005 1kHz 0.002 0.
■ Distorsión armónica total (PHONO) 10 5 THD + N Ratio (%) 2 1 0.5 0.2 0.1 0.05 20Hz 1kHz 20kHz 0.02 0.01 0.005 0.002 0.001 0.0005 0.0002 0.
Solución de problemas Consulte la tabla de abajo si esta unidad no funciona correctamente. Si el problema que usted tiene no está en la lista de abajo o las instrucciones no siguientes no sirven de ayuda, apague esta unidad, desconecte el cable de alimentación y póngase en contacto con el centro de servicio o concesionario Yamaha autorizado más cercano.
Problema Causa Remedio El nivel del sonido está bajo mientras se reproduce un disco. Ajuste incorrecto del conmutador PHONO del panel frontal. Ponga el conmutador PHONO en la posición MM o MC según el tipo de cápsula magnética del giradiscos El sonido se degrada cuando se escucha con los auriculares conectados al reproductor CD conectado a esta unidad. La alimentación de esta unidad está apagada. Conecte la alimentación de esta unidad. El mando a distancia no funciona bien.
高保真始于 Yamaha Yamaha 参与和钟情于音乐可以追溯到一个多世纪以前,我们在 1887 年的时候建成我们第一台簧风琴。现在我们是世界上领先的钢琴及 其它乐器生产者,并广泛参与到关于音乐的其他活动中。我们制造 专业录音设备,我们设计音乐厅并且协助艺术家在音乐会上配置和 调谐音响环境和设备。 在很多方面,我们的音频装置等产品得益于这些丰富的知识和 经验。 我们推出第一台高保真电唱机是在 1954 年。此后我们是第一 个提供批量生产高质量的音响设备的厂家之一 , 并推出了许多传奇 的音响组件。 我们希望您享受真正的高保真 Yamaha Natural Sound。
卓越的音频成就 第一个高保真系统的推出是在 1920 年 在 1955 年 -1965 年,我们推出许多高保真 组件 ( 电唱机,FM/AM 调谐器,综合放大器, 前置放大器 , 功率放大器和扬声器)。 自然声扬声器系列的推出在 1967 年 NS-20 监控扬声器 CA-1000 综合放大器 具有A级操作特色,CA-1000 为综合放大器奠定了 标准。 NS-690 监控扬声器 NS-1000M 监控扬声器 一个真正的有传奇色彩的扬声器,仍然为高保真爱 好者所崇敬。 B-1 功率放大器 创新的功率放大器,在所有阶段均使用 FET。 C-2 控制放大器 在米兰国际音乐节和高保真展上获得最高奖。 NS-10M 播音室监听机扬声器 成为世界上最热门的播音室监听机。 A-1 综合放大器 PX-2 电唱机 Yamaha 的第一个直臂电唱机。 B-6 功率放大器 金字塔型功率放大器。 GT-2000/L 电唱机 第一个 CD 播放机 (CD-1)的推出在 1983 年 B-2x 功率放大器 MX-10000 功率放大器 和 CX-10000 控制放大器 重新定义了分离组件的能力。 AX-1 综合放大
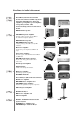
◆ 全浮动平衡电路设计首次完全实现模拟放大潜能 全新的浮动平衡功放实现完全对称,从输入插孔到扬声器插孔之前,允许充分的平衡传输 ( 放大 ) ◆ 全阶段平衡信号传输 世界上第一个综合放大器,可以提供全阶段平衡传输,将高功率输出和良好健全的质地以及优秀的 S/N 表现等 相结合 ◆ 浮动平衡功率放大器 ◆ 全面平衡控制放大器 ◆ 全面平衡数码音量和声调控制 ◆ 四个大容量电源 ◆ 对称结构 ◆ 用于低阻抗驱动器的耳机放大器 ■ 提供的配件 请检查您收到了下列所有的部件。 • 遥控器 • 干电池 (AA,R6,UM-3) (×2) • 电源线 • 安全手册 目录 控制钮和功能 ............................................................................6 连接 ...................................................................................14 规格 .................................................
控制钮和功能 在这部分,您将学会 A-S2000 的控制和功能。 5 Zh
控制钮和功能 ■ 前面板 ( 左侧 ) BASS - POWER PHONES TRIM ON -6 0 SPEAKERS +6 OFF A B A+B BI-WIRING +12 dB OFF 1 + 2 3 4 5 1 POWER 2 遥控器传感器 按钮向上或向下,以开启或关闭本机。 接收来自遥控器的信号。 遥控器发射一道有方向性的红外线光束。 在操作本机期间, 请确保遥控器直接对准前部面板上的遥控器传感器。 y 当开启本机时,POWER 上面的指示器点亮。 注 • 当您打开本机时如果 POWER 指示灯闪烁,断开交流电源, 就近联络 Yamaha 授权的经销商或服务中心 (请参阅第 24 页)。 • 当您打开本机时,在本机可以再现声音之前将有几秒钟的 延迟。 30 6 Zh 30 大约 6 米
INPUT TREBLE BALANCE VOLUME CD BAL LINE 1 CD LINE 2 MAIN DIRECT - + L TUNER PHONO R PHONO MM AUDIO MUTE MC 3 PHONES 插孔 5 SPEAKERS 输出独自用耳机收听的音频信号。 打开或关闭连接在后面板的 SPEAKERS L/R CH A 和/或 B 端 子上的这组前扬声器。 • 切换到 OFF 位置,关闭两组扬声器。 • 切换到 A 或 B 位置,打开连接到 SPEAKERS L/R CH A 注 当耳机插入时: - 连接到 SPEAKERS L/R CH A 和 B 终端的扬声器组被关闭。 - 在 PRE OUT 插孔无信号输出,信号输出到 REC 插孔。 - 您不能选择 MAIN DIRECT 作为输入源。 - 如果有耳机插入 PHONES 插孔,而 MAIN DIRECT 选定作为 输入源,则在 PHONES 插孔没有音频输出。 4 TRIM • 或 B 端子的扬声器组。 切换到 A+B BI-WIRING 位置,打开两组扬声器。 警告 如果
控制钮和功能 ■ 前面板 ( 右侧 ) BASS - POWER PHONES ON TRIM 0 -6 + SPEAKERS +6 OFF +12 A B A+B BI-WIRING dB OFF 6 6 BASS 8 BALANCE 增大或减少低频响应。 0 位置产生降音响应。 控制范围: -10 dB 到 +10 dB 调节左右扬声器的音频输出平衡,对于由于扬声器位置或听 音室条件引起的声音不均衡进行补偿。 7 TREBLE 注 增大或减少高频响应。 0 位置产生降音响应。 控制范围: -10 dB 到 +10 dB 注 • 当 BASS 和 TREBLE 控制钮双方设置为 0 时,音频信号绕过 音调控制电路。 • BASS 和 TREBLE 控制钮不影响 MAIN DIRECT 插孔的信号 输入和 REC OUT 插孔的信号输出。 BALANCE 控制钮不影响 MAIN DIRECT 插孔的信号输入和 REC OUT 插孔的信号输出。 9 PHONO 选择连接到后面板的 PHONO 插孔上的电唱机的电磁式拾音头 类型。 • 当被连接的电唱机有移动磁体
INPUT TREBLE BALANCE VOLUME CD BAL CD LINE 1 TUNER LINE 2 MAIN DIRECT - + L PHONO R PHONO MM AUDIO MUTE MC 7 8 9 0 A B 0 INPUT 选择器 A AUDIO MUTE 选择您想要收听的输入源。 选定输入源的音频信号也在 REC 插孔输出。 向下按下,减少当前的音量约 20 dB。 再次按此以恢复音频 输出到以前的音量水平。 注 • 切换到 CD BAL 位置,选择连接到 CD BAL 插孔 (均衡 XLR 插孔)的光盘播放机。 • 切换到 CD 位置,选择连接到 CD 插孔(非均衡 RCA 插孔)的 光盘播放机。 • 切换到 MAIN DIRECT 位置,选择连接到 MAIN IN 插孔的组 件。 当 MAIN DIRECT 被选作为输入源时,在 PRE OUT, REC 和 PHONES 插孔上无信号输出。 y • 当静音功能打开时,AUDIO MUTE 指示灯点亮。 • 您也可以按下前面板上的 VOLUME 或按下遥控器的 VOL +
控制钮和功能 ■ 后部面板 1 2 3 SPEAKERS R CH INPUT LINE2 A CD BAL TUNER LINE 1 PB REC L L R CD R B R L GND PHONO 请参阅第 14 页 获取有关连接信息。 1 SPEAKERS L/R CH 端子 2 INPUT 插孔 3 LINE2 插孔 4 MAIN IN 插孔 注 当您选择 MAIN DIRECT 作为输入源时,使用连接到 MAIN DIRECT 插孔的外部放大器的音量控制钮调整音量。 10 Zh 5 PRE OUT 插孔 注 • 当您连接音频针形插头到 PRE OUT 插孔使用外部放大器驱 动扬声器时,没有必要使用 SPEAKERS L/R CH 端子。 • 在 PRE OUT 插孔输出的信号受到音调控制设定的影响。 • PRE OUT 插孔输出与 SPEAKERS L/R CH 端子相同的声道 信号。 • 当您使用重低音扬声器时,连接它到 PRE OUT 插孔,扬声器 到 SPEAKERS L/R CH 终端。
4 5 1 6 7 SPEAKERS L CH MAIN IN PRE OUT VOLTAGE SELECTOR A 230240V L R AC IN B 8 6 AC IN 8 脚 利用这个端口插入附带的电源线。 本机的脚包含有内置固定钉。 使用固定钉在设置上能减少振 动影响。 使用该固定钉时,移走磁体脚。 7 VOLTAGE SELECTOR (仅限亚洲和通用型号) 在您将交流电源线插入到墙壁上的交流电源插座之前,本机 后部面板上的 VOLTAGE SELECTOR 必须要根据您当地的主电 压设置。 不妥当的 VOLTAGE SELECTOR 设置将会损坏本机并 可能造成火灾。 使用平板螺丝刀顺时针或逆时针旋转 VOLTAGE SELECTOR。 电压如下: AC 110/120/220/230-240 V,50/60 Hz 固定钉 警告 当使用脚的内置固定钉时,固定钉可能会划伤本机安装的支 架或地板。 当在昂贵的家具等安置本机时请使用保护材料。 y 如果本机不牢固,你可以旋转它来调整脚的高度。 中文 11 Zh
控制钮和功能 ■ 遥控器 4 放大器控制钮 1 INPUT / 选择您想要收听的输入源。 A/B/C/D/E 注 • 当 MAIN DIRECT 选作输入源时 , 在 PRE OUT 和 REC 插孔上无 信号输出。 • 如果有耳机插入 PHONES 插孔,而 MAIN DIRECT 选定作为 输入源,则在 PHONES 插孔没有音频输出。 2 PRESET VOL +/控制音量水平。 注 3 当你选择 MAIN DIRECT 作为输入源时,VOLUME 控制钮不起 作用。 使用连接到 MAIN DIRECT 插孔的外部放大器的音量控 制钮调整音量。 MUTE 降低当前的音量约 20 dB。 再次按此以恢复音频输出到以前 的音量水平。 y 您也可以按下 VOL +/- 以恢复音频输出。 VOL 4 MUTE INPUT ■ 安装遥控器电池 INPUT 1 VOL 3 2 1 红外信号传送 输出红外操作信号。 2 Yamaha 调谐器控制钮 用来操作 Yamaha 调谐器的功能。有关详情请参阅您的调谐 器的使用说明书。 1 按下 注 2 请按照位于电池舱内侧的
连接 在这个部分,您将建立 A-S2000,扬声器和源装置之间的连接。
连接 扬声器组 A ( 右声道) 具有 RCA 插孔的 CD 播放机 具有 XLR 插孔的 CD 播放机 调谐器 + - SPEAKERS R CH A LINE2 INPUT CD BAL TUNER LINE 1 PB MAIN IN REC PRE OUT L L R CD R B R L GND PHONO + 接地 扬声器组 B ( 右声道) 电唱机 DVD 播放机等 警告 • 请勿让裸露的扬声器导线互相接触或让它们接触到本机的 任何金属部分。 这可能损坏本机和 / 或扬声器。 • 所有连接必须正确: L (左)到 L,R (右)到 R,“+”到 “+”和 “-”到 “-”。如果连接不正确,从扬声器中将 听不到声音,而且如果扬声器连接的极性错误,声音将变 得不自然而且缺乏低音。 另外的,请参考您的每个装置的 使用说明书。 14 Zh • 使用 RCA 非平衡电缆连接除扬声器外的其他组件。 使用 “male”XLR 平衡电缆连接具有 XLR 平衡输出插孔的 CD 播放器到本机的 CD BAL 插孔。 • 将电唱机连接到 GND 端子,产生信号噪
前置放大器, AV 接收机等 外部放大器或 主动超低音扬声器 扬声器组 A ( 左声道) - SPEAKERS L CH LINE2 INPUT TUNER LINE 1 PB + MAIN IN REC PRE OUT A L L R AC IN B L GND – + 扬声器组 B ( 左声道) CD 录音机,磁带卡座等 警告 图1 图2 + + L L – – – – R + R 中文 + • 因为功率放大器 A-S2000 是浮动平衡型的,以下类型的连接 不可能。 - 连接左声道 “-”端子和右声道 “-”端子,以及 “+” 端子 ( 图 1)。 - 故意连接左 / 右声道 “-”端子和金属部分在本机后面 板,以及偶然地接触它们。 - 反向连接左声道 “-”端子和右声道 “-”端子 (交叉 连接,图 2)。 • 不要连接您的主动超低音扬声器到 SPEAKERS 端子。 把它 连接到本机的 PRE OUT 插孔。 15 Zh
连接 ■ 连接扬声器 ■ 连接香蕉形插头 (欧洲模式除外) 1 从每个扬声器缆线的端部剥去大约 10 毫米长的绝 缘层,将缆线的裸线拧成一体以防止短路。 首先,紧固旋钮,然后将香蕉形插头插入对应的端子 的末端。 10 毫米 香蕉形插头 2 拧开旋钮,将电线的裸露部分插入孔中。 ■ 连接 Y 型插头 1 拧开旋钮,然后将 Y 型插头夹在环状部件和底座 之间。 连接 Y 型插头 3 滑动 拧紧旋钮。 2 16 Zh 拧紧旋钮。
■ 双接线连接 ■ 连接到 CD BAL 插孔 双接线连接将低音扬声器从混合的中音范围和高音扬声器部 分分离出来。 双接线兼容扬声器有 4 个接线柱端子。 这两 套终端将扬声器分割成两个独立的部分。 这种分割连接中高 频率驱动器到一组端子,而将低频驱动器连接到另外一组。 连接您的 CD 播放器到 XLR 平衡输出插孔上。 这些 插孔上的针头分配如下所示。 参阅您的 CD 播放器的 使用手册并核实其 XLR 平衡输出插孔是否兼容针头的 分配。 警告 要使用双接线连接,每个扬声器的阻抗必须为 8 Ω 或更高。 2: 火线 注 • 去除短路棒或桥,分割 LPF (低通滤波器)和 HPF (高通 滤波器)交叉。 • 要使用双接线连接,切换 SPEAKERS 选择器到 A+B BI-WIRING 位置。 1: 接地线 3: 零线 当连接时,请务必匹配针头,插入 “阳”XLR 平衡电 缆的连接器,直到您听见 “卡塔”的声响。 当拔下 时,拔出 “阳”XLR 平衡电缆同时按下 CD BAL 插孔 的控制杆。 “阴”XLR 连接器 “阳”XLR 连接器 注 要使用 XLR 平衡连接,您必须切换前面板的 I
连接 ■ VOLTAGE SELECTOR (仅限亚洲和通用型号) 警告 在您将电源插头插入墙壁的交流电源之前,本机后部面板 上的 VOLTAGE SELECTOR 必须要根据您当地的主电压设置。 不妥当的 VOLTAGE SELECTOR 设置将会损坏本机并可能造成 火灾。 使用平板螺丝刀顺时针或逆时针旋转 VOLTAGE SELECTOR。 电压如下: ..............
规格 在这个部分介绍 A-S2000 的技术规格。
03ZH_03_Add_A-S2000_RTL.fm Page 20 Wednesday, August 6, 2008 1:19 PM 规格 功率部分 控制部分 • 最小 RMS 输出功率 • 输入灵敏度 / 输入阻抗 • • • • • • • • • • • • • (8 Ω , 20 Hz 到 20 kHz, 0.02% THD) ....... 90 W + 90 W (4 Ω , 20 Hz 到 20 kHz, 0.02% THD) ..... 150 W + 150 W 动态功率 (IHF) (8/6/4/2 Ω ) ...... 105/135/190/220 W 最小输出功率 (1 kHz, 0.7% THD, 4 Ω ) [ 仅限于英国和欧洲型号 ] ............................................. 160 W 最大有用输出功率 (JEITA) (1 kHz, 10% THD, 8/4 Ω ) [ 仅限于亚洲,通用,中国和韩国型号 ] .... 120/190 W 动态余量 8 Ω .................
■ 结构图 CD BAL PHONO CD HOT (POSITIVE PHASE) COLD (NEGATIVE PHASE) EQ AMP MC HEAD AMP MM/MC BUFFER AMP INPUT SELECTOR HOT COLD for LINE AMP2 for VOLUME1 TONE CONTROL DEVICES FLAT TONE CONTROL DEVICES FLAT TONE CONTROL/FLAT SUB TRANSFORMER (for POWER AMP / VOLTAGE AMP STAGE) POWER SWITCH HOT COLD BALANCE ⇐⇒ UNBALANCE CONVERTER MAIN TRANSFORMER MAIN DIRECT FLOATING BALANCE POWER AMPLIFIER SPEAKER DRIVER HOT (POSITIVE PHASE) SIDE for COLD R CH for HOT R CH for COLD L CH for HOT
规格 ■ 音调控制特性 +15 +12.5 +10 Response (dB) +7.5 +5 +2.5 0 –2.5 –5 –7.5 –10 –12.5 –15 10 20 50 100 200 500 1k 2k 5k 10k 20k 50k 100k Frequency (Hz) ■ 总谐波失真 1 0.5 THD + N Ratio (%) 0.2 0.1 0.05 0.02 20kHz 0.01 20Hz 0.005 1kHz 0.002 0.
■ 总谐波失真 (PHONO) 10 5 THD + N Ratio (%) 2 1 0.5 0.2 0.1 0.05 20Hz 1kHz 20kHz 0.02 0.01 0.005 0.002 0.001 0.0005 0.0002 0.
故障排除 如果本机工作不正常时,请参阅下面的表格。 如果您遇到的问题没有列在下面,或如果下面给出的指导不起 作用,请将本关闭,断开电源导线,并就近联络的 Yamaha 经销商或服务中心。 问题 本机开启失败。 原因 措施 参考 页码 交流电源线没有连接到后面板的 AC IN 入口,或没有插入墙壁上的 AC 电源 插座。 请牢靠连接交流电源线。 由于短路等原因,保护电路被启用。 检查扬声器导线有无互相接触,或在本机后面板 短路,然后打开本机的电源。 14 本机册曾被暴露在强烈的外部电击 (例如闪电或强烈的静电)。 关闭本机,断开交流电源线,过 30 秒钟后再次 插回,然后正常使用。 — 由于短路等原因,保护电路被启用。 检查扬声器导线有无互相接触,或在本机后面板 短路,然后打开本机的电源。 14 本机内部电路有问题。 拔下交流电源线,就近联络 Yamaha 授权的经销 商或服务中心。 — 当您打开本机时,前面 板的 INPUT 指示灯闪 烁,音量被调低。 由于短路等原因,保护电路被启用。 检查扬声器导线有无互相接触,或在本机后面板 短路,然后打开本机的电源。 无声音。
问题 原因 措施 参考 页码 — 当播放唱片时音量 水平低。 前面板的 PHONO 开关设置不正确。 根据电唱机的电磁式拾音头类型,切换 PHONO 开 关到 MM 或 MC 位置。 当使用连接到本机的 CD 播放机上的耳机收听 时,声音劣化。 本机的电源被关闭。 打开本机的电源。 遥控器不能正常工作或 起作用。 距离或角度错误。 遥控器在最大为 6 米的范围内起作用,且不能偏 离前部面板轴心超过 30 度。 6 直射阳光或光照 (来自逆变器型 荧光灯)影响了本机的遥控器传感器。 重新放置本机。 — 电池微弱。 更换所有电池。 12 — 本机的维护保养 当您擦拭本机时,请不要使用化学溶剂 ( 包含 酒精或稀释剂等);这可能损害表面漆层。 用干 净,干燥的布。 对于深层污垢,请用软布浸稀释 的洗涤剂,拧出来,然后再用布清洁本机。 因为木材的膨胀或收缩,侧面板上的螺钉有可能 松弛。在此情形下,请紧固螺钉。 中文 25 Zh
BLACK DIC 2181s* © 2007 Yamaha Corporation All rights reserved.
RTL Stereo amplifier SAFETY BROCHURE FOLLETO DE SEGURIDAD 安全手册
Caution: Read this before operating your unit. 1 To assure the finest performance, please read this manual carefully. Keep it in a safe place for future reference. 2 Install this sound system in a well ventilated, cool, dry, clean place – away from direct sunlight, heat sources, vibration, dust, moisture, and/or cold. Allow ventilation space of at least 30 cm on the top, 20 cm on the left and right, and 20 cm on the back of this unit.
■ Handling the remote control • Change all of the batteries if you notice that the operation range of the remote control decreases. • Use AA, R6, UM-3 batteries. • Make sure that the polarities are correct. See the illustration inside the battery compartment. • Remove the batteries if the remote control is not used for an extended period of time. • Do not use old batteries together with new ones. • Do not use different types of batteries (such as alkaline and manganese batteries) together.
Precaución: Lea las indicaciones siguientes antes de utilizar este aparato. 1 2 3 4 5 6 7 8 9 10 11 12 13 14 Para asegurar el mejor rendimiento de este aparato, lea atentamente este manual. Y luego guárdelo en un lugar seguro para poder consultarlo en el futuro en caso de ser necesario. Instale este sistema de sonido en un lugar bien ventilado, fresco, seco y limpio, alejado de la luz solar directa, fuentes de calor, vibración, polvo, humedad y/o frío.
■ Manejo del mando a distancia • Cambie todas las pilas si nota que el margen de control del mando a distancia se reduce. • Use pilas AA, R6, UM-3. • Asegúrese de que las polaridades estén bien puestas. Vea la ilustración del interior del compartimiento de las pilas. • Quite las pilas si no va a usar el mando a distancia durante mucho tiempo. • No utilice pilas viejas y nuevas juntas. • No utilice juntas pilas de tipos diferentes (alcalinas y de manganeso, por ejemplo).
ø ÿ ÷ýץݕ½Õ¼¶ƒ‹ 警告:操作本机前请认真阅读。 1 为了保证最佳的性能,请仔细阅读本手册。请妥善保管 以备日后查阅。 2 将本音响系统安装在通风,凉爽,乾燥,清洁的地方— 远离阳光直射,热源,振动,肮脏,潮湿和寒冷的地方。 请将本机放置在顶部最少留有余地 30 cm,左右最少留 有余地 20 cm,后部最少留有余地 20 cm 的通风良好的 地方。 3 将本机远离其他电器,马达或变压器放置,以避免产生 蜂鸣噪声。 4 不要将本机突然从低温环境转移到高温环境,也不要将 其置于高湿场所 (例如,放置有加湿器的房间),以防 止机器内部结露。结露可能导致触电,火灾,机器损坏 甚至人员伤害。 5 不要将本机放置于异物容易落入的场所,也不要放置在 液体飞溅的地方。在本机顶部,不要放置以下物品: - 其他装置,因为它们可能损害本机或使本机的外表变 色。 - 易燃物品 (比如,腊烛等),因为它们会引起火灾, 机器损坏甚至人员伤害。 - 盛有液体的容器,因为其中的液体有可能倾倒进入本 机,使得用户触电或损坏本机。 6 不要使用报纸,桌布,窗帘等物遮盖本机,以免妨碍散 热。如果本机内部温度升高,会引起火灾,机器
开始 ■ 有关电池的说明 ■ 使用遥控器 • 如果您注意到以下情形,请更换所有电池: 遥控器 • • • • • • • • • • 必须清除遥控器和本机之间范围的大型障碍物。 请勿水或其它液体洒在遥控器上。 请勿跌落遥控器。 请勿使遥控器处于或储存于下列情况中: - 高湿度的地方,例如浴室附近 - 高温度的地方,例如加热器或炉子附近 - 超低温的地方 - 肮脏的地方 • 不要将遥控器传感器暴露在强烈阳光,反向器类型 的荧光灯;否则,遥控器也许不能正常工作。 如 果需要,请将本机远离直射光线。 中文 • 的操作范围减小。 使用 AA, R6, UM-3 电池。 请确保极性正确。 请参考电池舱内侧的图。 如果较长一段时间不使用遥控器,请取出电池。 新旧电池请勿混用。 请勿将不同型号的电池一起使用 (例如碱性电池和 锰电池)。 请仔细阅读包装,因为这些不同类型的 电池可能具有相同的外形和颜色。 如果电池漏液,请立即将其处理掉。 请勿触摸泄漏 的物质或让其接触到衣服等。在安装新电池之前, 请彻底清洁电池舱。 不要将电池与家庭垃圾混同在一起丢弃;请按照所 在地的规定丢弃电池。 ii Zh
© 2007 YAMAHA ELECTRONICS CORPORATION, USA 6660 ORANGETHORPE AVE., BUENA PARK, CALIF. 90620, U.S.A. YAMAHA CANADA MUSIC LTD. 135 MILNER AVE., SCARBOROUGH, ONTARIO M1S 3R1, CANADA YAMAHA ELECTRONIK EUROPA G.m.b.H. SIEMENSSTR. 22-34, 25462 RELLINGEN BEI HAMBURG, GERMANY YAMAHA ELECTRONIQUE FRANCE S.A. RUE AMBROISE CROIZAT BP70 CROISSY-BEAUBOURG 77312 MARNE-LA-VALLEE CEDEX02, FRANCE YAMAHA ELECTRONICS (UK) LTD. YAMAHA HOUSE, 200 RICKMANSWORTH ROAD WATFORD, HERTS WD18 7GQ, ENGLAND YAMAHA SCANDINAVIA A.B.