LR Integrated Amplifier OWNER’S MANUAL MANUAL DE INSTRUCCIONES
CAUTION: READ THIS BEFORE OPERATING YOUR UNIT. 1 2 3 4 5 6 7 8 9 10 11 12 13 14 15 16 To assure the finest performance, please read this manual carefully. Keep it in a safe place for future reference. Install this sound system in a well ventilated, cool, dry, clean place - away from direct sunlight, heat sources, vibration, dust, moisture, and/or cold. For proper ventilation, allow the following minimum clearances around this unit.
CONTENTS OPERATION USEFUL FEATURES ............................................ 1 SUPPLIED ACCESSORIES ................................. 1 CONTROLS AND FUNCTIONS ......................... 2 Front panel and Remote control ................................ 2 About the remote control ........................................... 3 Rear panel .................................................................. 4 PLAYING AND RECORDING.............................8 Playing a source...................................
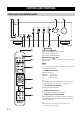
CONTROLS AND FUNCTIONS Front panel and Remote control (A-S500) 1 A (POWER) Front panel: A switch Turns on and off the power of this unit. On position: Pushed inward Off position: Released outward Remote control: A button When this unit is turned on: turns this unit on or sets it to standby mode. Note This unit consumes a small amount of power even when turned off or when in standby mode.
CONTROLS AND FUNCTIONS D VOLUME control VOLUME +/– Control the sound output level. This does not affect the REC level for recording. 7 SPEAKERS selector Turn on or off the speaker set connected to the SPEAKERS A and/or B terminals on the rear panel each time the corresponding SPEAKERS selector is set to A, B or A+B. MUTE button (Remote control only) Decreases the current volume by about 20 dB.
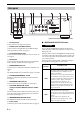
CONTROLS AND FUNCTIONS Rear panel (Taiwan and Central/South America models) 1 CD input jacks Used to connect a CD player (see page 5). 2 PHONO jacks and GND terminal Used to connect a turntable that uses an MM cartridge, and to ground the terminal (see page 5). 3 Audio input/output jacks Used to connect external components, such as a tuner, etc (see page 5). 4 DOCK jack Used to connect an optional Yamaha Universal Dock for iPod or Wireless System for iPod (see page 10).
PREPARATION CONNECTIONS Connecting speakers and source components CAUTION Turntable Speakers A DVD player, etc. Audio out Audio out CD player GND Audio out Audio out Tuner CD recorder, etc. Audio out Audio in PREPARATION • Do not connect this unit or other components to the main power until all connections between components are complete. • All connections must be correct: L (left) to L, R (right) to R, “+” to “+” and “–” to “–”.
CONNECTIONS CAUTION • The IMPEDANCE SELECTOR switch must be set to the appropriate position before connecting speaker sets. See page 4 for details. • Do not let the bare speaker wires touch each other or any metal part of this unit. This could damage this unit and/or the speakers. • Do not connect this unit or other components to the main power until all connections between components are complete.
CONNECTIONS Connecting the power cable POWER MANAGEMENT VOLTAGE SELECTOR To the wall outlet with the power cable PREPARATION (Taiwan and Central/South America models) ■ POWER MANAGEMENT switch Enables or disables the automatic power down function. When the automatic power down function is enabled, this unit will automatically switch to standby mode if no operations are performed for 8 hours.
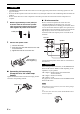
OPERATION PLAYING AND RECORDING Playing a source SPEAKERS VOLUME 5 Play the selected input source. 6 Rotate the VOLUME control on the front panel (or press VOLUME +/– buttons on the remote control) to adjust the sound output level. y You can adjust the tonal quality by using the BASS, TREBLE, BALANCE and LOUDNESS controls, or the PURE DIRECT switch on the front panel. A INPUT INPUT 7 When finished listening, press A switch on the front panel outward to turn off this unit.
PLAYING AND RECORDING ■ Adjusting the BASS and TREBLE controls The BASS and TREBLE controls adjust high and low frequency response. The center position produces a flat response. BASS When you feel there is not enough bass (low frequency sound), rotate clockwise to boost. When you feel there is too much bass, rotate counterclockwise to suppress. Control range: –10 dB to +10 dB (20 Hz) TREBLE When you feel there is not enough treble (high frequency sound), rotate clockwise to boost.
PLAYING BACK TUNES FROM YOUR iPhone/iPod Once you have connected an optional Yamaha Universal Dock for iPod or Wireless System for iPod to the DOCK jack on the rear panel of this unit, you can enjoy playback of your iPhone/iPod using the remote control supplied with this unit. Position the connected device as far as possible from the unit.
PLAYING BACK TUNES FROM YOUR iPhone/iPod Using a Universal Dock for iPod After setting your iPhone/iPod in your dock, rotate the INPUT selector on the front panel (or press DOCK button on the remote control) to select DOCK as the input source to play your iPhone/iPod. or Front panel Note Some shuffle modes and repeat modes may not be available depending on the model or the software version of your iPhone/ iPod.
PLAYING BACK TUNES FROM YOUR iPhone/iPod Using a Wireless System for iPod YID-W10 receiver YID-W10 transmitter ■ Establishing a wireless connection Once the iPhone/iPod is connected to the transmitter and playback begins, it takes about 5 seconds for audio to be heard. During this time the wireless connection between the transmitter and receiver is established. The status of the wireless connection between the transmitter and receiver is indicated by the respective status indicator.
ADDITIONAL INFORMATION TROUBLESHOOTING Refer to the chart below if this unit does not function properly. If the problem you are experiencing is not listed below or if the instructions below do not help, turn off this unit, disconnect the power cable, and contact the nearest authorized Yamaha dealer or service center. ■ General Problems This unit is not turned on. The POWER on indicator also does not light up. This unit turns off suddenly and the POWER on indicator blinks.
TROUBLESHOOTING Problems No sound. Possible Causes Solutions Refer to page Sound is muted. Press MUTE button on the remote control or rotate the VOLUME control. 3 Incorrect cable connections. Connect the stereo cable for audio units and the speaker wires properly. If the problem persists, the cables may be defective. 5 Playback has been stopped on the connected component. Turn the component on and start playback. No appropriate input source has been selected.
TROUBLESHOOTING Problems Using the BASS, TREBLE, BALANCE and LOUDNESS controls does not affect the tonal quality. Possible Causes The PURE DIRECT switch is turned on. Solutions Refer to page The PURE DIRECT switch must be turned off to use those controls. 8 ■ Universal Dock for iPod and Wireless System for iPod Problems No sound. You cannot operate the iPhone/iPod. When using a Wireless System for iPod: Sound frequently cuts out.
TROUBLESHOOTING ■ Remote control Solutions Refer to page The remote control is too far away or tilted too much. The remote control will function within a maximum range of 6 m (20 ft) and no more than 30 degrees offaxis from the front panel. 3 Direct sunlight or lighting (from an inverter type of fluorescent lamp, etc.) is striking the remote control sensor of this unit. Reposition this unit or lighting. The batteries are weak. Replace all batteries.
SPECIFICATIONS AUDIO SECTION • Minimum RMS output power (8 Ω, 20 Hz to 20 kHz, 0.019% THD) [A-S500] ................................................................ 85 W + 85 W [A-S300] ................................................................ 60 W + 60 W (6 Ω, 20 Hz to 20 kHz, 0.038% THD) [Except for Asia model] [A-S500] ............................................................ 100 W + 100 W [A-S300] ................................................................
PRECAUCIÓN: LEA LAS INDICACIONES SIGUIENTES ANTES DE UTILIZAR ESTE APARATO 1 2 3 4 5 6 7 8 9 10 11 12 13 Para asegurar el mejor rendimiento de este aparato, lea atentamente este manual. Y luego guárdelo en un lugar seguro para poder consultarlo en el futuro en caso de ser necesario. Instale este sistema de sonido en un lugar bien ventilado, fresco, seco y limpio, y alejado de la luz solar directa, fuentes de calor, vibración, polvo, humedad y/o frío.
ÍNDICE FUNCIONAMIENTO CARACTERÍSTICAS DE UTILIDAD ................ 1 ACCESORIOS SUMINISTRADOS ..................... 1 CONTROLES Y FUNCIONES............................. 2 Panel frontal y mando a distancia.............................. 2 Acerca del mando a distancia .................................... 3 Panel trasero............................................................... 4 REPRODUCCIÓN Y GRABACIÓN ....................8 Reproducción de una fuente ......................................
CONTROLES Y FUNCIONES Panel frontal y mando a distancia (A-S500) 1 A (ALIMENTACIÓN) Panel frontal: interruptor A Enciende y apaga la alimentación en esta unidad. Posición de encendido: botón presionado Posición de apagado: botón no presionado Mando a distancia: botón A Cuando la unidad está encendida: enciende la unidad o la pone en modo de espera. Nota Esta unidad consume una pequeña cantidad de energía aunque esté apagada o en modo de espera.
CONTROLES Y FUNCIONES D Control VOLUME VOLUME +/– Controla el nivel de salida de sonido. No afecta al nivel REC en la grabación. 7 Selector SPEAKERS Cada vez que el selector SPEAKERS correspondiente se ajusta en A, B o A+B, los altavoces conectados a los terminales SPEAKERS A y/o B se activan y se desactivan. Botón MUTE (sólo mando a distancia) Reduce el volumen actual unos 20 dB. 8 Selector REC OUT (sólo A-S500) Selecciona una fuente para grabar independientemente de la posición del selector INPUT.
CONTROLES Y FUNCIONES Panel trasero (Modelos para Taiwán y Centroamérica/Sudamérica) 1 Tomas de entrada de CD Se utilizan para conectar un reproductor de CD (consulte la página 5). 2 Tomas PHONO y terminal GND Se utilizan para conectar un tocadiscos con cartucho MM y para poner a tierra el terminal (consulte la página 5). 3 Tomas de entrada/salida de audio Se utilizan para conectar componentes externos, como un sintonizador, etc. (consulte la página 5).
PREPARACIÓN CONEXIONES Conexión de los altavoces y los componentes fuente PRECAUCIÓN Tocadiscos Reproductor de DVD, etc. Salida de audio Salida de audio Reproductor de CD GND Salida de audio Salida de audio Entrada de audio Sintonizador Conexiones de Grabadora de la toma DOCK (consulte la CD, etc. página 10) Salida de audio PREPARACIÓN • No conecte esta unidad ni otros componentes a la toma principal de alimentación hasta que no haya finalizado las conexiones entre todos los componentes.
CONEXIONES PRECAUCIÓN • El mando IMPEDANCE SELECTOR debe estar en la posición adecuada antes de conectar los altavoces. Para más información, Consulte la página 4. • No deje que los cables pelados de los altavoces se toquen entre sí ni toquen pieza metálica alguna de esta unidad. Podría averiar la unidad y/o los altavoces. • No conecte esta unidad ni otros componentes a la toma principal de alimentación hasta que no haya finalizado las conexiones entre todos los componentes.
CONEXIONES Conexión del cable de alimentación POWER MANAGEMENT VOLTAGE SELECTOR A la toma de pared con el cable de alimentación PREPARACIÓN (Modelos para Taiwán y Centroamérica/Sudamérica) ■ Interruptor POWER MANAGEMENT Activa o desactiva la función de apagado automático. Cuando la función de apagado automático está activada, la unidad pasará automáticamente al modo de espera si no se realiza ninguna operación en 8 horas.
FUNCIONAMIENTO REPRODUCCIÓN Y GRABACIÓN Reproducción de una fuente SPEAKERS VOLUME 5 Reproduzca la fuente de entrada seleccionada. 6 Gire el control VOLUME en el panel frontal (o pulse los botones VOLUME +/– en el mando a distancia) para ajustar el nivel de salida de sonido. y Puede ajustar la calidad tonal con los controles BASS, TREBLE, BALANCE y LOUDNESS, o con el interruptor PURE DIRECT del panel frontal.
REPRODUCCIÓN Y GRABACIÓN ■ Ajuste de los controles BASS y TREBLE Los controles BASS y TREBLE ajustan la respuesta de alta y baja frecuencia. La posición central produce una respuesta plana. BASS Cuando note que no hay suficientes graves (sonido de baja frecuencia), gire el control en el sentido de las agujas del reloj para potenciarlos. Si nota que hay demasiados graves, gire el control en sentido contrario a las agujas del reloj para mitigarlos.
REPRODUCCIÓN DE TEMAS DESDE EL iPhone/iPod Una vez que haya conectado una Dock Universal para iPod o un sistema inalámbrico para iPod opcionales Yamaha a la toma DOCK del panel trasero de la unidad, podrá disfrutar de la reproducción del iPhone/iPod utilizando el mando a distancia suministrado con la unidad. Coloque el dispositivo conectado lo más lejos posible de la unidad.
REPRODUCCIÓN DE TEMAS DESDE EL iPhone/iPod Uso de una Dock Universal para iPod Tras colocar el iPhone/iPod en la base, gire el selector INPUT en el panel frontal (o pulse el botón DOCK en el mando a distancia) para seleccionar DOCK como fuente de entrada para la reproducción del iPhone/iPod. o bien Panel frontal Nota Es posible que algunos modos de reproducción y de repetición no estén disponibles según el modelo o la versión de software del iPhone/iPod.
REPRODUCCIÓN DE TEMAS DESDE EL iPhone/iPod Uso de un sistema inalámbrico para iPod Receptor del YID-W10 Transmisor del YID-W10 ■ Establecimiento de una conexión inalámbrica Una vez que el iPhone/iPod está conectado al transmisor y comienza la reproducción, deben transcurrir unos 5 segundos hasta que se oiga el audio. Durante este tiempo se establece la conexión inalámbrica entre el transmisor y el receptor.
INFORMACIÓN ADICIONAL SOLUCIÓN DE PROBLEMAS Consulte el siguiente cuadro cuando el aparato no funcione bien. Si el problema surgido no aparece en la siguiente lista o las instrucciones no le ayudan, desactive el equipo, desconecte el cable de alimentación y consulte con un centro de servicio o con un distribuidor Yamaha autorizado. ■ General Problemas La unidad no se enciende. El indicador de alimentación tampoco se enciende. La unidad se apaga repentinamente y el indicador de alimentación parpadea.
SOLUCIÓN DE PROBLEMAS Problemas No hay sonido. Posibles causas Soluciones Consulte la página El sonido está silenciado. Pulse el botón MUTE del mando a distancia o gire el control VOLUME. 3 Conexión incorrecta de los cables. Conecte correctamente el cable estéreo de las unidades de audio y los cables de los altavoces. Si el problema persiste, los cables podrán estar defectuosos. 5 La reproducción se ha detenido en el componente conectado. Encienda el componente e inicie la reproducción.
SOLUCIÓN DE PROBLEMAS ■ Dock Universal para iPod y sistema inalámbrico para iPod Problemas No hay sonido. No es posible manejar el iPhone/iPod. Posibles causas Hay un problema con la ruta de la señal desde el iPhone/iPod a la unidad. El iPhone/iPod utilizado no es compatible con la unidad. Si se utiliza un sistema La conexión inalámbrica es pobre. inalámbrico para iPod: El sonido se corta con frecuencia.
SOLUCIÓN DE PROBLEMAS ■ Mando a distancia Problemas El mando a distancia no funciona correctamente. Posibles causas Consulte la página El mando a distancia está demasiado lejos o El mando a distancia tiene un alcance máximo de 6 m y demasiado inclinado. una inclinación máxima de 30 grados con respecto al eje del panel frontal. 3 El sensor del mando a distancia de la unidad Cambie la unidad de posición o modifique la está sometido a la luz solar directa o a iluminación.
ESPECIFICACIONES SECCIÓN DE AUDIO • Ruido residual (red IHF-A)..................................................... 30 µV • Potencia de salida RMS mínima (8 Ω, de 20 Hz a 20 kHz, 0,019% THD) [A-S500] ................................................................ 85 W + 85 W [A-S300] ................................................................ 60 W + 60 W (6 Ω, de 20 Hz a 20 kHz, 0,038% THD) [excepto para modelos de Asia] [A-S500] ............................................................
Printed in Malaysia WV17440-2