UC Integrated Amplifier Amplificateur Intégré OWNER’S MANUAL MODE D’EMPLOI
IMPORTANT SAFETY INSTRUCTIONS CAUTION RISK OF ELECTRIC SHOCK DO NOT OPEN CAUTION: TO REDUCE THE RISK OF ELECTRIC SHOCK, DO NOT REMOVE COVER (OR BACK). NO USER-SERVICEABLE PARTS INSIDE. REFER SERVICING TO QUALIFIED SERVICE PERSONNEL.
IMPORTANT SAFETY INSTRUCTIONS FCC INFORMATION (for US customers) 1 IMPORTANT NOTICE: DO NOT MODIFY THIS UNIT! This product, when installed as indicated in the instructions contained in this manual, meets FCC requirements. Modifications not expressly approved by Yamaha may void your authority, granted by the FCC, to use the product. 2 IMPORTANT: When connecting this product to accessories and/or another product use only high quality shielded cables. Cable/s supplied with this product MUST be used.
CAUTION: READ THIS BEFORE OPERATING YOUR UNIT. 1 2 3 4 5 6 7 8 9 10 11 12 13 14 15 16 To assure the finest performance, please read this manual carefully. Keep it in a safe place for future reference. Install this sound system in a well ventilated, cool, dry, clean place - away from direct sunlight, heat sources, vibration, dust, moisture, and/or cold. For proper ventilation, allow the following minimum clearances around this unit.
CONTENTS OPERATION USEFUL FEATURES ............................................ 1 SUPPLIED ACCESSORIES ................................. 1 CONTROLS AND FUNCTIONS ......................... 2 Front panel and Remote control ................................ 2 About the remote control ........................................... 3 Rear panel .................................................................. 4 PLAYING AND RECORDING.............................8 Playing a source...................................
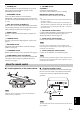
CONTROLS AND FUNCTIONS Front panel and Remote control (A-S500) 1 A (POWER) Front panel: A switch Turns on and off the power of this unit. On position: Pushed inward Off position: Released outward Remote control: A button When this unit is turned on: turns this unit on or sets it to standby mode. Note This unit consumes a small amount of power even when turned off or when in standby mode.
CONTROLS AND FUNCTIONS D VOLUME control VOLUME +/– Control the sound output level. This does not affect the REC level for recording. 7 SPEAKERS selector Turn on or off the speaker set connected to the SPEAKERS A and/or B terminals on the rear panel each time the corresponding SPEAKERS selector is set to A, B or A+B. MUTE button (Remote control only) Decreases the current volume by about 20 dB.
CONTROLS AND FUNCTIONS Rear panel 1 CD input jacks Used to connect a CD player (see page 5). 2 PHONO jacks and GND terminal Used to connect a turntable that uses an MM cartridge, and to ground the terminal (see page 5). 3 Audio input/output jacks Used to connect external components, such as a tuner, etc (see page 5). 4 DOCK jack Used to connect an optional Yamaha Universal Dock for iPod or Wireless System for iPod (see page 10).
PREPARATION CONNECTIONS Connecting speakers and source components CAUTION Turntable Speakers A DVD player, etc. Audio out Audio out CD player GND Audio out Audio out Tuner CD recorder, etc. Audio out Audio in PREPARATION • Do not connect this unit or other components to the main power until all connections between components are complete. • All connections must be correct: L (left) to L, R (right) to R, “+” to “+” and “–” to “–”.
CONNECTIONS CAUTION • The IMPEDANCE SELECTOR switch must be set to the appropriate position before connecting speaker sets. See page 4 for details. • Do not let the bare speaker wires touch each other or any metal part of this unit. This could damage this unit and/or the speakers. • Do not connect this unit or other components to the main power until all connections between components are complete.
CONNECTIONS Connecting the power cable POWER MANAGEMENT To the wall outlet with the power cable PREPARATION ■ POWER MANAGEMENT switch Enables or disables the automatic power down function. When the automatic power down function is enabled, this unit will automatically switch to standby mode if no operations are performed for 8 hours. ■ Connecting the power cable Plug the power cable into the wall outlet after all other connections are complete.
OPERATION PLAYING AND RECORDING Playing a source SPEAKERS VOLUME 5 Play the selected input source. 6 Rotate the VOLUME control on the front panel (or press VOLUME +/– buttons on the remote control) to adjust the sound output level. y You can adjust the tonal quality by using the BASS, TREBLE, BALANCE and LOUDNESS controls, or the PURE DIRECT switch on the front panel. A INPUT INPUT 7 When finished listening, press A switch on the front panel outward to turn off this unit.
PLAYING AND RECORDING ■ Adjusting the BASS and TREBLE controls The BASS and TREBLE controls adjust high and low frequency response. The center position produces a flat response. BASS When you feel there is not enough bass (low frequency sound), rotate clockwise to boost. When you feel there is too much bass, rotate counterclockwise to suppress. Control range: –10 dB to +10 dB (20 Hz) TREBLE When you feel there is not enough treble (high frequency sound), rotate clockwise to boost.
PLAYING BACK TUNES FROM YOUR iPhone/iPod Once you have connected an optional Yamaha Universal Dock for iPod or Wireless System for iPod to the DOCK jack on the rear panel of this unit, you can enjoy playback of your iPhone/iPod using the remote control supplied with this unit. Position the connected device as far as possible from the unit.
PLAYING BACK TUNES FROM YOUR iPhone/iPod Using a Universal Dock for iPod After setting your iPhone/iPod in your dock, rotate the INPUT selector on the front panel (or press DOCK button on the remote control) to select DOCK as the input source to play your iPhone/iPod. or Front panel Note Some shuffle modes and repeat modes may not be available depending on the model or the software version of your iPhone/ iPod.
PLAYING BACK TUNES FROM YOUR iPhone/iPod Using a Wireless System for iPod YID-W10 receiver YID-W10 transmitter ■ Establishing a wireless connection Once the iPhone/iPod is connected to the transmitter and playback begins, it takes about 5 seconds for audio to be heard. During this time the wireless connection between the transmitter and receiver is established. The status of the wireless connection between the transmitter and receiver is indicated by the respective status indicator.
ADDITIONAL INFORMATION TROUBLESHOOTING Refer to the chart below if this unit does not function properly. If the problem you are experiencing is not listed below or if the instructions below do not help, turn off this unit, disconnect the power cable, and contact the nearest authorized Yamaha dealer or service center. ■ General Problems This unit is not turned on. The POWER on indicator also does not light up. This unit turns off suddenly and the POWER on indicator blinks.
TROUBLESHOOTING Problems No sound. Possible Causes Solutions Refer to page Sound is muted. Press MUTE button on the remote control or rotate the VOLUME control. 3 Incorrect cable connections. Connect the stereo cable for audio units and the speaker wires properly. If the problem persists, the cables may be defective. 5 Playback has been stopped on the connected component. Turn the component on and start playback. No appropriate input source has been selected.
TROUBLESHOOTING Problems Using the BASS, TREBLE, BALANCE and LOUDNESS controls does not affect the tonal quality. Possible Causes The PURE DIRECT switch is turned on. Solutions Refer to page The PURE DIRECT switch must be turned off to use those controls. 8 ■ Universal Dock for iPod and Wireless System for iPod Problems No sound. You cannot operate the iPhone/iPod. When using a Wireless System for iPod: Sound frequently cuts out.
TROUBLESHOOTING ■ Remote control Solutions Refer to page The remote control is too far away or tilted too much. The remote control will function within a maximum range of 6 m (20 ft) and no more than 30 degrees offaxis from the front panel. 3 Direct sunlight or lighting (from an inverter type of fluorescent lamp, etc.) is striking the remote control sensor of this unit. Reposition this unit or lighting. The batteries are weak. Replace all batteries.
SPECIFICATIONS AUDIO SECTION • Minimum RMS output power (8 Ω, 20 Hz to 20 kHz, 0.019% THD) [A-S500] ................................................................ 85 W + 85 W [A-S300] ................................................................ 60 W + 60 W (6 Ω, 20 Hz to 20 kHz, 0.038% THD) [Except for Asia model] [A-S500] ............................................................ 100 W + 100 W [A-S300] ................................................................
PRÉCAUTIONS CONCERNANT LA SÉCURITÉ CAUTION RISK OF ELECTRIC SHOCK DO NOT OPEN ATTENTION : POUR RÉDUIRE LES RISQUES D’INCENDIE ET DE DÉCHARGE ELECTRIQUE, NE PAS RETIRER LE COUVERCLE (OU LE PANNEAU ARRIÈRE). AUCUNE PIÈCE INTERNE NE PEUT ÊTRE CHANGÉE PAR L’UTILISATEUR. POUR L’ENTRETIEN, S’ADRESSER À UN PERSONNEL QUALIFIÉ.
PRÉCAUTIONS CONCERNANT LA SÉCURITÉ Informations de la FCC (Pour les clients résidents aux États-Unis) 1 AVIS IMPORTANT : NE PAS APPORTER DE MOFIDICATIONS À CET APPAREIL ! Ce produit est conforme aux exigences de la FCC s’il est installé selon les instructions du mode d’emploi. Toute modification non approuvée expressément par Yamaha peut invalider l’autorisation, accordée par la FCC, d’utiliser ce produit.
ATTENTION : VEUILLEZ LIRE CE QUI SUIT AVANT D’UTILISER L’APPAREIL. 1 Pour utiliser l’appareil au mieux de ses possibilités, lisez attentivement ce mode d’emploi. Conservez-le soigneusement pour référence. 2 Installez cet ensemble audio dans un endroit bien aéré, frais, sec et propre - veillez à ce qu’il soit à l’abri de la lumière directe du soleil, des sources de chaleur, des vibrations, des poussières, de l’humidité et/ou du froid.
TABLE DES MATIÈRES OPÉRATION FONCTIONS UTILES........................................... 1 ACCESSOIRES FOURNIS ................................... 1 COMMANDES ET FONCTIONS ........................ 2 Panneau avant et télécommande................................ 2 À propos de la télécommande.................................... 3 Panneau arrière .......................................................... 4 LECTURE ET ENREGISTREMENT..................8 Lecture d’une source.......................................
COMMANDES ET FONCTIONS Panneau avant et télécommande (A-S500) 1 A (ALIMENTATION) Panneau avant : commutateur A Permet de mettre l’appareil sous et hors tension. Position ON (marche) : enfoncé Position OFF (arrêt) : désarmé Télécommande : touche A Lorsque l’appareil est allumé : met l’appareil sous tension ou le fait passer en mode veille. Remarque Cet appareil consomme une faible quantité d’énergie même lorsqu’il est éteint ou en mode veille.
COMMANDES ET FONCTIONS D Commande VOLUME VOLUME +/– Pour régler le niveau sonore. Cela n’affecte pas le niveau sonore REC pour l’enregistrement. 7 Sélecteur SPEAKERS Pour activer ou désactiver le jeu d’enceintes raccordé aux bornes SPEAKERS A et/ou B situées sur le panneau arrière lorsque le sélecteur SPEAKERS correspondant est réglé sur A, B ou A+B. Touche MUTE (sur la télécommande uniquement) Pour réduire le volume sélectionné d’environ 20 dB.
COMMANDES ET FONCTIONS Panneau arrière 1 Prises d’entrée CD Pour connecter un lecteur de CD (voir page 5). 2 Prises PHONO et borne GND Pour connecter une platine utilisant une cartouche MM et pour mettre la borne à la terre (voir page 5). 3 Prises d’entrée/sortie audio Pour connecter des périphériques externes, tels qu’un syntoniseur, etc. (voir page 5). 4 Prise DOCK Pour connecter un Dock Universal pour iPod ou un système sans fil pour iPod (voir page 10) Yamaha en option.
PRÉPARATION RACCORDEMENTS Raccordement des enceintes et des composants source ATTENTION Enceintes A Tourne-disque Lecteurs de DVD, etc. Sortie audio Sortie audio Lecteur de CD GND (Masse) Sortie audio Sortie audio Syntoniseur Raccordements Enregistreur de la prise de CD, etc. DOCK (voir page 10) Sortie audio Entrée audio PRÉPARATION • Ne raccordez pas cet appareil ou d’autres composants au secteur tant que toutes les connexions entre les composants ne sont pas établies.
RACCORDEMENTS ATTENTION • Le commutateur IMPEDANCE SELECTOR doit être réglé sur la position appropriée avant de raccorder des jeux d’enceintes. Voir page 4 pour plus de détails. • Ne laissez pas les fils d’enceinte dénudés se toucher et évitez qu’ils entrent en contact avec les pièces métalliques de cet appareil. Cela risquerait d’endommager l’appareil et/ou les enceintes.
RACCORDEMENTS Raccordement du cordon d’alimentation POWER MANAGEMENT Vers la prise murale avec le cordon d’alimentation PRÉPARATION ■ Commutateur POWER MANAGEMENT Permet d’activer ou de désactiver la fonction de mise hors tension automatique. Lorsque cette fonction est activée, l’appareil entre automatiquement en mode veille s’il reste inactif pendant 8 heures. ■ Raccordement du cordon d’alimentation Une fois tous les raccordements effectués, branchez le cordon d’alimentation sur la prise secteur.
OPÉRATION LECTURE ET ENREGISTREMENT Lecture d’une source SPEAKERS VOLUME 5 Lisez la source d’entrée sélectionnée. 6 Tournez le bouton VOLUME du panneau avant (ou appuyez sur les touches VOLUME +/– de la télécommande) pour régler le niveau sonore. y Vous pouvez régler la qualité des tonalités à l’aide des commandes BASS, TREBLE, BALANCE et LOUDNESS ou du commutateur PURE DIRECT du panneau avant.
LECTURE ET ENREGISTREMENT ■ Réglage des commandes BASS et TREBLE Les commandes BASS et TREBLE permettent de régler la réponse dans les hautes et les basses fréquences. La position centrale produit une réponse plate. BASS Si vous estimez qu’il n’y a pas assez de graves (son de basse fréquence), tournez dans le sens horaire pour les amplifier. Si vous estimez qu’il y a trop de graves, tournez dans le sens antihoraire pour les supprimer.
LECTURE DE MORCEAUX DE VOTRE iPhone/iPod Lorsque vous avez connecté un Dock Universal pour iPod ou un système sans fil pour iPod Yamaha en option à la prise DOCK du panneau arrière de l’appareil, vous pouvez écouter votre iPhone/iPod à l’aide de la télécommande fournie avec l’appareil. Placez le périphérique connecté le plus loin possible de l’appareil.
LECTURE DE MORCEAUX DE VOTRE iPhone/iPod Utilisation d’un Dock Universal pour iPod Après avoir placé votre iPhone/iPod sur la station, tournez le sélecteur INPUT du panneau avant (ou appuyez sur la touche DOCK de la télécommande) pour sélectionner DOCK comme source d’entrée pour lire le contenu de votre iPhone/iPod.
LECTURE DE MORCEAUX DE VOTRE iPhone/iPod Utilisation d’un système sans fil pour iPod Récepteur YID-W10 Émetteur YID-W10 ■ Établissement d’une connexion sans fil Une fois que l’iPhone/iPod est connecté à l’émetteur et que la lecture commence, le son n’est audible qu’après environ 5 secondes. Pendant ce temps, la connexion sans fil entre l’émetteur et le récepteur est établie. L’état de la connexion sans fil entre l’émetteur et le récepteur est indiqué par le témoin d’état correspondant.
INFORMATIONS COMPLÉMENTAIRES GUIDE DE DÉPANNAGE Reportez-vous au tableau suivant si l’appareil ne fonctionne pas comme il devrait. Si le problème que vous rencontrez n’est pas mentionné ci-dessous, ou encore si les actions correctives suggérées sont sans effet, mettez l’appareil hors tension, débranchez le cordon d’alimentation et prenez contact avec le revendeur ou le service après-vente agréé Yamaha le plus proche. ■ Généralités Anomalies L’appareil ne se met pas sous tension.
GUIDE DE DÉPANNAGE Anomalies Aucun son. Solutions Voir la page Le son est désactivé. Appuyez sur la touche MUTE de la télécommande ou tournez la commande VOLUME. 3 Raccordement incorrect des câbles. Connectez correctement le câble stéréo pour appareils audio et les fils d’enceinte. Si l’anomalie persiste, il se peut que les câbles soient défectueux. 5 Causes possibles La lecture a été interrompue sur le composant connecté. Allumez le composant et lancez la lecture.
GUIDE DE DÉPANNAGE Anomalies L’utilisation des commandes BASS, TREBLE, BALANCE et LOUDNESS n’affecte pas la qualité des tonalités. Causes possibles Le commutateur PURE DIRECT est activé. Solutions Voir la page Le commutateur PURE DIRECT doit être désactivé pour utiliser ces commandes. 8 ■ Dock Universal pour iPod et système sans fil pour iPod Anomalies Aucun son. Impossible d’utiliser l’iPhone/iPod. Lors de l’utilisation d’un système sans fil pour iPod : Le son se coupe fréquemment.
GUIDE DE DÉPANNAGE ■ Télécommande Anomalies La télécommande ne fonctionne pas correctement. Causes possibles Solutions Voir la page La télécommande est trop éloignée ou trop inclinée. La télécommande fonctionne jusqu’à une portée de 6 m et à un angle de 30 degrés maximum par rapport au panneau avant. 3 Les rayons directs du soleil ou un éclairage direct (provenant d’une lampe fluorescente à changement de fréquence, etc.) frappent le capteur de télécommande de l’appareil.
SPÉCIFICATIONS SECTION AUDIO • Puissance minimale de sortie efficace (8 Ω, 20 Hz à 20 kHz, 0,019 % DHT) [A-S500] .................................................................85 W + 85 W [A-S300] .................................................................60 W + 60 W (6 Ω, 20 Hz à 20 kHz, 0,038 % DHT) [sauf modèle pour l’Asie] [A-S500] .............................................................100 W + 100 W [A-S300] .................................................................
Printed in Malaysia ZE28070-1