RTL Integrated Amplifier OWNER’S MANUAL MANUAL DE INSTRUCCIONES
CAUTION: READ THIS BEFORE OPERATING YOUR UNIT. 1 To assure the finest performance, please read this manual carefully. Keep it in a safe place for future reference. 2 Install this sound system in a well ventilated, cool, dry, clean place – away from direct sunlight, heat sources, vibration, dust, moisture, and/or cold. Allow ventilation space of at least 30 cm (11-13/16 in) on the top, 20 cm (7-7/8 in) on the left and right, and 20 cm (7-7/8 in) on the back of this unit.
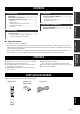
CONTENTS OPERATION FEATURES............................................................. 1 SUPPLIED ACCESSORIES ................................. 1 CONTROLS AND FUNCTIONS ......................... 2 Playing a source......................................................... 9 Adjusting the tonal quality ...................................... 10 Recording a source .................................................. 11 ADDITIONAL INFORMATION TROUBLESHOOTING .......................................
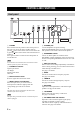
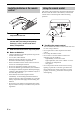
CONTROLS AND FUNCTIONS Front panel 1 POWER Press inward to the ON position to turn on the power of this unit. You can set this unit to standby mode by pressing button on the remote control or turn on the unit by pressing button on the remote control when this unit is turned on. Press again to release it outward to the OFF position to turn off this unit. Note Even when this unit is turned off, this unit consumes a small amount of power to preserve the memory.
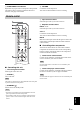
CONTROLS AND FUNCTIONS D VOLUME Control the sound output level. This does not affect the REC level for recording. INTRODUCTION C PURE DIRECT and indicator Reproduces any input source in the purest sound possible. The indicator above it lights up when this function is turned on. See page 10 for details. Remote control 4 Input selector buttons Select the input source you want to listen to. 5 Amplifier control buttons INPUT l / h Select the input source you want to listen to.
CONTROLS AND FUNCTIONS Installing batteries in the remote control 1 Using the remote control The remote control transmits a directional infrared beam. Be sure to aim the remote control directly at the remote control sensor on the front panel of this unit during operation. 3 2 1 Press the part and slide the battery compartment cover off. 2 Insert two supplied batteries (AA, R6, UM-3) according to the polarity markings (+ and –) on the inside of the battery compartment.
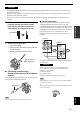
CONTROLS AND FUNCTIONS Rear panel INTRODUCTION (Asia and General models) 1 CD input jacks Connect a CD player. See page 6 for connection information. ■ IMPEDANCE SELECTOR switch 2 PHONO jacks and GND terminal The PHONO jacks are designed to connect a turntable with an MM cartridge. See page 6 for connection information. Do not change the IMPEDANCE SELECTOR switch while the power of this unit is turned on, as doing so may damage the unit.
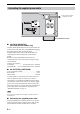
PREPARATION CONNECTIONS Connecting speakers and other components CAUTION • Do not connect this unit or other components to the main power until all connections between components are complete. • All connections must be correct: L (left) to L, R (right) to R, “+” to “+” and “–” to “–”. If the connections are faulty, no sound will be heard from the speakers, and if the polarity of the speaker connections is incorrect, the sound will be unnatural and lack bass.
CONNECTIONS CAUTION • The IMPEDANCE SELECTOR must be set to the appropriate position before connecting one or two speaker sets. See page 5 for details. • Do not let the bare speaker wires touch each other or do not let them touch any metal part of this unit. This could damage this unit and/or the speakers. • Do not connect this unit or other components to the main power until all connections between components are complete.
CONNECTIONS Connecting the supplied power cable To the wall outlet with the supplied power cable (Asia and General models) ■ VOLTAGE SELECTOR (Asia and General models only) The VOLTAGE SELECTOR on the rear panel of this unit must be set for your local main voltage BEFORE plugging the supplied power cable into the wall outlet. Improper setting of the VOLTAGE SELECTOR may cause damage to this unit and create a potential fire hazard.
OPERATION PLAYING AND RECORDING Playing a source 3 Rotate the INPUT selector on the front panel (or press one of the input selector buttons on the remote control) to select the input source you want to listen to. The indicator of the selected input source lights up. or Front panel Remote control Lights up OPERATION 4 1 Rotate the SPEAKERS selector on the front panel to select SPEAKERS A, B or A+B. Rotate VOLUME on the front panel to the extreme counterclockwise position.
PLAYING AND RECORDING 6 ■ Using the PURE DIRECT switch Rotate VOLUME on the front panel (or press VOL +/– on the remote control) to adjust the sound output level. Routes input signals from your audio sources. As a result, the input signals bypass the BASS, TREBLE, BALANCE and LOUDNESS controls, thus eliminating any alterations to the audio signals to produce more direct and high-grade sound from all input sources.
PLAYING AND RECORDING ■ Adjusting the LOUDNESS control Retain a full tonal range at any volume level, thus compensating for the human ears’ loss of sensitivity to high and low-frequency ranges at low volume. CAUTION If the CD DIRECT AMP switch (or the PURE DIRECT switch) is turned on with the LOUDNESS control set at a certain level, the input signals bypass the loudness control, resulting in a sudden increase in the sound output level.
ADDITIONAL INFORMATION TROUBLESHOOTING Refer to the chart below if this unit does not function properly. If the problem you are experiencing is not listed below or if the instructions below do not help, set this unit to the standby mode, disconnect the power cable, and contact the nearest authorized Yamaha dealer or service center. ■ General Possible Causes Pressing the POWER switch on the front panel does not turn on this unit. The POWER on indicator also does not light up.
TROUBLESHOOTING Problems Possible Causes Solutions Refer to page Sound is muted. Press MUTE on the remote control to resume the audio output. 3 Incorrect cable connections. Connect the stereo cable for audio units and the speaker wires properly. If the problem persists, the cables may be defective. 6 No appropriate input source has been selected. Select an appropriate input source with the INPUT selector on the front panel (or one of the input selector buttons on the remote control).
TROUBLESHOOTING ■ Remote control Problems The remote control does not work nor function properly. 14 En Solutions Refer to page The remote control is too far away or tilted too much. The remote control will function within a maximum range of 6 m (20 ft) and no more than 30 degrees offaxis from the front panel. 4 Direct sunlight or lighting (from an inverter type of fluorescent lamp, etc.) is striking the remote control sensor of this unit. Reposition this unit or lightning. The batteries are weak.
SPECIFICATIONS POWER SECTION CONTROL SECTION • Minimum RMS output power (8 Ω, 20 Hz to 20 kHz, 0.019% THD)...................... 90 W + 90 W (6 Ω, 20 Hz to 20 kHz, 0.03% THD).................... 105 W + 105 W • Input Sensitivity/Input Impedance PHONO .................................................................. 3.0 mV/47 kΩ CD, etc. .................................................................. 200 mV/47 kΩ • Dynamic Power (IHF) (8/6/4/2 Ω) ......................................................
PRECAUCIÓN: LEA LAS INDICACIONES SIGUIENTES ANTES DE UTILIZAR ESTE APARATO. 1 2 3 4 5 6 7 8 9 10 11 12 13 14 Para asegurar el mejor rendimiento de este aparato, lea atentamente este manual. Y luego guárdelo en un lugar seguro para poder consultarlo en el futuro en caso de ser necesario. Instale este sistema de sonido en un lugar bien ventilado, fresco, seco y limpio, alejado de la luz solar directa, fuentes de calor, vibración, polvo, humedad y/o frío.
ÍNDICE FUNCIONAMIENTO CARACTERÍSTICAS ........................................... 1 ACCESORIOS SUMINISTRADOS ..................... 1 CONTROLES Y FUNCIONES............................. 2 Reproducción de una fuente ...................................... 9 Ajuste de la calidad tonal......................................... 10 Grabación de una fuente .......................................... 11 INFORMACIÓN ADICIONAL SOLUCIÓN DE PROBLEMAS...........................12 ESPECIFICACIONES ........................
CONTROLES Y FUNCIONES Panel frontal 1 POWER Pulse hacia dentro hasta la posición ON para encender esta unidad. Puede poner la unidad en modo de espera si pulsa el botón del mando a distancia o si enciende la unidad con el botón del mando a distancia cuando la unidad ya está encendida. Vuelva a pulsarlo para liberarlo hacia fuera hasta la posición OFF para apagar la unidad. Nota Incluso con la unidad apagada, se produce un consumo mínimo eléctrico para conservar la memoria.
CONTROLES Y FUNCIONES D VOLUME Controla el nivel de salida de sonido. No afecta al nivel de REC en la grabación. INTRODUCCIÓN C Selector e indicador PURE DIRECT Reproduce cualquier fuente de entrada con el sonido más puro posible. El indicador se ilumina cuando se activa esta función. Consulte la página 10 para obtener más información. Mando a distancia 4 Botones de selección de entradas Seleccione la fuente de entrada que quiera escuchar.
CONTROLES Y FUNCIONES Inserción de las baterías en el mando a distancia 1 Uso del mando a distancia El mando a distancia transmite un haz infrarrojo dirigido. Es importante dirigir correctamente el mando a distancia hacia el sensor del mando a distancia situado en el panel frontal cuando lo utilice. 3 2 1 Pulse la pieza y deslice el compartimento de las pilas para quitar la tapa.
CONTROLES Y FUNCIONES Panel trasero INTRODUCCIÓN (Sólo para modelos de Asia y modelo general) 1 Tomas de entrada de CD Conecte un reproductor de CD. Consulte la página 6 para obtener información sobre la conexión. 8 AC OUTLET(S) Se utiliza para alimentar el resto de componentes de audio/vídeo. Consulte la página 8 para obtener más información. 2 Tomas PHONO y terminal GND Las tomas PHONO están pensadas para la conexión de un tocadiscos con un cartucho MM.
PREPARACIÓN CONEXIONES Conexión de los altavoces y otros componentes PRECAUCIÓN • No conecte esta unidad ni otros componentes a la toma principal de alimentación hasta que no haya finalizado las conexiones entre todos los componentes. • Todas las conexiones deben estar realizadas correctamente: L (izquierdo) con L, R (derecho) con R, “+” con “+” y “–” con “–”. Si las conexiones son incorrectas, no obtendrá sonido en los altavoces.
CONEXIONES PRECAUCIÓN • El IMPEDANCE SELECTOR debe estar ajustado en la posición correcta antes de conectar el resto de conjuntos de altavoces. Consulte la página 5 para obtener más información. • No deje que los cables pelados de los altavoces se toquen entre sí ni ninguna pieza metálica de esta unidad. Podría averiar la unidad o los altavoces. • No conecte esta unidad ni otros componentes a la toma principal de alimentación hasta que no haya finalizado las conexiones entre todos los componentes.
CONEXIONES Conexión del cable de alimentación suministrado A la toma de pared con el cable de alimentación suministrado (Sólo para modelos de Asia y modelo general) ■ VOLTAGE SELECTOR (Solamente en modelos para Asia y en modelo general) El VOLTAGE SELECTOR del panel trasero de la unidad debe estar ajustado para su voltaje principal local ANTES de conectar el cable de alimentación suministrado en la toma de pared.
FUNCIONAMIENTO REPRODUCCIÓN Y GRABACIÓN Reproducción de una fuente 3 Gire el selector INPUT del panel frontal (o pulse uno de los botones de selección de entradas del mando a distancia) para seleccionar la fuente de entrada que quiera escuchar. El indicador de la fuente de entrada seleccionada se iluminará. o Panel frontal Mando a distancia FUNCIONAMIENTO Se ilumina 4 1 Gire el selector SPEAKERS del panel frontal para seleccionar SPEAKERS A, B o A+B.
REPRODUCCIÓN Y GRABACIÓN 6 ■ Uso del interruptor PURE DIRECT Gire VOLUME en el panel frontal (o pulse VOL +/– en el mando a distancia) para ajustar el nivel de salida de sonido. Enruta las señales de entrada de las fuentes de audio. Como resultado, las señales de entrada omiten el ajuste de los controles BASS, TREBLE, BALANCE y LOUDNESS, eliminando así las posibles alteraciones de las señales de sonido y conseguir una calidad más directa y perfecta en todas las fuentes de entrada.
REPRODUCCIÓN Y GRABACIÓN ■ Ajuste del control LOUDNESS Conserva todo el rango tonal en cualquier nivel de volumen, compensando así la pérdida de sensibilidad del oído humano en las frecuencias altas y bajas con poco volumen. PRECAUCIÓN Si el interruptor CD DIRECT AMP (o el interruptor PURE DIRECT) está encendido con la configuración de control LOUDNESS a cierto nivel, las señales de entrada eluden el control del volumen, produciendo un incremento repentino del nivel de salida del sonido.
INFORMACIÓN ADICIONAL SOLUCIÓN DE PROBLEMAS Consulte el siguiente cuadro cuando el aparato no funcione bien. Si el problema no es uno de los que aparecen en la siguiente lista o si las instrucciones facilitadas no ayudan a solucionar el problema, ponga la unidad en modo de espera, desenchufe el cable de alimentación y póngase en contacto con el distribuidor de servicio autorizado de Yamaha más cercano. ■ General Posibles causas Al pulsar el interruptor POWER del panel frontal no se enciende la unidad.
SOLUCIÓN DE PROBLEMAS Problemas Posibles causas Soluciones Consulte la página El sonido está silenciado. Pulse MUTE en el mando a distancia para reanudar la salida de audio. 3 Los cables no se han conectado correctamente. Conecte el cable estéreo para unidades de audio y los cables de los altavoces de forma correcta. Si el problema no desaparece, es posible que los cables estén defectuosos. 6 No se ha seleccionado ninguna fuente de entrada adecuada.
SOLUCIÓN DE PROBLEMAS ■ Mando a distancia Problemas El mando a distancia no funciona correctamente. 14 Es Posibles causas Soluciones Consulte la página El mando a distancia está demasiado lejos o demasiado inclinado. El mando a distancia tiene un alcance máximo de 6 m y una inclinación máxima de 30 grados con respecto al eje del panel frontal.
ESPECIFICACIONES SECCIÓN DE ALIMENTACIÓN SECCIÓN DE CONTROL • Potencia de salida RMS mínima (8 Ω, de 20 Hz a 20 kHz, 0,019% THD) ...................90 W + 90 W (6 Ω, de 20 Hz a 20 kHz, 0,03% THD) ................ 105 W + 105 W • Sensibilidad de entrada/Impedancia de entrada PHONO .................................................................. 3,0 mV/47 kΩ CD, etc. .................................................................. 200 mV/47 kΩ • Potencia dinámica (IHF) (8/6/4/2 Ω) ....................
警告:操作本机前请认真阅读。 警告:操作本机前请认真阅读。 1 为了保证最佳的性能,请仔细阅读本手册。请妥善保管以 备日后查阅。 2 将本音响系统安装在通风,凉爽,干燥,清洁的地方—远 离阳光直射,热源,振动,肮脏,潮湿和寒冷的地方。请 将本机放置在顶部最少留有余地 30 cm,左右最少留有余 地 20 cm,后部最少留有余地 20 cm 的通风良好的地方。 3 将本机远离其他电器,马达或变压器放置,以避免产生蜂 鸣噪声。 4 不要将本机突然从低温环境转移到高温环境,也不要将其 置于高湿场所 (例如,放置有加湿器的房间),以防止机 器内部结露。结露可能导致触电,火灾,机器损坏甚至人 员伤害。 5 不要将本机放置于异物容易落入的场所,也不要放置在液 体飞溅的地方。在本机顶部,不要放置以下物品: – 其他装置,因为它们可能损害本机或使本机的外表 变色。 – 易燃物品 (比如,蜡烛等),因为它们会引起火灾, 机器损坏甚至人员伤害。 – 盛有液体的容器,因为其中的液体有可能倾倒进入 本机,使得用户触电或损坏本机。 6 不要使用报纸,桌布,窗帘等物遮盖本机,以免妨碍散 热。如果本机内部温度升高,会引起火灾,机器损坏甚
目录 简介 操作 前面板 ................................... 遥控器 ................................... 安装遥控器电池 ........................... 使用遥控器 ............................... 后面板 ................................... 播放和录制 ...............................9 播放音源 ................................. 9 调节音质 ................................ 10 录制音源 ................................ 11 2 3 4 4 5 简介 特点 ..................................... 1 附件 ..................................... 1 控制器和功能 .............................
控制器和功能 前面板 1 POWER 向内按到 ON 位置可打开本机电源。您可以在本机开启 时通过按遥控器上的 按钮将本机设为待机模式, 或按遥控器上的 按钮打开本机。 再次按下使按钮向外释放到 OFF 位置可关闭本机。 注意 即使本机关闭时,也会消耗少量电源以保存记忆内容。 2 POWER 开启指示灯 如下亮起: ON:亮 待机模式:暗 OFF:熄灭 3 遥控感应器 接收遥控器发出的信号。 4 INPUT 选择器和指示灯 选择您要聆听的输入源。 当选择输入源时,相应的输入源指示灯亮起。 y 输入源名称与后面板上的连接插孔名称是一一对应的。 注意 输入设定会在拔下电源插头后保留 1 周左右。 5 PHONES 插孔 连接耳机以便个人聆听。 将前面板上的 SPEAKERS 选择器转动至 OFF 位置可关闭 扬声器的声音。 6 SPEAKERS 选择器 每次将 SPEAKERS 选择器设定至 A、B 或 A+B 时,打开 或关闭相应连接至后面板上 SPEAKERS A 和 / 或 B 端子 的扬声器。 2 Zh 7 REC OUT 选择器 选择一个独立于 INPUT 选择器设定的音源进行录制, 能让
控制器和功能 遥控器 4 输入选择器按钮 选择您要聆听的输入源。 简介 5 放大器控制按钮 INPUT l / h 选择您要聆听的输入源。 VOL +/控制声音输出电平。 不会影响录制的 REC 电平。 MUTE 静音。再次按 MUTE 可恢复音频输出。静音时,所选的 输入源指示灯会闪烁。 ■ 控制其他组件 控制其他 Yamaha 组件的按钮功能与这些组件上相应按 钮的功能相同。详细说明,请参阅这些组件的使用说 明书。 6 Yamaha 调谐器控制按钮 控制 Yamaha 调谐器的各种功能。详细说明,请参阅调 谐器的用户手册。 注意 并非所有的 Yamaha 调谐器或功能都能由本遥控器控制。 ■ 控制本机 1 红外线信号发射器 将信号发送至主机。 7 Yamaha CD 播放器控制按钮 控制 Yamaha CD 播放器的各种功能。详细说明,请参 阅 CD 播放器的用户手册。 注意 并非所有的 Yamaha CD 播放器或功能都能由本遥控器控制。 2 POWER ( ) 打开本机。 注意 此按钮仅当前面板上的 POWER 向内按到 ON 位置时才可操作。 3 STANDBY ( ) 将本机设
控制器和功能 安装遥控器电池 使用遥控器 遥控器会发射定向的红外线光束。 操作时,务必将遥控器直接对准本机前面板上的遥控 感应器。 1 3 2 1 按 2 根据电池舱内的极性标记 (+ 和 -) 插入两节附送 的电池 (AA、R6、UM-3)。 3 滑回电池舱盖直至卡到位。 ■ 有关电池的注意事项 • 当遥控器的操作范围缩小时,请同时更换两节电 池。 • 使用 AA、R6、UM-3 电池。 • 确保极性正确。请注意电池舱内的图示。 • 如果打算长时间不使用遥控器,请取出电池。 • 请勿混用新旧电池。 • 请勿同时使用不同类型的电池 (例如,同时使用碱 性电池和锰电池)。请仔细看清电池包装,因为不 同类型的电池可能有相同的形状和颜色。 • 如果电池漏液,请立即将电池废弃。避免接触漏液 或使其接触衣服等物品。请彻底清洁电池舱后再装 入新电池。 • 请勿将电池与一般家庭废品一同丢弃;请根据当地 法规正确废弃电池。 4 Zh 6 m内 部分并滑出电池舱盖。 ■ 使用遥控器 • • • • 遥控器和本机之间的区域内不得有大的障碍物。 请勿使水或其他液体溅到遥控器上。 请勿摔落遥控器。 请
控制器和功能 后面板 简介 (亚洲和常规型号) 1 CD 输入插孔 连接 CD 播放器。 有关连接信息,请参阅第 6 页。 ■ IMPEDANCE SELECTOR 开关 2 PHONO 插孔和 GND 端子 PHONO 插孔设计用于连接带 MM 唱头的电唱机。 有关连接信息,请参阅第 6 页。 请勿在本机电源开启时切换 IMPEDANCE SELECTOR 开 关,否则可能会损坏本机。 如果本机未能开启,则可能是 IMPEDANCE SELECTOR 开 关没有完全滑到左侧或右侧。这时,请在本机电源完 全切断时,将开关完全滑到左侧或右侧。 根据系统中扬声器的阻抗,选择开关位置 (LOW 或 HIGH)。 3 音频输入 / 输出插孔 连接调谐器等外接组件。 有关连接信息,请参阅第 6 页。 4 VOLTAGE SELECTOR (仅限亚洲和常规型号) 在将附带的电源线插头插入电源插座之前,必须先将 VOLTAGE SELECTOR 设定为当地的电压。 详细说明,请参阅第 8 页。 5 AC IN 用于插入附带的电源线。 有关连接信息,请参阅第 8 页。 警告 开关位置 阻抗等级 HIGH
准备 连接 连接扬声器和其他组件 警告 • 请在完成其他组件之间的所有连接之后,再将本机或组件连接至主电源。 • 所有连接必须正确:L (左)至 L、R (右)至 R、“+”至 “+”和 “-”至 “-”。如果连接不当,则扬声器 没有声音输出,如果扬声器的极性连接错误,则声音会不自然或缺少低音。另外,也请参阅各组件的用户手 册。 • 请使用 RCA 立体声线用于除扬声器以外的音频装置。 扬声器 A 调谐器 CD 播放器 音频输出 音频输出 音频输出 DVD 播放器等 音频输出 GND 音频 输出 电唱机 音频输入 磁带机等 CD 刻录机等 音频 输出 扬声器 B y • PHONO 插孔设计用于连接带 MM 唱头的电唱机。 • 将电唱机连接至 GND 端子以减少信号中的噪音。但是对于有些电唱机,不进行 GND 端子连接也可能听到较少的噪音。 6 Zh
连接 警告 • 连接一个或两个扬声器装置前,必须将 IMPEDANCE SELECTOR 设定至适当位置。详细说明,请参阅第 5 页。 • 请勿让裸露的扬声器电线互相接触,也请勿让电线接触本机的金属部分。否则会损坏本机和 / 或扬声器。 • 请在完成其他组件之间的所有连接之后,再将本机或组件连接至主电源。 1 除去每个扬声器导线末端约 10 mm 的绝缘层,然后 将裸露的电线拧在一起以防止短路。 10 mm ■ 双线连接 双线连接可将低频部分从组合的中频和高频部分中分 离出来。双线兼容扬声器有四个接线柱端子。这两组 端子可让扬声器分成两个独立的部分。使用这些连接 时,一组端子连接中频和高频驱动器,而另一组端子 连接低频驱动器。 准备 本机 扬声器 2 连接扬声器导线。 1 旋松旋钮。 2 将一根裸露的电线插入各端子侧面的孔中。 3 拧紧旋钮以固定电线。 红色:正极 (+) 黑色:负极 (-) 用相同方法将另一个扬声器连接至另一组端子。 警告 ■ 通过香蕉插头进行连接 (亚洲、韩国、英国和欧洲型号除外) 首先拧紧旋钮,然后将香蕉插头插入相应端子的末 端。 进行双线连接时,根据扬声器的阻
连接 连接附带的电源线 使用附带的电源线连接 至电源插座 (亚洲和常规型号) ■ VOLTAGE SELECTOR (仅限亚洲和常规型号) 在将附带的电源线插头插入电源插座之前,必须先将 本机后面板上的 VOLTAGE SELECTOR 设定为当地的电 压。 VOLTAGE SELECTOR 设定不当可能会造成本机损坏或产 生潜在的火灾危险。 使用一字螺丝刀将 VOLTAGE SELECTOR 顺时针或逆时针 转动至正确的位置。 电压如下: 亚洲型号 ............ AC 220/230-240 V,50/60 Hz 常规型号 .... AC 110/120/220/230-240 V,50/60 Hz ■ AC OUTLET(S) (SWITCHED) 英国和澳大利亚型号 ................ 1 个电源插口 韩国型号 .................................... 无 其他型号 ..........................
操作 播放和录制 播放音源 3 转动前面板上的INPUT选择器(或按遥控器上的任 意一个输入选择器按钮)选择您要聆听的输入 源。 所选输入源的指示灯亮起。 或 前面板 遥控器 点亮 操作 4 1 转动前面板上的 SPEAKERS 选择器选择 SPEAKERS A、B 或 A+B。 将前面板上的 VOLUME 逆时针转动到底。 注意 • 进行双线连接时,或同时使用两组扬声器 (A 和 B)时,将 SPEAKERS 选择器切换至 A+B 位置。 • 如果用耳机聆听,请将选择器转动至 OFF 位置。 5 2 播放音源。 将前面板上的 POWER 向内按到 ON 位置。 中文 9 Zh
播放和录制 6 转动前面板上的 VOLUME (或按遥控器上的 VOL +/-)调节声音输出电平。 ■ 使用 PURE DIRECT 开关 发送来自音源的输入信号。因此,输入信号绕过BASS、 TREBLE、BALANCE 和 LOUDNESS 控制器,从而不对音频 信号作任何改变,从所有输入源产生更直接及高品质 的声音。 点亮 或 前面板 遥控器 y 您可以使用前面板上的 BASS、TREBLE、BALANCE 和 LOUDNESS 控制器、CD DIRECT AMP 开关或 PURE DIRECT 开关调节音质。 7 使用后,请按前面板上的 POWER 关闭电源。 注意 当 PURE DIRECT 开关打开时,BASS、TREBLE、BALANCE 和 LOUDNESS 控制器无效。 ■ 调节 BASS 和 TREBLE 控制器 调节高低频率响应。 中间位置产生平坦响应。 BASS 当您感觉低音不够时,顺时针转动可增强低音。当您 感觉低音过多时,逆时针转动可减弱低音。 控制范围:-10 dB 至 +10 dB (20 Hz) y 如果您通过按遥控器上的 则可以通过按遥控器上的
播放和录制 ■ 调节 LOUDNESS 控制器 在任何音量等级都保持全音调范围,从而以低音量补 偿人耳对高低频范围敏感度的缺失。 录制音源 注意 警告 如果在 LOUDNESS 控制器设定在一定等级时打开 CD DIRECT AMP 开关 (或 PURE DIRECT 开关),输入信号 会绕过响度控制器,而造成声音输出电平突然增大。 为防止您的耳朵或扬声器受损,务必在调低声音输出 电平或检查 LOUDNESS 控制器是否正确设定之后,再 按下 CD DIRECT AMP 开关 (或 PURE DIRECT 开关)。 将 LOUDNESS 控制器设定至 FLAT 位置。 2 转动前面板上的 VOLUME (或按遥控器上的 VOL +/-),将声音输出电平设定至您愿意聆听的 最响的聆听电平。 操作 1 • 当用REC OUT选择器选择了LINE 2或LINE 3时,音频信号不 通过 LINE 2 REC 或 LINE 3 REC 输出插孔输出。 如果选择 PHONO、TUNER、CD 或 LINE 1,音频信号同时从 LINE 2 REC 和 LINE 3 REC 输出插孔输出。 • VOLUM
附加信息 故障排除 如果本机运作不正常,请参阅以下表格。如果您所遇到的问题未在以下表格中列出,或如果以下说明没有帮助, 请将本机设定为待机模式,断开电源线连接,然后联系附近授权的 Yamaha 经销商或服务中心。 ■ 常规 问题 可能原因 按前面板上的 POWER 开 关无法打开本机。POWER 开启指示灯也未亮起。 没有连接附带的电源线,或没有正确插 入电源线。 牢牢连接附带的电源线。 当本机关闭时按下了遥控器上的 POWER ( )按钮。 将前面板上的 POWER 按到 ON。 本机的内部电路有问题。 断开交流电源线,联系附近授权的 Yamaha 经销商 或服务中心。如果本机发出异味或噪音,切勿打 开电源,请断开交流电源线,然后联系服务中心 要求维修。 — 正确连接扬声器导线,再重新将电源按钮按到 ON。INPUT 指示灯闪烁约 15 秒钟后,会自动降低 VOLUME 并打开本机。通过逐渐调高音量来确认扬 声器声音输出正常,然后即可正常操作本机。 7 更换扬声器装置,再重新将电源按钮按到 ON。 INPUT 指示灯闪烁约 15 秒钟后,会自动降低 VOLUME 并打开本机。通过
故障排除 问题 无声音 可能原因 解决方法 参考页 已静音。 按遥控器上的 MUTE 恢复音频输出。 3 导线连接不正确。 正确连接音频装置的立体声线和扬声器电线。如 果问题仍然存在,则导线可能损坏。 6 选择了不适合的输入源。 用前面板上的 INPUT 选择器 (或遥控器上任意一 个输入选择器按钮)选择合适的输入源。 9 SPEAKERS 选择器设定不正确。 将相应的SPEAKERS选择器设定至A、B或A+B位置。 9 由于发生短路等而启动了保护电路。 检查 IMPEDANCE SELECTOR 设定是否正确。 5 确认扬声器电线没有互相接触或没有在本机后面 板上短路,然后重新打开本机电源。 6 导线连接不正确。 正确连接导线。如果问题仍然存在,则导线可能 损坏。 6 BALANCE 控制器的设定不正确。 将 BALANCE 控制器设定至适当的位置。 10 低音不够,没有气氛。 放大器或扬声器的 + 和 - 电线接反了。 将扬声器电线连接至正确的 + 和 - 相位。 6 能听到 “嗡嗡”声。 导线连接不正确。 牢牢连接音频插头。如果问题仍然
故障排除 ■ 遥控器 问题 遥控器不工作或功能不 正常。 14 Zh 可能原因 遥控器离得太远或太倾斜。 解决方法 参考页 遥控器在离前面板最大 6 m 且不超过中心轴 30 度 的范围内有效。 4 直射阳光或 (逆变型荧光灯等发出的) 重新放置本机或照明。 灯光正照在本机的遥控感应器上。 — 电池电量弱。 4 更换所有电池。
规格 功率部分 控制部分 • 最小 RMS 输出功率 • 输入灵敏度 / 输入阻抗 (8 Ω, 20 Hz 到 20 kHz, 0.019% THD) ....... 90 W + 90 W (6 Ω, 20 Hz 到 20 kHz, 0.03% THD) ...... 105 W + 105 W • 动态功率 (IHF) (8/6/4/2 Ω) ....................... 135/160/200/240 W • 最大输出功率 [ 仅限欧洲型号 ] (1 kHz, 0.7% THD, 4 Ω) ...................... 160 W [ 仅限亚洲和常规型号 ] (JEITA) (1 kHz, 10% THD, 8/6 Ω) ................. 140/160 W • IEC 输出功率 [ 仅限欧洲型号 ] (1 kHz, 0.019% THD, 8 Ω) ...................... 105 W • 功率带宽 (0.03% THD, 50 W, 8 Ω) ...............
© 2008 Yamaha Corporation All rights reserved.