
manual


Setup
10 NUAGE I/O (16D )/ NUAGE I/O (16A) / NUAGE I/O (8A8D) Operation Manual
Setup
Overall Process
This section explains how to set up the device for use with
the DANTE ACCELERATOR. Before setting up, make sure
that the following conditions are met.
• The DANTE ACCELERATOR installed to the computer
works properly.
• The Dante Controller has already been installed.
For details, refer to the DANTE ACCELERATOR manual.
1. Connect the device to a computer with a
Ethernet cable. “Connection between the
Device and a Computer” (page 10)
2. Connect the power cable then turn the
power on. “Setting up the Power Supply”
(page 11)
3. Configure the audio routing of the Dante
network with the Dante Controller.
“Configuring the Audio Routing of the Dante
Network” (page 11)
4. Install TOOLS for NUAGE. “Installing
TOOLS for NUAGE” (page 11)
5. Configure the Workgroup on NUAGE with
the NUAGE Workgroup Manager.
“Configuring the Workgroup on NUAGE”
(page 11)
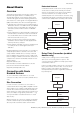
Connection between the
Device and a Computer
Connect the devices and computer by using a star
connection or a daisy chain connection.
Star Connection
This section explains the connections when configuring a
redundant network.
1. Connect the Ethernet cable as shown below.
2. Set the [UNIT ID rotary switch] on the rear
panel to a unique ID.
3. Turn on (down) the [Dip switch] No.1 on the
rear panel.
NOTE
Redundant network operation may not be available on the
DANTE ACCELERATOR depending on its firmware version. Make
sure that the firmware version currently on the DANTE
ACCELERATOR supports a redundant network by checking the
following website.
http://www.yamahaproaudio.com/
Computer
Ethernet port
Network switch Network switch
PRIMARY
PRIMARY
PRIMARY
SECONDARY
SECONDARY
SECONDARY
PRIMARY SECONDARY
CASCADE
OUT
CASCADE
OUT
CASCADE IN
CASCADE IN
DANTE
ACCELERATOR
ID#1
ID#2
ID#3