
Owner`s manual


Part Names and Functions
5
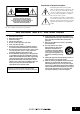
Front Panel
A
WORD CLOCK indicators
These indicators indicate the currently selected
wordclock source. If the unit is not locking to the
selected wordclock source, the corresponding
wordclock source indicator flashes.
B
[WORD CLOCK] button
This button enables you to select the wordclock source
from 44.1kHz, 48kHz, 88.2kHz, 96kHz, WORD
CLOCK IN, and DIGITAL OUT A (See page 7.)
C
+48V indicators
These indicators indicate the on/off status of the +48
phantom power of the corresponding channels.
D
HPF indicators
These indicators indicate the on/off status of the high
pass filter of the corresponding channels.
E
Level meters
These meters indicate the corresponding channel
output level in six steps.
F
Channel Select buttons
These buttons enable you to select channels to edit.
G
[+48V] button
This button turns the +48 phantom power of the
selected channels on or off (See page 7.) The button
indicator lights up when the +48V phantom power of
the selected channels is turned on.
H
[HPF] button
This button turns the high pass filter of the selected
channels on or off (See page 8.) The button indicator
lights up when the high pass filter of the selected
channels is turned on.
I
Gain display
This 3-digit, 7-segment display indicates the gain of
the currently selected channel.
J
Gain control
This control sets the gain of the selected channel.
NOTE:
The PAD will be switched on or off internally when the gain
is adjusted between -14 dB and -13 dB. Keep in mind that
noise may be generated if there is a difference between
the Hot and Cold output impedance of the external device
connected to the INPUT connector when using phantom
power.
K
[+48V MASTER] switch
This switch turns the +48V phantom master power on
or off.
L
[POWER] switch
This switch turns the power to the AD8HR on or off.
The gain and high pass filter settings are stored even
after you turn off the power to the unit.
Part Names and Functions
+48V
HPF
dB
96kHz
88.2kHz
48kHz
44.1kHz
+48V
OFF ON
MASTER
WORD CLOCK
12
7
6
8LKJ9
5
3
4
• If you don’t need phantom power, be sure to turn
this button off.
• Before you turn phantom power on, make sure
that no devices other than phantom-powered
devices, such as a condenser microphone, are
connected. Otherwise, you risk damaging the
devices.
CAUTION
• Do not connect or disconnect a device while
phantom power is applied. Doing so can damage
the connected device and/or the unit itself.
•To protect your speaker system, leave the power
amps (powered speakers) turned off when
switching the phantom power on/off. We also
recommend that you set all output level faders to
the minimum position. Otherwise, high-volume
output may damage your hearing or equipment.