
Installation Guide


Add-On Effects Installation Guide
4
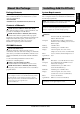
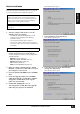
Installation Procedure
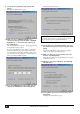
Choose one of the following installation procedures (direct
installation or indirect installation) depending on your
system environment. In most cases, choose the direct
installation procedure (i.e., installing by accessing the
Internet from your computer).
* The circled numbers in the illustrations above indicate the
sequence of the installation procedure.
PRODUCT ID
This is a number unique to each software package. This
number is required to obtain the access key. It is printed on a
label on the CD-ROM case.
Registration code
This is a number unique to each console. This number is
required to obtain the access key. It is automatically created
from the data inside your console. If you are installing a
different software package, its number will be different.
Access key
This is required to install your Add-On Effects. You must
obtain the access key from the authentication server via the
Internet using the PRODUCT ID and registration code.
NOTE:
You can de-authorize the license of the installed Add-On
Effects package, then install it on another console.
12
43
Registration
code
Console
Registration
code &
PRODUCT ID
USB
Internet
Access
key
Computer
Authentication
server
Direct installation
(Accessing the Internet from your computer)
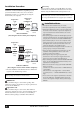
Access
key
1
2
4
3
Registration
code
Console
Registration
code &
PRODUCT ID
USB
Internet
Access
key
Computer #2
Access
key
Authentication
server
Indirect installation
(Accessing the Internet from another computer)
Computer #1
NOTE:
If you lose the registration code or access key, you can
obtain them again. You will need the PRODUCT ID to do so. Be
sure to keep the PRODUCT ID in a safe place after installation.
Installation Notes
•
The software can be installed on only one console.
•
You will be responsible for the entire installation procedure.
•
During the installation procedure, do not turn off the power to
the console, remove the cables, or operate the computer in a
way not instructed in this manual. Otherwise, the console
may malfunction.
•
This software program installs the Add-On Effects from the
computer via USB connection. You cannot install the software
using any driver other than the Yamaha USB-MIDI Driver.
•
If the installation fails for reasons such as a defective cable,
turning on the power to the console will start the console in
Flash Update mode, instead of normal mode. In this case,
replace the cable and try the installation again.
•
If a second installation attempt fails and the console does not
operate properly, consult your Yamaha dealer.
•
Exit or quit all open application programs before you start
installation. During installation, do not execute other
programs or activate any windows.
•
If the computer sleeps in energy saving mode, data
transmission to the console may be stopped. Cancel such
modes to prevent the computer from falling asleep.
•
Before installing the software, install the Yamaha USB-MIDI
Driver. See the Studio Manager Installation Guide for more
information on installing drivers.
•
Make sure that the Thru setting of the Yamaha USB-MIDI
Driver is turned off.
(Windows users: Select [Control Panel
→
MIDI-USB Driver
→
Thru OFF].)
(Macintosh users: Select [Apple Menu
→
Control Panels
(System Preferences)
→
Yamaha USB MIDI Patch
→
Thru
Off].)
•
Do not connect to the computer any USB devices other than
the console, USB mouse, and USB keyboard. Connect the
console to the computer’s USB port directly without using a
USB hub.