LIVE STREAMING MICROPHONE 使用指南 ZHTW
目錄 目錄 簡介 5 關於本指南.. ........................................................................................... 5 手冊編排方式.. ........................................................................................ 7 產品特色.. .............................................................................................. 8 配件.. .................................................................................................... 9 組件名稱與功能 10 正面....................................................................
目錄 本產品搭配電腦使用.. ............................................................................. 42 在視訊會議中使用本產品 45 搭配 iPhone/iPad 使用.. ........................................................................ 45 本產品搭配 Android 裝置使用.................................................................. 49 本產品搭配電腦使用.. ............................................................................. 52 使用本產品錄製 Podcast 55 使用 WaveLab Cast...............................................................................
目錄 指向性.................................................................................................. 70 頻率響應............................................................................................... 71 方塊與位準圖.. ......................................................................................
簡介 > 關於本指南 簡介 關於本指南 本指南內容的注意事項 本使用指南提供有關使用者連接及操作本產品的說明。注意事項及其他事項分類如下。 警告 ( 此內容表示「重傷或死亡的危險」。 注意 ( 此內容表示「受傷的危險」。 ( ( 須知 表示您必須遵守的要點,防止產品失效、損壞或故障與資料遺失,以及保護環境。 註 表示功能的指示、限制,以及其他可能有幫助的資訊。 ( 本指南中的所有圖例與畫面均為說明用途。 ( 軟體可能修改及更新,恕不另行通知。 ( 未經製造商書面同意,明確禁止以任何方式拷貝軟體或複製本指南的全部或部分內容。 ( Steinberg Media Technologies GmbH 及 Yamaha 公司對於軟體與說明文件的使用不作任何陳述或 保證,亦不對本指南與軟體使用所導致之結果承擔任何責任。 著作權保護 ( 請勿將本產品用於任何可能侵害著作權等任意第三方權利之用途,由各國家或地區法律訂定之。 ( 針對因使用本產品而有任何侵害第三方權利之虞者,Yamaha 不承擔責任。 ( 本產品內安裝之「內容」*1 的著作權屬於 Steinberg Media
簡介 > 關於本指南 ( ( ( ( Steinberg、Cubase、Cubasis 和 WaveLab Cast 為 Steinberg Media Technologies GmbH 的註冊 商標。 Windows、Teams 和 Skype 為 Microsoft Corporation 在美國及其他國家的註冊商標。 Apple、Mac、iPad、iPhone、App Store、Lightning 和 FaceTime 是 Apple Inc.
簡介 > 手冊編排方式 手冊編排方式 與本產品有關的手冊如下。 紙本手冊 本產品隨附以下手冊。 ( ( 快速入門指南 說明將本產品連接至外部裝置的基本方法、如何進行設定,以及各零件的名稱與功能。 安全指南 說明使用本產品時必須注意的安全相關要點。 線上手冊 ( 使用指南(本指南) 說明各零件的名稱與功能、如何連接各種裝置及進行聲音設定。本指南還有說明如何在不同情況下使 用本產品。 註 您可從 Yamaha 網站下載這些手冊。Yamaha 網站上有提供最新的手冊資料,請視需要自行取用。 https://download.yamaha.
簡介 > 產品特色 產品特色 本產品為具有混音功能的Live Streaming Microphone,可透過連接電腦、iPad 或智慧型手機進行直播 及其他用途。 n 內建壓縮器、等化器及殘響並可調整音調特性 使用專用的「AG Controller」對音調特性進行詳細調整。您可在產品上開啟/關閉殘響。 n 適合直播的實用回送功能 您可混合電腦、iPad 或智慧型手機的輸入音訊與本產品麥克風的音訊,並將其傳送回您的電腦、iPad 或智慧型手機。 n 可安裝到麥克風架或桌上型麥克風懸臂 您可從本產品拆下支架,並將本產品裝到市售的麥克風架或桌上型麥克風懸臂。 n 搭載「WaveLab Cast」,適合錄製 Podcast 節目 本產品隨附「WaveLab Cast」的授權。您可使用本軟體來錄製 Podcast 或編輯視訊內容中的音訊。 n 搭載「Cubase AI」DAW 軟體 本產品隨附「Cubase AI」的授權。對於基本音樂製作所需執行的工作,包括錄音、編輯、混音等等, 都可使用本軟體。 n 使用 USB 匯流排電源進行操作 您可將本產品連接到電腦並透過 USB 供電(需要至少 5 V / 1
簡介 > 配件 配件 本產品隨附下列配件。 ( USB 纜線(USB-C 對 USB-A),1.
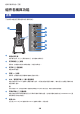
組件名稱與功能 > 正面 組件名稱與功能 正面 下方說明本產品正面各組件的名稱與功能。 a b c d e f g a 電容式麥克風 用於輸入音訊。將 [h] 標記朝向自己,並對著麥克風說話。 b 麥克風靜音 [m] 按鈕 開啟時,按鈕會亮起且麥克風會靜音(不會發出聲音)。 c 麥克風 [M] 音量旋鈕 調整麥克風音量。 d 殘響 [r] 按鈕 開啟時,按鈕會亮起且殘響效果會套用至音訊訊號。 e USB/智慧型手機 [n] 輸入音量旋鈕 調整已連接至 USB 2.0 連接埠之電腦的輸入音訊,或已連接至智慧型手機輸入/輸出插孔之智慧型手機或其他 裝置的輸入音訊。 註 您無法使用 USB/智慧型手機輸入音量旋鈕來調整 [AUX] 輸入插孔音量。調整已連接裝置的音量。 f 耳罩式耳機 [H] 音量旋鈕 調整已連接至耳罩式耳機輸出插孔之耳罩式耳機或耳機的音量。這不會影響到使用背面 [STREAMING OUT] 選 擇開關所設定的音訊音量。 g 電源 LED 正在從 [5V DC IN] USB 連接埠或 USB 2.
組件名稱與功能 > 背面 背面 下方說明本產品背面各組件的名稱與功能。 j k h h l i m 支架安裝螺絲 用於拆卸及安裝 i 支架。 i 支架 用於立起本產品。您可拆下此支架並將麥克風裝到麥克風架或桌上型麥克風懸臂。 ( j “如何安裝” (p.
組件名稱與功能 > 背面 k [STREAMING OUT] 選擇開關 選擇要傳送至 iPhone/iPad/電腦以及與智慧型手機 [P] 輸入/輸出插孔連接之裝置的音訊訊號。 警告 ( 變更背面選擇開關的設定前,請先調整音量。這是因為音量可能根據您連接的裝置而突然變大聲,這可能傷害您 的聽力或導致外部裝置故障。 [MIC] 僅將輸入的音訊傳送至本產品。 註 使用 DAW 軟體或類似應用程式錄音時,建議將本產品的殘響功能關閉,確保僅錄下未處理的聲音。在使用麥克風錄音 後,這可讓您更自由地在 DAW 軟體中套用及混合殘響或其他效果。 [INPUT MIX] 此設定適合播送談話與演講(語音聊天)。將輸入至本產品 [AUX] 輸入插孔的音訊作為立體聲混音傳送。 註 您可以將智慧型手機或樂器(如鍵盤)連接至 [AUX] 輸入插孔,並傳送混合背景音樂或音效的音訊。 [LOOPBACK] 此設定適合播送談話與遊戲串流。[INPUT MIX] 音訊以及來自 iPhone/iPad/電腦與來自已連接智慧型手機輸 入/輸出插孔之智慧型手機的音訊輸入會混合,並以立體聲傳送。這也會混合從 iPhone/iPad/電
組件名稱與功能 > 底部 底部 下方說明本產品底部各組件的名稱與功能。 n q o r p n 耳罩式耳機 [H] 輸出插孔 在此連接耳罩式耳機或耳機。相容於 3.5 mm 立體聲迷你插頭纜線。 註 雖然您可使用轉接器連接藍牙耳機,但藍牙耳機通常會出現延遲情形,因此不適合某些用途使用。 o [5V DC IN] USB 連接埠(USB-C) 在此連接市售 USB 電源變壓器、USB 行動電源或類似裝置。使用 iPhone 或 iPad 等無法供電的裝置或連接至 無法供應充足匯流排電力的電腦時,請使用此連接埠。本產品不包含 USB 電源變壓器或 USB 行動電源。 須知 ( ( p 務必閱讀欲使用之 USB 電源變壓器或 USB 行動電源的安全注意事項。 使用輸出電壓為 4.8 V–5.2 V 且輸出電流至少 1 A 的 USB 電源變壓器或 USB 行動電源。 [AUX] 輸入插孔 輸入插孔可用於許多不同情況。相容於 3.
組件名稱與功能 > 底部 r USB 2.0 [U] 連接埠(USB-C) 在此連接電腦或 iPhone/iPad。連接電腦時,電源會從電腦供應至本裝置。連接 iPhone/iPad 時,將 USB 電源 變壓器(另售)連接至底部的 [5V DC IN] USB 連接埠。 請遵守下列重要注意事項,防止裝置故障或資料遺失。 須知 ( ( ( ( 不可將 iPhone、iPad 或電腦以外的任何裝置連接至 USB 2.
開始使用本產品 > 連接 iPhone/iPad 開始使用本產品 連接 iPhone/iPad 此處說明如何透過連接 iPhone/iPad 來為本裝置供電。需要使用外部電源才能連接 iPhone/iPad。 事前準備 ( USB 電源變壓器或 USB 行動電源 (至少5 V / 1 A) ( USB 纜線 (市售,用於電源供應) ( USB 纜線(隨附) ( Apple Lightning-USB3 相機轉接器(使用具有 Lightning 接頭的 iPhone/iPad 時) ( Apple USB-C 數位 AV 多埠轉接器(使用具有 USB-C 接頭的 iPad 時) 註 ( ( 當本產品用於串流或長時間使用時,手邊備妥用於供電 iPhone/iPad 的電源供應器。 如需相容作業系統的清單,請瀏覽以下 Yamaha 網站。 https://www.yamaha.
開始使用本產品 > 連接 iPhone/iPad 註 如果使用具有 USB-C 接頭的 iPad,請使用 Apple USB-C 數位 AV 多埠轉接器。您也可以使用 iPad 隨附的 USB-C 充 電線直接連接至本產品。不過,iPad 的使用時間將會受剩餘電池電量的限制。 5 將轉接線連接至 iPhone/iPad。 iPhone/iPad 一旦連接本產品,iPhone/iPad 即會自動辨識。 無需在 iPhone/iPad 上進行任何設定。 16
開始使用本產品 > 連接 Android 裝置 連接 Android 裝置 此處說明如何透過連接 Android 裝置 來為本裝置供電。需要使用外部電源才能連接 Android 裝置。 事前準備 ( USB 電源變壓器或 USB 行動電源 (至少5 V / 1 A) ( USB 纜線 (市售,用於電源供應) ( 3.5 mm 4 芯立體聲迷你纜線 註 ( ( ( 本產品無法透過 USB 纜線輸入/輸出音訊。 傳送到 Android 裝置的音訊訊號為單聲道。 當本產品用於串流或長時間使用時,手邊備妥用於供電 Android 裝置 的電源供應器。 連接 1 2 確定本產品及已連接裝置的音量都已經關閉。 將市售的 USB 電源變壓器、USB 行動電源或類似裝置連接至裝置底部的 [5V DC IN] USB 連接埠。 底部 USB 纜線 (市售) USB 電源變壓器 至 電源 3 4 檢查本產品的電源 LED 是否亮起。 使用 3.5 mm 四芯立體聲迷你纜線,將本產品上的智慧型手機 [P] 輸入/輸出插孔連 接至 Android 裝置的頭戴式裝置插孔。 底部 3.
開始使用本產品 > 連接 Android 裝置 註 ( ( 如果 Android 裝置沒有連接立體聲迷你插頭的插孔,您需要使用轉接線。例如,對於使用 USB-C 連接埠來輸入/ 輸出音訊的 Android 裝置,您需要 USB-C 對 3.
開始使用本產品 > 連接電腦並進行設定(Windows) 連接電腦並進行設定(Windows) 首先,您必須從以下網站下載並安裝「Yamaha Steinberg USB Driver」,您的電腦才能辨識本產品。 https://www.yamaha.
開始使用本產品 > 連接電腦並進行設定(Mac) 連接電腦並進行設定(Mac) macOS 提供的標準驅動程式可依現況使用,無需安裝驅動程式。 註 如需相容作業系統的清單,請瀏覽以下 Yamaha 網站。 https://www.yamaha.
開始使用本產品 > 連接電腦並進行設定(Mac) 6 結束「音訊 MIDI 設定」。 21
使用本產品進行直播(17LIVE、Twitch、YouTube Live) > 搭配 iPhone/iPad 使用 使用本產品進行直播(17LIVE、Twitch、 YouTube Live) 搭配 iPhone/iPad 使用 此處說明如何使用本產品與 iPhone/iPad 進行設定,以及針對在 17LIVE、Twitch、YouTube Live 或其 他類似服務進行語音或演唱直播執行所需的操作。(17LIVE、Twitch 及 YouTube Live 是串流應用程式 的名稱。) 事前準備 ( ( 本產品 iPhone/iPad(已安裝 AG Controller 及直播應用程式) 在 App Store 上搜尋「AG Controller」應用程式並安裝至 iPhone/iPad。 ( 耳罩式耳機或耳機及立體聲迷你插頭纜線 ( Apple Lightning-USB3 相機轉接器(使用具有 Lightning 接頭的 iPhone/iPad 時) ( Apple USB-C 數位 AV 多埠轉接器(使用具有 USB-C 接頭的 iPad 時) ( USB 電源變壓器 (
使用本產品進行直播(17LIVE、Twitch、YouTube Live) > 搭配 iPhone/iPad 使用 3 進行本產品的設定 依下列說明對背面各開關進行設定。 [MIC GAIN]:[MID] [STREAMING OUT]:[INPUT MIX] [H-MIX MINUS MIC]:[OFF] 背面 在本產品上完成設定後,啟動「AG Controller」應用程式並按下畫面底部的「Sound Check」。在顯示的 Sound Check 畫面上,調整聲音檢查音量。 聲音檢查畫面 4 調整耳罩式耳機/耳機音量 1 視需要調整麥克風音量。 23
使用本產品進行直播(17LIVE、Twitch、YouTube Live) > 搭配 iPhone/iPad 使用 2 將耳罩式耳機 [H] 音量旋鈕調整至最低 [0] 位置。 1 調整自己聲音 的音量 2, 3 3 5 調整耳罩式耳機/耳機 的音量 將 [h] 標記朝向自己並對著麥克風說話時,調整耳罩式耳機/耳機音量。 調整耳罩式耳機或耳機的音量不會影響直播音訊的音量。 調整整體音量 使用麥克風 [M] 音量旋鈕和 USB/智慧型手機 [n] 輸入音量旋鈕,調整個別音量。 啟動直播應用程式並檢查聽眾的平衡。 註 如果聽不到任何聲音,請參閱“音訊相關及其他問題” (p.
使用本產品進行直播(17LIVE、Twitch、YouTube Live) > 本產品搭配 Android 裝置使用 本產品搭配 Android 裝置使用 此處說明如何使用本產品與 Android 裝置進行設定,以及針對在 17LIVE、Twitch、YouTube Live 或其 他類似服務進行語音或演唱直播執行所需的操作。(17LIVE、Twitch 及 YouTube Live 是串流應用程式 的名稱。) 事前準備 ( 本產品 ( Android 裝置 ( 耳罩式耳機或耳機及立體聲迷你插頭纜線 ( 3.5 mm 4 芯立體聲迷你纜線 ( USB 電源變壓器 ( USB 纜線 (市售,用於電源供應) 遵循以下步驟 1 連接 Android 裝置 參考「開始使用本產品」→「連接 Android 裝置」,執行所需的連接。 “連接 Android 裝置” (p.
使用本產品進行直播(17LIVE、Twitch、YouTube Live) > 本產品搭配 Android 裝置使用 3 進行本產品的設定 依下列說明對背面各開關進行設定。 [MIC GAIN]:[MID] [STREAMING OUT]:[INPUT MIX] [H-MIX MINUS MIC]:[OFF] 背面 4 調整耳罩式耳機/耳機音量 1 2 視需要調整麥克風音量。 將耳罩式耳機 [H] 音量旋鈕調整至最大 [0] 位置。 1 調整自己聲音 的音量 2, 3 26 調整耳罩式耳機/耳機 的音量
使用本產品進行直播(17LIVE、Twitch、YouTube Live) > 本產品搭配 Android 裝置使用 3 5 將 [h] 標記朝向自己並對著麥克風說話時,調整耳罩式耳機/耳機音量。 調整耳罩式耳機或耳機的音量不會影響直播音訊的音量。 調整整體音量 使用麥克風 [M] 音量旋鈕和 USB/智慧型手機 [n] 輸入音量旋鈕,調整個別音量。 啟動直播應用程式並檢查聽眾的平衡。 註 如果聽不到任何聲音,請參閱“音訊相關及其他問題” (p.
使用本產品進行直播(17LIVE、Twitch、YouTube Live) > 本產品搭配電腦使用 本產品搭配電腦使用 此處說明如何使用本產品與 Windows 電腦或 Mac 進行設定,以及針對在 17LIVE、Twitch、YouTube Live 或其他類似服務進行語音或演唱直播執行所需的操作。(17LIVE、Twitch 及 YouTube Live 是串流 應用程式的名稱。) 事前準備 ( ( 本產品 Windows 電腦或 Mac(已安裝 AG Controller 及直播應用程式) 從下列網站安裝「AG Controller」應用程式。 https://www.yamaha.com/2/ag01/ ( 耳罩式耳機或耳機及立體聲迷你插頭纜線 ( USB 纜線(隨附) 遵循以下步驟 1 安裝驅動程式(僅適用於 Windows) 如果使用 Mac,則無需安裝驅動程式。從步驟 2 開始操作。 如果尚未安裝驅動程式,請參考「開始使用本產品」→「連接電腦並進行設定 (Windows)」進行安裝。 “連接電腦並進行設定(Windows)” (p.
使用本產品進行直播(17LIVE、Twitch、YouTube Live) > 本產品搭配電腦使用 4 進行本產品的設定 依下列說明對背面各開關進行設定。 [MIC GAIN]:[MID] [STREAMING OUT]:[INPUT MIX] [H-MIX MINUS MIC]:[OFF] 背面 在本產品上完成設定後,啟動「AG Controller」應用程式並按下畫面底部的「Sound Check」。在顯示的 Sound Check 畫面上,調整聲音檢查音量。 聲音檢查畫面 5 調整耳罩式耳機/耳機音量 1 視需要調整麥克風音量。 29
使用本產品進行直播(17LIVE、Twitch、YouTube Live) > 本產品搭配電腦使用 2 將耳罩式耳機 [H] 音量旋鈕調整至最大 [0] 位置。 1 調整自己聲音 的音量 2, 3 3 6 調整耳罩式耳機/耳機 的音量 將 [h] 標記朝向自己並對著麥克風說話時,調整耳罩式耳機/耳機音量。 調整耳罩式耳機或耳機的音量不會影響直播音訊的音量。 調整整體音量 使用麥克風 [M] 音量旋鈕和 USB/智慧型手機 [n] 輸入音量旋鈕,調整個別音量。 啟動直播應用程式並檢查聽眾的平衡。 註 如果聽不到任何聲音,請參閱“音訊相關及其他問題” (p.
使用本產品進行直播(17LIVE、Twitch、YouTube Live) > 本產品搭配電腦使用 3 對於「全域音訊裝置」中的「桌面音效」設定,請使用「預設」或「已停用」。 如果已將本產品上的 [STREAMING OUT] 選擇開關設為 [MIC] 或 [INPUT MIX],請將此設 為「預設」;如果已將選擇開關設為 [LOOPBACK],請將此設為「已停用」。 4 此外,將「全域音訊裝置」中的「麥克風/輔助音效」設定設為「Yamaha AG01」線 路設定。 5 6 7 8 在左側導覽選單上,按下「串流」。 選擇要使用的串流服務,並視需要輸入從該服務接收的串流金鑰。 關閉「設定」畫面。 開始直播。 31
使用本產品進行直播(17LIVE、Twitch、YouTube Live) > 直播時的操作 直播時的操作 此處說明直播時可使用的操作。 n 將麥克風靜音 如果要在直播期間離席或稍作休息,請開啟麥克風靜音 [m] 按鈕(LED 亮起),如此麥克風就不會播 音。 n 將殘響加入聲音 若要將殘響加入麥克風音訊,請開啟殘響 [r] 按鈕(LED 亮起)。 使用 AG Controller 應用程式 若要進行本產品的詳細設定,請使用 AG Controller 應用程式。此處以 EQ 和殘響的設定畫面為範例。 ( EQ 設定畫面 開啟方式:[Detail r] → 按下 [EQ] 圖形為 [CH 1] 畫面 32
使用本產品進行直播(17LIVE、Twitch、YouTube Live) > 直播時的操作 ( 殘響設定畫面 開啟方式:[Detail r] → 按下 [Reverb] 圖形畫面 註 Android 裝置無法使用 AG Controller 應用程式。 33
使用本產品進行直播(17LIVE、Twitch、YouTube Live) > 連接樂器或音樂播放器 連接樂器或音樂播放器 這顯示如何連接樂器或音樂播放器,以及進行新增背景音樂或音效的設定。 n 連接樂器 將數位鋼琴、合成器或其他數位樂器連接至本裝置底部的 [AUX] 輸入插孔。 調整已連接樂器的音量。 註 您可能需要使用轉接線或其他方式才能連接樂器。檢查樂器適用的連接方式。 底部 3.5 mm 立體聲 迷你纜線 數位鋼琴 n 連接音樂播放器 若要播放背景音樂或音效,請將音樂播放器連接至本裝置底部的 [AUX] 輸入插孔。 調整已連接裝置的音量。 底部 3.
使用本產品直播遊戲聊天(Discord) > 搭配 iPhone/iPad 使用 使用本產品直播遊戲聊天(Discord) 搭配 iPhone/iPad 使用 此處說明使用本產品與 iPhone/iPad 在 Discord 或類似應用程式(「Discord」為應用程式的名稱)上 開遊戲聊天直播時要執行的設定及操作。 在 iPhone/iPad 上使用聊天應用程式時,即使透過 USB 纜線連接,也不會聽見本產品的聲音。您需要 使用 3.5 mm 4 芯(TRRS)立體聲迷你纜線進行連接。 事前準備 ( 本產品 ( iPhone/iPad(已安裝 Discord) ( 耳罩式耳機或耳機及立體聲迷你插頭纜線 ( 遊戲機 ( ( Lightning - 3.5 mm 耳罩式耳機插孔轉接器(使用具有 Lightning 接頭的 iPhone/iPad 時。建議使用 Apple 原廠產品。) USB - 3.5 mm 耳罩式耳機插孔轉接器(使用具有 USB-C 接頭的 iPad 時。建議使用 Apple 原廠產 品。) ( 3.
使用本產品直播遊戲聊天(Discord) > 搭配 iPhone/iPad 使用 4 使用 3.5 mm 4 芯(TRRS)立體聲迷你纜線,將 Lightning 或 USB-C 3.5 mm 耳罩式耳機插 孔轉接器連接至本產品的智慧型手機 [P] 輸入/輸出插孔。 USB 電源變壓器 USB 纜線(市售) 2 至 電源 底部 4 4 3.5 mm 4 芯(TRRS)立體聲迷你 纜線 3 Lightning/USB-C 3.
使用本產品直播遊戲聊天(Discord) > 搭配 iPhone/iPad 使用 3 連接遊戲機 將遊戲機的耳罩式耳機輸出連接至 [AUX] 輸入插孔。 底部 完成所有連接後,即可開始本產品的設定。 4 進行本產品的設定 依下列說明對背面各開關進行設定。 [MIC GAIN]:[MID] [STREAMING OUT]:[MIC] [H-MIX MINUS MIC]:[OFF];如果聽不到自己的聲音,請將此設為 [ON]。 背面 5 開始語音聊天 1 2 啟動 Discord。 3 使用 USB/智慧型手機 [n] 輸入音量旋鈕,調整交談對象的音量。 當遊戲機正在播放音訊時,使用耳罩式耳機 [H] 音量旋鈕調整音量。如果遊戲機的聲音太小 聲,調高遊戲機的音量。 37
使用本產品直播遊戲聊天(Discord) > 搭配 iPhone/iPad 使用 4 使用麥克風 [M] 音量旋鈕,調整自己的音量。 4 調整自己聲音 的音量 3 調整交談對象 的音量 2 調整耳罩式耳機/耳機 的音量 語音聊天時的操作 ( 將自己的聲音靜音 如果要中斷語音聊天,請開啟麥克風靜音 [m] 按鈕(LED 亮起)。 註 如果聽不到任何聲音,請參閱“音訊相關及其他問題” (p.
使用本產品直播遊戲聊天(Discord) > 本產品搭配 Android 裝置使用 本產品搭配 Android 裝置使用 此處說明使用本產品與 Android 裝置 在 Discord 或類似應用程式(「Discord」為應用程式的名稱)上 開遊戲聊天直播時要執行的設定及操作。 註 使用 Android 裝置時,無法透過 USB 輸入本產品的音訊。您需要使用 3.5 mm 4 芯(TRRS)立體聲迷你纜線進行連接。 事前準備 ( 本產品 ( Android 裝置(已安裝 Discord) ( 耳罩式耳機或耳機及立體聲迷你插頭纜線 ( 遊戲機 ( 3.5 mm 4 芯(TRRS)立體聲迷你纜線 ( USB 電源變壓器 ( USB 纜線 (市售,用於電源供應) 遵循以下步驟 1 連接 Android 裝置 參考「開始使用本產品」→「連接 Android 裝置」,執行所需的連接。 “連接 Android 裝置” (p.
使用本產品直播遊戲聊天(Discord) > 本產品搭配 Android 裝置使用 3 連接遊戲機 將遊戲機的耳罩式耳機輸出連接至 [AUX] 輸入插孔。 底部 完成所有連接後,即可開始本產品的設定。 4 進行本產品的設定 依下列說明對背面各開關進行設定。 [MIC GAIN]:[MID] [STREAMING OUT]:[MIC] [H-MIX MINUS MIC]:[OFF];如果聽不到自己的聲音,請將此設為 [ON]。 背面 5 開始語音聊天 1 2 啟動 Discord。 3 使用 USB/智慧型手機 [n] 輸入音量旋鈕,調整交談對象的音量。 當遊戲機正在播放音訊時,使用耳罩式耳機 [H] 音量旋鈕調整音量。如果遊戲機的聲音太小 聲,調高遊戲機的音量。 40
使用本產品直播遊戲聊天(Discord) > 本產品搭配 Android 裝置使用 4 使用麥克風 [M] 音量旋鈕,調整自己的音量。 4 調整自己聲音 的音量 3 調整交談對象 的音量 2 調整耳罩式耳機/耳機 的音量 語音聊天時的操作 ( 將自己的聲音靜音 如果要中斷語音聊天,請開啟麥克風靜音 [m] 按鈕(LED 亮起)。 註 如果聽不到任何聲音,請參閱“音訊相關及其他問題” (p.
使用本產品直播遊戲聊天(Discord) > 本產品搭配電腦使用 本產品搭配電腦使用 此處說明使用本產品與 Windows 電腦或 Mac 在 Discord 或類似應用程式(「Discord」為應用程式的 名稱)上開遊戲聊天直播時要執行的設定及操作。 事前準備 ( 本產品 ( Windows 電腦或 Mac(已安裝 Discord) ( 耳罩式耳機或耳機及立體聲迷你插頭纜線 ( USB 纜線(隨附) ( 遊戲機 ( 3.5 mm 立體聲迷你纜線 遵循以下步驟 1 安裝驅動程式(僅適用於 Windows) 如果使用 Mac,則無需安裝驅動程式。從步驟 2 開始操作。 如果尚未安裝驅動程式,請參考「開始使用本產品」→「連接電腦並進行設定 (Windows)」進行安裝。 “連接電腦並進行設定(Windows)” (p.19) ( 2 連接電腦 參考「開始使用本產品」→「連接電腦並進行設定(Windows)/(Mac)」進行連接。 “連接電腦並進行設定(Windows)” (p.19) “連接電腦並進行設定(Mac)” (p.
使用本產品直播遊戲聊天(Discord) > 本產品搭配電腦使用 4 連接遊戲機 將遊戲機的耳罩式耳機輸出連接至 [AUX] 輸入插孔。 底部 完成所有連接後,即可開始本產品的設定。 5 進行本產品的設定 依下列說明對背面各開關進行設定。 [MIC GAIN]:[MID] [STREAMING OUT]:[MIC] [H-MIX MINUS MIC]:[OFF];如果聽不到自己的聲音,請將此設為 [ON]。 背面 6 進行 Discord 設定 啟動 Discord 後登入。 確認「語音設定」聲音輸入裝置和聲音輸出裝置皆設為「Yamaha AG01」。 7 開始語音聊天 1 當遊戲機正在播放音訊時,使用耳罩式耳機 [H] 音量旋鈕調整音量。如果遊戲機的聲音太小 聲,調高遊戲機的音量。 2 使用 USB/智慧型手機 [n] 輸入音量旋鈕,調整交談對象的音量。 43
使用本產品直播遊戲聊天(Discord) > 本產品搭配電腦使用 3 使用麥克風 [M] 音量旋鈕,調整自己的音量。 3 調整自己聲音 的音量 2 調整交談對象 的音量 1 調整耳罩式耳機/耳機 的音量 語音聊天時的操作 ( 將自己的聲音靜音 如果要中斷語音聊天,請開啟麥克風靜音 [m] 按鈕(LED 亮起)。 註 如果聽不到任何聲音,請參閱“音訊相關及其他問題” (p.
在視訊會議中使用本產品 > 搭配 iPhone/iPad 使用 在視訊會議中使用本產品 搭配 iPhone/iPad 使用 此處說明使用本產品與 iPhone/iPad 在 Zoom、Skype、Teams、FaceTime 及 LINE 等應用程式上舉 行視訊會議時要執行的設定及操作。(Zoom、Skype、Teams、FaceTime 及 LINE 是應用程式的名 稱。)在 iPhone/iPad 上使用 Skype、FaceTime 及 LINE 時,即使透過 USB 纜線連接,也不會聽見本 產品的聲音。您需要使用 3.5 mm 4 芯(TRRS)立體聲迷你纜線進行連接。 事前準備 ( 本產品 ( iPhone/iPad(已安裝要使用的各種應用程式) ( ( Lightning - 3.5 mm 耳罩式耳機插孔轉接器(使用具有 Lightning 接頭的 iPhone/iPad 時。建議使用 Apple 原廠產品。) USB - 3.
在視訊會議中使用本產品 > 搭配 iPhone/iPad 使用 4 使用 3.5 mm 4 芯(TRRS)立體聲迷你纜線,將 Lightning 或 USB-C 3.5 mm 耳罩式耳機插 孔轉接器連接至本產品的智慧型手機 [P] 輸入/輸出插孔。 USB 電源變壓器 USB 纜線(市售) 2 至 電源 底部 4 4 3.5 mm 4 芯(TRRS)立體聲迷你 纜線 3 Lightning/USB-C 3.
在視訊會議中使用本產品 > 搭配 iPhone/iPad 使用 3 進行本產品的設定 依下列說明對背面各開關進行設定。 [MIC GAIN]:[MID] [STREAMING OUT]:[MIC] [H-MIX MINUS MIC]:[OFF];如果聽不到自己的聲音,請將此設為 [ON]。 背面 4 開始視訊會議。 1 2 3 4 5 將 USB/智慧型手機 [n] 輸入音量旋鈕設為 3 點鐘位置。 啟動您要使用的視訊會議應用程式。 使用 USB/智慧型手機 [n] 輸入音量旋鈕,調整交談的音量。 使用耳罩式耳機 [H] 音量旋鈕,調整耳罩式耳機或耳機的音量。 使用麥克風 [M] 音量旋鈕,調整自己的音量。 5 調整自己聲音 的音量 1, 3 4 交談時的操作 ( 將自己的聲音靜音 如果要中斷交談,請開啟麥克風靜音 [m] 按鈕(LED 亮起)。 47 調整交談 的音量 調整耳罩式耳機/耳機 的音量
在視訊會議中使用本產品 > 搭配 iPhone/iPad 使用 註 如果聽不到任何聲音,請參閱“音訊相關及其他問題” (p.
在視訊會議中使用本產品 > 本產品搭配 Android 裝置使用 本產品搭配 Android 裝置使用 此處說明使用本產品與 Android 裝置 在 Zoom、Skype、Teams、FaceTime 及 LINE 等應用程式上舉 行視訊會議時要執行的設定及操作。(Zoom、Skype、Teams、FaceTime 及 LINE 是應用程式的名 稱。) 註 使用 Android 裝置時,無法透過 USB 輸入本產品的音訊。您需要使用 3.5 mm 4 芯(TRRS)立體聲迷你纜線進行連接。 事前準備 ( 本產品 ( Android 裝置(已安裝要使用的各種應用程式) ( 耳罩式耳機或耳機及立體聲迷你插頭纜線 ( 3.5 mm 4 芯(TRRS)立體聲迷你纜線 ( USB 電源變壓器 ( USB 纜線(市售,用於電源供應) 遵循以下步驟 1 連接 Android 裝置 參考「開始使用本產品」→「連接 Android 裝置」,執行所需的連接。 “連接 Android 裝置” (p.
在視訊會議中使用本產品 > 本產品搭配 Android 裝置使用 3 進行本產品的設定 依下列說明對背面各開關進行設定。 [MIC GAIN]:[MID] [STREAMING OUT]:[MIC] [H-MIX MINUS MIC]:[OFF];如果聽不到自己的聲音,請將此設為 [ON]。 背面 4 開始視訊會議。 1 2 3 4 5 將 USB/智慧型手機 [n] 輸入音量旋鈕設為 3 點鐘位置。 啟動您要使用的視訊會議應用程式。 使用 USB/智慧型手機 [n] 輸入音量旋鈕,調整交談的音量。 使用耳罩式耳機 [H] 音量旋鈕,調整耳罩式耳機或耳機的音量。 使用麥克風 [M] 音量旋鈕,調整自己的音量。 5 調整自己聲音 的音量 1, 3 4 交談時的操作 ( 將自己的聲音靜音 如果要中斷交談,請開啟麥克風靜音 [m] 按鈕(LED 亮起)。 50 調整交談 的音量 調整耳罩式耳機/耳機 的音量
在視訊會議中使用本產品 > 本產品搭配 Android 裝置使用 註 如果聽不到任何聲音,請參閱“音訊相關及其他問題” (p.
在視訊會議中使用本產品 > 本產品搭配電腦使用 本產品搭配電腦使用 此處說明使用本產品與 Windows 電腦或 Mac 在 Zoom、Skype、Teams、FaceTime 或 LINE 上舉行視 訊會議時要執行的設定及操作。(Zoom、Skype、Teams、FaceTime 及 LINE 是應用程式的名稱。) 事前準備 ( 本產品 ( Windows 電腦或 Mac(已安裝要使用的各種應用程式) ( 耳罩式耳機或耳機及立體聲迷你插頭纜線 ( USB 纜線(隨附) 遵循以下步驟 1 安裝驅動程式(僅適用於 Windows) 如果使用 Mac,則無需安裝驅動程式。從步驟 2 開始操作。 如果尚未安裝驅動程式,請參考「開始使用本產品」→「連接電腦並進行設定 (Windows)」進行安裝。 “連接電腦並進行設定(Windows)” (p.19) ( 2 連接電腦 參考「開始使用本產品」→「連接電腦並進行設定(Windows)/(Mac)」進行連接。 “連接電腦並進行設定(Windows)” (p.19) “連接電腦並進行設定(Mac)” (p.
在視訊會議中使用本產品 > 本產品搭配電腦使用 4 進行本產品的設定 依下列說明對背面各開關進行設定。 [MIC GAIN]:[MID] [STREAMING OUT]:[MIC] [H-MIX MINUS MIC]:[OFF];如果聽不到自己的聲音,請將此設為 [ON]。 背面 5 進行應用程式的設定 啟動要用於舉行視訊會議的應用程式、在應用程式中開啟裝置設定,並確認聲音輸入裝置 和聲音輸出裝置皆設為「Yamaha AG01」。 6 開始視訊會議。 1 使用 USB/智慧型手機 [n] 輸入音量旋鈕,調整交談的音量。將此設為 3 點鐘設定即可開 始。 2 3 使用耳罩式耳機 [H] 音量旋鈕,調整耳罩式耳機或耳機的音量。 使用麥克風 [M] 音量旋鈕,調整自己的音量。 53 3 調整自己聲音 的音量 1 調整交談 的音量 2 調整耳罩式耳機/耳機 的音量
在視訊會議中使用本產品 > 本產品搭配電腦使用 交談時的操作 ( 將自己的聲音靜音 如果要中斷交談,請開啟麥克風靜音 [m] 按鈕(LED 亮起)。 註 如果聽不到任何聲音,請參閱“音訊相關及其他問題” (p.
使用本產品錄製 Podcast > 使用 WaveLab Cast 使用本產品錄製 Podcast 使用 WaveLab Cast WaveLab Cast 是適合在 Windows 和 Mac 上製作 Podcast 音訊/視訊內容的應用程式。此應用程式可 讓您輕鬆錄製、編輯及直播內容。 WaveLab Cast 安裝程式: 請參考以下網頁下載應用程式並啟動授權。 https://www.steinberg.net/getwavelabcast 註 您需要下載存取碼才能下載此應用程式。此代碼列在本產品隨附的 WAVELAB CAST DOWNLOAD INFORMATION 紙本文件上。 搜尋以下網站可取得 WaveLab Cast 手冊。 https://steinberg.
使用本產品進行錄製 > 在 iPhone/iPad 上使用 Rec'n'Share 使用本產品進行錄製 在 iPhone/iPad 上使用 Rec'n'Share 使用 Rec'n'Share 應用程式搭配本產品,可錄製及編輯音訊等內容。Rec'n'Share 應用程式可以輕鬆完 成從表演及錄製您喜愛的歌曲、錄製及編輯您的表演影片,到上傳成品等所有工作。 如需 Rec'n'Share 的詳細資訊,請參閱以下網站。 https://www.yamaha.
使用本產品進行錄製 > 在電腦上使用 Cubase AI 在電腦上使用 Cubase AI 使用 Cubase AI 搭配本產品,可錄製及編輯音訊等內容。Cubase AI 是用於製作音樂的 DAW 軟體,可 使用您的電腦錄製、播放及編輯音訊。 Cubase AI 安裝程式: 請參考以下網頁下載應用程式並啟動授權。 https://www.steinberg.net/getcubaseai 註 您需要下載存取碼才能下載此應用程式。此代碼列在本產品隨附的 CUBASE AI DOWNLOAD INFORMATION 紙本文件上。 搜尋以下網站可取得 Cubase AI 手冊。 https://steinberg.
使用本產品製作音樂 > 在 iPhone/iPad 上使用 Cubasis LE 使用本產品製作音樂 在 iPhone/iPad 上使用 Cubasis LE 使用 Cubasis LE 搭配本產品,可錄製及編輯音訊。Cubasis LE 是行動版 DAW Cubasis 的基本版。如同 Cubasis,這是一款音訊製作應用程式,可讓您從 iPhone/iPad 錄製、播放及編輯音訊。 若要使用此應用程式,請從 App Store 搜尋並下載「Cubasis LE」。 如需 Cubasis LE 的詳細資訊,請參閱以下 Steinberg 網站。 https://www.steinberg.
使用本產品製作音樂 > 在電腦上使用 Cubase AI 在電腦上使用 Cubase AI 使用 Cubase AI 搭配本產品,可錄製及編輯音訊等內容。Cubase AI 是用於製作音樂的 DAW 軟體,可 使用您的電腦錄製、播放及編輯音訊。 Cubase AI 安裝程式: 請參考以下網頁下載應用程式並啟動授權。 https://www.steinberg.net/getcubaseai 註 您需要下載存取碼才能下載此應用程式。此代碼列在本產品隨附的 CUBASE AI DOWNLOAD INFORMATION 紙本文件上。 搜尋以下網站可取得 Cubase AI 手冊。 https://steinberg.
將本產品安裝到麥克風架或桌上型麥克風懸臂 > 如何安裝 將本產品安裝到麥克風架或桌上型麥克風懸臂 如何安裝 此處說明如何將本產品安裝到市售的麥克風架或桌上型麥克風懸臂。 事前準備 ( 本產品 ( 麥克風架或桌上型麥克風懸臂 ( 3/8″轉接器: 建議使用 König & Meyer 19695 通用接頭 - 3/8" 外牙 請遵守下列重要注意事項,避免裝置損壞或人員受傷。 注意 ( ( ( ( 請勿在不穩定的表面上安裝或拆卸本產品。 安裝前,務必從本產品拔除所有纜線。 安裝或拆卸前,務必用手支撐本產品並鬆開或鎖緊螺絲。 將本產品牢牢地安裝到麥克風架或桌上型麥克風懸臂。 1 用手支撐本產品並轉動螺絲,拆下螺絲及墊片。 60
將本產品安裝到麥克風架或桌上型麥克風懸臂 > 如何安裝 2 稍微撐開支架,將本產品從支架拆下。 3 拆下本產品兩側的隔片,以及背面蓋住螺絲孔的保護蓋。 4 將轉接頭安裝到麥克風架或桌上型麥克風懸臂。 註 使用相容於直徑3/8″螺絲孔的麥克風架或桌上型麥克風懸臂。 61
將本產品安裝到麥克風架或桌上型麥克風懸臂 > 如何安裝 5 將本產品裝到轉接頭。 轉接頭 5 4 麥克風架 桌上型 麥克風懸臂 4 轉接頭 5 確定產品牢固安裝後,即完成作業。 註 請勿遺失拆下的螺絲、隔片及保護蓋,應將其妥善保存。 62
將本產品安裝到麥克風架或桌上型麥克風懸臂 > 裝回本產品的支架 裝回本產品的支架 請遵守下列重要注意事項,避免裝置損壞或人員受傷。 注意 ( ( ( 請勿在不穩定的表面上安裝或拆卸本產品。 安裝前,務必從本產品拔除所有纜線。 安裝或拆卸前,務必用手支撐本產品並鬆開或鎖緊螺絲。 當本產品從麥克風架或桌上型麥克風懸臂拆下並裝回支架時,請反向執行 “如何安裝” (p.
故障排除 > 電源相關 故障排除 電源相關 電源 LED 不亮 ( 是否開啟本產品的電源? 如果本產品沒有開啟電源,LED 將不會亮起。 使用 iPhone、iPad 或 Android 裝置時:需要外部電源,例如 USB 電源變壓器或 USB 行動電 源。您需要能輸出至少 5 V / 1 A 電源的 USB 電源變壓器或 USB 行動電源。 使用 Windows 電腦、Mac 或 iPad(USB-C 接頭)時:裝置使用 USB 電源(至少 5 V / 1 A)。 如果電源 LED 不亮,可能是匯流排電力不足。連接獨立的 USB 電源變壓器、USB 行動電源或類 似裝置以供應外部電源。 ( ( 電源 LED 閃爍或僅間歇亮起 ( 電源供應可能發生問題。 ( 電源出現某些問題時,LED 會閃爍。將市售的 USB 電源變壓器或 USB 行動電源連接至 [5V DC IN] USB 連接埠以供應電源。 ( 是否使用適當的 USB 纜線? ( ( 務必使用隨附的 USB 纜線。 將 iPad 或電腦的 USB-C 連接埠直接連接到本產品時,需要使用 iPad 隨附的 USB-C 充電線,或 使用市
故障排除 > 音訊相關及其他問題 音訊相關及其他問題 聽不到本產品的音訊,或沒有輸出聲音。 ( 背面的開關是否使用適當的設定? ( ( 當 [H-MIX MINUS MIC] 選擇開關設為 [ON] 時,無法使用耳罩式耳機聽見本產品的音訊(您的聲 音)。在此情況下,請將此設為 [OFF]。 將 [MIC GAIN] 選擇開關設為 [MID] 或 [HIGH]。 ( 麥克風音量是否設為「0」? ( 如果麥克風音量旋鈕設為「0」(零),將無法聽見本產品的聲音。轉動旋鈕以提高音量。 回授 ( 是否適當調整麥克風或耳罩式耳機/耳機的音量? ( 如果聽見低脈動或高音調的刺耳聲(回授),請降低麥克風、耳罩式耳機或耳機的音量。 無法調整音量 ( 是否調整已連接裝置 [AUX] 輸入插孔的音量? ( 您無法使用 USB/智慧型手機輸入音訊旋鈕來調整 [AUX] 輸入插孔音量。調整已連接裝置的音 量。 Windows 電腦無法辨識 ( 是否已安裝驅動程式? ( 如果要將本產品連接至 Windows 電腦,必須安裝 Yamaha Steinberg USB Driver。 關於 Yamaha Ste
附錄 > 一般規格 附錄 一般規格 0 dBu = 0.775 Vrms,訊號產生器的輸出阻抗 (Rs) = 150 Ω 如果沒有規定,所有位準控制項皆為額定值。 麥克風前級放大器輸 +0.5 dB/-1.5 dB(20 Hz 至 20 kHz @ Fs = 192 kHz),額定輸出位準 入 → PHONES OUT(透過 USB IN/ 參考 @ 1 kHz,MIC GAIN:MID,STREAMING OUT:MIC OUT) 頻率響應 總諧波失真 (THD+N) *1 麥克風前級放大器輸 0.1% @ -2.0 dBu(50 Hz 至 20 kHz),MIC GAIN:MID 入至 PHOENS OUT 0.01% @ +0.
附錄 > 麥克風規格 麥克風規格 類型 背極電容式 指向性 心型 位址類型 側式 頻率響應 30 Hz 至 20 kHz 最大輸入 SPL 110 dB (THD ≦1.
附錄 > 輸入/輸出特性 輸入/輸出特性 類比輸入特性 0 dBu = 0.775 Vrms 輸入插孔 實際負載阻抗 適用額定 AUX 10 kΩ 智慧型手機 10 kΩ 輸入位準 接頭 靈敏度 *1 額定值 失真前最大 600 Ω 線路 −14 dBu (154.6 mV) −8 dBu (308.5 mV) +2 dBu (975.7 mV) 3.5 mm 耳機插 孔*2 600 Ω 線路 −14 dBu (154.6 mV) −8 dBu (308.5 mV) +2 dBu (975.7 mV) 3.5 mm 耳機插 孔 *3 (CTIA) *1 靈敏度是產生 +0 dBu (0.775 V) 輸出的最低位準,或裝置設為最大增益時的額定輸出位準。(所有位 準控制項皆為其最大位置。) *2 尖 = 左訊號,環 = 右訊號,套 = GND *3 尖 = 左訊號,環 1 = 右訊號,環 2 = GND,套 = 智慧型手機輸出 類比輸出特性 0 dBu = 0.
附錄 > 尺寸 281 尺寸 116 118 (單位:mm) 69
附錄 > 指向性 指向性 330º 0 0º 30º -5 300º 60º -10 270º 90º 240º 120º 210º 150º 180º 70 [dB] @1 kHz
附錄 > 頻率響應 頻率響應 [dB] 10 5 0 -5 -10 -15 50 100 500 1k 5k 71 20k [Hz]
附錄 > 方塊與位準圖 方塊與位準圖 關於 AG01 方塊與位準圖,請瀏覽以下 Yamaha 網站。 https://www.yamaha.
Layout Folder: YMH_PDF_Manual_A5_PA Stylesheet Name: 01_YMH_PDF_Manual_A5_PA_En-Multi Stylesheet Version: 2022.04.13 Yamaha Pro Audio global website https://www.yamahaproaudio.com/ Yamaha Downloads https://download.yamaha.