LIVE STREAMING MICROPHONE ユーザーガイド JA
目次 目次 はじめに 5 本ガイドについて.................................................................................... 5 マニュアルの構成.................................................................................... 7 本製品の特長.. ........................................................................................ 8 付属品.. ................................................................................................. 9 各部の名称と機能 10 前面...................................................................................
目次 Android端末と使う.. ............................................................................. 41 コンピューターと使う............................................................................ 44 オンライン会議で使う 47 iPhone/iPadと使う............................................................................... 47 Android端末と使う.. ............................................................................. 51 コンピューターと使う............................................................................
目次 入出力仕様.. ......................................................................................... 70 寸法図.................................................................................................. 72 指向特性............................................................................................... 73 周波数特性.. ......................................................................................... 74 ブロック図/レベル図..............................................................................
はじめに > 本ガイドについて はじめに 本ガイドについて 本ガイドの記載内容に関するお知らせ 本ガイドでは、本製品をお使いになる方のために、接続方法や操作方法を説明していま す。また、注意事項などを次のように分類しています。 ( 警告 「死亡する可能性または重傷を負う可能性が想定される」内容です。 ( 注意 「傷害を負う可能性が想定される」内容です。 ( ( ご注意 製品の故障、損傷や誤動作、データの損失を防ぐため、また環境保護のため、お守りい ただく内容です。 お知らせ 使用時の注意点や機能の制約、知っておくと便利な補足情報です。 ( 本ガイドに掲載されているイラストや画面は、すべて説明のためのものです。 ( ソフトウェアは改良のため予告なしにバージョンアップすることがあります。 ( ( ソフトウェアおよび本ガイドの一部または全部を無断で複製、改変することはできませ ん。 ソフトウェアまたは本ガイドを使用した結果と影響については、一切責任を負いかねま すのでご了承ください。 著作権保護について ( ( ( 本製品を、著作権をはじめとする国や地域の法律が定める第三者の権
はじめに > 本ガイドについて の使用を通して、上記コンテンツを使用した音楽制作や演奏を行い、それらを録音して 配布する場合、配布方法が有償、無償を問わず著作権者の許諾は必要ありません。 *1:「コンテンツ」には、コンピュータープログラム、サウンドデータ、伴奏スタイル データ、MIDIデータ、WAVEデータ、音声記録データ、楽譜や楽譜データなどを含みま す。 *2:「複製または転用」には、本製品に内蔵または付属されたコンテンツそのものを取 り出すこと、もしくは酷似した形態で記録/録音して配布することを含みます。 商標について 本説明に使用する商標は、次のとおりです。 ( ( ( Steinberg、Cubase、Cubasis、WaveLab Castは、Steinbergの登録商標です。 Windows、Teams、Skypeは、米国Microsoft Corporationの米国およびその他の国に おける登録商標または商標です。 Mac、iPad、iPhone、App Store、Lightning、 FaceTimeは、米国および他の国々で登 録されたApple Inc.
はじめに > マニュアルの構成 マニュアルの構成 本製品に関連するマニュアルは、次のとおりです。 紙マニュアル 製品に同梱されているマニュアルです。 ( ( クイックガイド 基本的な接続方法と設定方法、各部の名称を説明しています。 セーフティーガイド 安全上のご注意について説明しています。 電子マニュアル ( ユーザーガイド(本ガイド) 各部の名称と機能や、各機器を接続して音が出るまでのセットアップ方法を説明してい ます。また、シーン別に使いかたを説明しています。 お知らせ 各マニュアルはヤマハウェブサイトからダウンロードできます。ヤマハウェブサイトには常に最新の マニュアルデータが掲載されていますので、必要に応じてご活用ください。 https://download.yamaha.
はじめに > 本製品の特長 本製品の特長 本製品は、コンピューター、iPad、スマートフォン経由でライブ配信などをするための、 ミキサー機能付きのライブストリーミング マイクロフォンです。 n 音質を調節できるコンプレッサー、イコライザー、リバーブを搭載 専用アプリ「AG Controller」で音質を細かく調節できます。リバーブは本製品でオン/オ フできます。 n ライブ配信に便利なループバック機能 コンピューター、iPad、スマートフォンからの入力音声に本製品のマイク音声をミックス してコンピューター、iPad、スマートフォンに戻せます。 n マイクスタンドやデスクアームに取り付け可能 本製品のスタンドを取り外して、市販のマイクスタンドやデスクアームに取り付けること ができます。 n ポッドキャスティングなどに便利な「WaveLab Cast」をバンドル WaveLab Castのライセンスが付属しています。ポッドキャスティングや、ビデオコンテ ンツの音声編集に使えます。 n DAWソフトウェア「Cubase AI」をバンドル Cubase AIのライセンスが付属しています。録音、編集、ミック
はじめに > 付属品 付属品 本製品には次の付属品が同梱されています。 ( USBケーブル(USB C to USB A)1.
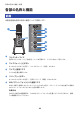
各部の名称と機能 > 前面 各部の名称と機能 前面 本製品前面の各部の名称と機能について説明します。 a b c d e f g a コンデンサーマイク 音声を入力します。[h](指向性)マークの正面から、マイクに向かって話します。 b マイクミュート[m]ボタン オンのときにボタンが点灯し、マイクがミュート(消音)されます。 c マイク[M]音量ツマミ マイクの音量を調節します。 d リバーブ[r]ボタン オンのときにボタンが点灯し、音声にリバーブ(残響)がかかります。 e USB/スマートフォン[n]入力音量ツマミ USB 2.
各部の名称と機能 > 前面 f ヘッドホン[H]音量ツマミ ヘッドホン出力端子に接続されたヘッドホンまたはイヤホンの音量を調節します。背面の [STREAMING OUT]スライドスイッチで設定した音の音量には影響しません。 g 電源LED [5V DC IN]USB端子またはUSB2.
各部の名称と機能 > 背面 背面 本製品背面の各部の名称と機能について説明します。 j k h l i m h スタンド取り付けネジ iのスタンドの取り外し、取り付けをします。 i スタンド 本製品を立てます。スタンドを外して、マイクスタンドやデスクアームに取り付けることがで きます。 ( j 「取り付け方法」(62ページ) [MIC GAIN]スライドスイッチ 基本となるマイクの音量を決めます。音が歪む場合は、[LOW](低)にしてください。音が小 さい場合は、[HIGH](高)にしてください。 12
各部の名称と機能 > 背面 k [STREAMING OUT]スライドスイッチ iPhone/iPad/コンピューターおよびスマートフォン[P]入出力端子に接続した機器へ送る音を選 択します。 警告 ( 背面のスライドスイッチを切り替えるときは、音量を調節してから切り替えてください。 接続した機器によっては、大音量が出て、聴覚障害または外部機器の故障になることがあ ります。 [MIC] 本製品に入力された音のみを送ります。 お知らせ DAWソフトウェアなどへの録音時は本体のリバーブをOFFに設定し、リバーブがかかっていな い音を録音することをおすすめします。そうすることで録音後にDAWソフトウェア上でリバー ブをかけるなどの自由度の高いミキシングができます。 [INPUT MIX] 雑談配信や音声通話(チャット)向けの設定です。本製品と[AUX]入力端子に入力された音をス テレオミックスして送ります。 お知らせ [AUX] 入力端子にはスマートフォンや、ギター、キーボードなどの楽器を接続し、BGMや効果 音をミックスして送ることができます。 [LOOPBACK] 雑談配信やゲーム配信向けの設定
各部の名称と機能 > 背面 m マイクスタンド用3/8インチネジ穴(保護キャップ付き) マイクスタンドやデスクアームを取り付けるときに使います。保護キャップを取り外して取り 付けてください。取り付けには3/8インチ変換アダプターが必要です。 ご注意 ( 取り外した保護キャップはなくさないよう、大切に保管してください。 お知らせ 3/8インチ変換アダプター(推奨品): K&M社 スタンド用アダプター19695 3/8(ホルダー)-3/8(スタンド) 14
各部の名称と機能 > 底面 底面 本製品底面の各部の名称と機能について説明します。 n q o r p n ヘッドホン[H]出力端子 ヘッドホンまたはイヤホンを接続します。3.5 mmステレオミニプラグに対応しています。 お知らせ アダプターなどを使ってBluetoothイヤホンを接続することもできますが、一般的なBluetooth イヤホンには遅延があるため、用途によっては使用に適さない場合があります。 o [5V DC IN]USB端子(USB C) 市販のUSB電源アダプターやUSBモバイルバッテリーなどを接続します。iPhoneやiPadなどの 外部に電源が供給できない機器や、十分なバスパワーを供給できないコンピューターと接続す る場合に使用します。本製品にはUSB電源アダプターやUSBモバイルバッテリーは付属してい ません。 ご注意 ( ( p お使いになるUSB電源アダプターやUSBモバイルバッテリーの安全上のご注意をお読みく ださい。 出力電圧4.8V~5.
各部の名称と機能 > 底面 q スマートフォン[P]入出力端子 3.5 mm 4極ステレオミニプラグに対応しています。Android端末などのスマートフォンやタブ レットを接続します。本製品からの音声を接続した機器へ送ることができます。 本製品のステレオミニプラグ対応一覧 AUX入力端子 ヘッドホン端子 スマートフォン 入出力端子 3極 3極 4極 絶縁線が2本 r 絶縁線が2本 絶縁線が3本 USB 2.0 [U]端子(USB C) コンピューターやiPhone/iPadを接続します。コンピューターを接続した場合は、電源がコン ピューターから本体に供給されます。iPhone/iPad を接続した場合は、底面の [5V DC IN] USB 端子にUSB電源アダプター(別売)を接続します。 機器の故障やデータの損失を防ぐために、次の注意事項をお守りください。 ご注意 ( ( ( ( USB 2.
使う前の準備 > iPhone/iPadとの接続 使う前の準備 iPhone/iPadとの接続 電源の準備からiPhone/iPad との接続までを説明します。iPhone/iPadとの接続には外部 からの電力供給が必要です。 用意するもの ( USB電源アダプターまたはUSBモバイルバッテリー(5V 1A以上) ( USBケーブル(市販品:電源用) ( USBケーブル(付属品) ( ( Apple社製Lightning-USB3カメラアダプタ(Lightningコネクター対応のiPhone/iPadの 場合) Apple社製 USB-C Digital AV Multiportアダプタ(USB Cコネクター対応のiPadの場合) お知らせ ( ( 配信の際や、長時間お使いになる場合は、別途iPhone/iPad給電用の電源をご用意ください。 対応OSについては、次のヤマハウェブサイトをご参照ください。 https://www.yamaha.
使う前の準備 > iPhone/iPadとの接続 4 付属のUSBケーブルを使って、本製品とApple社製Lightning-USB3カメラアダプ タを接続します。 USBケーブル (付属品) お知らせ USB Cコネクター対応のiPadの場合は、Apple社製USB-C Digital AV Multiportアダプタをお使 いください。iPadに付属のUSB-C充電ケーブルなどを使って直接iPadと本製品を接続するこ ともできますが、iPad本体のバッテリー残量によっては使用可能時間が制限されます。 5 アダプタのケーブルをiPhone/iPadに接続します。 iPhone/iPad 接続が完了すると、本製品が自動的にiPhone/iPadで認識されます。 iPhone/iPadの設定は必要ありません。 18
使う前の準備 > Android端末との接続 Android端末との接続 電源の準備からAndroid端末との接続までを説明します。Android端末との接続には外部 からの電力供給が必要です。 用意するもの ( USB電源アダプターまたはUSBモバイルバッテリー(5V 1A以上) ( USBケーブル(市販品:電源用) ( 3.5 mm 4極ステレオミニケーブル お知らせ ( USBケーブルを使ったオーディオ入出力はできません。 ( Android端末に送られる音声はモノラルになります。 ( 配信の際や、長時間お使いになる場合は、別途Android給電用の電源をご用意ください。 接続 1 本製品や接続している機器の音量(ボリューム)が最小になっていることを確認し ます。 2 底面の[5V DC IN]USB端子に、市販のUSB電源アダプターまたはUSBモバイルバッ テリーなどを接続します。 底面 USBケーブル (市販品) USB 電源アダプター 電源へ 3 4 本製品の電源LEDが点灯したことを確認します。 3.
使う前の準備 > Android端末との接続 お知らせ ( ( ステレオミニ端子非対応のAndroid端末との接続には、変換アダプタケーブルが必要です。 たとえばUSB C端子で音声の入出力をするAndroid端末の場合は、USB C-3.
使う前の準備 > コンピューターとの接続と設定(Windows) コンピューターとの接続と設定(Windows) はじめに、本製品をコンピューターに認識させるドライバー「Yamaha Steinberg USB Driver」を次のヤマハウェブサイトからダウンロードしてインストールします。 https://www.yamaha.
使う前の準備 > コンピューターとの接続と設定(Mac) コンピューターとの接続と設定(Mac) Macの場合は、macOSに用意されている標準ドライバーをそのまま使うので、ドライバー のインストールは必要ありません。 お知らせ 対応OSについては、次のヤマハウェブサイトをご参照ください。 https://www.yamaha.
使う前の準備 > コンピューターとの接続と設定(Mac) 3 4 5 画面左下の 6 Audio MIDI設定を終了します。 をクリックして「このサウンド出力装置を使用」を選びます。 同様に「このサウンド入力装置を使用」を選びます。 手順3と手順4を完了すると、リストの「Yamaha AG01」の右下にマイクとスピー カーのアイコンが表示されます。 23
ライブ配信で使う(17LIVE、Twitch、YouTube ライブ) > iPhone/iPadと使う ライブ配信で使う(17LIVE、Twitch、 YouTube ライブ) iPhone/iPadと使う 本製品とiPhone/iPadを使って、自分の声や歌を17LIVE、Twitch、YouTubeライブなどで ライブ配信するための設定や操作について説明します(17LIVE、Twitch、YouTubeライ ブは、それぞれ配信アプリの名称です)。 用意するもの ( ( ( ( 本製品 iPhone/iPad(AG Controllerおよび配信アプリインストール済み) AG Controllerアプリは、App Storeから「AG Controller」を検索し、iPhone/iPadにイ ンストールしてください。 ステレオミニプラグのヘッドホンまたはイヤホン Apple社製Lightning-USB3カメラアダプタ(Lightningコネクター対応のiPhone/iPadの 場合) ( Apple社製 USB-C Digital AV Multiportアダプタ(USB Cコネクター
ライブ配信で使う(17LIVE、Twitch、YouTube ライブ) > iPhone/iPadと使う 3 本製品の設定をする 背面の各スイッチを次の設定にします。 [MIC GAIN] : [MID] [STREAMING OUT]:[INPUT MIX] [H-MIX MINUS MIC]:[OFF] 背面 本製品の設定ができたら、AG Controllerアプリを起動し、画面下部の「サウンドチェッ ク」をクリックします。 表示されるサウンドチェック画面で音量を調節、確認します。 サウンドチェック画面 4 ヘッドホンまたはイヤホンの音量を調節する 1 必要に応じてマイクの音量を調節します。 25
ライブ配信で使う(17LIVE、Twitch、YouTube ライブ) > iPhone/iPadと使う 2 ヘッドホン[H]音量ツマミを最小[0]の位置に設定します。 1 自分の声の音量調節 2, 3 3 5 ヘッドホン/イヤホンの音量調節 マイクの[h](指向性)マークの正面からマイクに向かって話しながら、ヘッドホン またはイヤホンの音量を調節します。 ヘッドホンまたはイヤホンの音量調節は配信される音量には影響しません。 全体の音量を調節する マイク[M]音量ツマミとUSB/スマートフォン[n]音量ツマミで、それぞれの音量を調節 します。 配信アプリを起動して、視聴者(リスナー)にバランスを確認します。 お知らせ 音が出ない場合は、「音声、その他のトラブル」(67ページ)をご参照ください。 26
ライブ配信で使う(17LIVE、Twitch、YouTube ライブ) > Android端末と使う Android端末と使う 本製品とAndroid端末を使って、自分の声や歌を17LIVE、Twitch、YouTubeライブなどで ライブ配信するための設定や操作について説明します(17LIVE、Twitch、YouTubeライ ブは、それぞれ配信アプリの名称です)。 用意するもの ( 本製品 ( Android端末 ( ステレオミニプラグのヘッドホンまたはイヤホン ( 3.
ライブ配信で使う(17LIVE、Twitch、YouTube ライブ) > Android端末と使う 3 本製品の設定をする 背面の各スイッチを次の設定にします。 [MIC GAIN] : [MID] [STREAMING OUT]:[INPUT MIX] [H-MIX MINUS MIC]:[OFF] 背面 4 ヘッドホンまたはイヤホンの音量を調節する 1 2 必要に応じてマイクの音量を調節します。 ヘッドホン[H]音量ツマミを最小[0]の位置に設定します。 1 自分の声の音量調節 2, 3 28 ヘッドホン/イヤホンの音量調節
ライブ配信で使う(17LIVE、Twitch、YouTube ライブ) > Android端末と使う 3 5 マイクの[h](指向性)マークの正面からマイクに向かって話しながら、ヘッドホン またはイヤホンの音量を調節します。 ヘッドホンまたはイヤホンの音量調節は配信される音量には影響しません。 全体の音量を調節する マイク[M]音量ツマミとUSB/スマートフォン[n]音量ツマミで、それぞれの音量を調節 します。 配信アプリを起動して、視聴者(リスナー)にバランスを確認します。 お知らせ 音が出ない場合は、「音声、その他のトラブル」(67ページ)をご参照ください。 29
ライブ配信で使う(17LIVE、Twitch、YouTube ライブ) > コンピューターと使う コンピューターと使う 本製品とWindows PCまたはMacを使って、自分の声や歌を17LIVE、Twitch、YouTubeラ イブなどでライブ配信するための設定や操作について説明します(17LIVE、Twitch、 YouTubeライブは、それぞれ配信アプリの名称です)。 用意するもの ( ( 本製品 Windows PCまたはMac(AG Controllerおよび配信アプリインストール済み) AG Controllerアプリは、次のウェブサイトからインストールしてください。 https://www.yamaha.
ライブ配信で使う(17LIVE、Twitch、YouTube ライブ) > コンピューターと使う 4 本製品の設定をする 背面の各スイッチを次の設定にします。 [MIC GAIN] : [MID] [STREAMING OUT]:[INPUT MIX] [H-MIX MINUS MIC]:[OFF] 背面 本製品の設定ができたら、AG Controllerアプリを起動し、画面下部にある「サウンド チェック」をクリックします。表示されるサウンドチェック画面で音量を調節、確認し ます。 サウンドチェック画面 5 ヘッドホンまたはイヤホンの音量を調節する 1 必要に応じてマイクの音量を調節します。 31
ライブ配信で使う(17LIVE、Twitch、YouTube ライブ) > コンピューターと使う 2 ヘッドホン[H]音量ツマミを最小[0]の位置に設定します。 1 自分の声の音量調節 2, 3 3 6 ヘッドホン/イヤホンの音量調節 マイクの[h](指向性)マークの正面からマイクに向かって話しながら、ヘッドホン またはイヤホンの音量を調節します。 ヘッドホンまたはイヤホンの音量調節は配信される音量には影響しません。 全体の音量を調節する マイク[M]音量ツマミとUSB/スマートフォン[n]音量ツマミで、それぞれの音量を調節 します。 配信アプリを起動して、視聴者(リスナー)にバランスを確認します。 お知らせ 音が出ない場合は、「音声、その他のトラブル」(67ページ)をご参照ください。 OBSを使った配信方法 ここでは配信ソフトウェアの例としてOBSを使った配信方法を説明します。OBSのダウン ロード、およびインストールについては、OBSの公式ホームページをご参照ください。 32
ライブ配信で使う(17LIVE、Twitch、YouTube ライブ) > コンピューターと使う 1 2 3 OBSを起動し「ファイル」から「設定」画面を開きます。 左側のナビゲーションメニューから「音声」を選択します。 「グローバル音声デバイス」にある「デスクトップ音声」の設定を「既定」または 「無効」にします。 本製品の[STREAMING OUT]スライドスイッチの設定を [MIC]または[INPUT MIX]にした 場合は「既定」に、[LOOPBACK]にした場合は「無効」にします。 4 同様に「グローバル音声デバイス」にある「マイク音声」の設定をライン 「Yamaha AG01」にします。 5 6 左側のナビゲーションメニューから「配信」を選択します。 7 8 「設定」画面を閉じます。 配信するサービスを選択し、必要に応じてサービスから提供されるストリームキー を入力します。 配信を開始します。 33
ライブ配信で使う(17LIVE、Twitch、YouTube ライブ) > ライブ配信中の操作 ライブ配信中の操作 ライブ配信中の操作について説明します。 n マイクをミュートにする ライブ配信中に離席する場合などは、マイクミュート[m]ボタンをオン(点灯)にしてマ イクの音が配信に流れないようにします。 n 声にリバーブ(残響)をかける マイクの音にリバーブをかける場合は、リバーブ[r]ボタンをオン(点灯)にします。 AG Controllerアプリを使う 本製品の細かな設定をしたいときはAG Controllerアプリを使います。ここでは、例として EQとリバーブの設定画面を紹介します。 ( EQ設定画面 画面の開きかた:[Detail r]→画面内の[CH 1]の[EQ]グラフをクリック 34
ライブ配信で使う(17LIVE、Twitch、YouTube ライブ) > ライブ配信中の操作 ( リバーブ設定画面 画面の開きかた:[Detail r]→画面内の[Reverb]のグラフをクリック お知らせ AG ControllerアプリはAndroid端末には対応しておりません。 35
ライブ配信で使う(17LIVE、Twitch、YouTube ライブ) > 楽器や音楽再生プレーヤーをつなぐ 楽器や音楽再生プレーヤーをつなぐ 楽器や音楽再生プレーヤーを接続して、BGMや効果音を入れる場合の設定について説明し ます。 n 楽器をつなぐ ギターや電子ピアノ、シンセサイザーなどの電子楽器は、底面の [AUX]入力端子に接続し ます。 音量は接続した楽器側で調節してください。 お知らせ 接続には変換ケーブルやエフェクターなどが必要になる場合があります。お使いの楽器の接続方法を 確認してください。 底面 3.5 mm ステレオ ミニケーブル ギター 電子ピアノ n 音楽再生プレーヤーをつなぐ BGMや効果音を再生する場合には、音楽再生プレーヤーを底面の[AUX]入力端子に接続し ます。 音量は接続した機器側で調節してください。 底面 3.
ゲームチャットで使う(Discord) > iPhone/iPadと使う ゲームチャットで使う(Discord) iPhone/iPadと使う 本製品とiPhone/iPadを使って、友達とDiscordなどで音声通話(ボイスチャット)しな がらゲームをする場合の設定や操作について説明します(Discordはアプリの名称で す)。 通話系のアプリをiPhone/iPadで使う場合、USBケーブルで接続しても、本製品からの音 がアプリに流れません。3.5 mm 4極ステレオミニケーブルを使って接続します。 用意するもの ( 本製品 ( iPhone / iPad (Discordインストール済み) ( ステレオミニプラグのヘッドホンまたはイヤホン ( ゲーム機 ( ( Lightning - 3.5 mmヘッドフォンジャックアダプタ(Lightningコネクター対応の iPhone/iPadの場合。Apple純正品推奨。) USB-C - 3.5 mmヘッドフォンジャックアダプタ(USB Cコネクター対応のiPadの場合。 Apple純正品推奨。) ( 3.
ゲームチャットで使う(Discord) > iPhone/iPadと使う 4 3.5 mm 4極ステレオミニケーブルで、Lightningまたは USB-Cの 3.5 mmヘッドフォ ンジャックアダプタと本製品のスマートフォン[P]入出力端子を接続します。 USBケーブル(市販品) USB 電源アダプター 2 電源へ 底面 4 4 3.5 mm 4極ステレオミニ ケーブル 3 Lightning/USB-C 3.
ゲームチャットで使う(Discord) > iPhone/iPadと使う 3 ゲーム機を接続する ゲーム機のヘッドホン出力を[AUX]入力端子に接続します。 底面 すべての接続が完了したら、本製品の設定をします。 4 本製品の設定をする 背面の各スイッチを次の設定にします。 [MIC GAIN] : [MID] [STREAMING OUT]:[MIC] [H-MIX MINUS MIC]:[OFF] 自分の声を聞きたくない場合は[ON]にします。 背面 5 音声通話を開始する 1 2 Discordを起動します。 3 USB/スマートフォン[n]入力音量ツマミで、通話相手からの音量を調節します。 ゲーム機から音を再生し、ヘッドホン[H]音量ツマミで、音量を調節します。ゲーム機 からの音が小さい場合は、ゲーム機側で音量を上げてください。 39
ゲームチャットで使う(Discord) > iPhone/iPadと使う 4 マイク[M]音量ツマミで、自分の声の音量を調節します。 4 自分の声の音量調節 3 通話相手の音量調節 2 ヘッドホン/イヤホンの音量調節 音声通話中の操作 ( 自分の声をミュートする 音声通話を中断する場合は、マイクミュート[m]ボタンをオン(点灯)にします。 お知らせ 音が出ない場合は、「音声、その他のトラブル」(67ページ)をご参照ください。 40
ゲームチャットで使う(Discord) > Android端末と使う Android端末と使う 本製品とAndroid端末を使って、友達とDiscordなどで音声通話(ボイスチャット)しなが らゲームをする場合の設定や操作について説明します(Discordはアプリの名称です)。 お知らせ Android端末は、USB接続で本製品からの音を入力することができません。3.5 mm 4極ステレオミニ ケーブルで接続します。 用意するもの ( 本製品 ( Android端末(Discordインストール済み) ( ステレオミニプラグのヘッドホンまたはイヤホン ( ゲーム機 ( 3.
ゲームチャットで使う(Discord) > Android端末と使う 3 ゲーム機を接続する ゲーム機のヘッドホン出力を[AUX]入力端子に接続します。 底面 すべての接続が完了したら、本製品の設定をします。 4 本製品の設定をする 背面の各スイッチを次の設定にします。 [MIC GAIN] : [MID] [STREAMING OUT]:[MIC] [H-MIX MINUS MIC]:[OFF] 自分の声を聞きたくない場合は[ON]にします。 背面 5 音声通話を開始する 1 2 Discordを起動します。 3 USB/スマートフォン[n]入力音量ツマミで、通話相手からの音量を調節します。 ゲーム機から音を再生し、ヘッドホン[H]音量ツマミで、音量を調節します。ゲーム機 からの音が小さい場合は、ゲーム機側で音量を上げてください。 42
ゲームチャットで使う(Discord) > Android端末と使う 4 マイク[M]音量ツマミで、自分の声の音量を調節します。 4 自分の声の音量調節 3 通話相手の音量調節 2 ヘッドホン/イヤホンの音量調節 音声通話中の操作 ( 自分の声をミュートする 音声通話を中断する場合は、マイクミュート[m]ボタンをオン(点灯)にします。 お知らせ 音が出ない場合は、「音声、その他のトラブル」(67ページ)をご参照ください。 43
ゲームチャットで使う(Discord) > コンピューターと使う コンピューターと使う 本製品とWindows PCまたはMacを使って、友達とDiscordなどで音声通話(ボイスチャッ ト)しながらゲームをする場合の設定や操作について説明します(Discordはアプリの名 称です)。 用意するもの ( 本製品 ( Windows PCまたはMac(Discordインストール済み) ( ステレオミニプラグのヘッドホンまたはイヤホン ( USBケーブル(付属品) ( ゲーム機 ( 3.
ゲームチャットで使う(Discord) > コンピューターと使う 4 ゲーム機を接続する ゲーム機のヘッドホン出力を[AUX]入力端子に接続します。 底面 すべての接続が完了したら、本製品の設定をします。 5 本製品の設定をする 背面の各スイッチを次の設定にします。 [MIC GAIN] : [MID] [STREAMING OUT]:[MIC] [H-MIX MINUS MIC]:[OFF] 自分の声を聞きたくない場合は[ON]にします。 背面 6 Discordの設定をする Discordを起動したらログインします。 「音声設定」の入力デバイスと出力デバイスがそれぞれ「Yamaha AG01」になってい ることを確認します。 7 音声通話を開始する 1 ゲーム機から音を再生し、ヘッドホン[H]音量ツマミで、音量を調節します。ゲーム機 からの音が小さい場合は、ゲーム機側で音量を上げてください。 2 USB/スマートフォン[n]入力音量ツマミで、通話相手からの音量を調節します。 45
ゲームチャットで使う(Discord) > コンピューターと使う 3 マイク[M]音量ツマミで、自分の声の音量を調節します。 3 自分の声の音量調節 2 通話相手の音量調節 1 ヘッドホン/イヤホンの音量調節 音声通話中の操作 ( 自分の声をミュートする 音声通話を中断する場合は、マイクミュート[m]ボタンをオン(点灯)にします。 お知らせ 音が出ない場合は、「音声、その他のトラブル」(67ページ)をご参照ください。 46
オンライン会議で使う > iPhone/iPadと使う オンライン会議で使う iPhone/iPadと使う 本製品とiPhone/iPadを使って、Zoom、Skype、Teams、FaceTime、LINEなどでオンラ イン会議をする場合の設定や操作について説明します(Zoom、Skype、Teams、 FaceTime、LINEは、アプリの名称です)。Skype、FaceTime、LINEなどをiPhone/iPad で使う場合、USBケーブルで接続しても、本製品からの音がアプリに流れません。3.5 mm 4極ステレオミニケーブルを使って接続します。 用意するもの ( 本製品 ( iPhone / iPad(各種アプリインストール済み) ( ( Lightning - 3.5 mmヘッドフォンジャックアダプタ(Lightningコネクター対応の iPhone/iPadの場合。Apple純正品推奨。) USB-C - 3.
オンライン会議で使う > iPhone/iPadと使う 4 3.5 mm 4極ステレオミニケーブルで、Lightningまたは USB-Cの3.5 mmヘッドフォ ンジャックアダプタと本製品のスマートフォン[P]入出力端子を接続します。 USBケーブル(市販品) USB 電源アダプター 2 電源へ 底面 4 4 3.5 mm 4極ステレオミニ ケーブル 3 Lightning/USB-C 3.
オンライン会議で使う > iPhone/iPadと使う 3 本製品の設定をする 背面の各スイッチを次の設定にします。 [MIC GAIN] : [MID] [STREAMING OUT]:[MIC] [H-MIX MINUS MIC]:[OFF] 自分の声を聞きたくない場合は[ON]にします。 背面 4 オンライン会議を開始する 1 2 3 4 5 USB/スマートフォン[n]入力音量ツマミを3時の位置に設定します。 オンライン会議で使用するアプリを起動します。 USB/スマートフォン[n]入力音量ツマミで、会議中の通話の音量を調節します。 ヘッドホン[H]音量ツマミで、ヘッドホンまたはイヤホンの音量を調節します。 マイク[M]音量ツマミで、自分の声の音量を調節します。 5 自分の声の音量調節 1, 3 4 通話の音量調節 ヘッドホン/イヤホンの音量調節 通話中の操作 ( 自分の声をミュートする 通話を中断する場合は、マイクミュート[m]ボタンをオン(点灯)にします。 49
オンライン会議で使う > iPhone/iPadと使う お知らせ 音が出ない場合は、「音声、その他のトラブル」(67ページ)をご参照ください。 50
オンライン会議で使う > Android端末と使う Android端末と使う 本製品とAndroid端末を使って、Zoom、Skype、Teams、FaceTime、LINEなどでオンラ イン会議をする場合の設定や操作について説明します(Zoom、Skype、Teams、 FaceTime、LINEは、アプリの名称です)。 お知らせ Android端末は、USB接続で本製品からの音を入力することができません。3.5 mm 4極ステレオミニ ケーブルで接続します。 用意するもの ( 本製品 ( Android端末(各種アプリインストール済み) ( ステレオミニプラグのヘッドホンまたはイヤホン ( 3.
オンライン会議で使う > Android端末と使う 3 本製品の設定をする 背面の各スイッチを次の設定にします。 [MIC GAIN] : [MID] [STREAMING OUT]:[MIC] [H-MIX MINUS MIC]:[OFF] 自分の声を聞きたくない場合は[ON]にします。 背面 4 オンライン会議を開始する 1 2 3 4 5 USB/スマートフォン[n]入力音量ツマミを3時の位置に設定します。 オンライン会議で使用するアプリを起動します。 USB/スマートフォン[n]入力音量ツマミで、会議中の通話の音量を調節します。 ヘッドホン[H]音量ツマミで、ヘッドホンまたはイヤホンの音量を調節します。 マイク[M]音量ツマミで、自分の声の音量を調節します。 5 自分の声の音量調節 1, 3 4 通話の音量調節 ヘッドホン/イヤホンの音量調節 通話中の操作 ( 自分の声をミュートする 通話を中断する場合は、マイクミュート[m]ボタンをオン(点灯)にします。 52
オンライン会議で使う > Android端末と使う お知らせ 音が出ない場合は、「音声、その他のトラブル」(67ページ)をご参照ください。 53
オンライン会議で使う > コンピューターと使う コンピューターと使う 本製品とWindows PCまたはMacを使って、Zoom、Skype、Teams、FaceTime、LINEな どでオンライン会議をする場合の設定や操作について説明します (Zoom、Skype、 Teams、FaceTime、LINEは、アプリの名称です)。 用意するもの ( 本製品 ( Windows PCまたはMac(各種アプリインストール済み) ( ステレオミニプラグのヘッドホンまたはイヤホン ( USBケーブル(付属品) 手順 1 (Windowsのみ)ドライバーをインストールする Macにはドライバーは不要です。手順2から始めてください。 ドライバーがインストールされていない場合は、使う前の準備→コンピューターとの接 続と設定(Windows)を参照してインストールしてください。 「コンピューターとの接続と設定(Windows)」(21ページ) ( 2 コンピューターと接続する 使う前の準備→コンピューターとの接続と設定(Windows)/(Mac)を参照して接続 します。 「コンピューターとの接続
オンライン会議で使う > コンピューターと使う 4 本製品の設定をする 背面の各スイッチを次の設定にします。 [MIC GAIN] : [MID] [STREAMING OUT]:[MIC] [H-MIX MINUS MIC]:[OFF]自分の声を聞きたくない場合は[ON]にします。 背面 5 アプリの設定をする オンライン会議で使用するアプリを起動して、アプリ内のデバイスの設定を開き、音声 入力デバイスと音声出力デバイスがそれぞれ「Yamaha AG01」になっていることを確 認します。 6 オンライン会議を開始する 1 USB/スマートフォン[n]入力音量ツマミで、会議中の通話の音量を調節します。最初 は3時の位置に設定してください。 2 3 ヘッドホン[H]音量ツマミで、ヘッドホンまたはイヤホンの音量を調節します。 マイク[M]音量ツマミで、自分の声の音量を調節します。 3 自分の声の音量調節 1 通話の音量調節 2 ヘッドホン/イヤホンの音量調節 通話中の操作 ( 自分の声をミュートする 通話を中断する場合は、マイクミュート[m]ボタンをオン(点灯)にします。 5
オンライン会議で使う > コンピューターと使う お知らせ 音が出ない場合は、「音声、その他のトラブル」(67ページ)をご参照ください。 56
ポッドキャストで使う > WaveLab Castを使う ポッドキャストで使う WaveLab Castを使う WaveLab Castは、ポッドキャストのオーディオ/ビデオコンテンツ制作に最適なWindows およびMac用のソフトウェアです。簡単な操作で録音、編集、配信ができます。 WaveLab Castセットアップ: 次のページをご参照の上、ダウンロードやライセンスのアクティベーションをお済ませく ださい。 https://japan.steinberg.net/getwavelabcast お知らせ ダウンロードには、ダウンロードアクセスコード(Download access code)が必要です。付属の WAVELAB CAST DOWNLOAD INFORMATION(紙)に記載されています。 WaveLab Castのマニュアルは、次のURLからご検索ください。 https://steinberg.
録音で使う > iPhone/iPadでRec’n’Shareを使う 録音で使う iPhone/iPadでRec’n’Shareを使う Rec'n'Shareアプリと本製品を組み合わせて、音声の録音や編集などができます。 Rec'n'Shareアプリは、お気に入りの楽曲の演奏、録音、演奏動画の撮影、編集からアッ プロードまでが簡単にできるアプリです。 Rec'n'Shareについて詳しくは、次のウェブサイトをご参照ください。 https://www.yamaha.
録音で使う > コンピューターでCubase AIを使う コンピューターでCubase AIを使う Cubase AIと本製品を組み合わせて、音声の録音や編集などができます。Cubase AIはコン ピューターで音声の録音や再生、編集ができる音楽制作用のDAWソフトウェアです。 Cubase AIのセットアップ: 次のページをご参照の上、ダウンロードやライセンスのアクティベーションをお済ませく ださい。 https://japan.steinberg.net/getcubaseai お知らせ ダウンロードには、ダウンロードアクセスコード(Download access code)が必要です。付属の CUBASE AI DOWNLOAD INFORMATION(紙)に記載されています。 Cubase AIのマニュアルは、次のURLからご検索ください。 https://steinberg.
音楽制作で使う > iPhone/iPadでCubasis LEを使う 音楽制作で使う iPhone/iPadでCubasis LEを使う Cubasis LEと本製品を組み合わせて、音声の録音や編集ができます。Cubasis LEは、モバ イルDAW、Cubasisのライト版です。Cubasisと同様に、iPhone/iPadから音声の録音、再 生、編集ができる音楽制作アプリです。 App Storeから「Cubasis LE」を検索し、ダウンロードしてお使いください。 Cubasis LEについて詳しくは、次のSteinbergウェブサイトをご参照ください。 https://japan.steinberg.
音楽制作で使う > コンピューターでCubase AIを使う コンピューターでCubase AIを使う Cubase AIと本製品を組み合わせて、音声の録音や編集などができます。Cubase AIはコン ピューターで音声の録音や再生、編集ができる音楽制作用のDAWソフトウェアです。 Cubase AIのセットアップ: 次のページをご参照の上、ダウンロードやライセンスのアクティベーションをお済ませく ださい。 https://japan.steinberg.net/getcubaseai お知らせ ダウンロードには、ダウンロードアクセスコード(Download access code)が必要です。付属の CUBASE AI DOWNLOAD INFORMATION(紙)に記載されています。 Cubase AIのマニュアルは、次のURLからご検索ください。 https://steinberg.
マイクスタンド/デスクアームへ取り付ける > 取り付け方法 マイクスタンド/デスクアームへ取り付ける 取り付け方法 本製品を市販のマイクスタンドやデスクアームへ取り付ける方法を説明します。 用意するもの ( 本製品 ( マイクスタンド ( または デスクアーム 3/8インチ変換アダプター (K&M社スタンド用アダプター19695 3/8(ホルダー)- 3/8(スタンド)推奨) 機器の破損や、お客様のけがを防ぐために、次の注意事項をお守りください。 注意 ( 不安定な場所での取り付け/取り外しはしないでください。 ( ケーブル類は必ず外した状態で取り付けてください。 ( ( 必ず本製品を手で押さえながら、ネジを締めたり緩めたりして、取り付け/取り外してくださ い。 本製品をマイクスタンド/デスクアームへ確実に取り付けてください。 1 本製品を押さえながら、ネジを回してネジとワッシャーを取り外します。 62
マイクスタンド/デスクアームへ取り付ける > 取り付け方法 2 スタンドを少し広げながら、本製品をスタンドから外します。 3 本製品の両サイドについているスペーサーと、背面にあるネジ穴の保護キャップを 取り外します。 4 アダプターをマイクスタンド/デスクアームに取り付けます。 お知らせ マイクスタンド/デスクアームは3/8インチ径のネジ穴に対応したものをお使いください。 63
マイクスタンド/デスクアームへ取り付ける > 取り付け方法 5 本製品をアダプターに取り付けます。 アダプター 5 4 マイクスタンド デスクアーム 4 アダプター 5 確実に取り付けられていることを確認できれば完了です。 お知らせ 取り外したネジ、スペーサー、保護キャップはなくさないように、大切に保管してください。 64
マイクスタンド/デスクアームへ取り付ける > 本製品スタンドの再取り付け 本製品スタンドの再取り付け 機器の破損や、お客様のけがを防ぐために、次の注意事項をお守りください。 注意 ( 不安定な場所での取り付け/取り外しはしないでください。 ( ケーブル類は必ず外した状態で取り付けてください。 ( 必ず本製品を手で押さえながら、ネジを締めたり緩めたりして、取り付け/取り外してくださ い。 マイクスタンド/デスクアームから取り外して、再度本製品スタンドに取り付ける場合 は、 「取り付け方法」(62ページ)の逆の手順を行います。 スペーサーを本体に取り付けるときは、本製品の穴に向きを合わせて、しっかりと取り付 けてください。 65
困ったときは > 電源のトラブル 困ったときは 電源のトラブル ヤマハウェブサイトに、よくあるお問い合わせ(Q&A)を掲載しています。 https://yamaha.custhelp.
困ったときは > 音声、その他のトラブル 音声、その他のトラブル ヤマハウェブサイトに、よくあるお問い合わせ(Q&A)を掲載しています。 https://yamaha.custhelp.
資料 > 一般仕様 資料 一般仕様 0 dBu = 0.775 Vrms シグナルジェネレーターの出力インピーダンス: 150 Ω 特に指定のない場合、コントロールはノミナル位置。 周波数特性 HA(ヘッドアンプ) +0.5 dB/-1.5 dB (20 Hz~20 kHz @ Fs = 192 kHz) 、ノミナ 入力 →PHONES ル出力基準@ 1 kHz、MIC GAIN: MID、STREAMING OUT: OUT(USB IN/ MIC OUT経由) 全高調波歪率 (THD+N)*1 HA入力 →PHONES OUT 0.1 % @ −2.0 dBu (50 Hz~20 kHz)、MIC GAIN: MID ハム & ノイズ *2 (20 Hz~20 kHz) 出力残留ノイズ −103 dBu (PHONESツマミ: 最小) クロストーク(1 kHz)*3 0.01 % @ +0.
資料 > マイクロフォン特性 マイクロフォン特性 形式 バックエレクトレットコンデンサー型 指向特性 カーディオイド アドレスタイプ サイド 周波数特性 30 Hz ~ 20 kHz 最大入力SPL 110 dB (THD ≦1.
資料 > 入出力仕様 入出力仕様 アナログ入力規格 0 dBu = 0.775 Vrms 入力端子 入力インピー 適合インピー ダンス ダンス 入力レベル 感度 *1 ノミナルレベ 最大ノンク ル リップレベル 端子形状 AUX 10 kΩ 600 Ω Lines −14 dBu (154.6 mV) −8 dBu (308.5 mV) +2 dBu (975.7 mV) 3.5 mm フォーン端子 *2 SMARTPHO NE 10 kΩ 600 Ω Lines −14 dBu (154.6 mV) −8 dBu (308.5 mV) +2 dBu (975.7 mV) 3.5 mm フォーン端子 *3 (CTIA) *1 入力感度:最大レベル設定(レベルコントロールがすべて最大)時で+0 dBu(0.
資料 > 入出力仕様 本ガイドは、発行時点での最新仕様で説明しています。 71
資料 > 寸法図 281 寸法図 116 118 (単位: mm) 72
資料 > 指向特性 指向特性 330º 0 0º 30º -5 300º 60º -10 270º 90º 120º 240º 210º 150º 180º 73 [dB] @1 kHz
資料 > 周波数特性 周波数特性 [dB] 10 5 0 -5 -10 -15 50 100 500 1k 5k 74 20k [Hz]
資料 > ブロック図/レベル図 ブロック図/レベル図 AG01のブロック図/レベル図は、下記のヤマハウェブサイトをご覧ください。 https://www.yamaha.
Layout Folder: YMH_PDF_Manual_A5_PA Stylesheet Name: 02_YMH_PDF_Manual_A5_PA_Ja Stylesheet Version: 2022.03.29 ヤマハ プロオーディオウェブサイト https://www.yamahaproaudio.com/ ヤマハダウンロード https://download.yamaha.