LIVE STREAMING MIXER ユーザーガイド JA
目次 目次 はじめに 4 本ガイドについて.................................................................................... 4 マニュアルの構成.................................................................................... 6 本製品の特長.. ........................................................................................ 7 付属品.. ................................................................................................. 8 各部の名称と機能 9 背面.. .................................................................................
目次 コンピューターと使う............................................................................ 56 ポッドキャストで使う 61 WaveLab Castを使う.. .......................................................................... 61 録音で使う 62 iPhone/iPadでRec’n’Shareを使う.......................................................... 62 コンピューターでCubase AIを使う.. ........................................................ 63 音楽制作で使う 64 iPhone/iPadでCubasis LEを使う............................................................
はじめに > 本ガイドについて はじめに 本ガイドについて 本ガイドの記載内容に関するお知らせ 本ガイドでは、本製品をお使いになる方のために、接続方法や操作方法を説明していま す。また、注意事項などを次のように分類しています。 ( 警告 「死亡する可能性または重傷を負う可能性が想定される」内容です。 ( 注意 「傷害を負う可能性が想定される」内容です。 ( ( ご注意 製品の故障、損傷や誤動作、データの損失を防ぐため、また環境保護のため、お守りい ただく内容です。 お知らせ 使用時の注意点や機能の制約、知っておくと便利な補足情報です。 ( 本ガイドに掲載されているイラストや画面は、すべて説明のためのものです。 ( 本ガイドに記載されている会社名および商品名等は、各社の登録商標または商標です。 ( ソフトウェアは改良のため予告なしにバージョンアップすることがあります。 ( ( ソフトウェアおよび本ガイドの一部または全部を無断で複製、改変することはできませ ん。 ソフトウェアまたは本ガイドを使用した結果と影響については、一切責任を負いかねま すのでご了承ください。 著作権保護に
はじめに > 本ガイドについて 時には、著作権の専門家にご相談されるなどのご配慮をお願いします。なお、製品本来 の使用を通して、上記コンテンツを使用した音楽制作や演奏を行い、それらを録音して 配布する場合、配布方法が有償、無償を問わず著作権者の許諾は必要ありません。 *1:「コンテンツ」には、コンピュータープログラム、サウンドデータ、伴奏スタイル データ、MIDIデータ、WAVEデータ、音声記録データ、楽譜や楽譜データなどを含みま す。 *2:「複製または転用」には、本製品に内蔵または付属されたコンテンツそのものを取 り出すこと、もしくは酷似した形態で記録/録音して配布することを含みます。 商標について 本説明に使用する商標は、次のとおりです。 ( ( ( Steinberg、Cubase、Cubasis、WaveLab Castは、Steinbergの登録商標です。 Windows、Teams、Skypeは、米国Microsoft Corporationの米国およびその他の国に おける登録商標または商標です。 Mac、iPad、iPhone、App Store、Lightning、 FaceTim
はじめに > マニュアルの構成 マニュアルの構成 本製品に関連するマニュアルは、次のとおりです。 紙マニュアル 製品に同梱されているマニュアルです。 ( ( クイックガイド 基本的な接続方法と設定方法、各部の名称を説明しています。 セーフティーガイド 安全上のご注意について説明しています。 電子マニュアル ( ユーザーガイド(本ガイド) 各部の名称と機能や、各機器を接続して音が出るまでのセットアップ方法を説明してい ます。また、シーン別に使いかたを説明しています。 お知らせ 各マニュアルはヤマハウェブサイトからダウンロードできます。ヤマハウェブサイトには常に最新の マニュアルデータが掲載されていますので、必要に応じてご活用ください。 https://download.yamaha.
はじめに > 本製品の特長 本製品の特長 本製品は、コンピューター、iPad、スマートフォン経由でライブ配信などをするためのラ イブストリーミングミキサーです。 n 音質を調節できるコンプレッサー、イコライザー、リバーブを搭載 専用アプリ「AG Controller」で音質を細かく調節できます。コンプレッサー、イコライ ザー、リバーブは本製品でオン/オフできます。 n ライブ配信に便利なループバック機能 本製品に入力された音と、コンピューター、iPad、スマートフォンからの音をミックスし て、コンピューター、iPad、スマートフォンに戻せます。 n ポッドキャスティングなどに便利な「WaveLab Cast」をバンドル WaveLab Castのライセンスが付属しています。ポッドキャスティングや、ビデオコンテ ンツの音声編集に使えます。 n DAWソフトウェア「Cubase AI」をバンドル Cubase AIのライセンスが付属しています。録音、編集、ミックスなど音楽制作の基本作 業ができます。 n USBバスパワーで動作可能 コンピューターとUSB接続して本製品を動作できます(5V 1A以上の電
はじめに > 付属品 付属品 本製品には次の付属品が同梱されています。 ( USBケーブル(USB C to USB A)1.
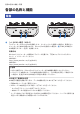
各部の名称と機能 > 背面 各部の名称と機能 背面 b a a b a [U]USB 2.0端子(USB C) コンピューターやiPhone/iPadを接続します。コンピューターを接続した場合は、電源がコン ピューターから本体に供給されます。iPhone/iPad を接続した場合は、b[5V DC] USB端子に USB電源アダプター(別売)を接続します。 お知らせ Windows®コンピューターは専用のドライバーが必要です。下記のウェブサイトからダウン ロード、インストールしてください。 AG03MK2 : https://www.yamaha.com/2/ag03mk2/ AG06MK2 : https://www.yamaha.com/2/ag06mk2/ ご注意 USB 2.
各部の名称と機能 > 背面 b [5V DC]USB端子(USB C) 市販のUSB電源アダプターやUSBモバイルバッテリーなどを接続します。iPhoneやiPadなどの 外部に電源が供給できない機器や、十分なバスパワーを供給できないコンピューターと接続す る場合に使用します。本製品にはUSB電源アダプターやUSBモバイルバッテリーは付属してい ません。 ご注意 ( ( お使いになる前に、USB電源アダプターやUSBモバイルバッテリーの安全上のご注意をお 読みください。 出力電圧4.8V~5.
各部の名称と機能 > 前面 前面 AG06MK2 AG03MK2 c d u w c e d v w x y h f gf l z x i m B n o p q r D y j f k A r m C n E p F q G s t z A C B D E F G t c マイク/ライン入力端子 マイク、電子楽器などを接続します。この端子は、XLRタイプとフォーンタイプ(バランス/ア ンバランス)のプラグを接続します。 プラグの種類 フォーンタイプ(バランス) XLRタイプ(バランス) フォーンタイプ(アンバランス) 11
各部の名称と機能 > 前面 d ライン[K(R)]入力端子(AG03MK2は[K]入力端子) AG06MK2 電子キーボードやオーディオ機器などのラインレベルの機器を接続します。チャンネル3/4は フォーンプラグ、チャンネル5/6はRCAピンプラグに対応しています。チャンネル3の[L/MONO] 端子はモノラル出力の機器を接続するときに使用します。このとき、[L/MONO] 端子に入力さ れた音は、ミキサー出力のLチャンネルだけではなくRチャンネルからも出力されます。 AG03MK2 電子キーボードやオーディオ機器などのラインレベルの機器を接続します。チャンネル2の[L/ MONO]端子はモノラル出力の機器を接続するときに使用します。このとき、[L/MONO] 端子に 入力された音は、ミキサー出力のLチャンネルだけではなくRチャンネルからも出力されます。 [GUITAR/LINE] 切り替えスイッチがGUITAR(O)のときは、動作しません。 e ギター[G]入力端子(AG03MK2のみ) エレキギターやエレキベースなどを接続します。フォーンプラグに対応しています。[GUITAR/ LINE] 切り替え
各部の名称と機能 > 前面 h [GUITAR/LINE]切り替えスイッチ(AG03MK2のみ) チャンネル2の入力を切り替えます。エレキギターやエレキベースなど出力インピーダンスの高 い楽器を、ギター[G]入力端子eに直接接続するときはGUITAR(O)にします。ラインレベ ルの機器をライン[K]入力端子dに接続するときはLINE(N)にします。このスイッチを GUITARにするときは、楽器と本体をアンバランスのフォーンケーブルで接続してください。バ ランスのケーブルで接続した場合、正常に動作しません。 警告 ( i スイッチを切り替えるときは、スピーカーツマミ、ヘッドホンツマミなどの出力コント ロールは、すべて最小にしてください。大音量が出て、聴力障害または外部機器の故障に なることがあります。 ファンタム[+48V CH1-2MIC]スイッチ/[+48V CH1-2MIC]LED(AG06MK2のみ) スイッチをオン(O)にすると[+48V CH1-2MIC]LEDが点灯し、チャンネル1とチャンネル2の マイク/ライン入力端子cに接続されたXLRプラグにDC+48V のファンタム電源を供給しま
各部の名称と機能 > 前面 k [GAIN HIGH LOW]スイッチ(AG03MK2のみ) チャンネル2/3の基本となる音量を決めます。音が歪む場合は、LOW(O)にしてください。 お知らせ レベルツマミを最小にしてから[GAIN HIGH LOW] スイッチを切り替えてください。[GAIN HIGH LOW] スイッチを切り替え時にノイズが出る場合があります。 l [HIGH LOW]スイッチ(AG06MK2のみ) チャンネル3/4、5/6の基本となる音量を決めます。音が歪む場合は、LOW(O)にしてくだ さい。 お知らせ レベルツマミを最小にしてから[HIGH LOW] スイッチを切り替えてください。[HIGH LOW] ス イッチを切り替え時にノイズが出る場合があります。 m [GAIN]ツマミ チャンネルの基本となる音量を決めます。強く歌ったときや強く弾いたときに[PEAK]LEDrが 一瞬点灯する程度にツマミを調節します。 n [COMP/EQ]ボタン コンプレッサーとイコライザーをオン(黄色に点灯)にします。初期設定は、配信に最適化し てあります。低域の不要なノイズや入力レベルのバ
各部の名称と機能 > 前面 t レベルツマミ 各チャンネル間の音量バランスを調節します。 AG06MK2 (M)チャンネル1に接続されたマイクなどから入力された音声の出力音量を調整します。 (G/M)チャンネル2に接続されたギターやマイクなどから入力された音声の出力音量を調整 します。 (K)チャンネル3/4に接続された電子キーボードなどから入力された音声の出力音量を調整 します。 (R)チャンネル5/6に接続されたオーディオ機器などから入力された音声の出力音量を調整 します。 (C/P)[USB 2.0]端子から入力された音声の出力音量を調整します。 AG03MK2 (G/K)チャンネル2/3に接続されたギターや電子キーボードなどから入力された音声の出 力音量を調整します。 (C/P)[USB 2.
各部の名称と機能 > 前面 z [HEADSET]マイク[M]入力端子 ヘッドセットのマイクを接続します。通常はピンク色のプラグです。ここから入力された音声 はチャンネル1に入ります。 お知らせ [HEADSET]マイク入力端子にマイクプラグが接続されると、チャンネル1(マイク/ライン入力 端子)に接続された機器の音はミュートされます。 [HEADSET]ヘッドホン[H]出力端子 ヘッドセットのヘッドホンを接続します。通常は薄緑色のプラグです。ヘッドホン[H]出力端 子yと同じ音が出力されます。 お知らせ [HEADSET] ヘッドホン出力端子にヘッドホンプラグが接続されると、ヘッドホン出力端子への の音声はミュートされます。 A [z](スタンバイ/オン)スイッチ 電源のスタンバイ(N)/オン(O)を切り替えます。 ご注意 ( B スイッチのスタンバイ/ オンを連続して素早く切り替えると、誤動作の原因になることが あります。スイッチをスタンバイにしてから再度オンにする場合は、6 秒以上の間隔を空 けてください。 [AUX(P)]スマートフォン入出力端子(4極 3.
各部の名称と機能 > 前面 D [STREAMING OUT]スライドスイッチ スマートフォンやコンピューターへ送る音を選択します。 警告 ( ( スライドスイッチを切り替えるときは、音量を調節してから切り替えてください。 接続した機器によっては、大音量が出て、聴覚障害または外部機器の故障になることがあ ります。 [DRY CH 1-2G](AG03MK2) [DRY CH 1-2](AG06MK2): マイク/ライン入力端子、ライン[K]入力端子、ギター[G]入力端子に入力された音を個別に 直接スマートフォンやコンピューターに送ります。 ご注意 ( [DRY CH 1-2](AG03MK2は[DRY CH 1-2G])設定時は、[MUTE]ボタンをオンにしても、ス マートフォンやコンピューターに送られる音はミュートされません。音声チャット等で ミュートしたい場合には、意図せずに相手側に音声が流れないよう、チャット側のミュー ト機能をお使いください。 お知らせ DAWなどに録音時に、[DRY CH 1-2](AG03MK2は[DRY CH 1-2G])に設定することでリバーブ などのエフェクト
各部の名称と機能 > 前面 E [MIX MINUS]スイッチ オン(O)にすると、チャンネル1、チャンネル2(AG03MK2は2G GUITAR)に入力された音 が、[MONITOR OUT]端子v、w、ヘッドホン[H] 出力端子y、[HEADSET]ヘッドホン[H]出力 端子zから出力されなくなります。 F スピーカー[S]ツマミ** [MONITOR OUT]端子v、wに接続された機器に送る音量を調節します。 G ヘッドホン[H]ツマミ** ヘッドホン[H]出力端子yや[HEADSET]ヘッドホン[H]出力端子zに接続されたヘッドホンの 音量を調節します。 **スピーカー[S] ツマミとヘッドホン[H]ツマミは、音量を別々に調節できます。 18
使う前の準備 > iPhone/iPadとの接続 使う前の準備 iPhone/iPadとの接続 電源の準備からiPhone/iPad との接続までを説明します。iPhone/iPadとの接続には外部 からの電力供給が必要です。 用意するもの ( ( ( USB電源アダプターまたはUSBモバイルバッテリー(5V 1A以上) Apple社製Lightning-USB3カメラアダプタ(Lightningコネクター対応のiPhone/iPadの 場合) iPadに付属のUSB-C充電ケーブル、または市販のUSB C to USB Cケーブル(USB Cコネ クター対応のiPadの場合) お知らせ ( ( 配信の際や、長時間お使いになる場合は、別途iPhone/iPad給電用の電源をご用意ください。 対応OSについては、次のヤマハウェブサイトをご参照ください。 AG03MK2: https://www.yamaha.com/2/ag03mk2/ AG06MK2: https://www.yamaha.
使う前の準備 > iPhone/iPadとの接続 5 付属のUSBケーブルを使って、本製品とApple社製Lightning-USB3カメラアダプ タを接続します。 背面 USBケーブル (付属品) お知らせ USB Cコネクター対応のiPadの場合は、Apple社製USB-C Digital AV Multiportアダプタをお使 いください。iPadに付属のUSB-C充電ケーブルなどを使って直接iPadと本製品を接続するこ ともできますが、iPad本体のバッテリー残量によっては使用可能時間が制限されます。 6 Apple社製LightningケーブルをiPhone/iPadに接続します。 iPhone/iPad 接続が完了すると、本製品が自動的にiPhone/iPadで認識されます。 iPhone/iPadの設定は必要ありません。 20
使う前の準備 > Android端末との接続 Android端末との接続 電源の準備からAndroid端末との接続までを説明します。Android端末との接続には外部 からの電力供給が必要です。 用意するもの ( USB電源アダプターまたはUSBモバイルバッテリー(5V 1A以上) ( USBケーブル(市販品:電源用) ( 3.
使う前の準備 > Android端末との接続 4 3.5 mm 4極ステレオミニケーブルで、本製品のスマートフォン[P]入出力端子と Android端末のヘッドセット用端子を接続します。 Android端末 4 極 3.5 mm ステレオミニケーブル お知らせ ( ( ステレオミニ端子非対応のAndroid端末との接続には、変換アダプタケーブルが必要です。 たとえばUSB C端子で音声の入出力をするAndroid端末の場合は、USB C-3.
使う前の準備 > コンピューターとの接続と設定(Windows) コンピューターとの接続と設定(Windows) はじめに、本製品をコンピューターに認識させるドライバー「Yamaha Steinberg USB Driver」を次のヤマハウェブサイトからダウンロードしてインストールします。 AG03MK2: https://www.yamaha.com/2/ag03mk2/ AG06MK2: https://www.yamaha.
使う前の準備 > コンピューターとの接続と設定(Windows) 3 「サウンド」画面上で出力と入力に、[Yamaha AG03MK2]か[Yamaha AG06MK2] を選択します。 24
使う前の準備 > コンピューターとの接続と設定(Mac) コンピューターとの接続と設定(Mac) 本製品をコンピューターに接続して使うには、ドライバーが必要です。 Macの場合は、macOSに用意されている標準ドライバーをそのまま使うので、ドライバー のインストールは必要ありません。 お知らせ 対応OSについては、次のヤマハウェブサイトをご参照ください。 AG03MK2: https://www.yamaha.com/2/ag03mk2/ AG06MK2: https://www.yamaha.
使う前の準備 > コンピューターとの接続と設定(Mac) 3 4 画面左下の をクリックして「このサウンド出力装置を使用」を選びます。 同様に「このサウンド入力装置を使用」を選びます。 手順3と手順4を完了すると、リストの[Yamaha AG03MK2]か[Yamaha AG06MK2]の右下 にマイクとスピーカーのアイコンが表示されます。 5 Audio MIDI設定を終了します。 26
ライブ配信で使う(17LIVE、Twitch、YouTube ライブ) > iPhone/iPadと使う ライブ配信で使う(17LIVE、Twitch、 YouTube ライブ) iPhone/iPadと使う 本製品とiPhone/iPadを使って、自分の声や歌を17LIVE、Twitch、YouTubeライブなどで ライブ配信するための設定や操作について説明します(17LIVE、Twitch、YouTubeライ ブは、それぞれ配信アプリの名称です)。これらの通話用のアプリをiPhone/iPadで使う 場合は、USBケーブルで接続しても、本製品からの音がアプリに流れません。3.
ライブ配信で使う(17LIVE、Twitch、YouTube ライブ) > iPhone/iPadと使う 2 ヘッドホンまたはイヤホンを接続する ヘッドホンまたはイヤホンを出力端子に接続します。 28
ライブ配信で使う(17LIVE、Twitch、YouTube ライブ) > iPhone/iPadと使う 3 マイクを接続する マイクをチャンネル1のマイク/ライン入力端子に接続します。 すべての接続が完了したら、本体の設定をします。 4 [z](スタンバイ/ オン)スイッチをオンにする [z](スタンバイ/ オン)スイッチをオンにします。 29
ライブ配信で使う(17LIVE、Twitch、YouTube ライブ) > iPhone/iPadと使う 5 AG本体の設定をする フロントパネルの各スイッチを以下の設定にします。 [LINE]スイッチ:オフ ファンタム[+48V] スイッチ:オン(コンデンサーマイクを使用する場合) チャンネル1[GAIN] ツマミ、レベルツマミ・フェーダー:適宜(イラスト参照) [STREAMING OUT]:[INPUT MIX] [MIX MINUS]:オフ ( ( ( ( ( 本製品の設定ができたら、AG Controllerアプリを起動し、画面下部の「サウンドチェッ ク」をクリックします。 30
ライブ配信で使う(17LIVE、Twitch、YouTube ライブ) > iPhone/iPadと使う 「サウンドチェック」画面で音量を調節、確認します。 6 ヘッドホンまたはイヤホンの音量を調節する マイクで話しながらヘッドホン[H] ツマミで音量を調節します。ヘッドホン[H]ツマミ の操作は、配信される音量に影響しません。 7 配信を開始する フェーダー(AG03MK2のみ)、レベルツマミで、それぞれの音量を調節します。 配信アプリを起動して、視聴者(リスナー)にバランスを確認します。 お知らせ 音が出ない場合は、「音声、その他のトラブル」(67ページ)をご参照ください。 31
ライブ配信で使う(17LIVE、Twitch、YouTube ライブ) > Android端末と使う Android端末と使う 本製品とAndroid端末を使って、自分の声や歌を17LIVE、Twitch、YouTubeライブなどで ライブ配信するための設定や操作について説明します(17LIVE、Twitch、YouTubeライ ブは、それぞれ配信アプリの名称です)。 用意するもの ( 本製品 ( Android端末 ( ステレオミニプラグのヘッドホンまたはイヤホン ( 3.
ライブ配信で使う(17LIVE、Twitch、YouTube ライブ) > Android端末と使う 2 ヘッドホンまたはイヤホンを接続する ヘッドホンまたはイヤホンをヘッドホン出力端子に接続します。 33
ライブ配信で使う(17LIVE、Twitch、YouTube ライブ) > Android端末と使う 3 マイクを接続する マイクをチャンネル1のマイク/ライン入力端子に接続します。 すべての接続が完了したら、本体の設定をします。 34
ライブ配信で使う(17LIVE、Twitch、YouTube ライブ) > Android端末と使う 4 AG本体の設定をする フロントパネルの各スイッチを以下の設定にします。 ファンタム[+48V] スイッチ:オン(コンデンサーマイクを使用する場合) チャンネル1[GAIN] ツマミ : 適宜(イラスト参照) [STREAMING OUT]:[INPUT MIX] [MIX MINUS]:オフ ( ( ( ( 5 [z](スタンバイ/ オン)スイッチをオンにする [z](スタンバイ/ オン)スイッチをオンにします。 6 ヘッドホンの音量を調節する マイクで話しながらヘッドホン[H] ツマミで音量を調節します。ヘッドホン[H]ツマミ の操作は、配信される音量に影響しません。 7 配信を開始する フェーダー(AG03MK2のみ)、レベルツマミで、それぞれの音量を調節します。 配信アプリを起動して、視聴者(リスナー)にバランスを確認します。 お知らせ 音が出ない場合は、「音声、その他のトラブル」(67ページ)をご参照ください。 35
ライブ配信で使う(17LIVE、Twitch、YouTube ライブ) > コンピューターと使う コンピューターと使う 本製品とWindows PCまたはMacを使って、自分の声や歌を17LIVE、Twitch、YouTubeラ イブなどでライブ配信するための設定や操作について説明します(17LIVE、Twitch、 YouTubeライブは、それぞれ配信アプリの名称です)。 用意するもの ( ( 本製品 WindowsまたはMacコンピューター(AG Controllerおよび配信アプリインストール 済 み) AG Controllerアプリは、次のウェブサイトからインストールしてください。 AG03MK2:https://www.yamaha.com/2/ag03mk2/ AG06MK2:https://www.yamaha.
ライブ配信で使う(17LIVE、Twitch、YouTube ライブ) > コンピューターと使う 3 ヘッドホンまたはイヤホンを接続する ヘッドホンまたはイヤホンをヘッドホン出力端子に接続します。 すべての接続が完了したら、本製品の設定をします。 37
ライブ配信で使う(17LIVE、Twitch、YouTube ライブ) > コンピューターと使う 4 AG本体の設定をする フロントパネルの各スイッチを以下の設定にします。 ファンタム[+48V] スイッチ:オン(コンデンサーマイクを使用する場合) チャンネル1[GAIN] ツマミ、レベルツマミ・フェーダー:適宜(イラスト参照) [STREAMING OUT]:[INPUT MIX] [MIX MINUS]:オフ ( ( ( ( 38
ライブ配信で使う(17LIVE、Twitch、YouTube ライブ) > コンピューターと使う 5 [z](スタンバイ/ オン)スイッチをオンにする [z](スタンバイ/ オン)スイッチをオンにします。 本製品の設定ができたら、AG Controllerアプリを起動し、画面下部にある「サウンド チェック」をクリックします。 サウンドチェック画面で音量を調節、確認します。 6 ヘッドホンまたはイヤホンの音量を調節する マイクで話しながらヘッドホン[H] ツマミで音量を調節します。ヘッドホン[H]ツマミ の操作は、配信される音量に影響しません。 7 配信を開始する フェーダー(AG03K2のみ)、レベルツマミで、それぞれの音量を調節します。 配信アプリを起動して、視聴者(リスナー)にバランスを確認します。 お知らせ 音が出ない場合は、「音声、その他のトラブル」(67ページ)をご参照ください。 OBSを使った配信方法 ここでは配信ソフトウェアの例としてOBSを使った配信方法を説明します。OBSのダウン ロード、およびインストールについては、OBSの公式ホームページをご参照ください。 1 2 O
ライブ配信で使う(17LIVE、Twitch、YouTube ライブ) > コンピューターと使う 3 「グローバル音声デバイス」にある「デスクトップ音声」の設定を「既定」または 「無効」にします。 本製品の[STREAMING OUT]スライドスイッチの設定を [DRY CH 1-2]または[INPUT MIX] にした場合は「既定」に、[LOOPBACK]にした場合は「無効」にします。 4 同様に「グローバル音声デバイス」にある「マイク音声」の設定をライン[Yamaha AG03MK2]か[Yamaha AG06MK2]にします。 5 6 左側のナビゲーションメニューから「配信」を選択します。 7 8 「設定」画面を閉じます。 配信するサービスを選択し、必要に応じてサービスから提供されるストリームキー を入力します。 配信を開始します。 40
ライブ配信で使う(17LIVE、Twitch、YouTube ライブ) > ライブ配信中の操作 ライブ配信中の操作 ライブ配信中の操作について説明します。 n マイクをミュートにする ライブ配信中に離席する場合などは、[MUTE] ボタンをオン(点灯)にしてマイクの音が 配信に流れないようにします。 n 声にリバーブ(残響)をかける マイクの音にリバーブをかける場合は、[REVERB] ボタンをオン(点灯)にします。 AG Controllerアプリを使う 本製品の細かな設定をしたいときはAG Controllerアプリを使います。ここでは、例として EQとリバーブの設定画面を紹介します。 ( EQ設定画面 画面の開きかた:[Detail r]→画面内の[CH 1]の[EQ]グラフをクリック 41
ライブ配信で使う(17LIVE、Twitch、YouTube ライブ) > ライブ配信中の操作 ( リバーブ設定画面 画面の開きかた:[Detail r]→画面内の[Reverb]のグラフをクリック お知らせ AG ControllerアプリはAndroid端末には対応しておりません。 42
ライブ配信で使う(17LIVE、Twitch、YouTube ライブ) > 楽器や音楽再生プレーヤーをつなぐ 楽器や音楽再生プレーヤーをつなぐ 楽器や音楽再生プレーヤーを接続して、BGMや効果音を入れる場合の設定について説明し ます。 n 楽器をつなぐ AG06MK2 ギターはチャンネル2にアンバランスのフォーンケーブルで接続し、[GUITAR]スイッチを オン(O)にしてください。 音量はチャンネル2のレベルツマミで調整します。 電子ピアノやシンセサイザーなどの電子楽器はチャンネル3/4のライン入力端子に接続し てください。音量はチャンネル3/4のレベルツマミで調整します。 AG03MK2 ギターはギター入力端子にアンバランスのフォーンケーブルで接続し、[GUITAR/LINE]切 り替えスイッチをGUITAR(O)にしてください。 電子ピアノやシンセサイザーなどの電子楽器はチャンネル2のライン入力端子に接続し、 [GUITAR/LINE]切り替えスイッチをLINE(N)にしてください。 音量はチャンネル2のレ ベルツマミで調整します。 お知らせ 接続には変換ケーブルやエフェクターなどが必要になる場合が
ライブ配信で使う(17LIVE、Twitch、YouTube ライブ) > 楽器や音楽再生プレーヤーをつなぐ ギター ギター 電子ピアノ 電子ピアノ BGMや効果音を入れる BGMや効果音を再生する場合には、音楽再生プレーヤーを[AUX(P)] スマートフォン入 出力端子に接続します。 音量は接続した機器側で調節してください。 AG06MK2はチャンネル5/6に入力すると、チャンネル5/6のレベルツマミで音量を調節で きます。 44
ライブ配信で使う(17LIVE、Twitch、YouTube ライブ) > 楽器や音楽再生プレーヤーをつなぐ 音楽再生プレーヤー 音楽再生プレーヤー 4 極 3.
オンライン会議で使う > iPhone/iPadと使う オンライン会議で使う iPhone/iPadと使う 本製品とiPhone/iPadを使って、Zoom、Skype、Teams、FaceTime、LINEなどでオンラ イン会議をする場合の設定や操作について説明します(Zoom、Skype、Teams、 FaceTime、LINEは、アプリの名称です)。Skype、FaceTime、LINEなどをiPhone/iPad で使う場合、USBケーブルで接続しても、本製品からの音がアプリに流れません。3.5 mm 4極ステレオミニケーブルを使って接続します。 用意するもの ( 本製品 ( iPhone / iPad(各種アプリインストール済み) ( ( Lightning - 3.5 mmヘッドフォンジャックアダプタ(Lightningコネクター対応の iPhone/iPadの場合。Apple純正品推奨。) USB-C - 3.
オンライン会議で使う > iPhone/iPadと使う 3 3.5 mm 4極ステレオミニケーブルで、Lightningまたは USB-Cの3.5 mmヘッド フォンジャックアダプタと本製品のスマートフォン[P]入出力端子を接続します。 2 2 Lightning/USB-C 3.5 mm ヘッドフォン ジャックアダプタ Lightning/USB-C 3.5 mm ヘッドフォン ジャックアダプタ 3 3.5 mm 4極ステレオミニ ケーブル 3.
オンライン会議で使う > iPhone/iPadと使う 4 ヘッドホンまたはイヤホンを接続する ヘッドホンまたはイヤホンをヘッドホン出力端子に接続します。 48
オンライン会議で使う > iPhone/iPadと使う 5 マイクを接続する マイクをチャンネル1のマイク/ライン入力端子に接続します。 すべての接続が完了したら、本体の設定をします。 6 [z](スタンバイ/ オン)スイッチをオンにする [z](スタンバイ/ オン)スイッチをオンにします。 49
オンライン会議で使う > iPhone/iPadと使う 7 AG本体の設定をする フロントパネルの各スイッチを以下の設定にします。 [LINE]スイッチ:オフ ファンタム[+48V] スイッチ:オン(コンデンサーマイクを使用する場合) チャンネル1[GAIN] ツマミ、レベルツマミ・フェーダー:適宜(イラスト参照) [STREAMING OUT]:[INPUT MIX] [MIX MINUS]:オフ ( ( ( ( ( 8 ヘッドホンまたはイヤホンの音量を調節する マイクで話しながらヘッドホン[H] ツマミで音量を調節します。ヘッドホン[H]ツマミ の操作は、配信される音量に影響しません。 9 オンライン会議を開始する フェーダー(AG03MK2のみ)、レベルツマミで、それぞれの音量を調節します。 配信アプリを起動して、視聴者(リスナー)にバランスを確認します。 通話中の操作 ( 自分の声をミュートする 通話を中断する場合は、MUTEボタンをオン(点灯)にします。 お知らせ 音が出ない場合は、「音声、その他のトラブル」(67ページ)をご参照ください。 50
オンライン会議で使う > Android端末と使う Android端末と使う 本製品とAndroid端末を使って、Zoom、Skype、Teams、FaceTime、LINEなどでオンラ イン会議をする場合の設定や操作について説明します(Zoom、Skype、Teams、 FaceTime、LINEは、アプリの名称です)。 お知らせ Android端末は、USB接続で本製品からの音を入力することができません。3.5 mm 4極ステレオミニ ケーブルで接続します。 用意するもの ( 本製品 ( Android端末(各種アプリインストール済み) ( ステレオミニプラグのヘッドホンまたはイヤホン ( 3.
オンライン会議で使う > Android端末と使う 2 ヘッドホンまたはイヤホンを接続する ヘッドホンまたはイヤホンをヘッドホン出力端子に接続します。 52
オンライン会議で使う > Android端末と使う 3 マイクを接続する マイクをチャンネル1のマイク/ライン入力端子に接続します。 すべての接続が完了したら、本体の設定をします。 53
オンライン会議で使う > Android端末と使う 4 AG本体の設定をする フロントパネルの各スイッチを以下の設定にします。 ファンタム[+48V] スイッチ:オン(コンデンサーマイクを使用する場合) チャンネル1[GAIN] ツマミ : 適宜(イラスト参照) [STREAMING OUT]:[INPUT MIX] [MIX MINUS]:オフ ( ( ( ( 5 [z](スタンバイ/ オン)スイッチをオンにする [z](スタンバイ/ オン)スイッチをオンにします。 6 ヘッドホンの音量を調節する マイクで話しながらヘッドホン[H] ツマミで音量を調節します。ヘッドホン[H]ツマミ の操作は、配信される音量に影響しません。 7 オンライン会議を開始する フェーダー(AG03MK2のみ)、レベルツマミで、それぞれの音量を調節します。 配信アプリを起動して、視聴者(リスナー)にバランスを確認します。 通話中の操作 ( 自分の声をミュートする 通話を中断する場合は、MUTEボタンをオン(点灯)にします。 54
オンライン会議で使う > Android端末と使う お知らせ 音が出ない場合は、「音声、その他のトラブル」(67ページ)をご参照ください。 55
オンライン会議で使う > コンピューターと使う コンピューターと使う 本製品とWindows PCまたはMacを使って、Zoom、Skype、Teams、FaceTime、LINEな どでオンライン会議をする場合の設定や操作について説明します (Zoom、Skype、 Teams、FaceTime、LINEは、アプリの名称です)。 用意するもの ( 本製品 ( Windows PCまたはMac(各種アプリインストール済み) ( ステレオミニプラグのヘッドホンまたはイヤホン ( USBケーブル(付属品) 手順 1 (Windowsのみ)ドライバーをインストールする Macにはドライバーは不要です。手順2から始めてください。 ドライバーがインストールされていない場合は、「使う前の準備」→「コンピューター との接続と設定(Windows)」を参照してインストールしてください。 「コンピューターとの接続と設定(Windows)」(23ページ) ( 2 コンピューターと接続する 「使う前の準備」→「コンピューターとの接続と設定(Windows)/(Mac)」を参照 して接続します。 「コンピ
オンライン会議で使う > コンピューターと使う 3 ヘッドホンまたはイヤホンを接続する ヘッドホンまたはイヤホンをヘッドホン出力端子に接続します。 57
オンライン会議で使う > コンピューターと使う 4 マイクを接続する マイクをチャンネル1のマイク/ライン入力端子に接続します。 すべての接続が完了したら、本体の設定をします。 58
オンライン会議で使う > コンピューターと使う 5 AG本体の設定をする フロントパネルの各スイッチを以下の設定にします。 ファンタム[+48V] スイッチ:オン(コンデンサーマイクを使用する場合) チャンネル1[GAIN] ツマミ、レベルツマミ・フェーダー:適宜(イラスト参照) [STREAMING OUT]:[INPUT MIX] [MIX MINUS]:オフ ( ( ( ( 6 アプリの設定をする オンライン会議で使用するアプリを起動して、アプリ内のデバイスの設定を開き、音声 入力デバイスと音声出力デバイスがそれぞれ[Yamaha AG03MK2]か[Yamaha AG06MK2] になっていることを確認します。 7 ヘッドホンまたはイヤホンの音量を調節する マイクで話しながらヘッドホン[H] ツマミで音量を調節します。ヘッドホン[H]ツマミ の操作は、配信される音量に影響しません。 8 オンライン会議を開始する フェーダー(AG03K2のみ)、レベルツマミで、それぞれの音量を調節します。 配信アプリを起動して、視聴者(リスナー)にバランスを確認します。 通話中の操作 ( 自分
オンライン会議で使う > コンピューターと使う お知らせ 音が出ない場合は、「音声、その他のトラブル」(67ページ)をご参照ください。 60
ポッドキャストで使う > WaveLab Castを使う ポッドキャストで使う WaveLab Castを使う WaveLab Castは、ポッドキャストのオーディオ/ビデオコンテンツ制作に最適なWindows およびMac用のソフトウェアです。簡単な操作で録音、編集、配信ができます。 WaveLab Castセットアップ: 次のページをご参照の上、ダウンロードやライセンスのアクティベーションをお済ませく ださい。 https://japan.steinberg.net/getwavelabcast お知らせ ダウンロードには、ダウンロードアクセスコード(Download access code)が必要です。付属の WAVELAB CAST DOWNLOAD INFORMATION(紙)に記載されています。 WaveLab Castのマニュアルは、次のURLからご検索ください。 https://steinberg.
録音で使う > iPhone/iPadでRec’n’Shareを使う 録音で使う iPhone/iPadでRec’n’Shareを使う Rec'n'Shareアプリと本製品を組み合わせて、音声の録音や編集などができます。 Rec'n'Shareアプリは、お気に入りの楽曲の演奏、録音、演奏動画の撮影、編集からアッ プロードまでが簡単にできるアプリです。 Rec'n'Shareについて詳しくは、次のウェブサイトをご参照ください。 https://www.yamaha.
録音で使う > コンピューターでCubase AIを使う コンピューターでCubase AIを使う Cubase AIと本製品を組み合わせて、音声の録音や編集などができます。Cubase AIはコン ピューターで音声の録音や再生、編集ができる音楽制作用のDAWソフトウェアです。 Cubase AIのセットアップ: 次のページをご参照の上、ダウンロードやライセンスのアクティベーションをお済ませく ださい。 https://japan.steinberg.net/getcubaseai お知らせ ダウンロードには、ダウンロードアクセスコード(Download access code)が必要です。付属の CUBASE AI DOWNLOAD INFORMATION(紙)に記載されています。 Cubase AIのマニュアルは、次のURLからご検索ください。 https://steinberg.
音楽制作で使う > iPhone/iPadでCubasis LEを使う 音楽制作で使う iPhone/iPadでCubasis LEを使う Cubasis LEと本製品を組み合わせて、音声の録音や編集ができます。Cubasis LEは、モバ イルDAW、Cubasisのライト版です。Cubasisと同様に、iPhone/iPadから音声の録音、再 生、編集ができる音楽制作アプリです。 App Storeから「Cubasis LE」を検索し、ダウンロードしてお使いください。 Cubasis LEについて詳しくは、次のSteinbergウェブサイトをご参照ください。 https://japan.steinberg.
音楽制作で使う > コンピューターでCubase AIを使う コンピューターでCubase AIを使う Cubase AIと本製品を組み合わせて、音声の録音や編集などができます。Cubase AIはコン ピューターで音声の録音や再生、編集ができる音楽制作用のDAWソフトウェアです。 Cubase AIのセットアップ: 次のページをご参照の上、ダウンロードやライセンスのアクティベーションをお済ませく ださい。 https://japan.steinberg.net/getcubaseai お知らせ ダウンロードには、ダウンロードアクセスコード(Download access code)が必要です。付属の CUBASE AI DOWNLOAD INFORMATION(紙)に記載されています。 Cubase AIのマニュアルは、次のURLからご検索ください。 https://steinberg.
困ったときは > 電源のトラブル 困ったときは 電源のトラブル ヤマハウェブサイトに、よくあるお問い合わせ(Q&A)を掲載しています。 https://yamaha.custhelp.
困ったときは > 音声、その他のトラブル 音声、その他のトラブル ヤマハウェブサイトに、よくあるお問い合わせ(Q&A)を掲載しています。 https://yamaha.custhelp.com/ Windows PCが本製品を認識しない ( ドライバーがインストールされていますか? ( 本製品をWindows PCに接続するためには、Yamaha Steinberg USB Driverのイン ストールが必要です。 Yamaha Steinberg USB Driverのインストール方法は次のウェブサイトをご参照く ださい。 AG03MK2 : https://www.yamaha.com/2/ag03mk2/ AG06MK2 : https://www.yamaha.
困ったときは > 音声、その他のトラブル ( レベルメーターCの [PEAK](赤色)が点灯していませんか? ( 各チャンネルのレベルツマミを調節してください。スピーカー[S] ツマミ、ヘッド フォン[H] ツマミで音量を下げてもレベルメーターの[PEAK] は消えません。 ( 本体に接続した機器の音量が大きすぎませんか? ( 接続した機器の音量を下げてください。 ( [LINE] スイッチfや [GAIN HIGH LOW] スイッチk(AG03MK2のみ)、[HIGH LOW]スイッチl(AG06MK2のみ)がオフ(N)になっていませんか? スイッチをオン(O)にしてください。音源からの音量が大きい場合、オフ (N)にしていると、音が歪むことがあります。 ( ( [STREAMING OUT] スライドスイッチDが [LOOPBACK] になっていませんか? ( DAW ソフトウェアを使用している場合、[LOOPBACK] になっていると、DAW ソフ トウェアの設定によってはループが形成されてハウリングが起こることがありま す。コンピューターを経由した音を聞きながら録音する場合は、必ず[L
資料 > 一般仕様 資料 一般仕様 AG06MK2 0 dBu = 0.775 Vrmsシグナルジェネレーターの出力インピーダンス: 150 Ω 特に指定のない場合、コントロールはノミナル位置。 ( 周波数特性 入力チャンネル →MONITOR OUT(USB IN/OUT経由) +0.5 dB/−1.5 dB (20 Hz ~ 48 kHz @ Fs = 192 kHz)、ノミナル出力基準@ 1 kHz、 GAIN ツマミ: 最小、STREAMING OUT: DRY CH1-2 ( ( 全高調波歪率 (THD+N)*1 入力チャンネル →MONITOR OUT 0.05 % @ 0 dBu (20 Hz~20 kHz)、GAINツマミ: 最小 0.
資料 > 一般仕様 ( 入力チャンネル機能 (CH1、CH2) PAD 26 dB DSP CH1: COMP/EQ、REVERB、MUTE CH2: COMP/EQ *4、AMP SIM、REVERB、MUTE PEAK LED 信号がクリッピングレベルの手前3 dBに達すると点灯 ( ( ( ( レベルメーター USB出力レベル 2 x 2ポイントLEDメーター (PEAK、SIG) ( ( USBオーディオ 2 IN / 2 OUT USB Audio Class 2.0 準拠、対応サンプリング周波数:最大192 kHz、対応量子化ビット 数: 24-bit ( ( ( ( ( ( ( ( ( ( ファンタム電源 +48 V フットスイッチ端子 REVERB ON/OFFまたはMUTE(CH1) ON/OFF 電源電圧 DC 5V、900 mA 消費電力 最大4.5 W 寸法 (幅×高さ×奥行き) 152 mm × 63 mm × 201 mm 質量 0.9 kg 同梱品 USB2.0 ケーブル (1.
資料 > 一般仕様 特に指定のない場合、コントロールはノミナル位置。 ( 周波数特性 入力チャンネル →MONITOR OUT(USB IN/OUT経由) +0.5 dB/−1.5 dB (20 Hz~48 kHz @ Fs = 192 kHz) 、ノミナル出力基準@ 1 kHz、GAIN ツマミ: 最小、STREAMING OUT: DRY CH1-2G ( ( 全高調波歪率 (THD+N)*1 入力チャンネル →MONITOR OUT 0.05 % @ 0 dBu (20 Hz~20 kHz)、GAINツマミ: 最小 0.
資料 > 一般仕様 ( USBオーディオ 2 IN / 2 OUT USB Audio Class 2.0 準拠、対応サンプリング周波数:最大192 kHz、対応量子化ビット 数: 24-bit ( ( ( ( ( ( ( ( ( ( ファンタム電源 +48 V フットスイッチ端子 REVERB ON/OFFまたはMUTE ON/OFF 電源電圧 DC 5V、900 mA 消費電力 最大4.5 W 寸法 (幅×高さ×奥行き) 126 mm × 63 mm × 201 mm 質量 0.8 kg 同梱品 USB2.0 ケーブル (1.
資料 > 入出力仕様 入出力仕様 アナログ入力規格(AG06MK2) 0 dBu = 0.775 Vrms 入力端子 PAD 26 dB ゲインノ ブ/SWポ ジション 入力イン ピーダン ス 適合イン ピーダン ス OFF 0 10 ノミナル レベル 最大ノン クリップ レベル 端子形状 3 kΩ 1.5 kΩ*4 CH1ヘッ ドセット マイク用 3.5 mm フォーン 端子 (Plug-in +22 dBu Power / (9.757 V) Unbalanc ed) (38.84 (154.6 (489.0 50 Ω-600 mV) mV) mV) Ω −46 dBu −34 dBu −24 dBu Mics/ (3.884 (15.46 (48.90 Lines mV) mV) mV) ON 0 dBu (775.0 mV) 0 +12 dBu (3.085 V) 10 −68 dBu −56 dBu −46 dBu (3.085 (1.228 (3.884 mV) mV) mV) 0 −22 dBu −10 dBu (61.56 (245.
資料 > 入出力仕様 HIGH LINE 3/4、5/6 - 10 kΩ 600 Ω Lines LOW AUX INPUT - - 10 kΩ 600 Ω Lines −20 dBu (77.50 mV) −8 dBu (308.5 mV) +2 dBu (975.7 mV) LINE 3/4 フォーン 端子*3 (Unbalan ced) −10 dBu (245.1 mV) +2 dBu (975.7 mV) +12 dBu (3.085 V) −14 dBu (154.6 mV) −8 dBu (308.5 mV) +2 dBu (975.7 mV) LINE 5/6 RCAピン 端子 (Unbalan ced) 3.5 mm フォーン 端子*6 (CTIA) *1 入力感度:最大レベル設定(レベルコントロールがすべて最大)時で+0 dBu (0.
資料 > 入出力仕様 AUX OUT 150 Ω −30 dBu (24.51 mV) 1.5 kΩ Line −20 dBu (77.50 mV) 3.5 mmフォー ン端子 *8 (CTIA) *7 Tip = HOT、Ring = COLD、Sleeve = GND *8 Tip = Signal L、Ring1 = Signal R、Ring2 = GND、Sleeve = Output for Smartphone デジタル入出力規格(AG06MK2) 端子 フォーマット USB USB Audio Class 2.0 / Yamaha Steinberg USB Driver データ長 サンプリング周波 数 端子形状 24-bit 44.1 kHz、48 kHz、88.2 kHz、 96 kHz、176.4 kHz、192 kHz USB Type-C アナログ入力規格(AG03MK2) 0 dBu = 0.
資料 > 入出力仕様 HIGH LINE 2/3 - 10 kΩ 600 Ω Lines 10 kΩ 600 Ω Lines LOW AUX INPUT - - −20 dBu (77.50 mV) −8 dBu (308.5 mV) −10 dBu (245.1 mV) +2 dBu (975.7 mV) −14 dBu (154.6 mV) −8 dBu (308.5 mV) +2 dBu (973.7 mV) フォーン 端子*3 (Unbalan +12 dBu ced) (3.085 V) +2 dBu (975.7 mV) 3.5 mm フォーン 端子*5 (CTIA) *1 入力感度:最大レベル設定(レベルコントロールがすべて最大)時で+0 dBu (0.
資料 > 入出力仕様 デジタル入出力規格 端子 フォーマット USB USB Audio Class 2.0 / Yamaha Steinberg USB Driver データ長 サンプリング周波 数 端子形状 24-bit 44.1 kHz、48 kHz、88.2 kHz、 96 kHz、176.
資料 > 寸法図 寸法図 152 AG06MK2 2.
資料 > 寸法図 126 AG03MK2 2.
資料 > ブロック図/レベル図 ブロック図/レベル図 AG06MK2 AG03MK2のブロックダイヤグラムは下記のヤマハウェブサイトをご覧くださ い。 https://www.yamaha.com/2/ag03mk2/ https://www.yamaha.
Layout Folder: YMH_PDF_Manual_A5_PA Stylesheet Name: 02_YMH_PDF_Manual_A5_PA_Ja Stylesheet Version: 2022.03.29 ヤマハ プロオーディオウェブサイト https://www.yamahaproaudio.com/ ヤマハダウンロード https://download.yamaha.