LIVE STREAMING MIXER Guida per l’utente IT
Indice Indice Introduzione 4 Informazioni sulla guida.. .......................................................................... 4 Struttura dei manuali................................................................................ 6 Caratteristiche del prodotto....................................................................... 7 Accessori.. ............................................................................................... 8 Nomi e funzioni dei componenti 9 Pannello posteriore.....
Indice Uso del prodotto per la registrazione 59 Uso di Rec'n'Share con iPhone/iPad........................................................... 59 Uso di Cubase AI con un computer.............................................................. 60 Uso del prodotto nella produzione musicale 61 Uso di Cubasis LE con iPhone/iPad.. ........................................................... 61 Uso di Cubase AI con un computer..............................................................
Introduzione > Informazioni sulla guida Introduzione Informazioni sulla guida Avviso sul contenuto della guida Questa guida dell'utente spiega come collegare e utilizzare il prodotto. La classificazione per le precauzioni e altri argomenti è la seguente. ( AVVERTENZA Questo contenuto indica "rischio di lesioni gravi o morte". ( ATTENZIONE Questo contenuto indica "rischio di lesioni".
Introduzione > Informazioni sulla guida dati MIDI, dati di forma d'onda, dati di registrazioni vocali, spartiti musicali, dati sugli spartiti ecc. *2: La frase "riprodurre ovvero deviare" include l'estrazione del contenuto stesso nel presente prodotto, ovvero la registrazione e distribuzione del contenuto senza modifiche in maniera simile. Marchi I marchi utilizzati in questa guida sono i seguenti. ( Steinberg, Cubase, Cubasis e WaveLab Cast sono marchi registrati di Steinberg Media Technologies GmbH.
Introduzione > Struttura dei manuali Struttura dei manuali I manuali che trattano questo prodotto sono elencati di seguito. Manuali stampati Il manuale incluso con questo prodotto. ( ( Quick Guide Spiega i metodi base per collegare il prodotto a dispositivi esterni, come configurare le impostazioni e illustra nome e funzione di ciascuna parte. Guida alla sicurezza Spiega i punti relativi alla sicurezza di cui tenere conto nell'usare il prodotto.
Introduzione > Caratteristiche del prodotto Caratteristiche del prodotto Il prodotto è un Live streaming mixer per dirette streaming e altri usi tramite collegamento al computer, iPad o smartphone. n Incorpora un compressore, un equalizzatore e un riverbero con tono regolabile Usare l'app dedicata AG Controller per effettuare regolazioni dettagliate al tono. È possibile attivare/ disattivare il compressore, l'equalizzatore e il riverbero direttamente sul prodotto.
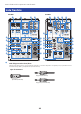
Introduzione > Accessori Accessori Il prodotto include i seguenti accessori.
Nomi e funzioni dei componenti > Pannello posteriore Nomi e funzioni dei componenti Pannello posteriore b a a b a [U] Porta USB 2.0 (USB-C) Connettere qui il computer o l'iPhone/iPad. Nella connessione al computer, quest'ultimo alimenta l'unità. Nella connessione all'iPhone/iPad, collegare un alimentatore USB (venduto separatamente) alla porta USB b [5V DC]. NOTA Per usare il prodotto con computer Windows®, è necessario un driver dedicato. Scaricare e installare il driver dal seguente sito web.
Nomi e funzioni dei componenti > Lato frontale Lato frontale AG06MK2 AG03MK2 c d u w c e d v w x y h f gf l z x i m B n o p q r D y j f A r m C n E p F q k z A C B D G s t t c Jack di ingresso microfono/linea Collegare qui un microfono, uno strumento elettronico o un altro dispositivo. In questa presa, è possibile inserire connettori di tipo XLR o jack (bilanciato/non bilanciato).
Nomi e funzioni dei componenti > Lato frontale d Jack ingresso di linea [K (R)] jack di ingresso ([K] sull'AG03MK2) AG06MK2 Collegare qui una tastiera elettronica, dispositivo audio o altra apparecchiatura con livello di linea. I canali 3/4 usano connettori jack e i canali 5/6 connettori di tipo RCA. Usare il jack del canale 3 [L/MONO] per collegare un dispositivo con uscita mono.
Nomi e funzioni dei componenti > Lato frontale i Interruttore Phantom [+48V CH1-2MIC]/LED [+48V CH1-2MIC] (solo AG06MK2) Con l'interruttore attivato (O), il LED [+48V CH1-2MIC] s'illumina, e viene fornita l'alimentazione phantom CC +48 V al connettore XLR collegati ai jack di ingresso microfono/linea per i canali 1 e 2 c. Attivare questo interruttore quando si usano microfoni a condensatore. AVVISO ( ( ( ( j Disattivare questo interruttore se non è necessaria l'alimentazione phantom.
Nomi e funzioni dei componenti > Lato frontale p Pulsante [REVERB] Accende il riverbero (il LED s'illumina in giallo). Ciò conferisce una riverberazione del suono naturale. q Pulsante [MUTE] Accende il silenziamento (il LED s'illumina in giallo). Utilizzabile per silenziare il suono durante una breve pausa o in situazioni simili durante le dirette streaming. r LED [PEAK] Si illumina quando il suono in ingresso è troppo alto.
Nomi e funzioni dei componenti > Lato frontale z Jack di ingresso microfono [HEADSET] [M] Collegare qui il microfono delle cuffie. Di solito, il connettore è rosa. L'audio in ingresso da questo jack viene trasmesso al canale 1. NOTA Quando si collega il connettore di un microfono al jack d'ingresso microfono [HEADSET], l'audio del dispositivo collegato al canale 1 (jack di ingresso microfono/linea) è silenziato. Jack uscita cuffie [HEADSET] [H] Collegare qui la sezione di ascolto delle cuffie.
Nomi e funzioni dei componenti > Lato frontale D Selettore STREAMING OUT Seleziona l'audio da trasmettere allo smartphone o al computer. AVVERTENZA ( ( Regolare il volume prima di modificare l'impostazione del selettore. Il motivo è che i livelli potrebbero improvvisamente aumentare a seconda del dispositivo collegato, e potrebbero danneggiare l'udito o causare malfunzionamenti dei dispositivi esterni.
Preparazione all'uso del prodotto > Connessione a un iPhone/iPad Preparazione all'uso del prodotto Connessione a un iPhone/iPad Segue la spiegazione di come alimentare l'unità, fino alla connessione a un iPhone/iPad. Per connettere un iPhone/iPad, è necessaria alimentazione esterna.
Preparazione all'uso del prodotto > Connessione a un iPhone/iPad 5 Collegare il prodotto a un adattatore Apple per fotocamere da Lightning a USB 3 tramite il cavo USB incluso. Pannello posteriore Cavo USB (incluso) NOTA Se si usa un iPad dotato di connettore USB-C, usare l'adattatore Apple multiporta da USB-C ad AV digitale. È possibile usare il cavo di carica USB-C incluso con l'iPad per collegarsi direttamente al prodotto.
Preparazione all'uso del prodotto > Connessione a dispositivi Android Connessione a dispositivi Android Segue la spiegazione di come alimentare l'unità, fino alla connessione a un dispositivo Android. Per connettere un dispositivo Android, è necessaria alimentazione esterna.
Preparazione all'uso del prodotto > Connessione a dispositivi Android 4 Collegare il jack ingresso/uscita [P] sul produttore tramite il cavo mini jack stereo da 3,5 mm a quattro conduttori al jack delle cuffie sul dispositivo Android. Dispositivo Android Cavo mini jack stereo da 3,5 mm a 4 conduttori (TRRS) NOTA ( ( Sarà necessario un cavo adattatore se il dispositivo Android non dispone di un jack per collegare mini jack stereo.
Preparazione all'uso del prodotto > Connessione al computer e configurazione delle impostazioni (Windows) Connessione al computer e configurazione delle impostazioni (Windows) Innanzitutto, sarà necessario scaricare e installare "Yamaha Steinberg USB Driver" dal seguente sito web, affinché il computer riconosca il prodotto. AG03MK2: https://www.yamaha.com/2/ag03mk2/ AG06MK2: https://www.yamaha.
Preparazione all'uso del prodotto > Connessione al computer e configurazione delle impostazioni (Windows) 3 Selezionare [Yamaha AG03MK2] o [Yamaha AG06MK2] per “Output” e “Input” sulla schermata “Audio”.
Preparazione all'uso del prodotto > Connessione al computer e configurazione delle impostazioni (Mac) Connessione al computer e configurazione delle impostazioni (Mac) Per connettere il computer al prodotto, è necessario un driver. Il driver standard fornito con macOS è utilizzabile senza modifiche. Non è quindi necessario installare il driver. NOTA Per un elenco dei sistemi operativi compatibili, visitare il seguente sito web Yamaha. AG03MK2: https://www.yamaha.com/2/ag03mk2/ AG06MK2: https://www.yamaha.
Preparazione all'uso del prodotto > Connessione al computer e configurazione delle impostazioni (Mac) 3 Fare clic su nell'angolo inferiore sinistro della schermata e selezionare "Utilizza questo dispositivo per l'uscita audio". 4 Analogamente, selezionare "Utilizza questo dispositivo per l'ingresso audio". Terminati i passaggi 3 e 4, appariranno le icone del microfono e dell'altoparlante nell'angolo inferiore destro di [Yamaha AG03MK2] o [Yamaha AG06MK2]. 5 Chiudere "Configurazione MIDI Audio".
Uso del prodotto per dirette streaming (17LIVE, Twitch, YouTube Live) > Uso con iPhone/iPad Uso del prodotto per dirette streaming (17LIVE, Twitch, YouTube Live) Uso con iPhone/iPad Segue una spiegazione di come usare il prodotto con iPhone/iPad per configurare le impostazioni ed eseguire le operazioni necessarie per lo streaming in diretta della propria voce su 17LIVE, Twitch, YouTube Live o altri servizi simili. (17LIVE, Twitch e YouTube Live sono nomi di app di streaming.
Uso del prodotto per dirette streaming (17LIVE, Twitch, YouTube Live) > Uso con iPhone/iPad 2 Collegare le cuffie o gli auricolari Collegare le cuffie o gli auricolari al jack di uscita.
Uso del prodotto per dirette streaming (17LIVE, Twitch, YouTube Live) > Uso con iPhone/iPad 3 Collegare il microfono Collegare il microfono al jack di ingresso microfono/linea del canale 1. Effettuate le connessioni, configurare le impostazioni per l'unità. 4 Attivare l'interruttore [z] (standby/acceso). Attivare l'interruttore [z] (standby/acceso).
Uso del prodotto per dirette streaming (17LIVE, Twitch, YouTube Live) > Uso con iPhone/iPad 5 Configurare le impostazioni di AG Eseguire le impostazioni per ciascun interruttore sul pannello frontale come segue. Interruttore [LINE]: disattivato Interruttore Phantom [+48V]: attivato (per l'uso con microfoni a condensatore) Manopola [GAIN] canale 1, manopola del livello, fader: a seconda della situazione (v.
Uso del prodotto per dirette streaming (17LIVE, Twitch, YouTube Live) > Uso con iPhone/iPad Regolare il volume per verificare l'audio nella schermata Sound Check. 6 Regolare il volume delle cuffie o degli auricolari Regolare il volume tramite la manopola delle cuffie [H] mentre si parla nel microfono. La regolazione del volume tramite la manopola delle cuffie [H] non influisce sul volume dell'audio della diretta streaming.
Uso del prodotto per dirette streaming (17LIVE, Twitch, YouTube Live) > Uso del prodotto con un dispositivo Android Uso del prodotto con un dispositivo Android Segue una spiegazione di come usare il prodotto con un dispositivo Android per configurare le impostazioni ed eseguire le operazioni necessarie per lo streaming in diretta della propria voce su 17LIVE, Twitch, YouTube Live o altri servizi simili. (17LIVE, Twitch e YouTube Live sono nomi di app di streaming.
Uso del prodotto per dirette streaming (17LIVE, Twitch, YouTube Live) > Uso del prodotto con un dispositivo Android 2 Collegare le cuffie o gli auricolari Collegare le cuffie o gli auricolari al jack di uscita delle cuffie.
Uso del prodotto per dirette streaming (17LIVE, Twitch, YouTube Live) > Uso del prodotto con un dispositivo Android 3 Collegare il microfono Collegare il microfono al jack di ingresso microfono/linea del canale 1. Effettuate le connessioni, configurare le impostazioni per l'unità.
Uso del prodotto per dirette streaming (17LIVE, Twitch, YouTube Live) > Uso del prodotto con un dispositivo Android 4 Configurare le impostazioni di AG Eseguire le impostazioni per ciascun interruttore sul pannello frontale come segue. Interruttore Phantom [+48V]: attivato (per l'uso con microfoni a condensatore) Manopola [GAIN] canale 1: a seconda della situazione (v. illustrazione) [STREAMING OUT]: [INPUT MIX] [MIX MINUS]: spento ( ( ( ( 5 Attivare l'interruttore [z] (standby/acceso).
Uso del prodotto per dirette streaming (17LIVE, Twitch, YouTube Live) > Uso del prodotto con un computer Uso del prodotto con un computer Segue una spiegazione di come usare il prodotto con un PC Windows o un Mac per configurare le impostazioni ed eseguire le operazioni necessarie per lo streaming in diretta della propria voce su 17LIVE, Twitch, YouTube Live o altri servizi simili. (17LIVE, Twitch e YouTube Live sono nomi di app di streaming.
Uso del prodotto per dirette streaming (17LIVE, Twitch, YouTube Live) > Uso del prodotto con un computer 3 Collegare le cuffie o gli auricolari Collegare le cuffie o gli auricolari al jack di uscita delle cuffie. Una volta effettuate tutte le connessioni, si può passare alla configurazione delle impostazioni del prodotto.
Uso del prodotto per dirette streaming (17LIVE, Twitch, YouTube Live) > Uso del prodotto con un computer 4 Configurare le impostazioni di AG Eseguire le impostazioni per ciascun interruttore sul pannello frontale come segue. Interruttore Phantom [+48V]: attivato (per l'uso con microfoni a condensatore) Manopola [GAIN] canale 1, manopola del livello, fader: a seconda della situazione (v.
Uso del prodotto per dirette streaming (17LIVE, Twitch, YouTube Live) > Uso del prodotto con un computer 5 Attivare l'interruttore [z] (standby/acceso). Attivare l'interruttore [z] (standby/acceso). Una volta impostato il prodotto, avviare l'app "AG Controller" e fare clic su "Sound Check" sul lato inferiore dello schermo. Regolare il volume per verificare l'audio nella schermata Sound Check.
Uso del prodotto per dirette streaming (17LIVE, Twitch, YouTube Live) > Uso del prodotto con un computer 3 Per le impostazioni "Audio desktop" in "Dispositivi audio globali", usare "Predefinito" o "Disattivato". Se il selettore [STREAMING OUT] sul prodotto è stato impostato su [DRY CH 1-2] o [INPUT MIX], impostare su “Predefinito”; e se il selettore è impostato su [LOOPBACK], impostare su “Disattivato”.
Uso del prodotto per dirette streaming (17LIVE, Twitch, YouTube Live) > Operazioni durante la diretta streaming Operazioni durante la diretta streaming Segue una spiegazione delle operazioni possibili in una diretta streaming. n Silenziare il microfono Se si abbandona la postazione o si fa una pausa durante la diretta, attivare il pulsante [MUTE] (il LED s'illumina), in modo che il suono del microfono non venga trasmesso.
Uso del prodotto per dirette streaming (17LIVE, Twitch, YouTube Live) > Operazioni durante la diretta streaming Schermata impostazioni riverbero Come accedere [Detail r] → fare clic sulla schermata [Reverb] ( NOTA L'app AG Controller non è disponibile per i dispositivi Android.
Uso del prodotto per dirette streaming (17LIVE, Twitch, YouTube Live) > Connessione dello strumento musicale o lettore musicale Connessione dello strumento musicale o lettore musicale Segue un'illustrazione di come connettere uno strumento musicale o un lettore musicale, e configurare le impostazioni per aggiungere musica di sottofondo o effetti sonori.
Uso del prodotto per dirette streaming (17LIVE, Twitch, YouTube Live) > Connessione dello strumento musicale o lettore musicale Aggiunta di musica di sottofondo ed effetti sonori Per riprodurre musica di sottofondo o effetti sonori, connettere il lettore musicale al jack d'ingresso/uscita smartphone [AUX (P)]. Regolare il volume sul dispositivo connesso. Con l'AG06MK2 in ingresso nei canali 5/6, è possibile regolare il volume tramite la manopola del livello dei canali 5/6.
Uso del prodotto in una conferenza via web > Uso con iPhone/iPad Uso del prodotto in una conferenza via web Uso con iPhone/iPad Segue una spiegazione delle impostazioni e operazioni da eseguire per usare il prodotto con iPhone/iPad per tenere conferenze via web con app come Zoom, Skype, Teams, FaceTime e LINE. (Zoom, Skype, Teams, FaceTime e LINE sono nomi di app.) Quando si usa iPhone/iPad per Skype, FaceTime e LINE, non si sentirà l'audio dal prodotto anche se connesso via cavo USB.
Uso del prodotto in una conferenza via web > Uso con iPhone/iPad 3 Connettere l'adattatore da Lightning o USB-C a jack per cuffie da 3,5 mm al jack d'ingresso/uscita smartphone [P] del prodotto con un cavo mini jack stereo da 3,5 mm a 4 conduttori (TRRS).
Uso del prodotto in una conferenza via web > Uso con iPhone/iPad 4 Collegare le cuffie o gli auricolari Collegare le cuffie o gli auricolari al jack di uscita delle cuffie.
Uso del prodotto in una conferenza via web > Uso con iPhone/iPad 5 Collegare il microfono Collegare il microfono al jack di ingresso microfono/linea del canale 1. Effettuate le connessioni, configurare le impostazioni per l'unità. 6 Attivare l'interruttore [z] (standby/acceso). Attivare l'interruttore [z] (standby/acceso).
Uso del prodotto in una conferenza via web > Uso con iPhone/iPad 7 Configurare le impostazioni di AG Eseguire le impostazioni per ciascun interruttore sul pannello frontale come segue. Interruttore [LINE]: disattivato Interruttore Phantom [+48V]: attivato (per l'uso con microfoni a condensatore) Manopola [GAIN] canale 1, manopola del livello, fader: a seconda della situazione (v.
Uso del prodotto in una conferenza via web > Uso con iPhone/iPad NOTA Se non si sente alcun suono, consultare “Problemi di audio e altri problemi” (pag. 64).
Uso del prodotto in una conferenza via web > Uso del prodotto con un dispositivo Android Uso del prodotto con un dispositivo Android Segue una spiegazione delle impostazioni e operazioni da eseguire per usare il prodotto con un dispositivo Android per tenere conferenze web con app come Zoom, Skype, Teams, FaceTime e LINE. (Zoom, Skype, Teams, FaceTime e LINE sono nomi di app.) NOTA Quando si usa un dispositivo Android, non è possibile trasmettere in ingresso l'audio dal prodotto via USB.
Uso del prodotto in una conferenza via web > Uso del prodotto con un dispositivo Android 2 Collegare le cuffie o gli auricolari Collegare le cuffie o gli auricolari al jack di uscita delle cuffie.
Uso del prodotto in una conferenza via web > Uso del prodotto con un dispositivo Android 3 Collegare il microfono Collegare il microfono al jack di ingresso microfono/linea del canale 1. Effettuate le connessioni, configurare le impostazioni per l'unità.
Uso del prodotto in una conferenza via web > Uso del prodotto con un dispositivo Android 4 Configurare le impostazioni di AG Eseguire le impostazioni per ciascun interruttore sul pannello frontale come segue. Interruttore Phantom [+48V]: attivato (per l'uso con microfoni a condensatore) Manopola [GAIN] canale 1: a seconda della situazione (v. illustrazione) [STREAMING OUT]: [INPUT MIX] [MIX MINUS]: spento ( ( ( ( 5 Attivare l'interruttore [z] (standby/acceso).
Uso del prodotto in una conferenza via web > Uso del prodotto con un dispositivo Android NOTA Se non si sente alcun suono, consultare “Problemi di audio e altri problemi” (pag. 64).
Uso del prodotto in una conferenza via web > Uso del prodotto con un computer Uso del prodotto con un computer Segue una spiegazione delle impostazioni e operazioni da eseguire per usare il prodotto con PC Windows e Mac per tenere conferenze web con app come Zoom, Skype, Teams, FaceTime e LINE. (Zoom, Skype, Teams, FaceTime e LINE sono nomi di app.
Uso del prodotto in una conferenza via web > Uso del prodotto con un computer 3 Collegare le cuffie o gli auricolari Collegare le cuffie o gli auricolari al jack di uscita delle cuffie.
Uso del prodotto in una conferenza via web > Uso del prodotto con un computer 4 Collegare il microfono Collegare il microfono al jack di ingresso microfono/linea del canale 1. Effettuate le connessioni, configurare le impostazioni per l'unità.
Uso del prodotto in una conferenza via web > Uso del prodotto con un computer 5 Configurare le impostazioni di AG Eseguire le impostazioni per ciascun interruttore sul pannello frontale come segue. Interruttore Phantom [+48V]: attivato (per l'uso con microfoni a condensatore) Manopola [GAIN] canale 1, manopola del livello, fader: a seconda della situazione (v.
Uso del prodotto in una conferenza via web > Uso del prodotto con un computer Operazioni durante la conversazione ( Silenziamento della propria voce Per interrompere la conversazione, attivare il pulsante [MUTE] (il LED s'illumina). NOTA Se non si sente alcun suono, consultare “Problemi di audio e altri problemi” (pag. 64).
Uso del prodotto per un podcast > Uso di WaveLab Cast Uso del prodotto per un podcast Uso di WaveLab Cast WaveLab Cast è un'app per Windows e Mac, ideale per produrre podcast audio/video. L'app consente in maniera facile di registrare, modificare e trasmettere contenuti. Configurazione WaveLab Cast: Consultare la seguente pagina, per scaricare l'app e attivare la licenza. https://www.steinberg.net/getwavelabcast NOTA Per scaricare l'app, è necessario un codice d'accesso.
Uso del prodotto per la registrazione > Uso di Rec'n'Share con iPhone/iPad Uso del prodotto per la registrazione Uso di Rec'n'Share con iPhone/iPad Usare l'app Rec'n'Share insieme al prodotto per registrare, modificare audio ecc. L'app Rec'n'Share semplifica la riproduzione e la registrazione dei brani preferiti o la registrazione e il montaggio video delle proprie esibizioni, nonché il caricamento dei contenuti. Per maggiori dettagli su Rec'n'Share, visitare il seguente sito web. https://www.yamaha.
Uso del prodotto per la registrazione > Uso di Cubase AI con un computer Uso di Cubase AI con un computer Usare l'app Cubase AI insieme al prodotto per registrare, modificare audio ecc. Cubase AI è un software DAW per la produzione musicale che consente di registrare, riprodurre e modificare audio con il computer. Configurazione Cubase AI: Consultare la seguente pagina, per scaricare l'app e attivare la licenza. https://www.steinberg.
Uso del prodotto nella produzione musicale > Uso di Cubasis LE con iPhone/iPad Uso del prodotto nella produzione musicale Uso di Cubasis LE con iPhone/iPad Usare l'app Cubasis LE insieme al prodotto per registrare e modificare audio. Cubasis LE è una versione base della DAW mobile Cubasis. Come Cubasis, si tratta di un'app per la produzione musicale che consente di registrare, riprodurre e modificare audio da iPhone/iPad. Per usare l'app, cercare e scaricare "Cubasis LE" dall'App Store.
Uso del prodotto nella produzione musicale > Uso di Cubase AI con un computer Uso di Cubase AI con un computer Usare l'app Cubase AI insieme al prodotto per registrare, modificare audio ecc. Cubase AI è un software DAW per la produzione musicale che consente di registrare, riprodurre e modificare audio con il computer. Configurazione Cubase AI: Consultare la seguente pagina, per scaricare l'app e attivare la licenza. https://www.steinberg.
Risoluzione dei problemi > Problemi energetici Risoluzione dei problemi Problemi energetici Il LED di alimentazione non si illumina ( L'alimentazione del prodotto è accesa? Il LED non si illumina se il prodotto non è acceso. Quando si usa iPhone, iPad o dispositivo Android: È necessario un alimentatore esterno come un alimentatore USB o un powerbank USB. Sarà necessario un alimentatore USB o un powerbank USB in grado di fornire almeno 5 V e 1 A d'energia.
Risoluzione dei problemi > Problemi di audio e altri problemi Problemi di audio e altri problemi Il PC Windows non riconosce il prodotto ( Il driver è stato installato? ( È necessario installare il Yamaha Steinberg USB Driver per connettere il prodotto a un PC Windows. Visitare il seguente sito web e seguire le istruzioni su come installare il Yamaha Steinberg USB Driver. AG03MK2: https://www.yamaha.com/2/ag03mk2/ AG06MK2: https://www.yamaha.
Risoluzione dei problemi > Problemi di audio e altri problemi ( Il selettore [STREAMING OUT] D è impostato su [LOOPBACK]? ( Se si usa un software DAW e l'impostazione [LOOPBACK, potrebbe verificarsi un loop a seconda delle impostazioni della DAW, con risultante ritorno. Per registrare mentre si ascolta l'audio dal computer, assicurarsi di non usare l'impostazione [LOOPBACK]. Maggior chiarezza per la voce ( Impostare il pulsante [COMP/EQ] n su ON (il pulsante s'illumina in giallo).
Appendice > Specifiche tecniche generali Appendice Specifiche tecniche generali AG06MK2 0 dBu = 0,775 Vrms, impedenza d'uscita del generatore di segnale (Rs) = 150 Ω Se non altrimenti specificato, tutti i controlli di livello sono nominali.
Appendice > Specifiche tecniche generali ( ( ( ( ( ( ( ( ( Tensione alimentazione phantom +48 V FOOT SW REVERB ON/OFF o MUTE (CH 1) ON/OFF Requisiti di alimentazione CC 5 V, 900 mA Consumo energetico Max. 4,5 W Dimensioni (L × A × P) 152 mm × 63 mm × 201 mm Peso netto 0,9 kg Accessori in dotazione Cavo USB 2.
Appendice > Specifiche tecniche generali ( Funzione canale in ingresso (CH1, CH2G) PAD 26 dB DSP CH1: COMP/EQ, REVERB, MUTE CH2G *4: COMP/EQ, AMP SIM, REVERB PEAK LED Il LED si accende quando il segnale raggiunge 3 dB sotto al livello di saturazione. ( ( ( ( Misuratore di livello Livello USB OUTPUT Misuratore LED a 2 x 2 punti [PEAK, SIG] ( ( Audio USB 2 INGRESSI/2 USCITE Conforme USB Audio Class 2.
Appendice > Caratteristiche ingresso/uscita Caratteristiche ingresso/uscita Caratteristiche ingresso analogico (AG06MK2) 0 dBu = 0,775 Vrms Jack d'ingresso PAD 26 dB GAIN Trim/ Impedenza SW di carico Position effettiva Per l'uso con nominale −60 dBu (0,775 mV) −50 dBu (2,451 mV) 0 −26 dBu (38,84 mV) −14 dBu (154,6 mV) −4 dBu (489,0 mV) −46 dBu (3,884 mV) −34 dBu (15,46 mV) −24 dBu (48,90 mV) 0 0 dBu (775,0 mV) +12 dBu (3,085 V) +22 dBu (9,757 V) 10 −68 dBu (3,085 mV) −56 dBu (1,228 mV)
Appendice > Caratteristiche ingresso/uscita Caratteristiche uscita analogica (AG06MK2) 0 dBu = 0,775 Vrms Terminali d'uscita Impedenza fonte effettiva Per l'uso con nominale STEREO OUT [L, R] 150 Ω MONITOR OUT [L, R] Livello d'uscita Connettore Nominale Max.
Appendice > Caratteristiche ingresso/uscita LINE 2/3 - LOW 10 kΩ Linee 600 Ω −10 dBu (245,1 mV) +2 dBu (975,7 mV) +12 dBu (3,085 V) Jack *3 (non bilanciato) AUX INPUT - - 10 kΩ Linee 600 Ω −14 dBu (154,6 mV) −8 dBu (308,5 mV) +2 dBu (975,7 mV) Jack da 3,5 mm *5 (CTIA) *1 La sensibilità è il livello più basso che produce un'uscita di +0 dBu (0,775 V) o il livello nominale d'uscita quando il guadagno è impostato al massimo sull'unità.
Appendice > Dimensioni Dimensioni 152 AG06MK2 2,3 63 28 201 201 (Unità: mm) 72
Appendice > Dimensioni 126 AG03MK2 2,3 63 28 201 201 (Unità: mm) 73
Appendice > Diagramma a blocchi e di livello Diagramma a blocchi e di livello Per il blocco AG06MK2 AG03MK2 e i diagrammi di livello, visitare il sito web Yamaha. https://www.yamaha.com/2/ag03mk2/ https://www.yamaha.
Layout Folder: YMH_PDF_Manual_A5_PA Stylesheet Name: 01_YMH_PDF_Manual_A5_PA_En-Multi Stylesheet Version: 2022.04.13 Yamaha Pro Audio global website https://www.yamahaproaudio.com/ Yamaha Downloads https://download.yamaha.