LIVE STREAMING MIXER 사용설명서 KO
목차 목차 소개 4 본 설명서의 정보.. ..................................................................................... 4 설명서 구성 방법.. ..................................................................................... 6 제품 특징................................................................................................. 7 액세서리.. ............................................................................................... 8 각부 명칭 및 기능 9 후면 패널...................................................................
목차 이 제품을 팟캐스트에 사용하기 56 WaveLab Cast 사용.. ............................................................................. 56 이 제품을 녹음에 사용하기 57 iPhone/iPad에서 Rec'n'Share 사용하기.. ................................................. 57 컴퓨터에서 Cubase AI 사용하기.. ............................................................... 58 음악 제작에 이 제품 사용하기 59 iPhone/iPad에서 Cubasis LE 사용하기...................................................... 59 컴퓨터에서 Cubase AI 사용하기.. .........................................................
소개 > 본 설명서의 정보 소개 본 설명서의 정보 본 설명서의 내용에 관한 주의사항 본 사용자 설명서는 사용자를 위해 이 제품을 연결하고 작동하는 방법에 대해 설명합니다. 안전 주의사항 및 기타 사항은 다음과 같이 분류됩니다. 경고 ( 이 내용은 "중상 또는 사망 위험"을 나타냅니다. 주의 ( 이 내용은 "상해 위험"을 나타냅니다. ( ( 주의사항 제품 고장, 손상 또는 오작동 및 데이터 손실 방지뿐만 아니라 환경을 보호하기 위해 준수해야 할 사항을 나타 냅니다. 주 지침, 기능 제한 및 도움이 될 수 있는 추가 정보에 대한 참고 사항을 나타냅니다. ( 본 설명서에 표시된 모든 그림과 화면은 설명을 위한 것입니다. ( 이 문서에 있는 모든 회사 이름, 제품 이름 또는 관련 이름은 해당 소유자의 등록 상표 또는 상표입니다. ( 소프트웨어는 사전 통지 없이 수정 및 업데이트될 수 있습니다.
소개 > 본 설명서의 정보 *1: "콘텐츠"라는 단어에는 컴퓨터 프로그램, 오디오 데이터, 반주 스타일 데이터, MIDI 데이터, 파형 데이터, 음성 녹음 데이터, 악보 및 악보 데이터 등이 포함됩니다. *2: "전재 또는 전용"이라는 표현에는 본 제품에 포함된 컨텐츠 자체를 발췌하거나 이와 유사한 방식으로 변경 없이 녹음 및 배포하는 행위가 포함됩니다. 상표 본 설명서에 사용된 상표는 다음과 같습니다. ( ( ( ( Steinberg, Cubase, Cubasis, WaveLab Cast는 Steinberg Media Technologies GmbH의 등록 상표입 니다. Windows, Teams, Skype는 미국 및 기타 국가에서 Microsoft Corporation의 등록 상표입니다. Apple, Mac, iPad, iPhone, App Store, Lightning, FaceTime은 미국 및 기타 국가에 등록된 Apple Inc. 의 상표입니다.
소개 > 설명서 구성 방법 설명서 구성 방법 본 제품을 다루는 설명서는 다음과 같습니다. 인쇄된 설명서 이 제품에 포함된 설명서입니다. ( ( Quick Guide 이 제품을 외부기기와 연결하는 기본적인 방법과 설정 방법, 각 부분의 명칭과 기능에 대해 설명합니다. 안전 가이드 이 제품을 사용할 때 주의해야 할 안전 관련 사항을 설명합니다. 온라인 설명서 ( 사용자 설명서(본 설명서) 각 부분의 명칭과 기능, 다양한 장치와 연결하는 방법, 사운드를 만들기 위한 설정 방법을 설명합니다. 이것은 또한 다양한 상황에서 이 제품을 사용하는 방법을 설명합니다. 주 Yamaha 웹사이트에서 본 설명서를 다운로드할 수 있습니다. 최신 설명서 데이터는 Yamaha 웹사이트에서 항상 사용할 수 있으므로 필요 에 따라 이 리소스를 활용하십시오. https://download.yamaha.
소개 > 제품 특징 제품 특징 이것은 컴퓨터, iPad, 스마트폰과 연결하여 라이브 스트리밍 및 기타 용도로 사용하는 Live streaming mixer입 니다. n 내장형 컴프레서, 이퀄라이저, 조절 가능한 음색 특성이 있는 리버브가 특징입니다. 전용 "AG Controller"를 사용하여 음색 특성을 세부적으로 조절합니다. 제품 자체에서 컴프레서, 이퀄라이저, 리버브를 켜고 끌 수 있습니다. n 라이브 스트리밍에 유용한 루프백 기능 이 기능을 사용하면 이 제품에 입력된 오디오를 컴퓨터, iPad, 스마트폰의 오디오와 믹스하여 컴퓨터, iPad, 스마 트폰으로 다시 보낼 수 있습니다. n 팟캐스팅에 유용한 "WaveLab Cast" 번들 제공 이 제품에는 "WaveLab Cast" 라이선스가 포함되어 있습니다. 이 소프트웨어를 팟캐스팅이나 비디오 콘텐츠의 오디오 편집에 사용할 수 있습니다.
소개 > 액세서리 액세서리 본 제품에는 다음과 같은 액세서리가 포함되어 있습니다. ( USB 케이블(USB-C - USB-A), 1.
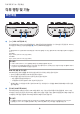
각부 명칭 및 기능 > 후면 패널 각부 명칭 및 기능 후면 패널 b a a b a [U] USB 2.0 잭(USB-C) 여기에 컴퓨터 또는 iPhone/iPad를 연결합니다. 컴퓨터를 연결하면 컴퓨터에서 이 기기로 전원이 공급됩니다. iPhone/ iPad 연결 시 USB 전원 어댑터(별매품)를 b [5V DC] USB 포트에 연결합니다. 주 이 제품을 Windows® 컴퓨터에서 사용하려면 전용 드라이버가 필요합니다. 다음 웹사이트에서 드라이버를 다운로드하여 설치합 니다. AG03MK2 : https://www.yamaha.com/2/ag03mk2/ AG06MK2 : https://www.yamaha.com/2/ag06mk2/ 주의사항 USB 2.0 포트에 iPhone, iPad, 컴퓨터를 제외한 다른 장치를 연결하지 마십시오. 버스 전원으로 이 제품을 작동하려면 5V, 1A의 전원 공급이 필요합니다.
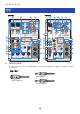
각부 명칭 및 기능 > 전면 전면 AG06MK2 AG03MK2 c d u w c e d v w x y h f gf l z x i m B n o p q r D y j A r m C n E p F q G s t f k z A C B D E F G t c 마이크/라인 입력 잭 여기에 마이크, 전자 악기 또는 기타 장치를 연결합니다. XLR 타입 또는 폰(밸런스드/언밸런스드) 플러그를 이 잭에 삽입 할 수 있습니다.
각부 명칭 및 기능 > 전면 d 라인 [K (R)] 입력 잭(AG03MK2의 [K] 입력 잭) AG06MK2 여기에 전자 키보드, 오디오 장치 또는 기타 라인 레벨 장비를 연결합니다. 채널 3/4는 폰 플러그를 사용하고 채널 5/6은 RCA 핀 타입 플러그를 사용합니다. 채널 3 [L/MONO] 잭을 사용하여 모노 출력이 있는 장치를 연결합니다. 이렇게 하면 [L/MONO] 잭의 오디오 입력이 믹서 출력의 L 및 R 채널 모두로 출력됩니다. AG03MK2 여기에 전자 키보드, 오디오 장치 또는 기타 라인 레벨 장비를 연결합니다. 채널 2 [L/MONO] 잭을 사용하여 모노 출력이 있는 장치를 연결합니다. 이렇게 하면 [L/MONO] 잭의 오디오 입력이 믹서 출력의 L 및 R 채널 모두로 출력됩니다. [GUITAR/LINE] 선택 스위치가 GUITAR (O)로 설정된 경우에는 작동하지 않습니다.
각부 명칭 및 기능 > 전면 i 팬텀 [+48V CH1-2MIC] 스위치/[+48V CH1-2MIC] LED (AG06MK2만 해당) 이 스위치를 켜면(O) [+48V CH1-2MIC] LED가 켜지고 채널 1 및 2 c의 마이크/라인 입력 잭에 연결된 XLR 플러그에 DC +48V 팬텀 전원이 공급됩니다. 콘덴서 마이크를 사용할 때 이 스위치를 켜십시오. 주의사항 ( ( ( ( j 팬텀 전원이 필요하지 않으면 스위치를 끄십시오. 본 제품 또는 외부 장치의 오작동 및 노이즈 방지를 위해 팬텀 전원을 지원하지 않는 장치를 채널 1, 2에 연결하기 전에 이 스 위치를 끄십시오. 본 제품 또는 외부 장치의 오동작 및 노이즈 방지를 위해 스위치가 아직 켜져 있는 상태에서 채널 1, 2에 케이블을 뽑거나 꽂 지 마십시오. 본 제품 또는 외부 장치의 오작동 및 노이즈 방지를 위해 채널 1/2 레벨 노브가 최소(0)로 설정되어 있을 때만 팬텀 전원을 켜 거나 끄십시오.
각부 명칭 및 기능 > 전면 p [REVERB] 버튼 리버브를 켭니다(LED가 노란색으로 켜짐). 이것은 자연스러운 소리의 잔향을 제공합니다. q [MUTE] 버튼 음소거를 켭니다(LED가 빨간색으로 켜짐). 라이브 스트리밍 중 짧은 휴식을 취하거나 유사한 상황에서 사운드를 무음으 로 설정하는 데 사용할 수 있습니다. r [PEAK] LED 입력 사운드가 너무 클 때 켜집니다. 이것이 켜지면 [GAIN] 노브 m을 반시계 방향으로 돌려 볼륨을 낮춥니다. s 페이더(AG03MK2만 해당) (M) 채널 1에 연결된 마이크 또는 기타 소스에서 입력되는 사운드의 출력 볼륨을 조절합니다. t 레벨 노브 두 채널 간의 볼륨 밸런스를 조절합니다. AG06MK2 (M) 채널 1에 연결된 마이크 또는 기타 소스에서 입력되는 사운드의 출력 볼륨을 조절합니다. (G/M) 채널 2에 연결된 기타, 마이크 또는 기타 소스에서 입력되는 사운드의 출력 볼륨을 조절합니다.
각부 명칭 및 기능 > 전면 z [HEADSET] 마이크 [M] 입력 잭 여기에 헤드셋 마이크를 연결합니다. 일반적으로 플러그는 분홍색입니다. 이 잭의 오디오 입력은 채널 1로 전송됩니다. 주 마이크 플러그를 [HEADSET] 마이크 입력 잭에 연결하면 채널 1(마이크/라인 입력 잭)에 연결된 장치의 오디오가 음소거됩니다. [HEADSET] 헤드폰 [H] 출력 잭 여기에 헤드셋의 헤드폰을 연결합니다. 일반적으로 플러그는 옅은 녹색입니다. 출력되는 오디오는 헤드폰 [H] 출력 잭 y의 오디오와 동일합니다. 주 헤드폰 플러그를 [HEADSET] 헤드폰 출력 잭에 연결하면 헤드폰 출력 잭으로 전송되는 오디오가 음소거됩니다. A [z] (대기/켜짐) 스위치 전원 대기(N)와 켜기(O) 사이를 전환합니다. 주의사항 ( B 이 스위치를 대기와 켜기 사이에서 빠르게 전환하면 제품이 오작동할 수 있습니다. 스위치를 대기로 전환한 후 스위치를 다시 켜기 전에 최소 6초 동안 기다려야 합니다.
각부 명칭 및 기능 > 전면 D STREAMING OUT 선택 스위치 스마트폰이나 컴퓨터로 보낼 오디오를 선택합니다. 경고 ( ( 선택 스위치의 설정을 변경하기 전에 볼륨을 조절합니다. 연결된 장치에 따라 볼륨이 갑자기 커져 청력이 손상되거나 외부 장치의 오동작이 발생할 수 있기 때문입니다. [DRY CH 1-2G] (AG03MK2) [DRY CH 1-2] (AG06MK2): 마이크/라인 입력 잭, 라인 [K] 입력 잭 및 기타 [G] 입력 잭의 오디오 입력을 별도의 오디오 신호로 스마트폰이나 컴 퓨터로 직접 보냅니다. 주의사항 ( [DRY CH 1-2](또는 AG03MK2의 [DRY CH 1-2G])를 설정하면 [MUTE] 버튼이 켜져 있어도 스마트폰이나 컴퓨터로 전송되 는 오디오 신호가 음소거되지 않습니다. 음성 채팅 또는 이와 유사한 콘텐츠를 음소거할 때 음성이 실수로 상대방에게 전송되 지 않도록 채팅 측의 음소거 기능을 사용하십시오.
이 제품을 사용하기 위한 준비 > iPhone/iPad에 연결 이 제품을 사용하기 위한 준비 iPhone/iPad에 연결 이것은 iPhone/iPad에 연결하여 이 기기에 전원을 공급하기 위해 수행할 작업을 설명합니다. iPhone/iPad에 연결하려면 외부 전원공급장치가 필요합니다. 준비물 ( USB 전원 어댑터 또는 USB 모바일 배터리(최소 5V, 1A) ( Apple Lightning-USB3 카메라 어댑터(Lightning 커넥터가 있는 iPhone/iPad 사용 시) iPad에 포함된 USB-C 충전 케이블 또는 시중에서 판매되는 USB-C - USB-C 케이블(USB-C 커넥터가 있는 iPad 사용 시) ( 주 ( ( 이 제품을 스트리밍용으로 사용하거나 장기간 사용하는 경우 iPhone/iPad에 전원을 공급할 전원공급장치를 준비합니다. 호환되는 운영체제 목록은 다음 Yamaha 웹사이트를 참조하십시오. AG03MK2: https://www.yamaha.
이 제품을 사용하기 위한 준비 > iPhone/iPad에 연결 5 포함된 USB 케이블을 사용하여 이 제품을 Apple Lightning-USB 3 카메라 어댑터에 연결 합니다. 후면 패널 USB 케이블 (포함) 주 USB-C 커넥터가 있는 iPad를 사용 중인 경우 Apple USB-C Digital AV Multiport 어댑터를 사용합니다. iPad에 포함된 USBC 충전 케이블을 사용하여 이 제품에 직접 연결할 수도 있습니다. 그러나 iPad를 사용할 수 있는 시간은 배터리 잔량에 따라 제한 됩니다. 6 Apple Lightning 케이블을 iPhone/iPad에 연결합니다. iPhone/iPad 이 제품은 iPhone/iPad가 연결되면 자동으로 인식됩니다. iPhone/iPad에서 설정을 구성할 필요가 없습니다.
이 제품을 사용하기 위한 준비 > Android 장치에 연결 Android 장치에 연결 이것은 Android 장치에 연결하여 이 기기에 전원을 공급하기 위해 수행할 작업을 설명합니다. Android 장치에 연결하려면 외부 전원공급장치가 필요합니다. 준비물 ( USB 전원 어댑터 또는 USB 모바일 배터리(최소 5 V, 1 A) ( USB 케이블(시판, 전원 공급용) ( 3.5 mm 4접점 스테레오 미니 케이블 주 ( 이 제품은 USB 케이블을 통해 오디오를 입력/출력할 수 없습니다. ( Android 장치로 전송되는 오디오 신호는 모노입니다. ( 이 제품을 스트리밍용으로 사용하거나 장기간 사용하는 경우 Android 장치에 전원을 공급할 전원공급장치를 준비합니다. 연결 1 2 이 제품과 연결된 장치의 볼륨이 완전히 꺼져 있는지 확인합니다.
이 제품을 사용하기 위한 준비 > Android 장치에 연결 4 3.5 mm 4접점 스테레오 미니 케이블을 사용하여 이 제품의 스마트폰 [P] 입력/출력 잭을 Android 장치의 헤드셋 잭에 연결합니다. Android 장치 4접점(TRRS), 3.5 mm 스테레오 미니 케이블 주 ( ( Android 장치에 스테레오 미니 플러그 연결용 잭이 없는 경우 변환 어댑터 케이블이 필요합니다. 예를 들어 USB-C 포트를 사용하여 오디오를 입력/출력하는 Android 기기의 경우 USB-C - 3.5 mm 4접점(TRRS) 이어폰 잭 변환 어댑터 케이블이 필 요합니다. 2접점 또는 3접점(TS/TRS) 케이블이 아닌 4접점(TRRS) 스테레오 미니 케이블을 사용합니다.
이 제품을 사용하기 위한 준비 > 컴퓨터에 연결 및 설정 구성(Windows) 컴퓨터에 연결 및 설정 구성(Windows) 먼저 컴퓨터에서 이 제품을 인식할 수 있도록 다음 웹사이트에서 "Yamaha Steinberg USB Driver"를 다운로 드하여 설치해야 합니다. AG03MK2: https://www.yamaha.com/2/ag03mk2/ AG06MK2: https://www.yamaha.com/2/ag06mk2/ 주 ( 설치 단계는 다운로드한 압축 폴더에 있는 설치설명서를 참조하십시오. ( 호환되는 운영체제 목록은 위에 나열된 Yamaha 웹사이트를 참조하십시오. 연결 1 2 3 마우스와 키보드를 제외한 모든 USB 장치를 컴퓨터에서 제거합니다. 이 제품과 연결된 장치의 볼륨이 완전히 꺼져 있는지 확인합니다. 드라이버를 설치한 후 포함된 USB 케이블을 사용하여 이 제품을 컴퓨터에 연결합니다. USB 허브를 사용하지 않고 장치를 바로 연결합니다.
이 제품을 사용하기 위한 준비 > 컴퓨터에 연결 및 설정 구성(Mac) 컴퓨터에 연결 및 설정 구성(Mac) 컴퓨터를 이 제품에 연결하려면 드라이버가 필요합니다. macOS와 함께 제공되는 표준 드라이버는 그대로 사용할 수 있으므로 드라이버를 설치할 필요가 없습니다. 주 호환되는 운영체제 목록은 다음 Yamaha 웹사이트를 참조하십시오. AG03MK2: https://www.yamaha.com/2/ag03mk2/ AG06MK2: https://www.yamaha.com/2/ag06mk2/ 연결 1 2 3 마우스와 키보드를 제외한 모든 USB 장치를 컴퓨터에서 제거합니다. 이 제품과 연결된 장치의 볼륨이 완전히 꺼져 있는지 확인합니다. Mac과 함께 제공된 USB 케이블 또는 USB-C 충전 케이블을 사용하여 이 제품을 컴퓨터에 연결합니다. USB 허브를 사용하지 않고 장치를 바로 연결합니다.
이 제품을 사용하기 위한 준비 > 컴퓨터에 연결 및 설정 구성(Mac) 4 마찬가지로 "이 기기를 사운드 입력에 사용"을 선택합니다. 3단계와 4단계를 완료하면 [Yamaha AG03MK2] 또는 [Yamaha AG06MK2] 오른쪽 하단에 마 이크 및 스피커 아이콘이 나타납니다. 5 "오디오 MIDI 설정"을 종료합니다.
이 제품을 라이브 스트리밍에 사용(17LIVE, Twitch, YouTube Live) > iPhone/iPad와 함께 사용하기 이 제품을 라이브 스트리밍에 사용(17LIVE, Twitch, YouTube Live) iPhone/iPad와 함께 사용하기 iPhone/iPad와 함께 이 제품을 사용하여 설정을 구성하고 음성 또는 노래를 17LIVE, Twitch, YouTube Live 또는 기타 유사한 서비스로 라이브 스트리밍하는 데 필요한 작업을 수행하는 방법을 설명합니다. (17LIVE, Twitch, YouTube Live는 스트리밍 앱의 이름입니다.) 이러한 음성 채팅 앱에 iPhone/iPad를 사용하는 경우 USB 케이블로 연결하더라도 이 제품의 사운드가 들리지 않습니다. 3.5mm 4접점(TRRS) 스테레오 미니 케이블 을 사용하여 연결해야 합니다.
이 제품을 라이브 스트리밍에 사용(17LIVE, Twitch, YouTube Live) > iPhone/iPad와 함께 사용하기 2 헤드폰 또는 이어폰 연결 헤드폰이나 이어폰을 출력 잭에 연결합니다.
이 제품을 라이브 스트리밍에 사용(17LIVE, Twitch, YouTube Live) > iPhone/iPad와 함께 사용하기 3 마이크 연결 마이크를 채널1 마이크/라인 입력 잭에 연결합니다. 연결을 완료했으므로 이제 이 기기에 대한 설정을 구성합니다. 4 [z](대기/켜기) 스위치를 켭니다. [z](대기/켜기) 스위치를 켭니다.
이 제품을 라이브 스트리밍에 사용(17LIVE, Twitch, YouTube Live) > iPhone/iPad와 함께 사용하기 5 AG에 대한 설정 구성 전면의 각 스위치에 대해 다음과 같이 설정합니다. [LINE] 스위치: 꺼짐 팬텀 [+48V] 스위치: 켜짐(콘덴서 마이크 사용 시) 채널1 [GAIN] 노브, 레벨 노브, 페이더: 적절히(그림 참조) [STREAMING OUT]: [INPUT MIX] [MIX MINUS]: 꺼짐 ( ( ( ( ( 이 제품에 대한 설정이 완료되면 "AG Controller" 앱을 실행하고 화면 하단의 "Sound Check"를 클릭합니다.
이 제품을 라이브 스트리밍에 사용(17LIVE, Twitch, YouTube Live) > iPhone/iPad와 함께 사용하기 볼륨을 조절하여 "Sound Check" 화면에서 소리를 확인합니다. 6 헤드폰/이어폰 볼륨 조절 마이크에 대고 말하는 동안 헤드폰 [H] 노브를 사용하여 볼륨을 조절합니다. 헤드폰 [H] 노브를 사용하여 볼륨을 조절해도 라이브 스트리밍 오디오에는 영향을 미치지 않습니다. 7 라이브 스트리밍 시작 페이더(AG03MK2에만 해당) 또는 레벨 노브를 사용하여 해당 볼륨을 조절합니다. 라이브 스트리밍 앱을 실행하고 청취자용 밸런스를 확인합니다. 주 소리가 들리지 않으면 “오디오 관련 및 기타 문제” (p.62)를 참조하십시오.
이 제품을 라이브 스트리밍에 사용(17LIVE, Twitch, YouTube Live) > Android 장치에서 이 제품 사용하기 Android 장치에서 이 제품 사용하기 Android 장치와 함께 이 제품을 사용하여 설정을 구성하고 음성 또는 노래를 17LIVE, Twitch, YouTube Live 또는 기타 유사한 서비스로 라이브 스트리밍하는 데 필요한 작업을 수행하는 방법을 설명합니다. (17LIVE, Twitch, YouTube Live는 스트리밍 앱의 이름입니다.) 준비물 ( 이 제품 ( Android 장치 ( 스테레오 미니 플러그 케이블이 있는 헤드폰 또는 이어폰 ( 3.5 mm 4접점 스테레오 미니 케이블 ( USB 전원 어댑터 ( USB 케이블(시판, 전원 공급용) 수행 단계 1 Android 장치에 연결 "이 제품 사용 준비하기" → "Android 장치에 연결하기"를 참조하여 필요한 연결을 합니다. “Android 장치에 연결” (p.
이 제품을 라이브 스트리밍에 사용(17LIVE, Twitch, YouTube Live) > Android 장치에서 이 제품 사용하기 2 헤드폰 또는 이어폰 연결 헤드폰 또는 이어폰을 헤드폰 출력 잭에 연결합니다.
이 제품을 라이브 스트리밍에 사용(17LIVE, Twitch, YouTube Live) > Android 장치에서 이 제품 사용하기 3 마이크 연결 마이크를 채널1 마이크/라인 입력 잭에 연결합니다. 연결을 완료했으므로 이제 이 기기에 대한 설정을 구성합니다.
이 제품을 라이브 스트리밍에 사용(17LIVE, Twitch, YouTube Live) > Android 장치에서 이 제품 사용하기 4 AG에 대한 설정 구성 전면의 각 스위치에 대해 다음과 같이 설정합니다. 팬텀 [+48V] 스위치: 켜짐(콘덴서 마이크 사용 시) 채널1 [GAIN] 노브: 적절히(그림 참조) [STREAMING OUT]: [INPUT MIX] [MIX MINUS]: 꺼짐 ( ( ( ( 5 [z](대기/켜기) 스위치를 켭니다. [z](대기/켜기) 스위치를 켭니다. 6 헤드폰 볼륨 조절 마이크에 대고 말하는 동안 헤드폰 [H] 노브를 사용하여 볼륨을 조절합니다. 헤드폰 [H] 노브를 사용하여 볼륨을 조절해도 라이브 스트리밍 오디오에는 영향을 미치지 않습니다. 7 라이브 스트리밍 시작 페이더(AG03MK2에만 해당) 또는 레벨 노브를 사용하여 해당 볼륨을 조절합니다. 라이브 스트리밍 앱을 실행하고 청취자용 밸런스를 확인합니다.
이 제품을 라이브 스트리밍에 사용(17LIVE, Twitch, YouTube Live) > 컴퓨터와 함께 이 제품 사용하기 컴퓨터와 함께 이 제품 사용하기 Windows PC 또는 Mac과 함께 이 제품을 사용하여 설정을 구성하고 음성 또는 노래를 17LIVE, Twitch, YouTube Live 또는 기타 유사한 서비스로 라이브 스트리밍하는 데 필요한 작업을 수행하는 방법을 설명합니다. (17LIVE, Twitch, YouTube Live는 스트리밍 앱의 이름입니다.) 준비물 ( ( 이 제품 Windows 또는 Mac 컴퓨터(AG Controller 및 라이브 스트리밍 앱 설치) 다음 웹사이트에서 "AG Controller" 앱을 설치합니다. AG03MK2: https://www.yamaha.com/2/ag03mk2/ AG06MK2: https://www.yamaha.
이 제품을 라이브 스트리밍에 사용(17LIVE, Twitch, YouTube Live) > 컴퓨터와 함께 이 제품 사용하기 3 헤드폰 또는 이어폰 연결 헤드폰 또는 이어폰을 헤드폰 출력 잭에 연결합니다. 모든 연결이 완료되면 이 제품에 대한 설정을 구성해 보겠습니다.
이 제품을 라이브 스트리밍에 사용(17LIVE, Twitch, YouTube Live) > 컴퓨터와 함께 이 제품 사용하기 4 AG에 대한 설정 구성 전면의 각 스위치에 대해 다음과 같이 설정합니다.
이 제품을 라이브 스트리밍에 사용(17LIVE, Twitch, YouTube Live) > 컴퓨터와 함께 이 제품 사용하기 5 [z](대기/켜기) 스위치를 켭니다. [z](대기/켜기) 스위치를 켭니다. 이 제품에 대한 설정이 완료되면 "AG Controller" 앱을 실행하고 화면 하단의 "Sound Check"를 클릭합니다. 볼륨을 조절하여 Sound Check 화면에서 소리를 확인합니다. 6 헤드폰/이어폰 볼륨 조절 마이크에 대고 말하는 동안 헤드폰 [H] 노브를 사용하여 볼륨을 조절합니다. 헤드폰 [H] 노브를 사용하여 볼륨을 조절해도 라이브 스트리밍 오디오에는 영향을 미치지 않습니다. 7 라이브 스트리밍 시작 페이더(AG03K2에만 해당) 또는 레벨 노브를 사용하여 해당 볼륨을 조절합니다. 라이브 스트리밍 앱을 실행하고 청취자용 밸런스를 확인합니다. 주 소리가 들리지 않으면 “오디오 관련 및 기타 문제” (p.62)를 참조하십시오.
이 제품을 라이브 스트리밍에 사용(17LIVE, Twitch, YouTube Live) > 컴퓨터와 함께 이 제품 사용하기 3 "광역 오디오 장치 목록"의 "데스크탑 오디오" 설정에 대해 "기본 장치" 또는 "사용안 함"을 사용합니다. 이 제품의 [STREAMING OUT] 선택 스위치를 [DRY CH 1-2] 또는 [INPUT MIX]로 설정한 경우 "기본 장치"로 설정하고, 선택 스위치를 [LOOPBACK]으로 설정했다면 이것을 "사용안함"으로 설정합니다. 4 또한 "광역 오디오 장치 목록"의 "마이크/보조 오디오" 설정을 [Yamaha AG03MK2] 또는 [Yamaha AG06MK2] 라인 설정으로 설정합니다. 5 6 왼쪽 탐색 메뉴에서 "방송"를 클릭합니다. 7 8 "설정" 화면을 닫습니다. 사용할 스트리밍 서비스를 선택하고 해당 서비스에서 받은 스트림 키를 필요에 따라 입력합 니다. 라이브 스트리밍을 시작합니다.
이 제품을 라이브 스트리밍에 사용(17LIVE, Twitch, YouTube Live) > 라이브 스트리밍 중 조작 라이브 스트리밍 중 조작 라이브 스트리밍 중에 사용할 수 있는 조작에 대해 설명합니다. n 마이크 음소거 라이브 스트리밍 중 자리를 비우거나 휴식을 취하는 경우 마이크 음소거 [MUTE] 버튼을 켜서(LED 점등) 마이크 에서 나오는 소리가 방송되지 않도록 합니다. n 목소리에 리버브 추가하기 마이크 오디오에 리버브를 추가하려면 [REVERB] 버튼을 켭니다(LED 점등). AG Controller 앱 사용 이 제품에 대한 상세 설정을 하려면 AG Controller 앱을 사용합니다. 예를 들어 다음은 EQ 및 리버브에 대한 설 정 화면입니다.
이 제품을 라이브 스트리밍에 사용(17LIVE, Twitch, YouTube Live) > 라이브 스트리밍 중 조작 ( 리버브 설정 화면 액세스 방법: [Detail r] → 화면의 [Reverb] 그래프를 클릭 주 AG Controller 앱은 Android 장치에서는 사용할 수 없습니다.
이 제품을 라이브 스트리밍에 사용(17LIVE, Twitch, YouTube Live) > 악기 또는 음악 플레이어 연결 악기 또는 음악 플레이어 연결 악기 또는 음악 플레이어를 연결하고 배경 음악 또는 음향 효과를 추가하기 위한 설정을 구성하는 방법을 보여줍 니다. n 악기 연결 AG06MK2 언밸런스드 폰 커넥터를 사용하여 기타를 채널2에 연결하고 [GUITAR] 스위치를 켭니다(O). 채널2의 레벨 노 브를 사용하여 볼륨을 조절합니다. 디지털 피아노, 신디사이저 또는 기타 디지털 악기를 채널3/4 라인 입력 잭에 연결합니다. 채널3/4의 레벨 노브를 사용하여 볼륨을 조절합니다. AG03MK2 언밸런스드 폰 커넥터를 사용하여 기타를 기타 입력 잭에 연결하고 [GUITAR/LINE] 스위치를 GUITAR (O)로 설정합니다. 디지털 피아노, 신디사이저 또는 기타 디지털 악기를 채널2 라인 입력 잭에 연결하고 [GUITAR/LINE] 스위치를 LINE (N)으로 설정합니다.
이 제품을 라이브 스트리밍에 사용(17LIVE, Twitch, YouTube Live) > 악기 또는 음악 플레이어 연결 연결된 장치의 볼륨을 조절합니다. AG06MK2가 채널5/6에 입력되면 채널5/6 레벨 노브를 사용하여 볼륨을 조절할 수 있습니다. 음악 플레이어 음악 플레이어 4접점(TRRS), 3.
웹 미팅에서 이 제품 사용하기 > iPhone/iPad와 함께 사용하기 웹 미팅에서 이 제품 사용하기 iPhone/iPad와 함께 사용하기 iPhone/iPad와 함께 이 제품을 사용하여 Zoom, Skype, Teams, FaceTime, LINE과 같은 앱으로 웹 미팅을 개최할 때 수행해야 하는 설정 및 조작에 대해 설명합니다. (Zoom, Skype, Teams, FaceTime, LINE은 앱의 이 름입니다.) iPhone/iPad를 Skype, FaceTime, LINE용으로 사용하는 경우 USB 케이블로 연결하더라도 이 제 품의 사운드가 들리지 않습니다. 3.5mm 4접점(TRRS) 스테레오 미니 케이블을 사용하여 연결해야 합니다. 준비물 ( 이 제품 ( iPhone/iPad(사용할 다양한 앱이 설치된 경우) ( Lightning - 3.5mm 헤드폰 잭 어댑터(Lightning 커넥터가 있는 iPhone/iPad 사용 시. 정품 Apple 제품 사 용을 권장합니다.
웹 미팅에서 이 제품 사용하기 > iPhone/iPad와 함께 사용하기 3 Lightning 또는 USB-C 3.5mm 헤드폰 잭 어댑터를 3.5mm 4접점(TRRS) 스테레오 미 니 케이블로 이 제품의 스마트폰 [P] 입력/출력 잭을 연결합니다. 2 2 Lightning/USB-C 3.5 mm 헤드폰 잭 어댑터 Lightning/USB-C 3.5 mm 헤드폰 잭 어댑터 3 3.5 mm 4접점(TRRS) 스테레오 미니 케이블 3.5 mm 4접점(TRRS) 스테레오 미니 케이블 3 주 2접점 또는 3접점 케이블이 아닌 4접점 스테레오 미니 케이블을 사용합니다.
웹 미팅에서 이 제품 사용하기 > iPhone/iPad와 함께 사용하기 4 헤드폰 또는 이어폰 연결 헤드폰 또는 이어폰을 헤드폰 출력 잭에 연결합니다.
웹 미팅에서 이 제품 사용하기 > iPhone/iPad와 함께 사용하기 5 마이크 연결 마이크를 채널1 마이크/라인 입력 잭에 연결합니다. 연결을 완료했으므로 이제 이 기기에 대한 설정을 구성합니다. 6 [z](대기/켜기) 스위치를 켭니다. [z](대기/켜기) 스위치를 켭니다.
웹 미팅에서 이 제품 사용하기 > iPhone/iPad와 함께 사용하기 7 AG에 대한 설정 구성 전면의 각 스위치에 대해 다음과 같이 설정합니다. [LINE] 스위치: 꺼짐 팬텀 [+48V] 스위치: 켜짐(콘덴서 마이크 사용 시) 채널1 [GAIN] 노브, 레벨 노브, 페이더: 적절히(그림 참조) [STREAMING OUT]: [INPUT MIX] [MIX MINUS]: 꺼짐 ( ( ( ( ( 8 헤드폰/이어폰 볼륨 조절 마이크에 대고 말하는 동안 헤드폰 [H] 노브를 사용하여 볼륨을 조절합니다. 헤드폰 [H] 노브를 사용하여 볼륨을 조절해도 라이브 스트리밍 오디오에는 영향을 미치지 않습니다. 9 웹 미팅 시작. 페이더(AG03MK2에만 해당) 또는 레벨 노브를 사용하여 해당 볼륨을 조절합니다. 라이브 스트리밍 앱을 실행하고 청취자용 밸런스를 확인합니다. 대화 중 조작 ( 자신의 목소리를 음소거 대화를 중단하려면 MUTE 버튼을 켭니다(LED 점등).
웹 미팅에서 이 제품 사용하기 > Android 장치에서 이 제품 사용하기 Android 장치에서 이 제품 사용하기 Android 장치와 함께 이 제품을 사용하여 Zoom, Skype, Teams, FaceTime, LINE과 같은 앱으로 웹 미팅을 개최할 때 수행해야 하는 설정 및 조작에 대해 설명합니다. (Zoom, Skype, Teams, FaceTime, LINE은 앱의 이 름입니다.) 주 Android 장치를 사용하는 경우 USB를 통해 본 제품의 오디오를 입력할 수 없습니다. 3.5mm 4접점(TRRS) 스테레오 미니 케이블을 사용 하여 연결해야 합니다. 준비물 ( 이 제품 ( Android 장치(사용할 다양한 앱이 설치된 경우) ( 스테레오 미니 플러그 케이블이 있는 헤드폰 또는 이어폰 ( 3.
웹 미팅에서 이 제품 사용하기 > Android 장치에서 이 제품 사용하기 2 헤드폰 또는 이어폰 연결 헤드폰 또는 이어폰을 헤드폰 출력 잭에 연결합니다.
웹 미팅에서 이 제품 사용하기 > Android 장치에서 이 제품 사용하기 3 마이크 연결 마이크를 채널1 마이크/라인 입력 잭에 연결합니다. 연결을 완료했으므로 이제 이 기기에 대한 설정을 구성합니다.
웹 미팅에서 이 제품 사용하기 > Android 장치에서 이 제품 사용하기 4 AG에 대한 설정 구성 전면의 각 스위치에 대해 다음과 같이 설정합니다. 팬텀 [+48V] 스위치: 켜짐(콘덴서 마이크 사용 시) 채널1 [GAIN] 노브: 적절히(그림 참조) [STREAMING OUT]: [INPUT MIX] [MIX MINUS]: 꺼짐 ( ( ( ( 5 [z](대기/켜기) 스위치를 켭니다. [z](대기/켜기) 스위치를 켭니다. 6 헤드폰 볼륨 조절 마이크에 대고 말하는 동안 헤드폰 [H] 노브를 사용하여 볼륨을 조절합니다. 헤드폰 [H] 노브를 사용하여 볼륨을 조절해도 라이브 스트리밍 오디오에는 영향을 미치지 않습니다. 7 웹 미팅 시작. 페이더(AG03MK2에만 해당) 또는 레벨 노브를 사용하여 해당 볼륨을 조절합니다. 라이브 스트리밍 앱을 실행하고 청취자용 밸런스를 확인합니다. 대화 중 조작 ( 자신의 목소리를 음소거 대화를 중단하려면 MUTE 버튼을 켭니다(LED 점등).
웹 미팅에서 이 제품 사용하기 > Android 장치에서 이 제품 사용하기 주 소리가 들리지 않으면 “오디오 관련 및 기타 문제” (p.62)를 참조하십시오.
웹 미팅에서 이 제품 사용하기 > 컴퓨터와 함께 이 제품 사용하기 컴퓨터와 함께 이 제품 사용하기 Windows PC 또는 Mac과 함께 이 제품을 사용하여 Zoom, Skype, Teams, FaceTime, LINE을 이용하여 웹 미팅을 개최할 때 수행해야 하는 설정 및 조작에 대해 설명합니다. (Zoom, Skype, Teams, FaceTime, LINE은 앱의 이름입니다.) 준비물 ( 이 제품 ( Windows PC 또는 Mac(사용할 다양한 앱이 설치된 경우) ( 스테레오 미니 플러그 케이블이 있는 헤드폰 또는 이어폰 ( USB 케이블(포함) 수행 단계 1 드라이버 설치(Windows만 해당) Mac을 사용하는 경우 드라이버 설치가 필요하지 않습니다. 2단계부터 시작합니다. 드라이버가 아직 설치되지 않았다면 "이 제품 사용 준비하기" → "컴퓨터에 연결하여 설정하기 (Windows)"를 참조하여 설치합니다. “컴퓨터에 연결 및 설정 구성(Windows)” (p.
웹 미팅에서 이 제품 사용하기 > 컴퓨터와 함께 이 제품 사용하기 3 헤드폰 또는 이어폰 연결 헤드폰 또는 이어폰을 헤드폰 출력 잭에 연결합니다.
웹 미팅에서 이 제품 사용하기 > 컴퓨터와 함께 이 제품 사용하기 4 마이크 연결 마이크를 채널1 마이크/라인 입력 잭에 연결합니다. 연결을 완료했으므로 이제 이 기기에 대한 설정을 구성합니다.
웹 미팅에서 이 제품 사용하기 > 컴퓨터와 함께 이 제품 사용하기 5 AG에 대한 설정 구성 전면의 각 스위치에 대해 다음과 같이 설정합니다. 팬텀 [+48V] 스위치: 켜짐(콘덴서 마이크 사용 시) 채널1 [GAIN] 노브, 레벨 노브, 페이더: 적절히(그림 참조) [STREAMING OUT]: [INPUT MIX] [MIX MINUS]: 꺼짐 ( ( ( ( 6 앱에 대한 설정 구성 웹 미팅을 개최하는 데 사용할 앱을 실행하고 앱에서 장치 설정을 열고 사운드 입력 장치와 사운드 출력 장치가[Yamaha AG03MK2] 또는 [Yamaha AG06MK2]로 설정되어 있는지 확인합니다. 7 헤드폰/이어폰 볼륨 조절 마이크에 대고 말하는 동안 헤드폰 [H] 노브를 사용하여 볼륨을 조절합니다. 헤드폰 [H] 노브를 사용하여 볼륨을 조절해도 라이브 스트리밍 오디오에는 영향을 미치지 않습니다. 8 웹 미팅 시작. 페이더(AG03K2에만 해당) 또는 레벨 노브를 사용하여 해당 볼륨을 조절합니다.
웹 미팅에서 이 제품 사용하기 > 컴퓨터와 함께 이 제품 사용하기 주 소리가 들리지 않으면 “오디오 관련 및 기타 문제” (p.62)를 참조하십시오.
이 제품을 팟캐스트에 사용하기 > WaveLab Cast 사용 이 제품을 팟캐스트에 사용하기 WaveLab Cast 사용 WaveLab Cast는 팟캐스트 오디오/비디오 콘텐츠 제작에 최적화된 Windows 및 Mac용 앱입니다. 이 앱을 사 용하면 콘텐츠를 쉽게 녹화, 편집, 스트리밍할 수 있습니다. WaveLab Cast 셋업: 다음 페이지를 참조하여 앱을 다운로드하고 라이선스를 활성화합니다. https://www.steinberg.net/getwavelabcast 주 이 앱을 다운로드하려면 다운로드 액세스 코드가 필요합니다. 이 코드는 이 제품에 포함된 인쇄된 WAVELAB CAST DOWNLOAD INFORMATION에 기재되어 있습니다. WaveLab Cast 매뉴얼은 다음 웹사이트에서 검색하여 얻을 수 있습니다. https://steinberg.
이 제품을 녹음에 사용하기 > iPhone/iPad에서 Rec'n'Share 사용하기 이 제품을 녹음에 사용하기 iPhone/iPad에서 Rec'n'Share 사용하기 이 제품과 함께 Rec'n'Share 앱을 사용하여 오디오 등을 녹음하고 편집합니다. Rec'n'Share 앱을 사용하면 좋 아하는 노래를 연주하고 녹음하는 것부터 연주 영상을 녹음하고 편집하여 결과물의 업로드까지 모든 것을 쉽게 할 수 있습니다. Rec'n'Share에 대한 자세한 내용은 다음 웹 사이트를 참조하십시오. https://www.yamaha.com/2/rec_n_share/ 주 ( App Store에서 앱과 호환되는 OS 버전을 확인합니다. ( 업로드할 수 있는 데이터는 사용 권한이 부여된 자신의 오리지널 곡, 사운드, 콘텐츠로 제한됩니다.
이 제품을 녹음에 사용하기 > 컴퓨터에서 Cubase AI 사용하기 컴퓨터에서 Cubase AI 사용하기 이 제품과 함께 Cubase AI를 사용하여 오디오 등을 녹음하고 편집합니다. Cubase AI는 컴퓨터를 사용하여 오디 오를 녹음, 재생, 편집할 수 있는 음악 제작용 DAW 소프트웨어입니다. Cubase AI 셋업: 다음 페이지를 참조하여 앱을 다운로드하고 라이선스를 활성화합니다. https://www.steinberg.net/getcubaseai 주 이 앱을 다운로드하려면 다운로드 액세스 코드가 필요합니다. 이 코드는 이 제품에 포함된 인쇄된 CUBASE AI DOWNLOAD INFORMATION에 기재되어 있습니다. Cubase AI 매뉴얼은 다음 웹사이트에서 검색하여 얻을 수 있습니다. https://steinberg.
음악 제작에 이 제품 사용하기 > iPhone/iPad에서 Cubasis LE 사용하기 음악 제작에 이 제품 사용하기 iPhone/iPad에서 Cubasis LE 사용하기 이 제품과 함께 Cubasis LE를 사용하여 오디오를 녹음하고 편집합니다. Cubasis LE는 모바일 DAW Cubasis의 기본 버전입니다. Cubasis와 마찬가지로 iPhone/iPad에서 오디오를 녹음, 재생, 편집할 수 있는 음악 제작 앱입 니다. 이 앱을 사용하려면 App Store에서 "Cubasis LE"를 검색하여 다운로드합니다. Cubasis LE에 대한 자세한 내용은 다음 Steinberg 웹사이트를 참조하십시오. https://www.steinberg.
음악 제작에 이 제품 사용하기 > 컴퓨터에서 Cubase AI 사용하기 컴퓨터에서 Cubase AI 사용하기 이 제품과 함께 Cubase AI를 사용하여 오디오 등을 녹음하고 편집합니다. Cubase AI는 컴퓨터를 사용하여 오디 오를 녹음, 재생, 편집할 수 있는 음악 제작용 DAW 소프트웨어입니다. Cubase AI 셋업: 다음 페이지를 참조하여 앱을 다운로드하고 라이선스를 활성화합니다. https://www.steinberg.net/getcubaseai 주 이 앱을 다운로드하려면 다운로드 액세스 코드가 필요합니다. 이 코드는 이 제품에 포함된 인쇄된 CUBASE AI DOWNLOAD INFORMATION에 기재되어 있습니다. Cubase AI 매뉴얼은 다음 웹사이트에서 검색하여 얻을 수 있습니다. https://steinberg.
문제 해결 > 전원 관련 문제 해결 전원 관련 전원 LED가 점등하지 않습니다 ( 이 제품의 전원이 켜져 있습니까? 이 제품이 켜져 있지 않으면 LED가 점등하지 않습니다. iPhone, iPad, Android 장치를 사용하는 경우: USB 전원 어댑터 또는 USB 모바일 배터리와 같은 외부 전원공급장치가 필요합니다. 최소 5 V, 1 A의 전원을 출력할 수 있는 USB 전원 어댑터 또는 USB 모바일 배터리가 필요합니다. Windows PC, Mac, iPad(USB-C 커넥터)를 사용하는 경우: 기기는 USB 전원(최소 5 V, 1 A)으로 작동 합니다. 전원 LED가 점등하지 않으면 버스 전원이 충분하지 않을 수 있습니다. 별도의 USB 전원 어댑터, USB 모바일 배터리 또는 이와 유사한 장치를 연결하여 외부 전원을 공급합니다. ( ( 전원 LED가 점멸하거나 간헐적으로만 점등합니다. ( 전원공급장치에 문제가 있을 수 있습니다. ( 전원공급장치에 문제가 있는 경우 LED가 점멸합니다.
문제 해결 > 오디오 관련 및 기타 문제 오디오 관련 및 기타 문제 귀하가 Windows PC는 이 제품을 인식하지 못함 ( 드라이버를 설치하셨나요? ( 이 제품을 Windows PC에 연결하려면 Yamaha Steinberg USB Driver를 설치해야 합니다. Yamaha Steinberg USB Driver를 설치하는 방법은 다음 웹사이트를 참조하십시오. AG03MK2: https://www.yamaha.com/2/ag03mk2/ AG06MK2: https://www.yamaha.com/2/ag06mk2/ 소리가 들리지 않음 ( STREAMING OUT 선택 스위치D에 적절한 설정을 사용하고 있습니까? ( 각 구성 요소의 이름과 기능을 참조하여 [STREAMING OUT] 선택 스위치를 사용 사례에 맞게 설정합니 다.
문제 해결 > 오디오 관련 및 기타 문제 ( [STREAMING OUT] 선택 스위치D가 [LOOPBACK]으로 설정되어 있습니까? ( DAW 소프트웨어를 사용하고 [LOOPBACK] 설정을 사용하는 경우 DAW 소프트웨어 설정에 따라 루프가 발생하여 피드백을 일으킬 수 있습니다. 컴퓨터에서 소리를 들으면서 녹음하려면 [LOOPBACK] 이외의 설 정을 사용해야 합니다. 보컬이나 말소리를 더 선명하게 만들기 ( [COMP/EQ] 버튼n을 켜짐으로 설정합니다(버튼이 노란색으로 점등). ( 인터넷 라이브 스트리밍에 적합한 파라미터가 이미 공장 기본값으로 이 버튼에 설정되어 있어 저역에서 불 필요한 소음을 줄이고 입력 레벨의 차이를 부드럽게 만드는 데 도움이 됩니다. 볼륨 조절 불가 ( 연결된 장치의 [AUX] 입력/출력 잭B의 볼륨을 조절하고 있습니까? ( 레벨 노브로 [AUX] 입력/출력 잭 볼륨을 조절할 수 없습니다. 연결된 장치에서 볼륨을 조절합니다.
부록 > 일반 사양 부록 일반 사양 AG06MK2 0dBu = 0.775Vrms, 신호 발생기의 출력 임피던스(Rs) = 150Ω 지정되지 않은 경우 모든 레벨 컨트롤은 공칭입니다. ( 주파수 응답 입력(MIC) → USB IN/OUT을 통한 MONITOR OUT +0.5dB/-1.5dB(20Hz~48 kHz @ Fs=192kHz), 1kHz에서 공칭 출력 레벨 레퍼런스, GAIN 노브: 최소, STREAMING OUT: DRY CH 1-2 ( ( 총 고조파 왜곡*1(THD+N) MONITOR OUT에 대한 입력 0.05% @ 0dBu(20Hz~20kHz), GAIN 노브: 최소 0.
부록 > 일반 사양 ( USB 오디오 2 입력 / 2 출력 USB 오디오 클래스 2.0 준수, 샘플링 주파수: 최대 192 kHz, 비트 깊이: 24bit ( ( ( ( ( ( ( ( ( ( 팬텀 전원 전압 +48V FOOT SW REVERB ON/OFF 또는 MUTE (CH 1) ON/OFF 전원 요구 사항 DC5V, 900mA 전력 소비 최대 4.5W 치수(W × H × D) 152mm×63mm×201mm 순중량 0.9kg 포함된 액세서리 USB 2.0 케이블(1.5m), Quick Guide, 안전 가이드, WAVELAB CAST DOWNLOAD INFORMATION, CUBASE AI DOWNLOAD INFORMATION 옵션 액세서리 발 스위치: FC5, 마이크 스탠드 어댑터: BMS-10A 작동 온도 0~+40℃ AG03MK2 0dBu = 0.775Vrms, 신호 발생기의 출력 임피던스(Rs) = 150Ω 지정되지 않은 경우 모든 레벨 컨트롤은 공칭입니다.
부록 > 일반 사양 ( ( ( 입력 채널 모노(MIC/LINE): 1, HEADSET MIC 포함(플러그인 전원; CH 1 MIC 및 HEADSET MIC는 동시에 사용할 수 없음), 스테레오(LINE) / 모노(기타): 1, USB IN: 1, AUX IN: 1 출력 채널 MONITOR OUT: 2, PHONES: 2(HEADSET PHONES 포함; PHONES 및 HEADSET PHONES는 동시에 사용할 수 없음), AUX OUT: 1 입력 채널 기능(CH1, CH2G) PAD 26dB DSP CH1: COMP/EQ, REVERB, MUTE CH2G*4: COMP/EQ, AMP SIM, REVERB PEAK LED 신호가 클리핑 레벨 아래 3dB에 도달하면 LED가 켜집니다. ( ( ( ( 레벨 미터 USB OUTPUT 레벨 2 x 2 포인트 LED 미터 [PEAK, SIG] ( ( USB 오디오 2 입력 / 2 출력 USB 오디오 클래스 2.
부록 > 일반 사양 *2 노이즈는 A-가중 필터로 측정됨. *3 크로스토크는 1kHz 대역통과필터로 측정됨. *4 전면 패널에 스위치나 노브가 없음. 본 설명서의 내용은 발행일 현재 최신 사양을 기준으로 하고 있습니다.
부록 > 입력/출력 특성 입력/출력 특성 아날로그 입력 특성(AG06MK2) 0 dBu=0.775 Vrms 입력 잭 PAD 26dB GAIN 트림/ 실제 부하 임 공칭과 함께 SW 위치 피던스 사용 3 kΩ 1.5 kΩ *4 ON 0 10 -68 dBu -56 dBu -46 dBu (3.085 mV) (1.228 mV) (3.884 mV) 0 -22 dBu -10 dBu 0 dBu (61.56 mV) (245.1 mV) (775.0 mV) 1 MΩ - 10 ON HIGH - AUX INPUT - 10 kΩ 600 Ω 라인 10 kΩ 600 Ω 라인 LOW - 커넥터 콤보 잭*2 (밸런스드) 폰 잭*2 -42 dBu -30 dBu -20 dBu (언밸런스드) (6.153 mV) (24.51 mV) (77.50 mV) +4 dBu (1.228 V) 0 LINE 3/4, 5/6 클립 전 최대 3.
부록 > 입력/출력 특성 출력 단자 실제 소스 임피던스 공칭과 함께 사용 STEREO OUT [L, R] 150 Ω MONITOR OUT [L, R] 출력 레벨 커넥터 공칭 클립 전 최대 10 kΩ 라인 0 dBu (0.775 V) +10 dBu (2.451 V) 폰 잭*7 (임피던스 밸런스 드) 150 Ω 10 kΩ 라인 0 dBu (0.775 V) +10 dBu (2.451 V) 폰 잭*7 (임피던스 밸런스 드) PHONES 120 Ω 40 Ω 폰 1.5 mW+1.5 mW 6 mW+6 mW 폰잭 3.5 mm 폰 잭 AUX OUT 150 Ω 1.5 kΩ 라인 -30 dBu (24.51 mV) -20 dBu (77.50 mV) 3.
부록 > 입력/출력 특성 *1 감도는 +0dBu(0.775V)의 출력을 생성하는 가장 낮은 레벨 또는 기기가 최대 이득으로 설정된 경우 공칭 출력 레벨입니다. (모든 레벨 컨트롤은 최대 위치에 있습니다.) *2 1 및 슬리브 = GND, 2 및 팁 = HOT, 3 및 링 = COLD *3 팁 = 신호, 슬리브 = GND *4 CH 1, HEADSET MIC의 경우 *5 팁 = 신호 L, 링 1 = 신호 R, 링 2 = GND, 슬리브 = 스마트폰용 출력 아날로그 출력 특성(AG03MK2) 0 dBu=0.775 Vrms 출력 단자 실제 소스 임피던스 MONITOR OUT [L, R] 150 Ω PHONES 120 Ω AUX OUT 150 Ω 출력 레벨 공칭과 함께 사용 공칭 클립 전 최대 0 dBu (0.775 V) +10 dBu (2.451 V) 40 Ω 폰 1.5 mW+1.5 mW 6 mW+6 mW 1.5 kΩ 라인 -30 dBu (24.
부록 > 치수 치수 152 AG06MK2 2.
부록 > 치수 126 AG03MK2 2.
부록 > 블록 및 레벨 다이어그램 블록 및 레벨 다이어그램 AG06MK2 AG03MK2 블록 및 레벨 다이어그램은 다음 Yamaha 웹사이트를 참조하십시오. https://www.yamaha.com/2/ag03mk2/ https://www.yamaha.
Layout Folder: YMH_PDF_Manual_A5_PA Stylesheet Name: 01_YMH_PDF_Manual_A5_PA_En-Multi Stylesheet Version: 2022.04.13 Yamaha Pro Audio global website https://www.yamahaproaudio.com/ Yamaha Downloads https://download.yamaha.