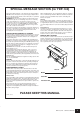
YDP-160 YDP-140 Owner's Manual For information on assembling the keyboard stand, refer to the instructions at the end of this manual. IMPORTANT — Check your power supply — (YDP-160) Make sure that your local AC mains voltage matches the voltage specified on the name plate on the bottom panel. In some areas a voltage selector may be provided on the bottom panel of the main keyboard unit near the power cord. Make sure that the voltage selector is set for the voltage in your area.
Introduction SPECIAL MESSAGE SECTION (for YDP-160) PRODUCT SAFETY MARKINGS: Yamaha electronic Battery Notice: This product MAY contain a small non- products may have either labels similar to the graphics shown below or molded/stamped facsimiles of these graphics on the enclosure. The explanation of these graphics appears on this page. Please observe all cautions indicated on this page and those indicated in the safety instruction section. rechargable battery which (if applicable) is soldered in place.
SPECIAL MESSAGE SECTION (for YDP-140) This product utilizes batteries or an external power supply (adapter). DO NOT connect this product to any power supply or adapter other than one described in the manual, on the name plate, or specifically recommended by Yamaha. WARNING: Do not place this product in a position where anyone could walk on, trip over ,or roll anything over power or connecting cords of any kind.
PRECAUTIONS PLEASE READ CAREFULLY BEFORE PROCEEDING * Please keep this manual in a safe place for future reference. WARNING Always follow the basic precautions listed below to avoid the possibility of serious injury or even death from electrical shock, short-circuiting, damages, fire or other hazards. These precautions include, but are not limited to, the following: Power supply Do not open • Only use the voltage specified as correct for the instrument.
• When setting up the product, make sure that the AC outlet you are using is easily accessible. If some trouble or malfunction occurs, immediately turn off the power switch and disconnect the plug from the outlet. Even when the power switch is turned off, electricity is still flowing to the product at the minimum level. When you are not using the product for a long time, make sure to unplug the AC power plug (YDP-160)/AC power adaptor (YDP-140) from the wall AC outlet.
Welcome Welcome Thank you for purchasing the Yamaha Digital Piano! We recommend that you read this manual carefully so that you can take full advantage of the advanced and convenient functions of your new digital piano. We also recommend that you keep this manual in a safe, convenient place for future reference.
Accessories Accessories • Owner’s Manual (this book) • Quick Operation Guide (separate sheet) • “50 Greats for the Piano” (Music Book) • AC Power cord (YDP-160) • Bench* • AC Power adaptor (YDP-140)* Users within Canada or U.S.: PA-150 or an equivalent Others: PA-5D or an equivalent * Included or optional depending on locale. Tuning Unlike an acoustic piano, this instrument does not need to be tuned. It always stays perfectly in tune.
Features Features AWM Dynamic Stereo Sampling The Yamaha YDP-160/140 digital piano offers a rich and versatile range of sounds, which are created using Yamaha’s proprietary sampling tone-generation system, “AWM Dynamic Stereo Sampling.” The AWM (Advanced Wave Memory) is a sampling system which creates sound close to that of an acoustic instrument by using digital technology to record the instrument sound and applying high-quality digital filter technology to the recorded audio samples.
Table of Contents Table of Contents Introduction SPECIAL MESSAGE SECTION ...................... 2 Connecting MIDI Instruments .................. 28 About MIDI ...................................................... 28 MIDI’s Capability ............................................. 28 About the Documentation and Reference Materials for this Instrument...................... 6 Connecting the Digital Piano to a Computer .................................................. 29 Accessories ......................
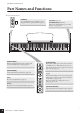
Part Names and Functions Part Names and Functions PHONES Bottom of the keyboard [PHONES] A set of standard stereo headphones can be plugged in here for private practice (page 15). [POWER](YDP-160) [STANDBY/ON](YDP-140) This power switch turns the power to the unit on or off. (page 14) POWER [DEMO/SONG] Listen to the playback of a demo song for each voice and 50 piano preset songs (page 16). [PIANO/VOICE] This button enables you to select any voice from 10 (YDP-160) or 6 (YDP-140) voices.
Part Names and Functions POWER [PEDAL] Connect the pedal cord (page 37). OUT [AC IN] (YDP-160) Connect the included power cord here. (page 13) PEDAL MIDI Bottom of the keyboard IN Bottom of the keyboard MIDI [IN/OUT] Connect a MIDI device to this connector to use various MIDI functions. (Connecting MIDI Instruments—page 28) [DC IN 12V] (YDP-140) Connect the included power adaptor here. (page 13) Shows the MIDI [IN/OUT] and [PEDAL] jacks as seen when viewed from the rear of the instrument.
Before Using the Digital Piano Before Using the Digital Piano Key Cover To open the key cover: Lift the cover slightly, then push and slide it open. To close the key cover: Slide the cover toward you and gently lower the cover over the keys. CAUTION Hold the cover with both hands when opening or closing it. Do not release it until it is fully opened or closed. Be careful to avoid catching fingers (yours or others, especially children’s) between the cover and main unit.
Before Using the Digital Piano Connecting the Power Cord (YDP-160) Read the instructions below very carefully to make sure that you correctly connect the power cord. YDP-140 users should skip to the next section “Connecting the Power Adaptor (YDP-140)” for information on connecting the power adaptor. 1. Insert the plug on one end of the power cord to the [AC IN] connector. Refer to the “Part Names and Functions” on page 11 for information on the location of the [AC IN] connector. 2.
Before Using the Digital Piano Turning the Power On Press the [POWER] (YDP-160) or [STANDBY/ON] (YDP-140) switch on the right end of the keyboard to turn on the power to the unit. The power indicator located below the left end of the keyboard lights up. [POWER] (YDP-160)/ [STANBY/ON] (YDP-140) Power indicator Press the [POWER] (YDP-160) or [STANDBY/ON] (YDP-140) switch again to turn off the power to the unit. The power indicator turns off.
Before Using the Digital Piano Using Headphones Connect a pair of headphones to one of the [PHONES] jacks. Two [PHONES] jacks are provided. You can connect two sets of standard stereo headphones. (If you are using only one pair of headphones, you can plug them into either jack.) CAUTION Do not listen to the instrument at a high volume level through headphones for a long period of time, or your hearing may be damaged.
Listening to the Demo Songs Reference Listening to the Demo Songs Demo songs are provided that effectively demonstrate each of this instrument’s voices. Refer to the voice list on page 19 for more information on the characteristics of each preset voice. Procedure 1. Turn on the power. (In case the power is not turned on) Press the [POWER] (YDP-160) or [STANDBY/ON] (YDP-140) button. The power to the unit turns on. Set the [MASTER VOLUME] control to the half-way point.
Listening to 50 Piano Preset Songs Adjusting the Volume Use the [MASTER VOLUME] control to adjust the volume. 4. Stop the Voice demo. Press the [DEMO/SONG] button to stop playback. Listening to 50 Piano Preset Songs This digital piano provides performance data for 50 piano songs as well as voice demo songs. You can simply listen to these songs. You can also refer to the included “50 Greats for the Piano” that contains scores for 50 piano preset songs. Procedure 1.
Listening to Songs Loaded from the Computer Listening to Songs Loaded from the Computer You can transfer song data from your computer to this instrument and play back the songs. (See page 32 for more information on loading song data from the computer.) Procedure 1. Select and play back a song. Song numbers (1 through 10) are assigned to the D 6–C7 keys (see the illustration below). While holding down the [DEMO/SONG] button, press one of the D 6–C7 keys to select a song to play back.
Selecting & Playing Voices Selecting & Playing Voices Selecting Voices Procedure Press and release the [PIANO/VOICE] button to select the Grand Piano 1 voice. Press and release the [PIANO/VOICE] button, press the [+] or [–] button to select a different voice. If you wish to select a particular voice directly, press and hold down the [PIANO/ VOICE] button, then press one of the C1–A1 (YDP-160) or C1–F1 (YDP-140) keys. Turn the [MASTER VOLUME] control to adjust the volume level while playing the keyboard.
Selecting & Playing Voices Using the Pedals Damper (Right) Pedal The damper pedal functions in the same way as a damper pedal on an acoustic piano. When the damper pedal is pressed, notes sustain longer. Releasing the pedal immediately stops (damps) any sustained notes. The damper pedal features a half-pedal function.
Selecting & Playing Voices Adding Variations to the Sound – Reverb This control enables you to select various digital reverb effects that add extra depth and expression to the sound to create a realistic acoustic ambience. Procedure While holding down the [PIANO/VOICE] button, press one of the C2–E2 keys to select a reverb type.
Selecting & Playing Voices Layering Two Voices (Dual mode) You can layer two voices and play them simultaneously to create a thicker and more supple sound. Procedure 1. Engage Dual mode. While holding down the [PIANO/VOICE] button, press two keys in the range of C1through A1 (YDP-160) or C1 through F1 (YDP-140) simultaneously (or press and hold down one key, then press another) to select the two desired voices.
Selecting & Playing Voices Transposition Your digital piano’s Transpose function makes it possible to shift the pitch of the entire keyboard up or down in semitone intervals up to a maximum of six semitones, and lets you easily match the pitch of the keyboard to the range of a singer or other instruments. For example, if you set the transposition amount to “5,” playing key C produces pitch F. In this way, you can play a song as though it were in C major, and this instrument will transpose it to F major.
Selecting & Playing Voices Using the Metronome Your digital piano features a built-in metronome (a device that keeps an accurate tempo) that is convenient for practicing. Procedure 1. Start the metronome. Press the [METRONOME] button to turn on the metronome. Determines the Time Signature While holding down the [METRONOME] button, press one of the C3–F3 keys.
Selecting & Playing Voices Adjusting the Volume You can change the volume of the metronome sound. While holding down the [METRONOME] button, press one of the C1–G2 keys to determine the volume. C1 The lowest key G2 The volume level increases as you press higher keys. 2. Stop the metronome. Turn off the metronome by pressing the [METRONOME] button.
Recording your Performance Recording your Performance Your digital piano’s recording function enables you to record your performance of one song. The recorded performance is called the “user song.” Follow the steps below to record and play back your performance. Audio recording and data recording Cassette tape recordings use a different data format than this instrument. Cassette tapes record audio signals.
Recording your Performance Playing Back Recorded Performance Data Procedure 1. Start the playback. Press the [PLAY] button. The [PLAY] button indicator flashes at the current tempo. 2. Stop the playback. While the user song is playing, press and hold down the [METRONOME] button and press the [+] or [–] button to change the song tempo. If you are using the metronome (page 24) during demo song playback, press the [+] or [–] button to change the song tempo. You can also press keys to change the tempo.
Connecting MIDI Instruments Connecting MIDI Instruments Your digital piano features MIDI connectors. Using the MIDI functions enables you to access a variety of musical genres. About MIDI MIDI (Musical Instrument Digital Interface) is a global format standard for performance data transmission and reception between electronic musical instruments. Connecting musical instruments that support MIDI via MIDI cables enables you to transfer performance and setting data between multiple musical instruments.
Connecting the Digital Piano to a Computer Connecting the Digital Piano to a Computer Connecting the digital piano to a computer using the MIDI connectors enables you to transfer MIDI data between the piano and the computer. This connection requires that you have appropriate application software installed on the computer. Also, installing Musicsoft Downloader on the computer enables you to transfer song data between the piano and the computer.
MIDI Functions MIDI Functions You can make detailed adjustments to MIDI settings. MIDI Transmit/Receive Channel Selection In any MIDI control setup, the MIDI channels of the transmitting and receiving equipment must be matched for proper data transfer. This parameter enables you to specify the channel on which the digital piano transmits or receives MIDI data. Procedure Setting the transmit channel While holding down the [DEMO/SONG] and [PIANO/VOICE] buttons simultaneously, press one of the C1–E2 keys.
MIDI Functions Program Change ON/OFF Normally this instrument will respond to MIDI program change numbers received from an external keyboard or other MIDI device, causing the correspondingly-numbered voice to be selected on the corresponding channel (the keyboard voice does not change).
Transmitting Song Data between the Computer and the Digital Piano Transmitting Song Data between the Computer and the Digital Piano In addition to the demo songs and the 50 piano preset songs stored in this instrument, you can play data for other song by loading it from a connected computer. To be able to use this function, you must first download Musicsoft Downloader from Yamaha website at the following URL, and install it on your computer. http://music.yamaha.
Transmitting Song Data between the Computer and the Digital Piano Transmitting Song Data from the Digital Piano to a Computer Musicsoft Downloader enables you to transfer the user song in this instrument to a computer. For more information on transferring song data from this instrument to a computer, please refer to “Transferring Data Between the Computer and Instrument (for unprotected data)” in the Help file that came with Musicsoft Downloader.
Troubleshooting Troubleshooting Problem Possible Cause and Solution This instrument does not turn on. This instrument has not been plugged in properly. (YDP-160) Securely insert the female plug into the socket on this instrument, and the male plug into a proper AC outlet (page 13). (YDP-140) Securely insert the adaptor plug into the socket on this instrument, and the adaptor plug into a proper AC outlet (page 13). Noise from the speakers or headphones is audible.
Keyboard Stand Assembly Keyboard Stand Assembly CAUTION • Be careful not to confuse parts, and be sure to install all parts in the correct direction. Please assemble in accordance with the sequence given below. • Assembly should be carried out by at least two persons. • Assemble the stand on the flat floor surface. • Be sure to use the included screws only, and insert screws of the correct size in the correct hole locations. Use of incorrect screws can cause damage or malfunction of the product.
Keyboard Stand Assembly 2. 4. Attach B. Mount A. Depending on the model of digital piano you purchased, the surface color of one side of B may be different from the other side. In this case, position B so that the side of the surface color similar to D and E faces the player. D B CAUTION • Fingers can become pinched between the main 5. B R Place the bottom ends of the rear panel on each foot. At least 10 cm E unit and the rear or side panels, be extra careful so as not to drop the main unit.
Keyboard Stand Assembly 6. Connect the pedal cord. 7-2 Connect the plug on the power cord to the rear panel connector. 6-1 Insert the pedal cord plug to the pedal connector from the rear. 6-2 Attach the cord holders to the rear panel as shown, then clip the cord into the holders. 6-3 Use a vinyl tie to take up any slack in the pedal cord.
Keyboard Stand Assembly After completing the assembly, please check the following. • Are there any parts left over? → Review the assembly procedure and correct any errors. • Is this instrument clear of doors and other movable fixtures? → Move the instrument to an appropriate location. When moving the instrument after assembly, always hold the bottom of the main unit. CAUTION Do not hold the key cover or top portion. Improper handling can result in damage to the instrument or personal injury.
Index Index Symbols L +/–....................................................................................10 Layering Two Voices (Dual mode) ................................ 22 Left Pedal ......................................................................... 20 Numerics Local Control .................................................................. 30 50 Piano Preset Songs .....................................................17 M A MASTER VOLUME...............................................
Index Start/Stop playback 50 Piano Preset Songs................................................17 Demo Songs...............................................................16 T Tempo..............................................................................24 Touch Sensitivity.............................................................25 Transmitting Song Data..................................................32 Transporting......................................................................
Appendix Specifications / Technische Daten / Caractéristiques techniques / Especificaciones Appendix/Anhang/Annexe/Apéndice Specifications / Technische Daten / Caractéristiques techniques / Especificaciones Keyboard YDP-160 YDP-140 GH(Graded Hammer) keyboard GHS(Graded Hammer Standard) keyboard with matte black keytops Number of keys 88keys (A-1–C7) Touch Hard/Medium/Soft/Fixed Sound Source AWM Dynamic Stereo Sampling Polyphony Voice Selection 64 Notes Max.
YDP-160 Explanation of Graphical Symbols The lightning flash with arrowhead symbol within an equilateral triangle is intended to alert the user to the presence of uninsulated “dangerous voltage” within the product’s enclosure that may be of sufficient magnitude to constitute a risk of electric shock to persons.
YDP-160/140 FCC INFORMATION (U.S.A.) 1. IMPORTANT NOTICE: DO NOT MODIFY THIS UNIT! This product, when installed as indicated in the instructions contained in this manual, meets FCC requirements. Modifications not expressly approved by Yamaha may void your authority, granted by the FCC, to use the product. 2. IMPORTANT: When connecting this product to accessories and/or another product use only high quality shielded cables. Cable/s supplied with this product MUST be used.
For details of products, please contact your nearest Yamaha representative or the authorized distributor listed below. Die Einzelheiten zu Produkten sind bei Ihrer unten aufgeführten Niederlassung und bei Yamaha Vertragshändlern in den jeweiligen Bestimmungsländern erhältlich. Pour plus de détails sur les produits, veuillez-vous adresser à Yamaha ou au distributeur le plus proche de vous figurant dans la liste suivante. NORTH AMERICA CANADA Yamaha Canada Music Ltd.