
User Manual


DGX-670 Owner’s Manual
70
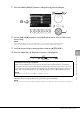
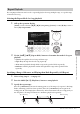
3 While holding down the [REC] button, press the appropriate [1UD] – [8UD]
buttons to set the desired channels to “Rec.”
When the channel is set to Rec, the following window which indicates the part assignment for
the selected channel will appear.
If necessary, use the Data dial to change the part assignment for the channel to be recorded.
To cancel the “Rec” status of the channel, press the desired channel button.
NOTICE
Previously recorded data will be overwritten if you set channels which have recorded data to Rec.
NOTE
If you want to cancel recording, press the [REC] button before going on to the next step.
4 Start recording.
You can start recording by playing the keyboard, starting a Style or pressing the SONG [R/K]
(Play/Pause) button.
When you are overdubbing to a recorded Song, start recording by pressing the SONG [R/K]
(Play/Pause) button so that you can record while listening to the already recorded data.
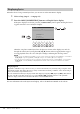
5 After you finish your performance, press the [REC] button again to stop recording.
A message may appear prompting you to save the recorded data. Press the [EXIT] button to
close the message.
To hear the recorded performance, press the [R/K] (Play/Pause) button.
6 Record your performance to another channel by repeating steps 3 to 5 above.
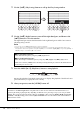
7 Save the recorded performance as a Song.
7-1
Press the SONG [SELECT] button to call up the Song Selection display.
7-2 Save the recorded data as a file by following the instructions on page 26.
NOTE
The recorded Song will be lost if you change to another Song or you turn the power off without executing the Save
operation.
Deleting a Specific Channel of the Song
You can delete the data of the specified channel in the Song by using the Song Creator function. For
details, refer to the Reference Manual on the website.
+