
User Manual
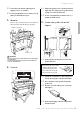
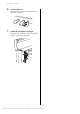
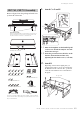
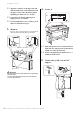
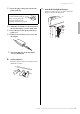
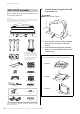
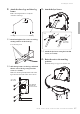
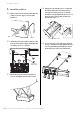
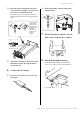
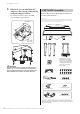
Table Of Contents
- PRECAUTIONS
- NOTICE
- Information
- Included Accessories
- About the Manuals
- Table of Contents
- Features
- Introduction
- Main Operations
- Enjoying the Piano Performance
- Playing Various Musical Instrument Sounds (Voices)
- Playing the Keyboard along with Rhythm Playback
- Playing Back Songs
- Recording Your Performance
- Handling Song Files
- Connections
- Connectors
- Connecting to an Audio Player ([AUX IN] jack)
- Using an External Speaker System for Playback (AUX OUT [L/L+R]/[R] jacks)
- Connecting USB Devices (USB [TO DEVICE] Terminal)
- Connecting External MIDI Devices (MIDI Terminals)
- Connecting to a Computer (USB [TO HOST] Terminal)
- Connecting to a Smart Device
- Using a Smart Device App
- Detailed Settings (Menu Display)
- Appendix

Assembling the Clavinova
126
CLP-785, CLP-775, CLP-745, CLP-735, CLP-795GP, CLP-765GP Owner’s Manual
Remove all parts from the package and make sure
you have all of the items.
1. Lean the main unit against the wall
as shown below.
CAUTION
Be careful not to pinch your fingers.
1-1. Spread a large soft cloth, such as a blanket,
as shown to protect the floor and wall
surfaces.
1-2. Lean the main unit against the wall with
the key cover closed and the keyboard side
on the bottom.
CLP-795GP Assembly
Pedal box
Pads
Cord holder
Power cord
Main unit
To prevent damage to the connector panels located at the bottom of main
unit, make sure to place main unit on the Styrofoam pads. Also, make sure
that the pads do not touch the connector panels.
Bundled pedal cord inside.
The pedals are covered with
vinyl covers when shipped from
the factory. Remove the cover
from damper pedal for optimum
use of the GP Responsive
Damper Pedal effect.
Legs
Leg beams
Lyre braces
Headphone hanger
4 × 10 mm thin screws
(2 pcs.)
6 × 20 mm fixing screws
(4 pcs.)
6 × 40 mm fixing screws
(12 pcs.)
4 × 16 mm thin screws
(4 pcs.)
4 × 10 mm thin screws
(12 pcs.)
Connector panel Connector panel
AC adaptor
4 × 10 mm thin screws
(4 pcs.)
Adaptor holders
Incorrect
NOTICE
Do not place the main unit as shown in the illustration here.
Incorrect
Incorrect
The power cord and AC adaptor may not be included, or may look different
from the illustration above, depending on your particular area. Please check
with your Yamaha dealer.