
Owner's Manual


10
AUDIOGRAM 3 Owner’s Manual
Quick Guide
1
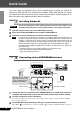
Adjust the volume on all instruments that are connected to the AUDIOGRAM interface.
Set the OUT LEVEL control to the minimum position. Failure to do so may result in
loud noise bursts that can damage your equipment, your ears, or both.
2
Adjust the channel LEVEL controls so that the level indicator PEAK LED flash briefly on
the highest peak levels.
3
Adjust the overall volume with the OUT LEVEL control while monitoring via headphones
or monitor speakers.
This section describes the procedure for recording to the Cubase AI software we installed earlier via
the AUDIOGRAM interface.
Cubase AI 6 is used for the examples in this manual. For details about other versions of Cubase
AI or Cubase AI operation in general, refer to the PDF manual provided with the software.
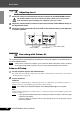
Cubase AI Setup
1
Set the computer output to the maximum level.
For details on how to make the setting refer to the “The recorded sound is too low in level.” section in the
“Troubleshooting” on page 20.
2
Launch Cubase AI.
Windows:
Click [Start] → [All Program] → [Steinberg Cubase AI *] → [Cubase AI *] to launch the program. (“*”
indicates where the version number appears in the actual icon name.)
If the ASIO Direct Sound Full Duplex Driver dialog window appears, click [OK].
Mac:
Double-click the [Application] → [Cubase AI *]. (“*” indicates where the version number appears in the
actual icon name.)
• If you specified a file destination when installing the Cubase AI software, launch the appli-
cation from that location.
• Create a Cubase AI shortcut or alias on your desktop so you can easily launch the pro-
gram when required.
Step
4
Adjusting Level
Step
5
Recording with Cubase AI
CAUTION
LEVEL controls
OUT LEVEL control
Level indicator
NOTE
NOTE
NOTE