Version 2.
AW4416 Versión 2.0 Apéndice del manual Este apéndice del manual explica las funciones y especificaciones que han sido añadidas o cambiadas en versión 2.0 del software del sistema del AW4416. La sección “Operación” explica cómo utilizar la nueva funcionalidad, y “Referencia” proporciona explicaciones detalladas acerca de todos los elementos en las páginas que se han añadido.
Operación Extensiones a la función Quick Rec La pantalla Quick Rec tiene ahora dos páginas: Quick Rec 1 y Quick Rec 2.Las operaciones correspondientes a la anterior página Quick Rec se realizarán en la página Quick Rec.1, la página nueva Quick Page 2 permite a los diferentes canales de entrada/señales de entrada efectuar un patch a las pistas del grabador.
AW4416 Versión 2.0 Apéndice del manual 4 En el área REC.TR, mueva el cursor hacia el jack para la pista destino de patch deseada y pulse la tecla [ENTER]. 6 La fuente del patch y el destino de patch en la pantalla estarán conectados por un cable de patch. Cuando haya realizado todas las conexiones de cable del patch, mueva el cursor hacia el botón EXECUTE de la parte inferior derecha de la pantalla y pulse la tecla [ENTER]. Aparecerá la siguiente pantalla emergente.
Definiciones de combinaciones de teclas La nueva versión del programa del sistema permite asignar funciones deseadas a varias combinaciones de la tecla [SHIFT] situada a la derecha de la pantalla (la tecla [CTRL]) para crear las propias combinaciones de teclas. 1 3 El símbolo correspondiente se destacará y podrá asignarle una función. En la sección UNIT, pulse la tecla [UTILITY] → tecla [F5] (CTRL Key Asgn.). Consejo Aparecerá la página CTRL Key Asgn añadida en versión 2.0.
AW4416 Versión 2.0 Apéndice del manual Funciones MIDI añadidas/modificadas La funcionalidad relacionada con MIDI ha sido mejorada notablemente en la version 2.0. Las siguientes funciones y especificaciones han sido añadidas o modificadas. ● Los distintos elementos en la página MIDI Setup y la página MIDI Sync han sido reorganizadas en la página MIDI Setup 1 y en la MIDI Setup 2.
H Rx CH (Canal de recepción) ● ECHO Si este botón está activo, los cambios de control recibidos serán “thru-ed” (retransmitidos) sin ningún cambio del conector MIDI OUT/TO HOST. C PARAMETER CHANGE Aquí puede efectuar ajustes de trasmisión/recepción para mensajes exclusivos del sistema que controlen los parámetros del AW4416( mensajes de cambio de parámetro Cada botón tiene la siguiente función.
AW4416 Versión 2.0 Apéndice del manual ■ Página MIDI Setup 2 En esta página puede seleccionar el puerto usado para transmisión y recepción MIDI: Conectores MIDI OUT/THRU, conector TO HOST, o ranura opcional. Aquí puede seleccionar los mensajes de sincronización que serán transmitidos a dispositivos externos.
Utilizar cambios de control para usar los parámetros del AW4416 2 Desplace el cursor en la fila CTL CHG. No. y utilice el dial [DATA/JOG] para seleccionar el número de cambio de control al que se asignará un parámetro. 3 Desplace el cursor al área PARAMETER, y utilice el dial [DATA/JOG] para seleccionar el parámetro que desee asignar y sus valores. En la versión 2.
AW4416 Versión 2.0 Apéndice del manual ■ Grabar/reproducir operaciones de parámetro en un secuenciador MIDI Con estos ajustes, utilizar el parámetro del AW4416 causará la transmisión del cambio de control asignado a ese parámetro en la página CTL Asgn. Cuando se recibe un cambio de control desde un dispositivo externo, el parámetro correspondiente cambiará. Aquí puede usar cambios de control para grabar/ reproducir operaciones de parámetro del AW4416 en un secuenciador MIDI.
Utilizar cambios de parámetro para ejecutar operaciones del AW4416 En la versión 2.0, un tipo de mensaje exclusivo del sistema llamado “cambios de parámetro” puede usarse (en lugar de cambios de control) para utilizar parámetros internos del AW4416. A continuación se explica como grabar/reproducir cambios de parámetros en el secuenciador MIDI. 1 Ajuste el AW4416 and y el secuenciador MIDI para que funcionen sincronizados usando MTC. Para más detalles acerca de conexiones consulte la P.10.
AW4416 Versión 2.0 Apéndice del manual A CATEGORY Si selecciona una categoría de la columna derecha de botones (SCENE MEM.–REMOTE), desplace el cursor al área situada a la derecha del botón correspondiente, y gire el dial [DATA/JOG] para seleccionar el contenido dentro de esa categoría que se transmitirá. Desplace el cursor en ela categoría de información que desee transmitir como información de volcado y pulse la tecla [ENTER] para seleccionar esa categoria Categoría Valores SETUP MEM.
5 Coloque el secuenciador MIDI en modo preparado para grabar. Antes de grabar información de volcado en su secuenciador MIDI, asegúrese de que la función MIDI Thru (a veces denominada “Patch Thru” o “MIDI Echo”) del secuenciador esté desactivada. Si esta función está activada, la información de volcado transmitido desde el AW4416 se devolverá inmediatamente al AW4416, provocando un mal funcionamiento. 6 Mueva el cursor al botón TRANSMIT y pulse la tecla [ENTER]. El volcado general empezará.
AW4416 Versión 2.0 Apéndice del manual En este estado, puede pulsar la tecla [F1] para acceder a la pantalla REMOTE. También puede definir ajustes para que un mensaje MIDI con un valor fijo se transmita sólo cuando se active la tecla [ON] (iluminada). Por ejemplo, si asigna un mensaje program change #1, el mensaje de cambio de programa correspondiente se transmitirá cada vez que active la tecla [ON].
6 • En la página MIDI Setup 1, compruebe que el botón ECHO en el área CONTROL CHANGE esté desactivado. Si el botón ECHO está activado, los cambios de control recibidos desde el dispositivo externo se transmitirán de nuevo al dispositivo externo, provocando un mal funcionamiento de la unidad. • En la página MIDI Setup 2, compruebe que el conmutador MIDI OUT/THRU esté ajustado a OUT.
AW4416 Versión 2.0 Apéndice del manual 6 Mueva el cursor al botón LEARN situado encima del área de visualización del mensaje (deslizador), y pulse la tecla [ENTER]. El botón LEARN del deslizador se activará. Mientras este botón esté iluminado, los mensajes de canal (nota activada/desactivada, cambio de control, cambio de programa, etc.
■ Asignar un mensaje MIDI a una tecla [ON] 4 Es posible asignar un mensaje MIDI deseado a una tecla [ON] de manera que el mensaje se transmitirá al pulsar la tecla. Pulse una de las teclas [F1]–[F4] para visualizar el deslizador/tecla [ON] al que desea asignar un mensaje MIDI. En este ejemplo se selecciona la página Remote A 1-8.
AW4416 Versión 2.0 Apéndice del manual 7 Utilice el pedal sustain conectado al sintetizador. Se introducirá un mensaje control change #64 (Hold-on) con un valor de 127 (hexadecimal 7F) en el área de mensajes de la tecla [ON]. En este mensaje, el primer valor de las casillas que se prolongan hacia la derecha (es decir, el primer byte) es el canal MIDI, el segundo es el número de control, y el tercer byte es el valor real del mensaje.
Funcionalidad adicional para Automezcla Debido a la adición de la función MIDI Remote, a partir de ahora las operaciones de ésta podrán grabarse/editarse en la automezcla. que las operaciones se graben en automezcla como eventos de MIDI Remote.
AW4416 Versión 2.0 Apéndice del manual 3 Desplace el cursor al botón REMOTE situado a la derecha de la lista de eventos, y pulse la tecla [ENTER]. La lista de eventos sólo mostrará los eventos de MIDI Remote (operaciones de deslizador u operaciones de la tecla [ON]). En esta pantalla, cada columna de la lista de eventos visualiza la siguiente información. 1 2 3 A TIME Indica el tiempo al que se grabará el evento, en unidades de horas/minutos/segundos/milisegundos. (La unidad mínima es 25 milisegundos.
Sistema plug-in Mini YGDAI compatible con operaciones de tarjeta I/O Las páginas Plug-In 1 y Plug-In 2 se han añadido a los parámetros de pantalla para tarjetas I/O compatibles con el sistema plug-in Mini YGDAI. Para acceder a la página Plug-In 1, pulse la tecla [AUX7] → [F5]. Para acceder a la página Plug-In 2, pulse la tecla [AUX8] → [F5]. El contenido y funcionamiento de las páginas Plug-In 1/Plug-In 2 dependerá del tipo de tarjeta I/O que esté instalada.
AW4416 Versión 2.0 Apéndice del manual Acceder a una tarjeta I/O Cuando se recupera una escena del AW4416 (o cuando se carga una canción), los ajustes de MEM.BANK 1 se restablecen de forma automática a la tarjeta I/O en la ranura opcional 1, y los ajustes de MEM.BANK 2 a la tarjeta I/O en la ranura opcional 2. No obstante, si fuera necesario, puede realizar esta operación manualmente. Este método permite restablecer los ajustes de MEM.BANK 1 a la tarjeta I/O de la ranura opcional 2 (o viceversa).
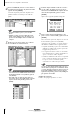
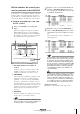
Referencia Esta sección explica todas las funciones de las páginas añadidas a la versión 2.0 del AW4416. Pantalla QUICK REC Página Quick Rec 2 Aplicar patches de fuentes de entrada a las pistas de forma visual Función 1 3 2 4 5 Aplicar patches de 16 fuentes de entrada individualmente a las pistas de audio 1–16, y definir ajustes para la grabación simultánea en una operación.
Pantalla QUICK REC • Todas las pistas correspondientes se ajustarán en el modo preparado para grabar. • Es posible conectar la salida directa de un canal a más de una pista. No obstante, no puede conectar más de una salida directa en la misma pista. • Se pueden conectar un máximo de 16 cables de patch. Si ha conectado los 16, no será posible modificar el direccionamiento a menos que desconecte uno de los cables.
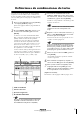
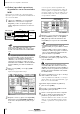
Pantalla UTILITY Página CTRL Key Asgn. Asigna funciones a la tecla [CTRL] + teclas de función Función 1 Selecciona la función que se ejecutará si mantiene pulsada la tecla [CTRL] (tecla [SHIFT] de la derecha) y pulsa una tecla [F1]–[F5]. Funcionamiento de las teclas • Tecla [UTILITY] → Tecla [F5] (CTRL KeyAsgn.) • Pulse repetidamente la tecla [UTILITY] hasta que aparezca la pantalla de la derecha. 2 3 4 5 Funcionamiento del ratón Botón M → Botón UTIL → Ficha CTRL KeyAsgn.
Pantalla UTILITY C Botón ASSIGN Este botón ejecuta la asignación de función. Si desplaza el cursor a este botón y pulsa la tecla [ENTER], una ventana emergente le pedirá su confirmación. Mueva el cursor a OK y pulse la tecla [ENTER] para realizar la asignación. D Botón SHIFT E Botón CTRL Utilice estos botones para seleccionar la función de la tecla [SHIFT] en la parte derecha de la pantalla. Si el botón SHIFT está activado, la tecla funcionará como una tecla [SHIFT], como de costumbre.
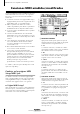
Pantalla MIDI Página CTL Asgn. Asignar parámetros para controlar cambios Función 1 2 Asigna los parámetros internos del AW4416 para controlar los números de cambio (0–95, 102-119). Funcionamiento de las teclas • Tecla [MIDI] → Tecla [F4] (CTL Asgn.) (*1) • Pulse repetidamente la tecla [MIDI] hasta que aparezca la pantalla de la derecha. *1. En la versión 2.0, las fichas visualizadas en la parte inferior de la pantalla MIDI se dividen en dos grupos.
Pantalla MIDI • Lista de parámetros que se pueden asignar Parámetro 1 Parámetro 2 Parámetro 3 NO ASSIGN Contenido Ningún parámetro asignado Parámetro 1 Parámetro 2 Parámetro 3 CHANNEL Utiliza el deslizador del canal especificado INPUT 1-24 Canal de entrada 1-24 MONI 1–16 Canal de monitorización 1–16 RETURN 1/2 Canal de retorno 1/2 Utiliza el deslizador del canal de salida estéreo o el nivel master del bus AUX 1–8/bus 1–8.
Parámetro 1 Parámetro 2 Parámetro 3 Contenido Controla el canal EQ y la atenuación. Utilice el parámetro 2 para seleccionar el tipo del parámetro que desee controlar y utilice el parámetro 3 para especificar el canal deseado.
Pantalla MIDI • Parámetros por defecto de cada número de cambio de control CTL CHG.
Página Bulk Dump Transmitir ajustes internos del AW4416 a través del volcado general Función Transmite el contenido de diferentes memorias del AW4416 (memoria de escena, bibliotecas, automezcla, etc.) y ajustes relacionados con MIDI como información de volcado desde el conector MIDI OUT/THRU (o conector TO HOST/ranura opcional). 1 Funcionamiento de las teclas • Tecla [MIDI] → Tecla [F5] (Volcado general) (*1) • Pulse repetidamente la tecla [MIDI] hasta que aparezca la pantalla mostrada a la derecha.
Pantalla MIDI B Botón ALL E INTERVAL Si desplaza el cursor a este botón y pulsa la tecla [ENTER], todos los botones del área 1 se activarán. Además, el ajuste “ALL” se seleccionará como el valor para SCENE MEM.–REMOTE. C Botón REQUEST Si desplaza el cursor a este botón y pulsa la tecla [ENTER], se transmitirá un mensaje “bulk dump request”, solicitando la información de volcado general seleccionada en 1, desde el conector MIDI OUT/THRU (o conector TO HOST/ranura opcional).
Páginas Remote A 1-8/Remote A 9-16/ Remote B 1-8/Remote B 9-16 Controlar de forma remota los dispositivos MIDI externos Función 2 3 4 5 Utiliza los deslizadores 1–16/teclas [ON] 1–16 para transmitir los mensajes MIDI deseados y controlar de forma remota los dispositivos MIDI externos. Funcionamiento de las teclas 1 • Tecla [MIDI] → Tecla [F1] (Remote A 1-8) – Tecla [F4] (Remote B 9-16) (*1) • Pulse repetidamente la tecla [MIDI] hasta que aparezca la pantalla mostrada a la derecha. *1.
Pantalla MIDI B Botón NAME EDIT D Botones LEARN Este botón le permite editar el nombre (máximo de ocho caracteres) asignado al deslizador/tecla [ON]. Si desplaza el cursor a este botón y pulsa la tecla [ENTER], aparecerá una ventana emergente, que le permitirá introducir el nombre deseado. C Botón LATCH/UNLATCH Este botón selecciona el funcionamiento cuando se pulsa [ON]. Cuando desplaza el cursor a este botón y pulsa la tecla [ENTER], el botón cambiará entre los siguientes dos ajustes.
• Parámetros por defecto para la página MIDI remote Remote A 1–8 Canal Tecla [ON] Nombre Mensaje Deslizador Nombre Mensaje 1 No assignment CH1 VOL Control change #7 (MIDI ch=1) 2 No assignment CH2 VOL Control change #7 (MIDI ch=2) 3 No assignment CH3 VOL Control change #7 (MIDI ch=3) 4 No assignment CH4 VOL Control change #7 (MIDI ch=4) 5 No assignment CH5 VOL Control change #7 (MIDI ch=5) 6 No assignment CH6 VOL Control change #7 (MIDI ch=6) 7 No assignment CH7 VOL Control c
Pantalla MIDI ■ Funciones adicionales en las páginas Remote A 1-8 – Remote B 9-16 En las páginas Remote A 1-8 – Remote B 9-16, si mantiene pulsada la tecla [SHIFT] se asignarán las siguientes funciones a las teclas [F1]–[F5]. • Tecla [F1] (CHANGE TAB) Cambia entre los dos siguientes grupos de fichas. • Tecla [F2] (LATCH/UNLATCH) Cambia entre Latch y Unlatch como el funcionamiento cuando se pulsa la tecla [ON]. Es la misma función que el botón LATCH/UNLATCH (3).
MIDI data format 1. Functions 1.7 MTC slave synchronization 1.1 MIDI setup There are two types of serial connector: the MIDI connectors and the TO HOST connector. Each has the same functionality, and you can select either of these to use, depending on the type of device that will be connected. Both types use the MIDI format for communication. When using the TO HOST connector, you must select one of the three transmission methods listed below.
MIDI data format 2.1.5 OUT/THRU Select whether the MIDI OUT/THRU connector will function as OUT or as THRU. If THRU is selected, messages received at the MIDI IN connector will be re-transmitted without change from the MIDI OUT/THRU connector. Regardless of the MIDI/HOST setting, the connector will function as a THRU connector if the THRU setting is selected. If you want to use the connector as MIDI OUT, the MIDI/HOST setting must be OUT. 2.1.
4.3 CONTROL CHANGE (Bn) < Reception > < Reception > This message is received when [Control Change RX] is ON and the [Rx CH] matches. However if [OMNI] is ON, this is received regardless of the channel. This message is echoed if [Control Change ECHO] is ON. Parameters will be controlled according to the [Control Change Assign Table] settings. If a message is received while the [Control Change Assign Table] is displayed, the cursor will move to that control number.
MIDI data format < Reception > If the AW4416 is operating as an MMC Slave, the transport will stop when this message is received with a matching device number or a device number of 7F. STATUS ID No. Device ID 11110000 F0 01111111 7F 0ddddddd dd Command 00000110 06 EOX 00000001 01 11110111 F7 System Exclusive Message Real Time System Exclusive Destination (00-7E, 7F:all call) Machine Control Command(mcc) sub-id Stop(MCS) End Of Exclusive 4.13.1.
4.13.1.9.1 MMC INFORMATION FIELD - TRACK RECORD READY < Reception > This message is received if the AW4416 is operating as an MMC Slave and the device number matches. REC SELECT will be switched on/off for the recorder tracks as specified by the Standard Track Bitmap data.
MIDI data format CHECK SUM 0eeeeeee ee EOX 11110111 F7 ee=(INVERT('L'+'M'+...+ds+ ...+de)+1) AND 7Fh End Of Exclusive All data is divided into 4 bit units. 4.13.2.4 Setup Memory Bulk Dump Request Format STATUS 11110000 F0 ID No. 01000011 43 SUB STATUS 0010nnnn 2n FORMAT No.
4.13.2.10 Dynamics Library Bulk Dump Request Format STATUS 11110000 F0 ID No. 01000011 43 SUB STATUS 0010nnnn 2n FORMAT No. 01111110 01001100 01001101 00100000 00100000 00111000 01000011 00110011 00110110 DATA NAME 01011001 0mmmmmmm EOX 7E 4C 4D 20 20 38 42 39 38 59 mm 11110111 F7 System Exclusive Message Manufacturer's ID (YAMAHA) n=0-15(MIDI Channel No.116) Universal Bulk Dump 'L' 'M' ' ' ' ' '8' 'B' '9' '8' 'Y' m=0-127 (Dynamics Library No.1-128) End Of Exclusive 4.13.2.
MIDI data format 4.13.2.16 Channel Library Bulk Dump Request Format STATUS 11110000 F0 ID No. 01000011 43 SUB STATUS 0010nnnn 2n FORMAT No. 01111110 01001100 01001101 00100000 00100000 00111000 01000011 00110011 00110110 DATA NAME 01001000 0mmmmmmm EOX 7E 4C 4D 20 20 38 42 39 38 48 mm 11110111 F7 System Exclusive Message Manufacturer's ID (YAMAHA) n=0-15(MIDI Channel No.116) Universal Bulk Dump 'L' 'M' ' ' ' ' '8' 'B' '9' '8' 'H' m=0-64 (Channel Library No.0-64) End Of Exclusive 4.13.2.
FORMAT No. 01111110 01001100 01001101 00100000 00100000 00111000 01000011 00110011 00110110 DATA NAME 01000011 00100000 EOX 11110111 7E 4C 4D 20 20 38 42 39 38 43 20 F7 Universal Bulk Dump 'L' 'M' ' ' ' ' '8' 'B' '9' '8' 'C' ' ' End Of Exclusive 4.13.3 Parameter Change 4.13.3.1 Basic format STATUS 11110000 F0 ID No.
MIDI data format 4.13.3.5 Parameter Change (byte operation for type 0x01:setup memory) < Reception > 4.13.3.7 Parameter Value Request (type 0x00:edit buffer, 0x01:setup memory) < Reception > This message is received if [Parameter Change RX] is ON and the [Rx CH] matches the MIDI channel included in the Sub Status. This message will be echoed if [Parameter Change ECHO] is ON. When this message is received, the specified parameter will be controlled.
function number channel Tx/Rx -----------------------+------------------------+----------------+--------0x00 scene recall 0-96(memory 0-96) 0x00 Tx* /Rx 0x01 eq lib recall 0-127(library 1-128) 0-26,32-47 Tx/Rx 0x02 dyn lib recall 0-127(library 1-128) 0-23,26,32-47 Tx/Rx 0x03 eff lib recall 0-127(library 1-128) 24,25 Tx/Rx 0x04 ch lib recall 0-64(library 0-64) 0-26,32-47 Tx/Rx 0x05 patch lib recall 0-20(library 0-20) 0 Tx/Rx 0x10 scene store 1-96(memory 1-96) 0x00 Rx only 0x11 eq lib store 40-127(library 41-
YAMAHA CORPORATION IP 48 Printed in Japan Pro Audio & Digital Musical Instrument Division P.O.