ABL Blu-ray Disc Player BD-S677 Owner’s Manual 5# %& USB
Information for Users on Collection and Disposal of Old Equipment and Used Batteries These symbols on the products, packaging, and/or accompanying documents mean that used electrical and electronic products and batteries should not be mixed with general household waste. For proper treatment, recovery and recycling of old products and used batteries, please take them to applicable collection points, in accordance with your national legislation and the Directives 2002/96/EC and 2006/66/EC.
The laser component in this product is capable of emitting radiation exceeding the limit for Class 1. LASER Specification: Class 1 LASER Product Wave length: 790 nm (CDs)/658 nm (DVDs)/405 nm (BDs) Laser output: max. 1 mW • Hereby, Yamaha Music Europe GmbH, declares that this BD-S677 is in compliance with the essential requirements and other relevant provisions of Directive 1999/5/EC. • This product is limited to indoor use only. Yamaha Music Europe GmbH Siemensstr.
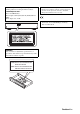
Caution: Read this before operating your unit. 1 2 3 4 5 6 7 8 9 10 11 12 13 14 15 16 17 To assure the finest performance, please read this manual carefully. Keep it in a safe place for future reference. Install this sound system in a well ventilated, cool, dry, clean place-away from direct sunlight, heat sources, vibration, dust, moisture, and/or cold. For proper ventilation, allow the following minimum clearances.
Contents 1. Introduction 1 5. Additional information What you can do with this Player ..................... 2 Troubleshooting ............................................... 38 Wide variety of supported discs and file formats ........... 2 Enhanced network features............................................. 2 Easy setup and operations............................................... 2 Power ............................................................................ 38 Basic operation.................
INTRODUCTION What you can do with this Player Various discs Network streaming contents 5# %& USB contents Wireless network (WPS supported) PC/NAS contents (DLNA) Smartphone contents (Miracast) ■ Wide variety of supported discs and file formats – Blu-ray Disc™, DVDs, SA-CDs and CDs (p. 23) – Blu-ray 3D™ (p. 11), BONUSVIEW™ and BD-Live™ (p. 25) – Video, music and photo files on DVD-R/RW discs, CD-R/RW discs and USB memory devices (p.
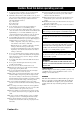
1 About discs and files – 12 cm (5”) and 8 cm (3”) discs can be played back in this Player. Do not use an 8 cm (3”) to 12 cm (5”) adapter. – Use discs that conform to compatible standards as indicated by the presence of official logos on the disc label. Playback of discs not complying with these standards is not guaranteed. In addition, the image quality or sound quality is not guaranteed even if the discs can be played back.
About discs and files Region management information Destination Russia BD-Video Region code “C” or “ABC” DVD-Video Region number “5” or “ALL” 5 ALL Notes – Blu-ray Disc/DVD video operations and functions may be different from the explanations in this manual and some operations may be prohibited due to disc manufacturer’s settings. – If a menu screen or operating instructions are displayed during playback of a disc, follow the operating procedure displayed.
About discs and files ■ Disc precautions – Blu-ray Disc, DVD and CD discs are sensitive to dust, fingerprints and especially scratches. A scratched disc may not be able to be played back. Handle discs with care and store them in a safe place. Proper disc storage Place the disc in the center of the disc case and store the case and disc upright. Avoid storing discs in locations subject to direct sunlight, close to heating appliances or in locations of high humidity.
Controls and functions ■ Front panel 5# %& USB 1 2 34 1 p (On/Standby) Turns this Player on/Sets to standby mode. Press and hold p on the front panel for more than 5 seconds to reset this Player (system reset). 5 6 7 8 9 0 A 7 (Search backward/Skip backward) Press to skip backward, and press and hold to search backward. 8 3 SA-CD indicator Lights up when an SA-CD is loaded and the SA-CD layer (p. 4) is selected.
Controls and functions ■ Rear panel 1 Introduction AC IN DIGITAL OUT COAXIAL NETWORK AUDIO OUT OUT IN REMOTE CONTROL HDMI 1 2 OPTICAL 3 USB 4 5 6 7 1 AUDIO OUT (L/R) (p. 13) 5 NETWORK (p. 14) 2 HDMI (p. 11) 6 REMOTE CONTROL (OUT/IN) (p. 17) 3 DIGITAL OUT (COAXIAL/OPTICAL) (p. 13) 7 AC IN (p. 17) 4 USB (p.
Controls and functions ■ Remote control Note 1 Infrared signal transmitter: Outputs infrared signal. Aim this window to the remote control sensor (p. 10). – 2 p: Turns this Player on or sets it to standby mode. will appear on the top left corner of the screen when the pressed button is not available. ZOOM DVD VIDEO PHOTO : Zooms in/out. The size of the screen will change each time you press the button (zoom in/out: 3 steps each).
Controls and functions Note G REPEAT A/B BD DVD CD VIDEO MUSIC : Plays back a specific part you want to repeat. 1 Press REPEAT A/B at the scene where you want to set the start point. “A-” is displayed on the screen. – Specific operations may be different depending on the disc. Follow the instructions of each menu screen. 2 Press REPEAT A/B again at the scene where you want to set the end point. “A-B” is displayed on the screen. Repeat playback starts.
Controls and functions Loading the batteries in the remote control 1 3 2 Notes – Change both batteries when the operation range of the remote control decreases. – Use AAA, R03, UM-4 batteries. – Make sure that the polarities are correct. Refer to the illustration inside the battery compartment. – Remove the batteries if the remote control is not to be used for an extended period of time. – Do not use old batteries together with new ones.
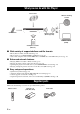
CONNECTION Video/audio connections Make the corresponding video/audio cable connections depending on the equipment you want to use. 2 Hints Enjoying video/audio using a TV and an AV receiver Refer to “Connecting to a TV via an AV receiver” (p. 12). TV AV receiver This Player 5# %& USB Video/audio (HDMI) Video (HDMI) Speakers ♪ Audio ♪ Enjoying video/audio using only a TV Refer to “Connecting to a TV directly” (p. 12).
Video/audio connections ■ Connecting to a TV via an AV receiver ■ Connecting to a TV directly Connect this Player to the TV with an HDMI cable. Connect this Player to the AV receiver and the AV receiver to the TV with HDMI cables. For details on speaker connections, refer to the owner’s manuals of the AV receiver and speakers. Caution! Caution! Do not connect the power cable of this Player until all connections are completed.
Video/audio connections ■ Connecting to a TV and audio equipment Connect this Player to the TV with an HDMI cable, and this Player to the audio equipment with an audio cable (digital optical, digital coaxial or stereo pin cable). 2 Caution! Connection Do not connect the power cable of this Player until all connections are completed.
Network connection By connecting this Player to the network (wireless or wired), you can use the following features. – Playing back DLNA server (PC or NAS) contents (p. 19) – Playing back various network service contents (p. 21) – Playing BD-Live compatible discs (p. 25) – Operating this Player from mobile devices (AV CONTROLLER) (p. 22) Notes – To use the network services or BD-Live feature, a broadband internet connection is required.
Network connection ■ DLNA server setup By using DLNA, you can share multimedia contents (such as videos, music and photos) stored on your DLNA server (PC or NAS) connected to your network, and enjoy those contents with this Player. In addition, you can use your mobile device (such as a smartphone and a tablet) as a wireless controller to operate this Player through the network. To use the DLNA features, perform the following DLNA server setup after making the network connection (p. 14).
USB connection By connecting a USB memory device to the USB connector on the front or the rear panel of this Player, you can play multi-media files stored on the USB memory device (p. 19). Notes – Yamaha cannot guarantee that all brands’ USB memory devices will operate with this Player. – Connect a USB memory device to one of the USB connectors (front/rear) of this Player when using BD-Live feature (p. 26).
Other connections ■ Connecting to the REMOTE CONTROL jacks – For details about the SCENE function, refer to the owner’s manual supplied with your Yamaha AV receiver. – You can connect a Yamaha component (such as CD player) supports the SCENE function to the REMOTE CONTROL (OUT) jack of this Player. ■ Connecting the power cable – After all connections are completed, plug the supplied power cable into the AC IN on the rear of the Player. Then plug into AC outlet.
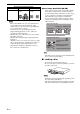
PLAYBACK Initial settings ■ Setting with the Easy Setup 3 Press 2/3 to select Yes, then press ENTER. Easy Setup allows you to set language, resolution, and screen aspect ratio easily. Easy Setup screen is displayed when you turn this Player on for the first time after purchase. Same setting can be performed from SETUP menu = System = Easy Setup. 1 When Easy Setup screen is displayed, press ENTER to start Easy Setup. 4 Press 2/3 to select one of the following setup methods, then press ENTER.
HOME menu The HOME menu allows you to perform the following basic operations of this Player. – Browsing and playing multi-media files on various discs, USB memory devices and your DLNA servers (PC or NAS) – Accessing to various network services (p. 21) – Displaying the SETUP menu (p. 27) – For details on playable discs and formats, see page 3. – To play DLNA server contents on this Player, the media sharing setting (p. 15) on the DLNA server should be configured.
HOME menu Note Operations for viewing photos – Note that the only the file type selected on this step will be displayed in the following step. For example, if you selected Photo folder in this step, only photo files are displayed after this step. While viewing photos, the buttons on the remote control work as shown below. : Stops slide show and returns to the file browser. : Pauses a slide show. : Plays a slide show. : Moves to a next photo. : Moves to a previous photo.
Using network services You can enjoy multimedia contents (such as photos and videos) using the following network services. – Dropbox – Picasa Web Albums – YouTube 3 Notes 1 Press HOME to move to HOME menu screen. Note Hint – To directly move to the YouTube menu screen, press YouTube. 2 Press 5/a to select Network Services, then press ENTER. – Operation procedures after step 4 vary depending on the menu items provided by each service.
Enjoying smartphone pictures and videos on the TV screen (Miracast™) Miracast is a solution for seamlessly displaying video between devices, without cables or a network connection via an access point (Wi-Fi Direct). You can do things like view pictures from a Miracast-compatible device (smartphone, etc.) on the screen of the TV connected to this Player. Notes – To check if your device is Miracast compliant, refer to the owner’s manual of the device.
Advanced playback operation This chapter explains playback of commercially available Blu-ray Discs, DVDs, SA-CDs, CDs, and recorded DVDRW/R discs. Note – For the basic playback operation, see page 8. To display On Screen menu, press ON SCREEN. After that, press 5/a/2/3 to select an item, then press ENTER to operate the desired function.
Advanced playback operation ■ Status menu This shows various settings, such as subtitles, angle settings and the title/chapter/track number currently played back. To display status menu, press STATUS. Status menu contains following menus.
Advanced playback operation ■ Program play DVD ■ Using Search CD BD DVD CD VIDEO MUSIC PHOTO This allows you to program playback order of audio disc tracks or DVD chapters. Press PROGRAM during playback to display the PROGRAM window to program playback order. You can program up to 15 tracks/chapters. This allows you to jump to the specified point during playback. Example: Programming the playback order of CD tracks 2 Press 5/a/2/3 to select one of the item below, then press ENTER.
Advanced playback operation ■ Using Picture in Picture function (secondary audio/video playback) BD-Video that includes secondary audio and video compatible with Picture in Picture can be played back with secondary audio and video simultaneously as a small video in the corner. Primary video Secondary video Notes – Yamaha cannot guarantee that all brands’ USB memory devices will operate with this Player.
SETTINGS SETUP menu The SETUP menu enables various audio/visual settings and adjustments for functions using the remote control unit. Menu/Submenu System Item Sets the power-saving function to on/off. HDMI Control Sets this Player to receive control signal from the remote control of your TV/AV receiver. 30 Load Default Resets all settings to the default setting except Security setting. 30 Upgrade Performs upgrade of this Player.
SETUP menu Menu/Submenu TV Display Setting Video Process Closed Caption Audio Output Item Page Selects 3D or 2D videos. 32 TV Screen Sets the screen aspect ratio of the connected TV, and adjust the video output. 32 HDMI Resolution Selects the HDMI video output resolution. 33 TV System Selects the TV System from NTSC/PAL/Multi. 33 Color Space Selects Color Space from YCbCr 4:4:4/YCbCr 4:2:2/Full RGB/RGB. 33 HDMI Deep Color Selects HDMI Deep Color from 30 bits/36 bits/48 bits/Off.
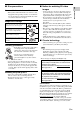
SETUP menu ■ Example of SETUP menu operation You need to call up the SETUP menu screen to perform settings for this Player. The following is the explanation for basic operations of the SETUP menu. 4. Select a desired setting. Press 5/a to select On or Off, then press ENTER. REPEAT A/B SUBTITTLE ANGLE CLEAR SEARCH MIRACAST 2ND AUDIO HOME TOP MENU 4 Settings PIP AUDIO SETUP POP-UP MENU Hint – You need to use the number buttons to enter numbers (such as password) for some menu items.
SETUP menu ■ General Setting The default settings are marked with “ * ”. System Load Default You can reset all settings of this Player to default setting except Security setting (p. 31). For details on default settings, see pages 27–34. Upgrade You can upgrade the software manually from USB Storage or Network. For details on software upgrade, refer to “Software upgrade” (p. 37). Auto Power Standby Sets the power-saving function to on/off.
SETUP menu Menu You can prioritize the language for disc menu. English, Français, 中文 , Español, Deutsch, Italiano, Nederlandse, Portuguese, Danish, Svenska, Finnish, Norwegian, Polski, Pyccкий, Korean, Japanese, More Audio You can prioritize the audio language for Blu-ray Disc/ DVD playback. For details on setting items, see “Menu” (p. 31). Subtitle You can prioritize the language for Subtitle. (The default settings in [Language] differ depending on your model.
SETUP menu Connection Test You can perform an internet connection test. If the test is failed, please check “IP Setting” (p. 32) and perform the test again. IP Setting You can configure the network settings. Auto* Select to automatically configure the network settings of this Player with the DHCP server. Manual Select to configure the network settings (IP Address, Subnet Mask, Default Gateway, and DNS) manually. BD-Live Connection You can set access restriction to BD-Live contents.
SETUP menu Auto*, Disc Native, 480i/576i, 480p/576p, 720p, 1080i, 1080p Note – To output HD audio (Dolby TrueHD or DTS-HD Master Audio) from HDMI terminal, set HDMI Resolution to Auto or more than 720p. TV System You can select TV System from PAL, NTSC and Multi. Set the same TV System as your TV set. For more details on output formats, refer to “About the HDMI video output formats” (p. 36). NTSC, PAL, Multi (The default setting differs depending on your model.
SETUP menu ■ Audio Setting SACD/CD Layer Selects the layer to be played when an SA-CD/CD hybrid disc is played back. SACD*, CD The default settings are marked with “ * ”. Hint Audio Output – The SA-CD indicator on the front panel lights up when an SA-CD is loaded and the SA-CD layer is selected. Coaxial / Optical You can select the output mode of COAXIAL jack and OPTICAL terminal. For more details on output formats, refer to “About the audio output formats” (p. 35).
SETUP menu ■ About the audio output formats Source format PCM 2ch PCM 5.1ch Dolby Digital with SA or BCS*1 DTS PCM 2ch without SA or BCS*1 PCM 5.1ch without SA or BCS*1 PCM 7.1ch without SA or BCS*1 without SA or BCS*1 Dolby Digital PCM up to 5.1ch Dolby Digital Plus PCM up to 7.1ch Dolby TrueHD PCM up to 7.1ch DTS PCM up to 5.
SETUP menu ■ About the HDMI video output formats When TV System is set to NTSC Contents HDMI Resolution Auto Disc Native 1080p 1080i 720p 480p/576p 480i/576i BD-Video with 1080p/24Hz content *1 1080p 24Hz 1080p 24Hz/ 60Hz *3 1080i 60Hz 720p 60Hz 480p 480i BD-Video without 1080p/24Hz content *1 *2 1080p 60Hz 1080i 60Hz 720p 60Hz 480p 480i DVD-Video *1 *2 1080p 60Hz 1080i 60Hz 720p 60Hz 480p 480i Others *1 *1 1080p 60Hz 1080i 60Hz 720p 60Hz 480p 480i When TV System is
Software upgrade New software that provides additional features or product improvements will be released as needed. We recommend upgrading the software of this Player to the latest version periodically. To check for the availability of a software upgrade, visit http://download.yamaha.com/ Note – Do not remove the USB memory device, set this Player to standby mode or unplug the power cable/network cable while the software upgrade is being performed. 1. Prepare for the software upgrade.
ADDITIONAL INFORMATION Troubleshooting Refer to the table below when this Player does not function properly. If the problem you are experiencing is not listed below or if the instruction below does not help, turn off this Player, disconnect the power cable, and contact the nearest authorized Yamaha dealer or service center. ■ Power Problem Possible causes and solutions No power. – Connect the AC power cable properly. – Press p on the front panel to turn on the power. The Player power is turned off.
Troubleshooting ■ Picture Problem Possible causes and solutions No picture. – Make sure that the cables are connected correctly. (p. 11) – Make sure that the connected TV or the AV receiver is set to the correct input. – With no disc inserted, or playback stopped, press and hold and on the front panel simultaneously to set video resolution to the default value. If a picture is still not output, press and hold on the front panel for approximately 5 seconds to switch NTSC/PAL.
Troubleshooting Problem Possible causes and solutions Cannot download BD-Live contents. – Verify that this Player can connect to the Internet normally. Refer to “Connection Test”. (p. 32) – Connect USB memory device properly. Check that the USB memory device is connected to the USB connector of this Player. (p. 16) – Check if the Blu-ray Disc supports BD-Live. – Connect the USB memory device formatted in FAT16, FAT32, or NTFS.
Glossary AVCHD AVCHD is a new format (standard) for high definition video cameras that can be used to record and play highresolution HD images. BD-Live™ BD-Live is a Blu-ray Disc standard that utilizes a network connection, enabling this Player to go online to download promotional videos and other data. BDMV Blu-ray 3D™ Blu-ray 3D enables you to view full high definition 3D images.
Specifications FLAC Mac address FLAC (Free Lossless Audio Codec) is an open file format for lossless audio data compression. While inferior in compression rate to other lossy compressed audio formats, it can often provide higher audio quality. HDMI HDMI (High-Definition Multimedia Interface) is an interface that supports both video and audio on a single digital connection.
Specifications is a trademark of DVD Format/Logo Licensing Corporation. Manufactured under license from Dolby Laboratories. Dolby and the double-D symbol are trademarks of Dolby Laboratories. “HDMI,” the “HDMI” logo and High-Definition Multimedia Interface are trademarks or registered trademarks of HDMI Licensing LLC in the United States and other countries. x.v.Color™ “x.v.Color” and “x.v.Color” logo are trademarks of Sony Corporation.
ADDITIONAL INFORMATION Index ■ Numerics 2ch Downmix, SETUP menu ............... 34 2ND AUDIO, remote control ................ 8 3D Output, SETUP menu .................... 32 3D Playback Message, SETUP menu ................................... 30 ■ A A/B, remote control ............................... 9 Angle Mark, SETUP menu .................. 31 Angle, On Screen menu ....................... 23 ANGLE, remote control ........................ 9 Audio output formats ...........................
Information about third party software licenses This product incorporates the following third party software. For information (copyright, etc) about each software, please read the terms and conditions stated below. By using this product, you will be deemed to have accepted the terms and conditions.
If any portion of this section is held invalid or unenforceable under any particular circumstance, the balance of the section is intended to apply and the section as a whole is intended to apply in other circumstances.
To “convey” a work means any kind of propagation that enables other parties to make or receive copies. Mere interaction with a user through a computer network, with no transfer of a copy, is not conveying.
c) Prohibiting misrepresentation of the origin of that material, or requiring that modified versions of such material be marked in reasonable ways as different from the original version; or d) Limiting the use for publicity purposes of names of licensors or authors of the material; or e) Declining to grant rights under trademark law for use of some trade names, trademarks, or service marks; or f) Requiring indemnification of licensors and authors of that material by anyone who conveys the material (or modif
END OF TERMS AND CONDITIONS How to Apply These Terms to Your New Programs If you develop a new program, and you want it to be of the greatest possible use to the public, the best way to achieve this is to make it free software which everyone can redistribute and change under these terms. To do so, attach the following notices to the program.
GNU LESSER GENERAL PUBLIC LICENSE TERMS AND CONDITIONS FOR COPYING, DISTRIBUTION AND MODIFICATION 0. This License Agreement applies to any software library or other program which contains a notice placed by the copyright holder or other authorized party saying it may be distributed under the terms of this Lesser General Public License (also called “this License”). Each licensee is addressed as “you”.
10. Each time you redistribute the Library (or any work based on the Library), the recipient automatically receives a license from the original licensor to copy, distribute, link with or modify the Library subject to these terms and conditions. You may not impose any further restrictions on the recipients’ exercise of the rights granted herein. You are not responsible for enforcing compliance by third parties with this License. 11.
The precise terms and conditions for copying, distribution and modification follow. Pay close attention to the difference between a “work based on the library” and a “work that uses the library”. The former contains code derived from the library, while the latter only works together with the library. Note that it is possible for a library to be covered by the ordinary General Public License rather than by this special one.
It is not the purpose of this section to induce you to infringe any patents or other property right claims or to contest validity of any such claims; this section has the sole purpose of protecting the integrity of the free software distribution system which is implemented by public license practices.
The above copyright notice and this permission notice shall be included in all copies or substantial portions of the Software. THE SOFTWARE IS PROVIDED “AS IS”, WITHOUT WARRANTY OF ANY KIND, EXPRESS OR IMPLIED, INCLUDING BUT NOT LIMITED TO THE WARRANTIES OF MERCHANTABILITY, FITNESS FOR A PARTICULAR PURPOSE AND NONINFRINGEMENT.
■ About protobuf Copyright © 2008, Google Inc. All rights reserved. Redistribution and use in source and binary forms, with or without modification, are permitted provided that the following conditions are met: 1. Redistributions of source code must retain the above copyright notice, this list of conditions and the following disclaimer. 2.
Redistribution and use in source and binary forms, with or without modification, are permitted provided that the following conditions are met: 1. Redistributions of source code must retain the above copyright notice, this list of conditions and the following disclaimer. 2. Redistributions in binary form must reproduce the above copyright notice, this list of conditions and the following disclaimer in the documentation and/or other materials provided with the distribution.
Please replace with the value from the FreeType version you actually use. Legal Terms 0. Definitions Throughout this license, the terms ‘package’, ‘FreeType Project’, and ‘FreeType archive’ refer to the set of files originally distributed by the authors (David Turner, Robert Wilhelm, and Werner Lemberg) as the ‘FreeType Project’, be they named as alpha, beta or final release.
All Rights Reserved except as specified below. Permission is hereby granted to use, copy, modify, and distribute this software (or portions thereof) for any purpose, without fee, subject to these conditions: (1) If any part of the source code for this software is distributed, then this README file must be included, with this copyright and no-warranty notice unaltered; and any additions, deletions, or changes to the original files must be clearly indicated in accompanying documentation.
© 2013 Yamaha Corporation Printed in China BD-S677/ABL