00_BD-S677_G_cv.
■ For U.K. customers If the socket outlets in the home are not suitable for the plug supplied with this appliance, it should be cut off and an appropriate 3 pin plug fitted. For details, refer to the instructions described below. Note – The plug severed from the mains lead must be destroyed, as a plug with bared flexible cord is hazardous if engaged in a live socket outlet. ■ Special Instructions for U.K.
• Hereby, Yamaha Music Europe GmbH, declares that this BD-S677 is in compliance with the essential requirements and other relevant provisions of Directive 1999/5/EC. • This product is limited to indoor use only. • Par la présente, Yamaha Music Europe GmbH déclare que lappareil BD-S677 est conforme aux exigences essentielles et aux autres dispositions pertinentes de la directive 1999/5/ CE. • Ce produit est uniquement destiné à une utilisation en intérieur.
Caution: Read this before operating your unit. 1 2 3 4 5 6 7 8 9 10 11 12 13 14 15 16 17 To assure the finest performance, please read this manual carefully. Keep it in a safe place for future reference. Install this sound system in a well ventilated, cool, dry, clean place-away from direct sunlight, heat sources, vibration, dust, moisture, and/or cold. For proper ventilation, allow the following minimum clearances.
Contents 1. Introduction 1 5. Additional information What you can do with this Player ..................... 2 Troubleshooting ............................................... 38 Wide variety of supported discs and file formats ........... 2 Enhanced network features............................................. 2 Easy setup and operations............................................... 2 Power ............................................................................ 38 Basic operation.................
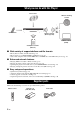
INTRODUCTION What you can do with this Player Various discs Network streaming contents 5# %& USB contents Wireless network (WPS supported) PC/NAS contents (DLNA) Smartphone contents (Miracast) ■ Wide variety of supported discs and file formats – Blu-ray Disc™, DVDs, SA-CDs and CDs (p. 23) – Blu-ray 3D™ (p. 11), BONUSVIEW™ and BD-Live™ (p. 25) – Video, music and photo files on DVD-R/RW discs, CD-R/RW discs and USB memory devices (p.
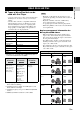
1 About discs and files – 12 cm (5”) and 8 cm (3”) discs can be played back in this Player. Do not use an 8 cm (3”) to 12 cm (5”) adapter. – Use discs that conform to compatible standards as indicated by the presence of official logos on the disc label. Playback of discs not complying with these standards is not guaranteed. In addition, the image quality or sound quality is not guaranteed even if the discs can be played back.
About discs and files Region management information Destination Russia BD-Video Region code “C” or “ABC” DVD-Video Region number “5” or “ALL” 5 ALL Notes – Blu-ray Disc/DVD video operations and functions may be different from the explanations in this manual and some operations may be prohibited due to disc manufacturer’s settings. – If a menu screen or operating instructions are displayed during playback of a disc, follow the operating procedure displayed.
About discs and files ■ Disc precautions – Blu-ray Disc, DVD and CD discs are sensitive to dust, fingerprints and especially scratches. A scratched disc may not be able to be played back. Handle discs with care and store them in a safe place. Proper disc storage Place the disc in the center of the disc case and store the case and disc upright. Avoid storing discs in locations subject to direct sunlight, close to heating appliances or in locations of high humidity.
Controls and functions ■ Front panel 5# %& USB 1 2 34 1 p (On/Standby) Turns this Player on/Sets to standby mode. Press and hold p on the front panel for more than 5 seconds to reset this Player (system reset). 5 6 7 8 9 0 A 7 (Search backward/Skip backward) Press to skip backward, and press and hold to search backward. 8 3 SA-CD indicator Lights up when an SA-CD is loaded and the SA-CD layer (p. 4) is selected.
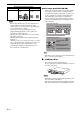
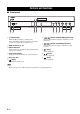
Controls and functions ■ Rear panel 1 Introduction AC IN DIGITAL OUT COAXIAL NETWORK AUDIO OUT OUT IN REMOTE CONTROL HDMI 1 2 OPTICAL 3 USB 4 5 6 7 1 AUDIO OUT (L/R) (p. 13) 5 NETWORK (p. 14) 2 HDMI (p. 11) 6 REMOTE CONTROL (OUT/IN) (p. 17) 3 DIGITAL OUT (COAXIAL/OPTICAL) (p. 13) 7 AC IN (p. 17) 4 USB (p.
Controls and functions ■ Remote control Note 1 Infrared signal transmitter: Outputs infrared signal. Aim this window to the remote control sensor (p. 10). – 2 p: Turns this Player on or sets it to standby mode. will appear on the top left corner of the screen when the pressed button is not available. ZOOM DVD VIDEO PHOTO : Zooms in/out. The size of the screen will change each time you press the button (zoom in/out: 3 steps each).
Controls and functions Note – Specific operations may be different depending on the disc. Follow the instructions of each menu screen. B Cursor buttons (5/a/2/3): Moves the focus in the menu screen. ENTER: Selects the focused menu/item. C RETURN: Returns to the previous menu or screen, etc. D Control buttons BD DVD CD VIDEO MUSIC PHOTO : Stops playback. : Pauses playback. : Plays back contents. / : Skips backward/forward. / BD DVD CD VIDEO MUSIC : Searches backward/forward.
Controls and functions Loading the batteries in the remote control 1 3 2 Notes – Change both batteries when the operation range of the remote control decreases. – Use AAA, R03, UM-4 batteries. – Make sure that the polarities are correct. Refer to the illustration inside the battery compartment. – Remove the batteries if the remote control is not to be used for an extended period of time. – Do not use old batteries together with new ones.
CONNECTION Video/audio connections Make the corresponding video/audio cable connections depending on the equipment you want to use. 2 Hints Connection – See page 35 for information on the audio/video output formats. – Prepare commercially available cables required for connections. The type and number of cables you need vary depending on the equipment to be connected. Enjoying video/audio using a TV and an AV receiver Refer to “Connecting to a TV via an AV receiver” (p. 12).
Video/audio connections ■ Connecting to a TV via an AV receiver ■ Connecting to a TV directly Connect this Player to the TV with an HDMI cable. Connect this Player to the AV receiver and the AV receiver to the TV with HDMI cables. For details on speaker connections, refer to the owner’s manuals of the AV receiver and speakers. Caution! Caution! Do not connect the power cable of this Player until all connections are completed.
Video/audio connections ■ Connecting to a TV and audio equipment Connect this Player to the TV with an HDMI cable, and this Player to the audio equipment with an audio cable (digital optical, digital coaxial or stereo pin cable). 2 Caution! Connection Do not connect the power cable of this Player until all connections are completed.
Network connection By connecting this Player to the network (wireless or wired), you can use the following features. – Playing back DLNA server (PC or NAS) contents (p. 19) – Playing back various network service contents (p. 21) – Playing BD-Live compatible discs (p. 25) – Operating this Player from mobile devices (AV CONTROLLER) (p. 22) Notes – To use the network services or BD-Live feature, a broadband internet connection is required.
Network connection ■ DLNA server setup By using DLNA, you can share multimedia contents (such as videos, music and photos) stored on your DLNA server (PC or NAS) connected to your network, and enjoy those contents with this Player. In addition, you can use your mobile device (such as a smartphone and a tablet) as a wireless controller to operate this Player through the network. To use the DLNA features, perform the following DLNA server setup after making the network connection (p. 14).
USB connection By connecting a USB memory device to the USB connector on the front or the rear panel of this Player, you can play multi-media files stored on the USB memory device (p. 19). Notes – Yamaha cannot guarantee that all brands’ USB memory devices will operate with this Player. – Connect a USB memory device to one of the USB connectors (front/rear) of this Player when using BD-Live feature (p. 26).
Other connections ■ Connecting to the REMOTE CONTROL jacks – For details about the SCENE function, refer to the owner’s manual supplied with your Yamaha AV receiver. – You can connect a Yamaha component (such as CD player) supports the SCENE function to the REMOTE CONTROL (OUT) jack of this Player. 2 Connection – You can transmit and receive the remote control signals by connecting to the REMOTE CONTROL (OUT/IN) jacks. – Firmly connect monaural 3.
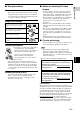
PLAYBACK Initial settings ■ Setting with the Easy Setup 3 Press 2/3 to select Yes, then press ENTER. Easy Setup allows you to set language, resolution, and screen aspect ratio easily. Easy Setup screen is displayed when you turn this Player on for the first time after purchase. Same setting can be performed from SETUP menu = System = Easy Setup. 1 When Easy Setup screen is displayed, press ENTER to start Easy Setup. 4 Press 2/3 to select one of the following setup methods, then press ENTER.
HOME menu The HOME menu allows you to perform the following basic operations of this Player. – Browsing and playing multi-media files on various discs, USB memory devices and your DLNA servers (PC or NAS) – Accessing to various network services (p. 21) – Displaying the SETUP menu (p. 27) – For details on playable discs and formats, see page 3. – To play DLNA server contents on this Player, the media sharing setting (p. 15) on the DLNA server should be configured.
HOME menu Note Operations for viewing photos – Note that the only the file type selected on this step will be displayed in the following step. For example, if you selected Photo folder in this step, only photo files are displayed after this step. While viewing photos, the buttons on the remote control work as shown below. : Stops slide show and returns to the file browser. : Pauses a slide show. : Plays a slide show. : Moves to a next photo. : Moves to a previous photo.
Using network services You can enjoy multimedia contents (such as photos and videos) using the following network services. – Dropbox – Picasa Web Albums – YouTube 3 Notes Playback – Access to content provided by third parties requires a high speed internet connection and may also require account registration and a paid subscription.
Enjoying smartphone pictures and videos on the TV screen (Miracast™) Miracast is a solution for seamlessly displaying video between devices, without cables or a network connection via an access point (Wi-Fi Direct). You can do things like view pictures from a Miracast-compatible device (smartphone, etc.) on the screen of the TV connected to this Player. Notes – To check if your device is Miracast compliant, refer to the owner’s manual of the device.
Advanced playback operation This chapter explains playback of commercially available Blu-ray Discs, DVDs, SA-CDs, CDs, and recorded DVDRW/R discs. Note – For the basic playback operation, see page 8. To display On Screen menu, press ON SCREEN. After that, press 5/a/2/3 to select an item, then press ENTER to operate the desired function.
Advanced playback operation ■ Status menu This shows various settings, such as subtitles, angle settings and the title/chapter/track number currently played back. To display status menu, press STATUS. Status menu contains following menus.
Advanced playback operation ■ Program play DVD ■ Using Search CD BD DVD CD VIDEO MUSIC PHOTO This allows you to program playback order of audio disc tracks or DVD chapters. Press PROGRAM during playback to display the PROGRAM window to program playback order. You can program up to 15 tracks/chapters. This allows you to jump to the specified point during playback. Example: Programming the playback order of CD tracks 2 Press 5/a/2/3 to select one of the item below, then press ENTER.
Advanced playback operation ■ Using Picture in Picture function (secondary audio/video playback) BD-Video that includes secondary audio and video compatible with Picture in Picture can be played back with secondary audio and video simultaneously as a small video in the corner. Primary video Secondary video Notes – Yamaha cannot guarantee that all brands’ USB memory devices will operate with this Player.
SETTINGS SETUP menu The SETUP menu enables various audio/visual settings and adjustments for functions using the remote control unit. Menu/Submenu System Item Sets the power-saving function to on/off. HDMI Control Sets this Player to receive control signal from the remote control of your TV/AV receiver. 30 Load Default Resets all settings to the default setting except Security setting. 30 Upgrade Performs upgrade of this Player.
SETUP menu Menu/Submenu TV Display Setting Video Process Closed Caption Audio Output Item Page Selects 3D or 2D videos. 32 TV Screen Sets the screen aspect ratio of the connected TV, and adjust the video output. 32 HDMI Resolution Selects the HDMI video output resolution. 33 TV System Selects the TV System from NTSC/PAL/Multi. 33 Color Space Selects Color Space from YCbCr 4:4:4/YCbCr 4:2:2/Full RGB/RGB. 33 HDMI Deep Color Selects HDMI Deep Color from 30 bits/36 bits/48 bits/Off.
SETUP menu ■ Example of SETUP menu operation You need to call up the SETUP menu screen to perform settings for this Player. The following is the explanation for basic operations of the SETUP menu. 4. Select a desired setting. Press 5/a to select On or Off, then press ENTER. REPEAT A/B SUBTITTLE ANGLE CLEAR SEARCH MIRACAST 2ND AUDIO HOME TOP MENU 4 Settings PIP AUDIO SETUP POP-UP MENU Hint – You need to use the number buttons to enter numbers (such as password) for some menu items.
SETUP menu ■ General Setting The default settings are marked with “ * ”. System Load Default You can reset all settings of this Player to default setting except Security setting (p. 31). For details on default settings, see pages 27–34. Upgrade You can upgrade the software manually from USB Storage or Network. For details on software upgrade, refer to “Software upgrade” (p. 37). Auto Power Standby Sets the power-saving function to on/off.
SETUP menu Menu You can prioritize the language for disc menu. English, Français, 中文 , Español, Deutsch, Italiano, Nederlandse, Portuguese, Danish, Svenska, Finnish, Norwegian, Polski, Pyccкий, Korean, Japanese, More Audio You can prioritize the audio language for Blu-ray Disc/ DVD playback. For details on setting items, see “Menu” (p. 31). Subtitle You can prioritize the language for Subtitle. (The default settings in [Language] differ depending on your model.
SETUP menu Connection Test You can perform an internet connection test. If the test is failed, please check “IP Setting” (p. 32) and perform the test again. IP Setting You can configure the network settings. Auto* Select to automatically configure the network settings of this Player with the DHCP server. Manual Select to configure the network settings (IP Address, Subnet Mask, Default Gateway, and DNS) manually. BD-Live Connection You can set access restriction to BD-Live contents.
SETUP menu Auto*, Disc Native, 480i/576i, 480p/576p, 720p, 1080i, 1080p Note – To output HD audio (Dolby TrueHD or DTS-HD Master Audio) from HDMI terminal, set HDMI Resolution to Auto or more than 720p. TV System You can select TV System from PAL, NTSC and Multi. Set the same TV System as your TV set. For more details on output formats, refer to “About the HDMI video output formats” (p. 36). NTSC, PAL, Multi (The default setting differs depending on your model.
SETUP menu ■ Audio Setting The default settings are marked with “ * ”. Audio Output Coaxial / Optical You can select the output mode of COAXIAL jack and OPTICAL terminal. For more details on output formats, refer to “About the audio output formats” (p. 35). Bitstream Outputs digital signal without any processing. Secondary Audio is not output. PCM Outputs 2-channel PCM. Reencode* Outputs Bitstream with Secondary Audio. Off Mutes sound. HDMI You can select the output mode of HDMI terminal.
SETUP menu ■ About the audio output formats Source format PCM 2ch PCM 5.1ch Dolby Digital with SA or BCS*1 DTS PCM 2ch without SA or BCS*1 PCM 5.1ch without SA or BCS*1 PCM 7.1ch without SA or BCS*1 without SA or BCS*1 Dolby Digital PCM up to 5.1ch Dolby Digital Plus PCM up to 7.1ch Dolby TrueHD PCM up to 7.1ch DTS PCM up to 5.1ch*2 without SA or BCS*1 with SA or BCS*1 with SA or DTS HD High BCS*1 DTS-HD High Resolution Resolution without SA or BCS*1 PCM up to 7.
SETUP menu ■ About the HDMI video output formats When TV System is set to NTSC Contents HDMI Resolution Auto Disc Native 1080p 1080i 720p 480p/576p 480i/576i BD-Video with 1080p/24Hz content *1 1080p 24Hz 1080p 24Hz/ 60Hz *3 1080i 60Hz 720p 60Hz 480p 480i BD-Video without 1080p/24Hz content *1 *2 1080p 60Hz 1080i 60Hz 720p 60Hz 480p 480i DVD-Video *1 *2 1080p 60Hz 1080i 60Hz 720p 60Hz 480p 480i Others *1 *1 1080p 60Hz 1080i 60Hz 720p 60Hz 480p 480i When TV System is
Software upgrade New software that provides additional features or product improvements will be released as needed. We recommend upgrading the software of this Player to the latest version periodically. To check for the availability of a software upgrade, visit http://download.yamaha.com/ Note – Do not remove the USB memory device, set this Player to standby mode or unplug the power cable/network cable while the software upgrade is being performed. 1. Prepare for the software upgrade.
ADDITIONAL INFORMATION Troubleshooting Refer to the table below when this Player does not function properly. If the problem you are experiencing is not listed below or if the instruction below does not help, turn off this Player, disconnect the power cable, and contact the nearest authorized Yamaha dealer or service center. ■ Power Problem Possible causes and solutions No power. – Connect the AC power cable properly. – Press p on the front panel to turn on the power. The Player power is turned off.
Troubleshooting ■ Picture Problem Possible causes and solutions No picture. – Make sure that the cables are connected correctly. (p. 11) – Make sure that the connected TV or the AV receiver is set to the correct input. – With no disc inserted, or playback stopped, press and hold and on the front panel simultaneously to set video resolution to the default value. If a picture is still not output, press and hold on the front panel for approximately 5 seconds to switch NTSC/PAL.
Troubleshooting Problem Possible causes and solutions Cannot download BD-Live contents. – Verify that this Player can connect to the Internet normally. Refer to “Connection Test”. (p. 32) – Connect USB memory device properly. Check that the USB memory device is connected to the USB connector of this Player. (p. 16) – Check if the Blu-ray Disc supports BD-Live. – Connect the USB memory device formatted in FAT16, FAT32, or NTFS.
Glossary AVCHD AVCHD is a new format (standard) for high definition video cameras that can be used to record and play highresolution HD images. BD-Live™ BD-Live is a Blu-ray Disc standard that utilizes a network connection, enabling this Player to go online to download promotional videos and other data. BDMV Blu-ray 3D™ Blu-ray 3D enables you to view full high definition 3D images.
Glossary FLAC FLAC (Free Lossless Audio Codec) is an open file format for lossless audio data compression. While inferior in compression rate to other lossy compressed audio formats, it can often provide higher audio quality. HDMI HDMI (High-Definition Multimedia Interface) is an interface that supports both video and audio on a single digital connection.
Specifications ■ General ■ Copyright Note – Audio-visual material may consist of copyrighted works which must not be recorded without the authority of the owner of the copyright. Refer to relevant laws in your country. “Blu-ray Disc™”, “Blu-ray™”, “Blu-ray 3D™”, “BDLive™”, “BONUSVIEW™”, and the logos are trademarks of the Blu-ray Disc Association. ■ Audio performance ■ Input/output HDMI output ..............................................................
Specifications Java is a registered trademark of Oracle and/or its affiliates. DLNA™ and DLNA CERTIFIED™ are trademarks or registered trademarks of Digital Living Network Alliance. All rights reserved. Unauthorized use is strictly prohibited. The Wi-Fi CERTIFIED Logo is a certification mark of the Wi-Fi Alliance. The Wi-Fi Protected Setup Identifier Mark is a mark of the Wi-Fi Alliance. “Wi-Fi”, “Wi-Fi Protected Setup”, “Wi-Fi Direct” and “Miracast” are marks or registered marks of the Wi-Fi Alliance.
ADDITIONAL INFORMATION Index ■ Numerics 2ch Downmix, SETUP menu ...............34 2ND AUDIO, remote control ................8 3D Output, SETUP menu ....................32 3D Playback Message, SETUP menu ...................................30 ■ A ■ B BD-Live ...............................................26 BD-Live Connection, SETUP menu ....32 Bitrate, On Screen menu ......................23 ■ C ■ D Data disc playback ...............................19 De-interlacing Mode, SETUP menu ....
Attention : Veuillez lire ce qui suit avant d’utiliser l’appareil. 1 2 3 4 5 Pour utiliser l’appareil au mieux de ses possibilités, lisez attentivement ce mode d’emploi. Conservez-le soigneusement pour référence. Installez cet appareil dans un endroit frais, bien aéré, sec et propre - à l’abri de la lumière du soleil, des sources de chaleur, des vibrations, des poussières, de l’humidité et/ou du froid. Pour une aération correcte, tenez compte des distances minimales suivantes.
Table des matières 1. Introduction 5. Informations complémentaires Possibilités offertes par ce lecteur................... 2 Grande variété de disques et formats de fichiers compatibles ... 2 Fonctionnalités réseau améliorées ....................................... 2 Simplicité d’installation et d’utilisation............................... 2 Accessoires fournis ........................................... 2 À propos des disques et des fichiers...............
INTRODUCTION Possibilités offertes par ce lecteur Divers disques Streaming de contenus sur réseau 5# %& Contenus sur clé USB Réseau sans fil (WPS pris en charge) Contenus PC/NAS (DLNA) Contenus sur Smartphone (Miracast) ■ Grande variété de disques et formats de fichiers compatibles – Blu-ray Disc™, DVD, SA-CD et CD (p. 23) – Blu-ray 3D™ (p. 11), BONUSVIEW™ et BD-Live™ (p. 25) – Fichiers vidéo, musique et image sur disques DVD-R/RW, CD-R/RW et dispositifs de stockage USB (p.
1 À propos des disques et des fichiers – Ce lecteur accepte les disques de 12 cm et de 8 cm. Aucun adaptateur 8 cm-12 cm n’est nécessaire. – Utilisez des disques conformes aux standards compatibles indiqués par les logos officiels présents sur l’étiquette du disque. La lecture de disques non conformes à ces standards n’est pas garantie. En outre, le fait de pouvoir lire ces disques ne garantit ni la qualité d’image ni la qualité du son.
À propos des disques et des fichiers Information sur la gestion des régions Destination Australie BD-Video DVD-Video Code de région « B » Numéro de région ou « ABC » « 4 » ou « ALL » 4 Russie ALL Code de région « C » Numéro de région ou « ABC » « 5 » ou « ALL » 5 À propos des disques Super Audio CD (SA-CD) – Format audio basé sur la norme CD actuelle mais qui inclut davantage d’informations permettant de restituer un son de meilleure qualité.
À propos des disques et des fichiers ■ Précautions d’emploi pour les disques – Les disques Blu-ray, DVD et CD sont sensibles à la poussière, aux traces de doigts et particulièrement aux rayures. Un disque rayé risque de ne pas pouvoir être lu sur ce lecteur. Manipulez les disques avec soin et rangez-les en lieu sûr. Rangement correct des disques Posez le disque au centre de son boîtier et rangez le boîtier et le disque en position verticale.
Commandes et fonctions ■ Panneau avant 5# %& USB 1 2 34 1 p (Mise sous tension/Mise en veille) Permet d’allumer ce lecteur ou de le mettre en veille. Maintenez le bouton p du panneau avant enfoncé pendant 5 secondes au moins pour réinitialiser le lecteur (réinitialisation du système). 5 6 7 8 4 Afficheur du panneau avant Affiche différentes informations relatives au fonctionnement de l’appareil.
Commandes et fonctions ■ Panneau arrière 1 Introduction AC IN DIGITAL OUT COAXIAL NETWORK AUDIO OUT OUT IN REMOTE CONTROL HDMI 1 2 OPTICAL 3 USB 4 5 6 7 1 AUDIO OUT (L/R) (p. 13) 5 NETWORK (p. 14) 2 HDMI (p. 11) 6 REMOTE CONTROL (OUT/IN) (p. 17) 3 DIGITAL OUT (COAXIAL/OPTICAL) (p. 13) 7 AC IN (p. 17) 4 USB (p.
Commandes et fonctions ■ Télécommande 1 Émetteur de signaux infrarouges : Envoie des signaux infrarouges. Dirigez l’émetteur de la télécommande vers le capteur de l’appareil de destination (p. 10). Remarque – apparaît dans le coin supérieur gauche de l’écran si la fonction correspondant à la touche n’est pas disponible.
Commandes et fonctions Remarque – Deuxième Marque Audio s’affiche à condition d’avoir activé la fonction Deuxième Marque Audio (p. 31). 0 HOME : Permet d’afficher l’écran de menu HOME (p. 19). A TOP MENU BD DVD : Affiche l’écran du menu principal si le disque contient un menu. Sélectionnez l’option voulue à l’aide des touches 5/a/2/3 et ENTER. Remarque – Étant donné que certaines opérations varient en fonction du disque, conformez-vous aux instructions affichées dans chaque écran de menu.
Commandes et fonctions Insertion des piles dans la télécommande 1 3 2 Remarques – Changer les deux piles lorsque la portée de la télécommande diminue. – Utilisez des piles AAA, R03, UM-4. – Assurez-vous que les polarités sont correctes. Reportez-vous à l’illustration figurant à l’intérieur du compartiment des piles. – Retirez les piles si vous n’avez pas l’intention d’utiliser la télécommande pendant une période prolongée. – N’utilisez pas des piles usagées associées à des piles neuves.
RACCORDEMENTS Raccordements vidéo/audio Raccordez les câbles vidéo/audio appropriés en fonction des appareils utilisés. 2 Astuces Lecture vidéo/audio via un téléviseur et ampli-tuner AV Reportez-vous à la section « Raccordement à un téléviseur via un ampli-tuner AV » (p. 12). Raccordements – Reportez-vous à la page 35 pour en savoir plus sur les formats de sortie audio/vidéo disponibles. – Procurez-vous les câbles appropriés nécessaires au raccordement de vos appareils.
Raccordements vidéo/audio ■ Raccordement à un téléviseur via un ampli-tuner AV ■ Raccordement direct à un téléviseur Raccordez ce lecteur à l’ampli-tuner AV et le téléviseur à l’ampli-tuner AV à l’aide de câbles HDMI. Pour en savoir plus sur le raccordement des haut-parleurs, reportez-vous au mode d’emploi fourni avec votre amplituner AV et vos haut-parleurs. Raccordez ce lecteur au téléviseur à l’aide d’un câble HDMI.
Raccordements vidéo/audio ■ Raccordement à un téléviseur et à un dispositif audio Raccordez ce lecteur au téléviseur à l’aide d’un câble HDMI et raccordez le dispositif audio au lecteur avec un câble audio (numérique optique, numérique coaxial ou câble à fiche stéréo). 2 Attention ! Ce lecteur Raccordements Ne branchez pas ce lecteur sur une prise secteur tant que vous n’avez pas effectué tous les raccordements nécessaires.
Raccordement réseau Le raccordement de ce lecteur à un réseau (sans fil ou filaire) permet d’utiliser les fonctions suivantes. – Lecture de contenus sur serveur DLNA (PC ou NAS) (p. 19) – Lecture de divers contenus sur services de réseau (p. 21) – Lecture de disques compatibles BD-Live (p. 25) – Pilotage du lecteur avec des dispositifs mobiles (AV CONTROLLER) (p. 22) Remarques – L’utilisation des services de réseau ou de la fonctionnalité BD-Live requiert une connexion internet à haut débit.
Raccordement réseau ■ Configuration du serveur DLNA Remarques – Pour que les fonctions DLNA soient disponibles, il est impératif que tous les dispositifs soient raccordés au même réseau. – Un NAS ne peut être utilisé comme serveur DLNA que s’il est compatible DLNA. 2 Raccordements La fonction DLNA permet de partager des contenus multimédia (comme des vidéos, de la musique et des photos) stockés sur un serveur DLNA (PC ou NAS) connecté à votre réseau et de visionner/écouter ces contenus via ce lecteur.
Raccordement USB Le raccordement d’une clé USB au port USB en face avant ou arrière de ce lecteur permet de lire les fichiers multimédia contenus sur la clé en question (p. 19). Remarques – Yamaha ne saurait garantir que ce lecteur fonctionne avec toutes les marques de clés USB. – Raccordez une clé USB à l’un des ports USB (en face avant/arrière) de ce lecteur pour utiliser la fonction BD-Live (p. 26).
Autres raccordements ■ Raccordement aux connecteurs REMOTE CONTROL Attention ! Ne branchez pas ce lecteur sur une prise secteur tant que vous n’avez pas effectué tous les raccordements nécessaires. – Pour en savoir plus sur la fonction SCENE, reportezvous au mode d’emploi fourni avec votre amplituner AV Yamaha. – Vous avez la possibilité de relier un appareil Yamaha (tel qu’un lecteur CD) disposant de la fonction SCENE au connecteur REMOTE CONTROL (OUT) de ce lecteur.
PLAYBACK Réglages initiaux ■ Configuration via Installation Facile La fonction Installation Facile permet de définir facilement la langue, la résolution et le format d’image. L’écran Installation facile s’affiche lors de la première mise sous tension de ce lecteur effectuée juste après l’achat de votre appareil. Vous pouvez procéder aux mêmes réglages à partir du menu SETUP = Système = Installation facile.
Menu HOME Le menu HOME permet d’accéder aux fonctions de base suivantes de ce lecteur. – Recherche et lecture des fichiers multimédia sur divers disques, clés USB et serveurs DLNA (PC ou NAS) – Accès à divers services de réseau (p. 21) – Affichage du menu SETUP (p. 27) 3 Astuces ■ Lecture de photo/musique/vidéo Opérations de base 2/3/5/a : Déplace la sélection. 2 : Revient au dossier parent. HOME : Accède à l’écran du menu HOME ou quitte cet écran. ENTER : Confirme le dossier/fichier choisi.
Menu HOME Remarque – Seul le type de fichier choisi au cours de cette étape sera présenté à l’étape suivante. Si vous sélectionnez, par exemple, le dossier Photo, vous verrez uniquement des fichiers image par la suite. 4 Sélectionnez le dossier contenant le fichier à lire. 5 Sélectionnez le fichier à lire, puis appuyez sur ENTER. Si le fichier sélectionné est un fichier vidéo, la lecture commence immédiatement. S’il s’agit d’un fichier de musique, la lecture commence après l’affichage d’un écran d’état.
Utilisation des services réseau Les services de réseau suivants vous permettent de visionner des contenus multimédia (comme des photos et des vidéos). – Dropbox – Albums photo en ligne Picasa – YouTube 3 Remarques 1 Appuyez sur la touche HOME pour afficher l’écran du menu HOME. Astuce – Pour afficher directement l’écran du menu YouTube, appuyez sur YouTube. 2 Appuyez sur 5/a pour sélectionner les services de réseau, puis appuyez sur ENTER.
Visionner les photos et vidéos d’un smartphone sur un téléviseur (Miracast™) Miracast permet de visionner des vidéos sur divers appareils, sans câble ni connexion à un réseau, via un point d’accès (Wi-Fi Direct). Cela vous permet par exemple de visionner les photos d’un dispositif compatible Miracast (smartphone, etc.) sur un téléviseur raccordé à ce lecteur. Remarques – Pour vérifier si votre dispositif est compatible Miracast, reportez-vous au mode d’emploi fourni avec l’appareil en question.
Mode de lecture avancé Ce chapitre traite de la lecture des disques Blu-ray, DVD, SA-CD, CD vendus dans le commerce et des disques DVD-RW/R enregistrés. Remarque ■ Menu à l’écran Pour afficher ce menu, appuyez sur la touche ON SCREEN. Il suffit ensuite d’appuyer sur 5/a/2/3 pour passer d’une option à l’autre, puis d’appuyer sur ENTER pour agir sur la fonction en question.
Mode de lecture avancé ■ État, menu Ce menu propose différents réglages, tels que les soustitres, l’angle de vue ou le numéro du titre, du chapitre, ou de la plage en cours de lecture. Pour afficher le menu d’état, appuyez sur la touche STATUS. Ce menu contient les sous-menus suivants.
Mode de lecture avancé ■ Programmation de l’ordre de lecture DVD CD Il est possible de programmer l’ordre de lecture des plages d’un disque audio ou des chapitres d’un DVD. Appuyez sur PROGRAM en cours de lecture pour afficher la fenêtre PROGRAMME. Vous avez la possibilité de programmer un maximum de 15 plages/chapitres. 1 Appuyez sur PROGRAM en cours de lecture. BD DVD CD VIDEO MUSIC PHOTO Cette fonction permet d’accéder directement à un point précis du support en cours de lecture.
Mode de lecture avancé ■ Utilisation de la fonction d’incrustation (lecture audio/vidéo secondaire) Si vous disposez d’un disque BD vidéo contenant des données audio et vidéo secondaires compatibles avec la fonction d’incrustation (image dans limage), vous avez la possibilité de lire ces données dans un coin de l’écran en même temps que le contenu principal. Image principale Image secondaire – Si l’espace de stockage est insuffisant, les données ne seront pas copiées/téléchargées.
PARAMÈTRES Menu SETUP Le menu SETUP offre différents réglages audio/vidéo des fonctions au moyen de la télécommande. Menu/sous-menu Système Réglages Généraux Lecture Description 30 Contrôle HDMI Configure le lecteur afin de recevoir le signal de commande en provenance de la télécommande de votre téléviseur/ampli-tuner AV. 30 30 Mettre à niveau Lance la mise à niveau du lecteur.
Menu SETUP Menu/sous-menu TV Paramètres vidéo Processus Vidéo Paramètre Page Permet de choisir le mode vidéo 3D ou 2D. 32 Écran TV Permet de régler le format d’écran du téléviseur raccordé ainsi que la sortie vidéo. 32 Résolution HDMI Permet de choisir la résolution de sortie vidéo HDMI. 33 Système TV Permet de choisir NTSC/PAL/Multi pour le Système TV. 33 Espace de couleur Permet de choisir YCbCr 4:4:4/YCbCr 4:2:2/Full RGB/RGB pour l’Espace de couleur.
Menu SETUP ■ Exemple d’utilisation du menu SETUP Les réglages du lecteur se font à partir de l’écran du menu SETUP. Vous trouverez ci-dessous des explications sur les opérations de base du menu SETUP. 4. Sélectionnez l’option voulue. Appuyez sur 5/a pour sélectionner Oui ou Non, puis appuyez sur ENTER.
Menu SETUP ■ Réglages Généraux Les réglages par défaut sont signalés par « * ». Système Veille Automatique Permet d’activer/désactiver la fonction d’économie d’énergie. En cas d’activation, le lecteur affiche l’économiseur d’écran au bout de 5 minutes d’inactivité. Puis passe en mode de veille si aucune opération n’a lieu dans les 15 minutes qui suivent.
Menu SETUP Sous-titres Ce paramètre permet de choisir votre langue de prédilection pour les sous-titres. English, Français, 中文 , Español, Deutsch, Italiano, Nederlandse, Portugais, Danois, Svenska, Finnois, Norvégien, Polski, Русский, Coréen, Japonais, Plus, Non (Les réglages par défaut du paramètre [Langue] diffèrent selon le modèle du lecteur.
Menu SETUP Test de connexion Vous pouvez effectuer un test de connexion Internet. En cas d’échec, vérifiez la « Configuration IP » (p. 32) et recommencez le test. Configuration IP Permet de configurer les paramètres de réseau. Auto* Manuel Choisissez cette option pour configurer automatiquement les paramètres de réseau de ce lecteur avec le serveur DHCP. Choisissez cette option pour configurer manuellement les paramètres de réseau (Adresse IP, Masque sous-réseau, Passerelle par défaut et DNS).
Menu SETUP Format d’image d’origine Sur un téléviseur 4:3 4:3 Pan Scan 4:3 Boîte à lettre 16:9 HDMI Deep Color Réglez ce paramètre en fonction de votre téléviseur et/ou ampli-tuner AV si ceux-ci sont compatibles avec la technologie Deep Color (p. 41). Cette fonction est disponible à condition de raccorder ce lecteur via un câble HDMI.
Menu SETUP ■ Paramètres audio Les réglages par défaut sont signalés par « * ». Sortie SACD Priorité SACD Sélectionne la priorité de lecture pour des contenus bicanal ou multicanal, lorsque le disque contient les deux types de contenus. Sortie audio Multi-canaux*, 2 canaux Coaxial / Optique Ce paramètre permet de choisir le mode de sortie du connecteur COAXIAL et de la borne OPTICAL.
Menu SETUP ■ À propos des formats de sortie audio Format de la source PCM 2ch PCM 5.1ch Dolby Digital avec SA ou BCS*1 avec SA ou BCS*1 avec SA ou BCS*1 DTS PCM 5.1ch sans SA ni BCS*1 avec SA ou BCS*1 sans SA ni BCS*1 avec SA ou BCS*1 sans SA ni BCS*1 avec SA ou BCS*1 DTS-HD Master Audio sans SA ni BCS*1 Dolby Digital PCM 7.1ch PCM 2ch PCM jusqu’à 5.1 canaux Dolby Digital Plus PCM jusqu’à 7.1 canaux Dolby TrueHD PCM jusqu’à 7.1 canaux DTS PCM jusqu’à 5.
Menu SETUP ■ À propos des formats de sortie vidéo HDMI Si Système TV est réglé sur NTSC Résolution HDMI Auto Format vidéo du disque original 1080p 1080i 720p 480p/576p 480i/576i BD-Video avec un contenu 1080p/ 24Hz *1 1080p 24Hz 1080p 24Hz/ 60Hz *3 1080i 60Hz 720p 60Hz 480p 480i BD-Video avec un contenu 1080p/24Hz *1 *2 1080p 60Hz 1080i 60Hz 720p 60Hz 480p 480i DVD-Video *1 *2 1080p 60Hz 1080i 60Hz 720p 60Hz 480p 480i Autres *1 *1 1080p 60Hz 1080i 60Hz 720p 60Hz 480p 4
Mise à niveau logicielle Des mises à jour du logiciel intégrant de nouvelles fonctions ou apportant des améliorations au produit seront proposées régulièrement. Nous vous conseillons de mettre régulièrement à niveau le logiciel de ce lecteur. Pour savoir si une nouvelle mise à niveau logicielle est disponible, rendez-vous sur le site Web suivant : http://download.yamaha.
INFORMATIONS COMPLÉMENTAIRES Guide de dépannage Reportez-vous au tableau suivant si ce lecteur ne fonctionne pas convenablement. Si l’anomalie constatée n’est pas mentionnée ou si les actions correctives suggérées sont sans effet, mettez le lecteur hors tension, débranchez le cordon d’alimentation et prenez contact avec un revendeur agréé ou le service après-vente de Yamaha. ■ Alimentation Anomalies Causes possibles et solutions Le lecteur ne s’allume pas.
Guide de dépannage ■ Image Anomalies Causes possibles et solutions – Assurez-vous que les câbles sont branchés correctement. (p. 11) – Assurez-vous que l’entrée sélectionnée sur le téléviseur ou l’ampli-tuner AV raccordé au lecteur est correcte. – Lorsqu’aucun disque n’est inséré ou lorsque la lecture est arrêtée, appuyez et maintenez les boutons et du panneau avant enfoncés simultanément pour réinitialiser la résolution vidéo.
Guide de dépannage Anomalies Causes possibles et solutions Impossible de télécharger le contenu BD-Live. – Vérifiez que le lecteur peut se connecter normalement à Internet. Reportez-vous à la section « Test de connexion ». (p. 32) – Vérifiez si la clé USB est insérée correctement. Assurez-vous que la clé USB est reliée au port USB du lecteur. (p. 16) – Vérifiez si le disque Blu-ray prend en charge la fonction BD-Live. – Utilisez une clé USB au format FAT16, FAT32 ou NTFS.
Glossaire AVCHD AVCHD désigne un nouveau format (norme) pour les caméras vidéo haute définition qui permet d’enregistrer et de lire des images HD de haute résolution. BD-Live™ BD-Live est une norme Blu-ray Disc utilisant une connexion réseau, permettant à ce lecteur de se mettre en ligne pour télécharger des vidéos promotionnelles ainsi que d’autres données. BDMV Blu-ray 3D™ Le format Blu-ray 3D permet de bénéficier d’images 3D en haute définition (Full HD).
Glossaire FLAC FLAC (Free Lossless Audio Codec) est un format de fichier libre permettant la compression de données audio sans perte. Bien que son taux de compression soit inférieur à ceux d’autres format de compression audio à perte, il fournit souvent un qualité audio supérieure. HDMI HDMI (High-Definition Multimedia Interface) est une interface multimédia haute définition prenant en charge les signaux vidéo et audio sur une seule connexion numérique.
Caractéristiques techniques ■ Généralités Alimentation [Modèles pour le R.-U., l’Europe, la Russie et l’Australie] ................................................................................ CA 110–240 V, 50 Hz [Modèles pour l’Asie, l’Amérique centrale et du Sud] ...........................................................................CA 110–240 V, 50/60 Hz [Autres modèles] .................................................... CA 110–240 V, 60 Hz Consommation électrique................................
Caractéristiques techniques Java est une marque déposée d’Oracle et/ou de ses filiales. DLNA™ et DLNA CERTIFIED™ sont des marques commerciales ou des marques déposées de Digital Living Network Alliance. Tous droits réservés. Toute utilisation illicite est strictement interdite. Le logo Wi-Fi CERTIFIED est une marque de certification de Wi-Fi Alliance. La marque d’identification Wi-Fi Protected Setup est une marque de Wi-Fi Alliance.
INFORMATIONS COMPLÉMENTAIRES Index ■ Numéros 2ND AUDIO, télécommande ................9 3D Message de la Réécoute, menu SETUP ..................................30 ■ A ■ B BD-Live ...............................................26 Bitrate, menu à l’écran .........................23 ■ C ■ D Dernière Mémoire, menu SETUP ........31 Désentrelacement vidéo, menu SETUP ... 33 Deuxième Audio, menu à l’écran ........23 Deuxième Marque Audio, menu SETUP ...................................
Vorsicht: Vor der Bedienung dieses Geräts durchlesen. 1 2 3 4 5 Um optimales Leistungsvermögen sicherzustellen, lesen Sie bitte die Anleitung aufmerksam durch. Bewahren Sie die Anleitung danach für spätere Nachschlagzwecke sorgfältig auf. Installieren Sie dieses Gerät an einem gut belüfteten, trockenen, sauberen Ort - entfernt von direktem Sonnenlicht, Wärmequellen, Erschütterungen, Staub, Feuchtigkeit und Kälte. Für eine sachgemäße Belüftung sollten folgende Mindestabstände gewährleistet sein.
Inhalt 1. Einleitung 1 5. Zusätzliche Informationen Verwendungszweck des Players ...................... 2 Fehlersuche ...................................................... 38 Vielzahl unterstützter Discs und Dateiformate............... 2 Erweiterte Netzwerkfunktionen...................................... 2 Einfache Einrichtung und Bedienung............................. 2 Strom............................................................................. 38 Grundlegende Bedienung.......................
EINLEITUNG Verwendungszweck des Players Verschiedene Discs Netzwerk-StreamingInhalte 5# %& USB-Inhalte Drahtloses Netzwerk (WPS-kompatibel) PC-/NAS-Inhalte (DLNA) Smartphone-Inhalte (Miracast) ■ Vielzahl unterstützter Discs und Dateiformate – Blu-ray Disc™, DVD, SA-CD und CD (S. 23) – Blu-ray 3D™ (S. 11), BONUSVIEW™ und BD-Live™ (S. 25) – Video-, Musik- und Bilddateien auf DVD-R/RW-Discs, CD-R/RW-Discs und USB-Speichergeräte (S.
1 Info zu Discs und Dateien – Mit diesem Player können 12-cm- und 8-cm-Discs wiedergegeben werden. Verwenden Sie keinen 8cm-auf-12-cm-Adapter. – Verwenden Sie Discs, die mit den nachstehend angegebenen Normen kompatibel sind, was durch die Kennzeichnung mit den offiziellen Logos auf der Disc angegeben ist. Die Wiedergabe von Discs, die nicht diesen Normen entsprechen, kann nicht garantiert werden.
Info zu Discs und Dateien Informationen über Regionalcodes Bestimmungsort Australien BD-Video Regionalcode „B“ oder „ABC“ DVD-Video Regionalcode „4“ oder „ALL“ 4 Russland Regionalcode „C“ oder „ABC“ ALL Regionalcode „5“ oder „ALL“ 5 Informationen über Super-Audio-CD (SA-CD) – Dies ist ein Audioformat, das auf den aktuellen CDStandards basiert, aber deutlich mehr Informationen umfasst, die eine höhere Klangqualität bieten. Es gibt drei Discarten: Single-Layer, Dual-Layer und Hybrid-Discs.
Info zu Discs und Dateien ■ Vorsichtsmaßnahmen für Discs – Blu-ray Discs , DVDs und CDs sind empfindlich gegen Staub, Fingerabdrücke und besonders Kratzer. Eine verkratzte Disc ist möglicherweise nicht mehr abspielbar. Handhaben Sie die Discs mit Sorgfalt und bewahren Sie sie an einem sicheren Ort auf. Korrekte Lagerung von Discs Legen Sie die Disc in die Mitte der DiscHülle und lagern Sie Hülle und Disc senkrecht.
Bedienungselemente und deren Funktionen ■ Vorderseite 5# %& USB 1 2 34 5 6 7 8 9 0 A 1 p (On/Standby) Schaltet den Player ein/versetzt ihn in den Bereitschaftsmodus. Halten Sie p an der Vorderseite mindestens fünf Sekunden lang gedrückt, um den Player zurückzusetzen (System-Rücksetzung). 6 (Auswerfen) Öffnet/schließt die Disclade. 7 (Rücklauf/Suchrücklauf) Drücken für Rücklauf und gedrückt halten für Suchrücklauf. 2 USB-Anschluss (S.
Bedienungselemente und deren Funktionen ■ Rückseite 1 Einleitung AC IN DIGITAL OUT COAXIAL NETWORK AUDIO OUT OUT IN REMOTE CONTROL HDMI 1 2 OPTICAL 3 USB 4 5 6 7 1 AUDIO OUT (L/R) (S. 13) 5 NETWORK (S. 14) 2 HDMI (S. 11) 6 REMOTE CONTROL (OUT/IN) (S. 17) 3 DIGITAL OUT (COAXIAL/OPTICAL) (S. 13) 7 AC IN (S. 17) 4 USB (S.
Bedienungselemente und deren Funktionen ■ Fernbedienung 1 Infrarotsender: Gibt ein Infrarotsignal aus. Zielen Sie damit auf den Fernbedienungssensor (S. 10). Hinweis 2 p: Schaltet den Player ein oder in den Bereitschaftsmodus. – 3 wird in der linken oberen Ecke des Bildschirms angezeigt, wenn die gedrückte Taste nicht verfügbar ist.
Bedienungselemente und deren Funktionen Hinweis – Bestimmte Bedienungen können sich je nach Disc unterscheiden. Führen Sie die Anweisungen der jeweiligen Menübildschirme aus. B Cursortasten (5/a/2/3): Versetzt die Markierung im Menü. ENTER: Wählt das hervorgehobene Menü/ Gegenstand aus. C RETURN: Kehrt zum vorherigen Menü oder Bildschirm usw. zurück. DVD CD VIDEO MUSIC PHOTO : Stoppt die Wiedergabe. : Hält die Wiedergabe an. : Gibt den Inhalt wieder.
Bedienungselemente und deren Funktionen Batterien in die Fernbedienung einlegen 1 Wirkungsbereich der Fernbedienung Fernbedienungssensor 3 SA-CD USB 30° 2 30° 6m Hinweise – Tauschen Sie beide Batterien aus, wenn sich die Funktionsreichweite der Fernbedienung verringert. – Verwenden Sie Batterien des Typs AAA, R03 bzw. UM-4. – Vergewissern Sie sich, dass Sie die Batterien mit der richtigen Polarität einlegen. Beachten Sie die Darstellung im Batteriefach.
ANSCHLÜSSE Video-/Audio-Verbindungen Stellen Sie entsprechend den zu verwendenden Geräten die notwendigen Video-/Audio-Verbindungen her. 2 Tipps Anschlüsse – Näheres über die Audio-/Video-Ausgangsformate finden Sie auf Seite 35. – Stellen Sie für die Verbindungen im Fachhandel erhältliche Kabel bereit. Die Art und Anzahl der notwendigen Kabel hängt von den anzuschließenden Geräten ab. Video-/Audio-Wiedergabe auf TV und AV-Receiver Siehe unter „TV-Verbindung über einen AV-Receiver“ (S. 12).
Video-/Audio-Verbindungen ■ TV-Verbindung über einen AVReceiver Verbinden Sie den Player mit dem AV-Receiver und den AV-Receiver mit dem TV über HDMI-Kabel. Informationen über Lautsprecherverbindungen finden Sie in den Bedienungsanleitungen des AV-Receivers und der Lautsprecher. ■ Direkte TV-Verbindung Verbinden Sie den Player mit dem TV über ein HDMIKabel. Vorsicht! Vorsicht! Schließen Sie das Netzkabel des Players nicht an, bevor alle anderen Anschlüsse vorgenommen wurden.
Video-/Audio-Verbindungen ■ TV- und Audiogerät-Verbindung Verbinden Sie den Player mit dem TV über ein HDMI-Kabel und den Player mit dem Audiogerät über ein Audiokabel (digital/optisch, digital/koaxial oder Cinch/stereo). 2 Vorsicht! Dieser Player Anschlüsse Schließen Sie das Netzkabel des Players nicht an, bevor nicht alle anderen Anschlüsse vorgenommen wurden.
Netzwerkanbindung Die Anbindung des Players an ein (Drahtlos- oder Kabel-) Netzwerk ermöglicht folgende Funktionen. – Wiedergabe von DLNA-Server (PC oder NAS)-Inhalten (S. 19) – Wiedergabe von Netzwerkdienstinhalten (S. 21) – Abspielen von BD-Live-kompatiblen Discs (S. 25) – Bedienung des Players über Mobilgeräte (AV CONTROLLER) (S. 22) Hinweise – Für die Nutzung von Netzwerkdiensten oder der BD-Live-Funktion ist eine Breitband-Internetverbindung erforderlich.
Netzwerkanbindung ■ DLNA-Server-Einrichtung Hinweise – Um die DLNA-Funktionen benutzen zu können, müssen alle Geräte am selben Netzwerk angebunden sein. – Um einen NAS als DLNA-Server einsetzen zu können, muss dieser DLNA unterstützen. 2 Anschlüsse Dank DLNA können Sie Multimedia-Inhalte (z.B. Videos, Musik und Fotos), die auf einem an Ihrem Netzwerk angebundenen DLNA-Server (PC oder NAS) gespeichert sind, freigeben und mit dem Player wiedergeben. Außerdem können Sie mit Ihrem Mobilgerät (z.B.
USB-Verbindung Sie können ein USB-Speichergerät am USB-Anschluss an der Vorder- oder Rückseite des Players einstecken und auf dem Speichergerät abgelegte Multimedia-Dateien wiedergeben (S. 19). Hinweise – Yamaha kann nicht garantieren, dass die USB-Speichergeräte aller Marken mit diesem Player verwendbar sind. – Stecken Sie für die Benutzung der BD-Live-Funktion (S. 26) ein USB-Speichergerät an einem der USBAnschlüsse (vorn/hinten) des Players ein.
Weitere Verbindungen ■ Verbindung mit den REMOTE CONTROL-Buchsen Vorsicht! – Informationen über die SCENE-Funktion finden Sie in der Bedienungsanleitung des Yamaha AVReceivers. – Sie können ein Yamaha-Gerät (z.B. CD-Player) mit SCENE-Funktion an die REMOTE CONTROL (OUT)-Buchse des Players anschließen. 2 Anschlüsse – Fernbedienungssignale können über die REMOTE CONTROL (OUT/IN)-Buchsen übertragen und empfangen werden.
WIEDERGABE Grundeinstellungen ■ Einstellung über Einfaches Konfigurationsmenü 3 Drücken Sie 2/3, um Ja zu wählen, und drücken Sie dann ENTER. Über Einfaches Konfigurationsmenü können Sie bequem die Sprache, die Auflösung und das Bildseitenverhältnis festlegen. Der Einfaches Konfigurationsmenü-Bildschirm wird angezeigt, wenn Sie den Player zum allerersten Mal einschalten. Die gleiche Einstellung kann über das SETUP-Menü = System = Einfaches Konfigurationsmenü vorgenommen werden.
HOME-Menü Über das HOME-Menü können Sie folgende Grundbedienung des Players vornehmen. – Durchsuchen und Wiedergabe von Multimedia-Dateien auf verschiedenen Discs, USB-Geräten und DLNAServern (PC oder NAS) – Zugang zu verschiedenen Netzwerkdiensten (S. 21) – Aufrufen des SETUP-Menüs (S. 27) – Einzelheiten zu den abspielbaren Discs und Formaten finden Sie auf Seite 3. – Für die Wiedergabe von DLNA-Server-Inhalten mit dem Player muss die Medienfreigabe-Einstellung (S.
HOME-Menü Hinweis – Beachten Sie, dass im nächsten Schritt nur der Dateityp angezeigt wird, der in diesem Schritt ausgewählt wurde. Wenn Sie beispielsweise in diesem Schritt den Foto-Ordner ausgewählt haben, werden nach diesem Schritt nur Fotodateien angezeigt. 4 Wählen Sie den Ordner aus, in dem die wiederzugebende Datei enthalten ist. 5 Wählen Sie die wiederzugebende Datei aus und drücken Sie dann ENTER. Wird eine Videodatei ausgewählt, startet die Wiedergabe.
Verwenden von Netzwerkdiensten Mit folgenden Netzwerkdiensten können Sie Multimedia-Inhalte (z.B. Fotos und Videos) genießen. – Dropbox – Picasa-Webalben – YouTube 3 Hinweise Wiedergabe – Der Zugang zu von Drittanbietern zur Verfügung gestellten Inhalten erfordert eine schnelle Internetverbindung und kann eventuell erst nach der Einrichtung und Registrierung eines Accounts oder eines kostenpflichtigen Abos erfolgen.
Smartphone-Bilder und -Videos auf dem TV Bildschirm betrachten (Miracast™) Miracast ermöglicht es über einen Zugangspunkt (Wi-Fi Direct) ohne Kabel oder Netzwerkverbindung Videos von und auf verschiedenen Geräten wiederzugeben. Sie können z.B. Bilder von einem Gerät, das Miracast unterstützt (Smartphone usw.), auf einem mit dem Player verbundenen TV betrachten. Hinweise – Zum Prüfen, ob Ihr Gerät Miracast unterstützt, beziehen Sie sich auf dessen Anleitung.
Erweiterte Wiedergabebedienung In diesem Kapitel wird die Wiedergabe von im Fachhandel erhältlichen Blu-ray-Discs, DVDs, SA-CDs, CDs und selbst aufgenommenen DVD-RW/R-Discs beschrieben. Hinweis ■ Bildschirmmenü – – – – – – – Normal Zufall CH (Kapitel) Zufall TT (Titel) Zufallswiedergabe Alle Zufalls-CH (Kapitel) Random TT (Titel) Random All VIDEO Zum Aufrufen des Bildschirmmenüs drücken Sie ON SCREEN.
Erweiterte Wiedergabebedienung ■ Status-Menü Hierüber werden unterschiedliche Einstellungen angezeigt, wie beispielsweise Untertitel, Blickwinkel und aktuell wiedergegebene Titel-/Kapitel-/Tracknummer. Zum Aufrufen des Status-Menüs drücken Sie STATUS. Das Status-Menü enthält die folgenden Untermenüs.
Erweiterte Wiedergabebedienung ■ Programmwiedergabe DVD ■ Verwenden der Suche CD BD Hiermit können Sie die Wiedergabereihenfolge der Audio-Disc-Tracks oder DVD-Kapitel programmieren. Drücken Sie PROGRAM während der Wiedergabe, um das PROGRAMM-Fenster für die Programmierung der Wiedergabereihenfolge aufzurufen. Sie können bis zu 15 Tracks/Kapitel programmieren. DVD CD VIDEO MUSIC PHOTO Hierüber können Sie während der Wiedergabe an einen bestimmten Punkt wechseln.
Erweiterte Wiedergabebedienung ■ Verwenden der Funktion Bild im Bild (Zweitbild/Zweitton-Wiedergabe) Bei BD-Videos, die Zweitbild und -ton für die Funktion Bild im Bild unterstützen, lässt sich in einem kleinen Fenster unten rechts auf dem Bildschirm zusätzlich zum Hauptbild ein Zweitbild mit eigenem Ton anzeigen. Hauptbild Zweitbild Hinweise – Yamaha kann nicht garantieren, dass die USBSpeichergeräte aller Marken mit diesem Player verwendbar sind.
EINSTELLUNGEN SETUP-Menü Im SETUP-Menü können Sie mit der Fernbedienung verschiedene Bild-, Ton- und Funktionseinstellungen vornehmen. Menü/Untermenü System Allgemeine Einstellungen Gegenstand Aktiviert/deaktiviert die Energiesparfunktion. 30 HDMI Steuerung Stellt diesen Player auf den Empfang von Steuersignalen von der Fernbedienung des TV/AV-Receivers ein. 30 Werkseinstellung laden Stellt sämtliche Einstellungen, außer der SicherheitEinstellung, auf die Werksvorgaben zurück.
SETUP-Menü Menü/Untermenü TV Anzeige Einstellung Gegenstand Funktion Seite 3D Ausgang Wählt zwischen 3D- und 2D-Videos aus. 32 TV Bildschirm Stellt das Bildseitenverhältnis für den angeschlossenen Fernseher und den Videoausgang ein. 32 Auflösung HDMI Legt die Auflösung des HDMI-Videoausgangs fest. 33 TV-System Richtet das TV-System auf NTSC/PAL/Multikanal ein. 33 Farbraum Richtet den Farbraum auf YCbCr 4:4:4/YCbCr 4:2:2/Voll RGB/RGB ein.
SETUP-Menü ■ Beispiel für die Bedienung des SETUP-Menüs Um Einstellungen für diesen Player vornehmen zu können, müssen Sie das SETUP-Menü aufrufen. Nachstehend wird die grundlegende Bedienung des SETUP-Menüs erläutert. 3. Wählen Sie einen Menüpunkt aus. Drücken Sie 5/a, um Disc Auto-Wiedergabe auszuwählen, und drücken Sie dann ENTER oder den Cursor 3. REPEAT A/B SUBTITTLE ANGLE CLEAR SEARCH MIRACAST 2ND AUDIO HOME TOP MENU SETUP POP-UP MENU 4. Wählen Sie einen gewünscht Einstellung aus.
SETUP-Menü ■ Allgemeine Einstellungen Werkseinstellung laden Sie können alle Einstellungen des Players, ausgenommen für Sicherheit, auf die Werksvorgaben zurücksetzen (S. 31). Weitere Informationen über die Werksvorgaben finden Sie auf den Seiten 27–34. Die Werkseinstellungen sind mit einem Sternchen „ * “ gekennzeichnet. Upgrade Sie können die Software manuell über USB oder Netzwerk aktualisieren. Weitere Einzelheiten zur Software-Aktualisierung finden Sie unter „SoftwareAktualisierung“ (S. 37).
SETUP-Menü Menü Sie können die Priorität der Sprache für das Discmenü festlegen. English, Français, 中文 , Español, Deutsch, Italiano, Nederlandse, Portugiesisch, Dänisch, Svenska, Finnisch, Norwegisch, Polski, Pyccкий, Koreanisch, Japanisch, Weitere English, Français, 中文, Español, Deutsch, Italiano, Nederlandse, Portugiesisch, Dänisch, Svenska, Finnisch, Norwegisch, Polski, Pyccкий, Koreanisch, Japanisch, Weitere, Aus (Die Standardeinstellungen unter Sprache hängen vom Modell ab.
SETUP-Menü Verbindungstest Sie können einen Internetanschlusstest durchführen. Sollte der Test fehlschlagen, prüfen Sie „IP Einstellungen“ (S. 32) und führen Sie den Test erneut durch. IP Einstellungen Sie können die Netzwerkeinstellungen konfigurieren. Auto* Wählen Sie diese Option zur automatischen Konfiguration der Netzwerkeinstellungen dieses CD-Players mit dem DHCP-Server.
SETUP-Menü Auflösung HDMI Sie können die Auflösung des HDMI-Videoausgangs festlegen. Weitere Informationen über die Ausgabeformate finden Sie unter „Informationen über Videoausgangsformate“ (S. 36). Bei der Einstellung Auto wird die für den angeschlossenen Fernseher maximale Auflösung eingerichtet. Bei der Einstellung Native Diskwiedergabe werden die ursprüngliche Auflösung und Videofrequenz verwendet, die auf der abgespielten Blu-ray Disc oder DVD aufgezeichnet sind.
SETUP-Menü ■ Audio-Einstellungen Die Werkseinstellungen sind mit einem Sternchen „ * “ gekennzeichnet. Audio-Ausgang Coaxial / Optical Sie können den Ausgabemodus der COAXIAL-und OPTICAL-Buchsen einstellen. Weitere Informationen über die Ausgabeformate finden Sie unter „Übersicht der Audioausgangsformate“ (S. 35). Bitstream Gibt ein digitales Signal ohne Verarbeitung aus. Der Zweitton wird nicht ausgegeben. PCM Gibt 2-Kanal-PCM aus.
SETUP-Menü ■ Übersicht der Audioausgangsformate Quellformat PCM 2-Kanal PCM 5.1-Kanal Dolby Digital mit ZT oder MTT*1 DTS ohne ZT oder MTT*1 Dolby Digital PCM bis 5.1-Kanal Dolby Digital Plus PCM bis 7.1-Kanal Dolby TrueHD PCM bis 7.1-Kanal DTS PCM bis 5.1-Kanal*2 DTS-HD High Resolution PCM bis 7.1-Kanal*2 DTS-HD Master Audio PCM bis 7.
SETUP-Menü ■ Informationen über HDMI-Videoausgangsformate Wenn TV-System auf NTSC eingestellt ist Auflösung HDMI Inhalt Auto Native Diskwiedergabe 1080p 1080i 720p 480p/576p 480i/576i 1080i 60Hz 720p 60Hz 480p 480i BD-Video mit 1080p/24Hz-Inhalt *1 1080p 24 Hz 1080p 24Hz/ 60Hz *3 BD-Video ohne 1080p/ 24Hz-Inhalt *1 *2 1080p 60Hz 1080i 60Hz 720p 60Hz 480p 480i DVD-Video *1 *2 1080p 60Hz 1080i 60Hz 720p 60Hz 480p 480i Andere *1 *1 1080p 60Hz 1080i 60Hz 720p 60Hz 480p 48
Software-Aktualisierung Neue Software mit zusätzlichen Merkmalen oder Produktverbesserungen erscheint nach Bedarf. Wir empfehlen die Software des Players regelmäßig zu aktualisieren. Ob ein Software-Aktualisierung verfügbar ist, erfahren Sie auf der Seite: http://download.yamaha.com/ Hinweis – Entnehmen Sie nicht das USB-Speichergerät, versetzen Sie den Player nicht in den Bereitschaftsmodus und ziehen Sie weder Netzkabel noch LAN-Kabel, während das Software-Aktualisierung durchgeführt wird. 1.
ZUSÄTZLICHE INFORMATIONEN Fehlersuche Suchen Sie eine Lösung aus der unten angegebenen Tabelle, wenn dieser Player nicht richtig funktionieren sollte. Falls Ihr Problem nicht hier aufgeführt ist oder die vorgeschlagene Lösung nicht abhilft, schalten Sie den Player aus, ziehen Sie das Netzkabel ab und wenden Sie sich an den nächsten Yamaha Händler oder Kundendienst. ■ Strom Problem Mögliche Ursache und Lösung Kein Spannungsversorgung. – Schließen Sie das Netzkabel richtig an.
Fehlersuche ■ Bild Problem Mögliche Ursache und Lösung – Vergewissern Sie sich, dass die Kabel korrekt angeschlossen sind. (S. 11) – Vergewissern Sie sich, dass der angeschlossene Fernseher oder AV-Receiver auf den korrekten Eingang eingestellt ist. – Halten Sie und an der Vorderseite gleichzeitig gedrückt, um die Videoauflösung auf den Standardwert einzustellen, während keine Disc eingelegt ist bzw. die Wiedergabe gestoppt wurde.
Fehlersuche Problem Mögliche Ursache und Lösung BD-Live-Inhalte können nicht heruntergeladen werden. – Überprüfen Sie, ob sich dieser Player normal mit dem Internet verbinden kann. Siehe „Verbindungstest“. (S. 32) – Stecken Sie ein USB-Speichergerät sachgemäß ein. Prüfen Sie, ob ein USBSpeichergerät am USB-Anschluss des Players eingesteckt ist. (S. 16) – Prüfen Sie, ob die Blu-ray Disc BD-Live unterstützt. – Stecken Sie ein FAT16-, FAT32- oder NTFS-formatiertes USB-Speichergerät ein.
Glossar AVCHD AVCHD ist ein neues Format (Standard) für HDCamcorder zur Aufzeichnung und Wiedergabe von hochauflösenden Videobildern. BD-Live™ BD-Live ist ein Blu-ray Disc-Standard, der dem Player über eine Netzwerkverbindung ermöglicht Werbevideos und andere Daten aus dem Internet herunterzuladen. BDMV Blu-ray 3D™ Blu-ray 3D erlaubt Ihnen das Abspielen hochauflösender 3D-Bilder.
Glossar FLAC FLAC (Free Lossless Audio Codec) ist ein offenes Dateiformat für die verlustlose Komprimierung von Audiodaten. Es weist gegenüber anderen verlustbehaftet komprimierten Audioformaten zwar eine schlechtere Komprimierungsrate auf, kann aber häufig eine höhere Audioqualität bieten. HDMI HDMI (High-Definition Multimedia Interface) ist eine Schnittstelle, die sowohl Video als auch Audio über einen einzigen digitalen Anschluss unterstützt.
Technische Daten ■ Allgemeines ■ Urheberrecht Hinweis – Audiovisuelles Material kann urheberrechtlich geschützt sein und darf eventuell ohne Genehmigung des Eigentümers der Urheberrechte nicht aufgenommen werden. Beziehen Sie sich auf die entsprechenden nationalen Gesetze. “Blu-ray Disc™”, “Blu-ray™”, “Blu-ray 3D™”, “BDLive™”, “BONUSVIEW™” und die entsprechenden Logos sind Warenzeichen der Blu-ray Disc Association. ■ Audioleistung Audioausgangspegel (1 kHz, 0 dB) Blu-ray Disc/DVD/CD-DA...................
Technische Daten Java ist ein eingetragenes Warenzeichen von Oracle und/ oder seiner verbundenen Unternehmen. DLNA™ und DLNA CERTIFIED™ sind Warenzeichen bzw. eingetragene Warenzeichen der Digital Living Network Alliance. Alle Rechte vorbehalten. Unerlaubte Verwendung ist ausdrücklich untersagt. Das Wi-Fi CERTIFIED-Logo ist eine Zertifizierungsmarke der Wi-Fi Alliance. Das Wi-Fi Protected Setup-Kennzeichen ist ein Zeichen der Wi-Fi Alliance.
ZUSÄTZLICHE INFORMATIONEN Index ■ Numerics 2 Kanal Downmix, SETUP-Menü .......34 2ND AUDIO, Fernbedienung ................8 3D Ausgang, SETUP-Menü ................32 3D Wiedergabe Information, SETUP-Menü ..................................30 ■ A ■ B BD-Live ...............................................26 BD-Live-Verbindung, SETUP-Menü ...32 Bedienung des SETUP-Menüs ............29 Bild im Bild Anzeige, SETUP-Menü ...31 Bildschirmmenü ...................................23 Bitrate, Bildschirmmenü ...
Observera: Läs detta innan enheten tas i bruk. 1 2 3 4 5 Läs noga denna bruksanvisning för att kunna ha största möjliga nöje av enheten. Förvara bruksanvisningen nära till hands för framtida referens. Installera anläggningen på en väl ventilerad plats där det är svalt, torrt, rent och se till att den inte utsätts för direkt solljus, värmekällor, vibrationer, damm, fukt och/eller kyla. Lämna följande mellanrum för ventilation.
Innehåll 1. Introduktion 1 5. Ytterligare information Vad du kan göra med den här spelaren ........... 2 Felsökning......................................................... 38 Ett brett utbud av skivor och filformat som stöds .......... 2 Förbättrade nätverksfunktioner....................................... 2 Enkel installation och drift ............................................. 2 Ström............................................................................. 38 Grundläggande funktioner .......
INTRODUKTION Vad du kan göra med den här spelaren Olika skivor Nätverkets strömmande innehåll 5# %& USB innehåll Trådlöst nätverk (WPS stöd) PC/NAS innehåll (DLNA) Smarttelefon med innehåll (Miracast) ■ Ett brett utbud av skivor och filformat som stöds – Blu-ray Disc™, DVD, SA-CD och CD (s. 23) – Blu-ray 3D™ (s. 11), BONUSVIEW™ och BD-Live™ (s. 25) – Video, musik och foto filer på DVD-R/RW skivor, CD-R/RW skivor och USB-minnenesenheter (s.
1 Om skivor och filer – 12 cm och 8 cm skivor kan spelas upp med denna spelare. Använd inte en 8 cm till 12 cm-adapter. – Använd skivor som överensstämmer med kompatibla normer såsom anges av officiella logotyper på skivetiketten. Vi kan inte garantera uppspelning av skivor som inte uppfyller dessa normer. Vi kan ej heller garantera optimal bild- eller ljudkvalitet, även om skivorna kan spelas upp.
Om skivor och filer Användningsinformation för regionen Destination Ryssland BD-Video Regionskod ”C” eller ”ABC” DVD-Video Regionsnummer ”5” eller ”ALL” 5 ALL Kommentarer – Blu-ray-skiva/DVD-video användning och funktioner kan skilja sig från förklaringarna i denna manual och vissa funktioner kan förbjudas på grund av skivtillverkarens inställningar. – Om en menyskärm eller instruktionsmeddelanden visas vid uppspelning av en skiva ska du följa de angivna anvisningarna.
Om skivor och filer ■ Försiktighetsåtgärder gällande skivor – Blu-ray-skiva, DVD-och CD -skivor är känsliga för damm, fingeravtryck och särskilt repor. En repig skiva kan kanske inte spelas upp. Hantera skivorna försiktigt och förvara dem på ett tryggt ställe. Förvaring av skivor Placera skivan mitt i skivasken och försvara asken och skivan upprätt. Undvik att förvara skivor på ställen som utsätts för solsken, nära värmekällor eller på ställen med hög luftfuktighet.
Kontroller och funktioner ■ Frontpanel 5# %& USB 1 2 34 1 p (På/standby) Slår på spelaren/ställer den i standby-läge. Tryck och håll p på frontpanelen i mer än 5 sekunder för att återställa den här spelaren (systemåterställning). 5 6 7 8 9 0 A 7 (Sök bakåt/Hoppa bakåt) Tryck för att hoppa bakåt och tryck och håll ner för att söka bakåt. 8 3 SA-CD indikator Lyser upp när en SA-CD laddas och SA-CD skikt (s. 4) är vald.
Kontroller och funktioner ■ Bakre panel 1 Introduktion AC IN DIGITAL OUT COAXIAL NETWORK AUDIO OUT OUT IN REMOTE CONTROL HDMI 1 2 OPTICAL 3 USB 4 5 6 7 1 AUDIO OUT (L/R) (s. 13) 5 NETWORK (s. 14) 2 HDMI (s. 11) 6 REMOTE CONTROL (OUT/IN) (s. 17) 3 DIGITAL OUT (COAXIAL/OPTICAL) (s. 13) 7 AC IN (s. 17) 4 USB (s.
Kontroller och funktioner ■ Fjärrkontroll Kommentar 1 Infraröd signalsändare: Skickat ut en infraröd signal. Sikta mot detta fönster med fjärrkontrollsensorn (s. 10). – 2 p: Slår på denna spelare eller ställer den i vänteläge. visas längst upp till vänster på skärmen när den nedtryckta knappen inte är tillgänglig. ZOOM DVD VIDEO PHOTO : Zoomar in/ut. Storleken på skärmen ändras varje gång du trycker på knappen (zooma in/ut: 3 steg vardera).
Kontroller och funktioner Kommentar – Specifika handlingar kan skilja sig från de som anges här beroende på skivan. Följ instruktionerna på varje menyskärm. G REPEAT A/B BD DVD CD VIDEO Spelar upp en specifik del du vill upprepa. MUSIC : 1 Tryck REPEAT A/B vid fönstret där du vill ställa in startpunkten. ”A-” visas på skärmen. 2 Tryck REPEAT A/B igen vid fönstret där du vill ställa in slutpunkten. ”A-B” visas på skärmen. Upprepad uppspelning påbörjas.
Kontroller och funktioner Isättning av batterier i fjärrkontrollen 1 När du använder flera Yamaha produkter kan fjärrkontrollen fungerar på en annan Yamaha-produkt eller att en annan fjärrkontroll kan fungera på denna spelare. I detta fall ändra fjärrkontroll -ID för att förhindra oönskad funktion. Om du har ändrat fjärrkontrollens ID måste du kontrollera att du valt samma ID för huvudenheten. Standardinställningen är ID1.
ANSLUTNING Video-/ljudanslutningar Gör motsvarande video/ljudkabelanslutningar beroende på den utrustning som du vill använda. 2 Tips Anslutning – Se sida 35 för information angående format för ljud-/videoutmatning. – Förbered kommersiellt tillgängliga kablar som krävs för anslutning. Typen och antalet kablar som behövs varierar beroende på vilken utrustning som ska anslutas. Få glädje av video/ljud genom att använda en TV och en AV-mottagare Se ”Ansluta till en TV via en AV-mottagare” (s. 12).
Video-/ljudanslutningar ■ Anslutning till en TV-apparat via en AV-mottagare ■ Anslutning till en TV-apparat direkt Anslut spelaren till AV-mottagaren och AV-mottagaren till TV-apparaten med HDMI-kablar. För information om högtalaranslutningar, se ägarmanualen för mottagare och högtalare. Anslut spelaren till TV-apparaten med en HDMI-kabel. Observera! Observera! Anslut inte spelarens strömkabel innan alla andra anslutningar har gjorts.
Video-/ljudanslutningar ■ Anslutning till en TV- och ljudutrustning Anslut spelaren till TV-apparaten med en HDMI-kabel, och spelaren till ljudutrustningen med en ljudkabel (digital optisk, digital koaxial eller stereostiftkabel). 2 Observera! Anslutning Anslut inte spelarens strömkabel innan alla andra anslutningar har gjorts.
Nätverksanslutningen Genom att ansluta denna spelare till nätverket (trådlöst eller trådbundet), kan du använda följande funktioner. – Spela upp innehållet i DLNA-server (PC eller NAS) (s. 19) – Uppspelning av olika innehåll i nätverkstjänster (s. 21) – Spelar BD-LIVE-kompatibla skivor (s. 25) – Användning av denna spelare från mobila enheter (AV KONTROLLER) (s. 22) Kommentarer – Om du vill använda nätverkstjänster eller BD-Live-funktionen, krävs en bredbandsanslutning.
Nätverksanslutningen ■ Inställning av DLNA server Kommentarer – För att använda DLNA funktionerna måste alla enheter vara anslutna till samma nätverk. – För att använda en NAS som en DLNA-server, måste NAS vara kompatibel med DLNA. 2 Anslutning Genom att använda DLNA kan du dela multimediainnehåll (t.ex. filmer, musik och foton) som lagrats på en DLNAserver (PC eller NAS) som är ansluten till ditt nätverk, och få glädje av dessa innehåll med denna spelare.
USB anslutning Genom att ansluta ett USB-minnesenhet till USB-anslutningen på framsidan eller baksidan av spelaren, kan du spela flera mediefiler lagrade på USB-minnet (s. 19). Kommentarer – Yamaha kan inte garantera att alla märken av USB-minnen kommer att fungera med denna spelare. – Anslut ett USB-minne till en av USB-portarna (fram/bak) på spelaren när du använder BD-Live-funktionen (s. 26).
Andra anslutningar ■ Anslutning till REMOTE CONTROL uttag – För mer information om SCENE funktionen, se manualen som medföljer Yamaha mottagaren. – Du kan ansluta en Yamaha-komponent (t.ex. CDspelare) som stöder SCENE fungera till REMOTE CONTROL (OUT) uttaget på denna spelare. ■ Ansluta nätkabeln 2 Anslutning – Du kan sända och ta emot signaler från fjärrkontrollen genom att ansluta till REMOTE CONTROL (OUT/IN) uttagen.
SPELA UPP Initial inställning ■ Inställning med snabbinstallation 3 Tryck 2/3 för att välja Ja, tryck sedan på ENTER. Med Easy Setup (Enkel inställning) kan du ställa in språk, upplösning och bildförhållande på ett enkelt sätt. Snabbinstallation skärmen visas när du sätter på denna spelare för första gången efter inköpet. Samma inställning kan göras från SETUP menyn = System = Snabbinstallation. 1 När Snabbinstallation skärmen visas, tryck på ENTER för att starta Snabbinstallation.
HOME meny Menyn HOME gör att du kan utföra följande grundläggande funktioner med denna spelare. – Bläddra och spela multimedia-filer på olika skivor, USB-minnen och dina DLNA-servrar (PC eller NAS) – Åtkomst till olika nättjänster (s. 21) – Visning av SETUP menyn (s. 27) 3 Tips Spela upp – Information om uppspelningsbara skivor och format finns på sidan 3. – För att spela innehållet från DLNA-server på denna spelare, bör mediadelning (s. 15) på DLNA-servern konfigureras.
HOME meny Kommentar Funktioner för visning av foton – Observera att endast den filtyp som väljs i detta steg visas i följande steg. Till exempel, om du har valt Foto mappen i detta steg visas endast foto filer. När du visar foton fungerar knapparna på fjärrkontrollen enligt följande. : Stoppar bildspelet och återgår till fillistan. : Gör paus i ett bildspel. : Spelar upp ett bildspel. : Flyttar till nästa foto. : Flyttar till föregående foto. : Gör ett bildspel snabbare i 3 steg.
Använda nätverkstjänster Du kan ha glädje av multimedia innehållet (t.ex. bilder och videoklipp) med hjälp av följande nättjänster. – Dropbox – Picasa Webbalbum – YouTube 3 Kommentarer 1 Tryck på HOME för att flytta till HOME menyskärmen. Tips – För att direkt flytta till YouTube menyn tryck på YouTube. 2 Tryck 5/a att välja nätverkstjänster, tryck sedan på ENTER. Spela upp – För att få tillgång till innehåll som tillhandahålls av tredje part behövs en snabb Internetuppkoppling.
Använd smarttelefon med bilder och videoklipp på TV-skärmen (Miracast™) Miracast är en lösning för att sömlöst visa video mellan enheter, utan kablar eller en nätverksanslutning via en åtkomstpunkt (Wi-Fi Direkt). Du kan göra saker som att visa bilder från en Miracast-kompatibel enhet (smarttelefon, etc.) på skärmen för TV som är ansluten till denna spelare. Kommentarer – För att kontrollera om din enhet är Miracast kompatibel, se manualen för enheten.
Avancerade uppspelningsfunktioner Detta kapitel förklarar uppspelning av kommersiellt tillgängliga Blu-ray-skivor, DVD-skivor, SA-CD, CD och inspelade DVD-RW / R-skivor. Kommentar ■ Skärmmeny För att visa på skärmmenyn, tryck ON SCREEN. Efter att ha tryckt 5/a/2/3 välj ett objekt, tryck sedan på ENTER för att styra den önskade funktionen.
Avancerade uppspelningsfunktioner ■ Statusmeny Detta visar olika inställningar, t.ex. undertexter, vinkelinställningar och den titel/kapitel/spårnummer som spelas upp. Visa statusmenyn genom att trycka på STATUS. Statusmenyn innehåller följande menyer.
Avancerade uppspelningsfunktioner ■ Programmerad uppspelning DVD ■ Använda sökning CD Denna funktion låter dig programmera uppspelningsordningen för skivans ljudspår eller DVDkapitel. Tryck på PROGRAM under uppspelning för att visa PROGRAM fönstret och programmera uppspelningsordning. Du kan programmera högst 15 spår/kapitel. 1 Tryck på PROGRAM under uppspelning. DVD CD VIDEO MUSIC 1 Tryck på SEARCH under uppspelning. Statusraden visas.
Avancerade uppspelningsfunktioner ■ Använda bild-i-bild-funktionen (uppspelning av sekundärt ljud/ video) BD-video som innehåller sekundärt ljud och video och är kompatibel med bild-i-bild-visning, kan spelas av med sekundärt ljud och video samtidigt som en liten bildruta i hörnet. Primär video Sekundär video Kommentarer – Yamaha kan inte garantera att alla märken av USBminnen kommer att fungera med denna spelare.
INSTÄLLNINGAR SETUP meny Menyn SETUP möjliggör olika ljud-/visuella inställningar för funktioner med hjälp av fjärrkontrollen. Meny/undermeny System Allmäna Inställningar Spela upp Säkerhet Sidan Automatisk avstängning Ställer in energisparfunktionen till på/av. HDMI Control Ställer in spelaren för att ta emot kontrollsignalen från fjärrkontrollen på TV/AV-mottagaren. 30 Ladda Default Återställer alla inställningar till grundinställningen utom säkerhetsinställningen.
SETUP meny Meny/undermeny TV Objekt Funktion Sidan 3D uppspelning Väljer 3D- eller 2D-video. 32 TV Screen Ställer in skärmformatet för den anslutna TV:n och justerar videoutmatningen. 32 HDMI Upplösning Väljer HDMI-videoupplösning. 33 TVsystem Väljer TV-system frånNTSC/PAL/Multi. 33 Färgrymd Väljer färgutrymme från YCbCr 4:4:4/YCbCr 4:2:2/Full RGB/RGB. 33 HDMI Deep Color Väljer HDMI Deep Color från 30 bits/36 bits/48 bits / Av.
SETUP meny ■ Exempel på SETUP meny operation Du måste ringa upp SETUP menyskärmen för att utföra inställningar för denna spelare. Följande är förklaringen till de grundläggande funktionerna av SETUP meny. 3. Välj en menypost. Tryck på 5/a för att välja Automatisk skivuppspelning, tryck sedan ENTER eller markören 3. REPEAT A/B SUBTITTLE ANGLE CLEAR SEARCH MIRACAST 2ND AUDIO HOME TOP MENU 4 Inställningar PIP AUDIO SETUP POP-UP MENU 4. Välj önskad inställning.
SETUP meny ■ Allmäna Inställningar Ladda Default Du kan återställa alla inställningar för den här spelaren till standardinställningen med undantag för säkerhetsinställningen (s. 31). Information om standardinställningar finns på sidorna 27–34. Standardinställningarna är markerade med ” * ”. Uppgradera Du kan uppgradera programvaran manuellt från USB lagring eller Nätverk. Mer information om programvaruuppgradering finns i ”Programvaruuppgradering” (s. 37).
SETUP meny Meny Du kan prioritera språket för skivmenyn. Säkerhet English, Français, 中文 , Español, Deutsch, Italiano, Nederlandse, Portugisiska, Danska, Svenska, Finska, Norska, Polski, Русский, Koreanska, Japanska, Mer Ljud Du kan prioritera ljudspråket för Blu-ray-skiva/DVD uppspelning. Mer information om inställningar av poster, se ”Meny” (s. 31). Textning Du kan prioritera språk för undertitel. (Standardinställningarna i [Språk] variera beroende på modell.
SETUP meny Anslutningstest Du kan utföra ett Internet-anslutningstest. Om testet misslyckades, kontrollera ”IP inställningar” (s. 32) och utför testet igen. IP inställningar Du kan konfigurera nätverksinställningarna. Auto* Välj att automatiskt konfigurera denna spelares nätverksinställningar med DHCP-servern. Manual Välj för att konfigurera nätverksinställningarna (IP adress, Subnet Mask, Standardgateway, och DNS) manuellt. Tips – – – – Numeric keys 2/3 CLEAR ENTER Anges i tecken.
SETUP meny Auto*, Läser skiva, 480i/576i, 480p/576p, 720p, 1080i, 1080p Kommentar – För att mata ut HD-ljud (Dolby TrueHD eller DTSHD Master Audio) från HDMI-terminalen, ställ in HDMI Upplösning till Auto eller mer än 720p. TVsystem Du kan välja TVsystem från PAL, NTSC och Multi. Ställ in samma TVsystem som din TV-apparat har. Mer information om utmatningsformat finns i ”Om formaten för HDMI videoutmatning” (s. 36). NTSC, PAL, Multi (Standardinställningen skiljer sig beroende på din modell.
SETUP meny ■ Ljudinställning SACD/CD lager Väljer skiktet som ska spelas upp när en SA-CD/CD hybrid skiva spelas upp. SACD*, CD Standardinställningarna är markerade med ” * ”. Tips Ljudutgång – SA-CD-indikatorn på frontpanelen tänds när en SACD är laddad och SA-CD-lagret har markerats. Koaxial / Optisk Du kan välja utmatningsläge för COAXIAL utgången och OPTICAL uttaget. Mer information om utmatningsformat finns i ”Angående format för ljudutmatning” (s. 35).
SETUP meny ■ Angående format för ljudutmatning Källformat PCM 2kanaler PCM 5.1kanal Dolby Digital med SA eller BCS*1 DTS PCM 5.1kanal utan SA eller BCS*1 med SA eller BCS*1 utan SA eller BCS*1 med SA eller BCS*1 utan SA eller BCS*1 med SA eller DTS HD High BCS*1 Resolution utan SA eller BCS*1 med SA eller BCS*1 DTS-HD Master Audio utan SA eller BCS*1 Dolby Digital Bitstream PCM 7.1kanal PCM upp till 5.1kanal Dolby Digital Plus PCM upp till 7.1kanal Dolby TrueHD PCM upp till 7.
SETUP meny ■ Om formaten för HDMI videoutmatning När TVsystem är inställd på NTSC Innehåll HDMI Upplösning Auto Läser skiva 1080p 1080i 720p 480p/576p 480i/576i BD-Video med 1080p/24Hz innehåll *1 1080p 24Hz 1080p 24Hz/ 60Hz *3 1080i 60Hz 720p 60Hz 480p 480i BD-Video utan 1080p/ 24Hz innehåll *1 *2 1080p 60Hz 1080i 60Hz 720p 60Hz 480p 480i DVD-Video *1 *2 1080p 60Hz 1080i 60Hz 720p 60Hz 480p 480i Övrigt *1 *1 1080p 60Hz 1080i 60Hz 720p 60Hz 480p 480i När TVsystem är
Programvaruuppgradering Ny mjukvara som ger ytterligare funktioner och produktförbättringar kommer att släppas efter behov. Vi rekommenderar att du uppgraderar programvaran för denna spelare till den senaste versionen regelbundet. Kontrollera om det finns tillgängliga uppgraderingar genom att besöka http://download.yamaha.com/ Kommentar – Ta inte bort USB-minnet. Ställ in den här spelaren i väntläge eller koppla ur strömkabeln/nätverkskabeln medan uppgraderingen utförs. 1. Förbered programvaruuppgradering.
YTTERLIGARE INFORMATION Felsökning Vi hänvisar till tabellen nedan när spelaren inte fungerar korrekt. Om du upplever ett problem som inte finns beskrivet nedan eller om instruktionerna nedan inte hjälper, stäng av spelaren, koppla ur strömkabeln och kontakta närmaste auktoriserad Yamaha återförsäljare eller serviceverkstad. ■ Ström Problem Tänkbara orsaker och lösningar Ingen ström. – Anslut nätkabeln ordentligt. – Tryck på p på frontpanelen för att slå på strömmen Strömmen till spelaren slås av.
Felsökning ■ Bild Problem Tänkbara orsaker och lösningar – Kontrollera att alla kablar anslutits på rätt sätt. (s. 11) – Kontrollera att den anslutna TV:n eller AV-mottagaren är inställd på rätt ingångskälla. – Om ingen skiva är isatt eller uppspelningen är stoppad, håller du ned och på frontpanelen samtidigt för att ställa in videoupplösningen på standardvärdet. Om en bild är fortfarande inte visas, tryck och håll på frontpanelen i ungefär 5 sekunder för att växla NTSC/PAL.
Felsökning Problem Tänkbara orsaker och lösningar Kan inte upptäcka DLNA-servern. – – – – – Kan inte spela upp filen på DLNAservern. – Kontrollera att filen är spelbar. (s. 3) – Kontrollera DLNA-serverns inställningar. – Kvaliteten och funktionen av uppspelningen kan påverkas av ditt hemmanätverks tillstånd. Kan inte ansluta till Internet via trådlöst LAN. – Kontrollera att den trådlösa LAN-routern är påslagen.
Ordlista AVCHD AVCHD är ett nytt format (standard) för videokameror med hög upplösning som kan användas för att spela in och spela upp HD-bilder i hög upplösning. BD-Live™ BD-Live är en standard Blu-ray-skiva som använder en nätverksanslutning, som gör att denna spelare kan ansluta sig online för att ladda ner PR-videor och annan data. BDMV Blu-ray 3D™ Med Blu-ray 3D kan du se alla bilder med hög upplösning i 3D.
Ordlista FLAC FLAC (Free Lossless Audio Codec) är ett öppet filformat för förlustfri ljuddatakompression. Även om det har sämre komprimeringsgrad jämfört med andra förlustgivande komprimerade ljudformat, kan det ofta ge högre ljudkvalitet. HDMI HDMI ( High- Definition Multimedia Interface ) är ett gränssnitt som stödjer både video och ljud via en enda digital anslutning.
Specifikationer ■ Allmänt ■ Upphovsrätt Kommentar – Audiovisuellt material kan bestå av upphovsrättsskyddade verk som ej får spelas in utan upphovsrättsinnehavarens tillstånd. Upplys dig om gällande lagar i detta avseende. ”Blu-ray Disc™”, ”Blu-ray™”, ”Blu-ray 3D™”, ”BD-Live™”, ”BONUSVIEW™”, och logotyper är varumärken som tillhör Blu-ray Disc Association. ■ Ljudprestanda Ljudutnivå (1 kHz, 0 dB) Blu-ray-skiva/DVD/CD-DA .......................................................2 ± 0.
Specifikationer Java är ett registrerat varumärke som tillhör Oracle och/ eller dess dotterbolag. DLNA ™ och DLNA CERTIFIED ™ är varumärken eller registrerade varumärken som tillhör Digital Living Network Alliance. Med ensamrätt. Obehörig användning är strängt förbjuden. Wi-Fi CERTIFIED-logotypen är ett certifieringsmärke som tillhör Wi-Fi Alliance. Wi-Fi Protected Setup Identifier Mark är en ikon som tillhör Wi-Fi Alliance.
YTTERLIGARE INFORMATION Index ■ Siffror 2ND AUDIO, fjärrkontroll ....................8 3D uppspelning, SETUP-menyn ..........32 ■ A ■ B BD-Live ...............................................26 BD-Live anslutning, SETUP-menyn ...32 Bild i Bild, SETUP-menyn ..................31 Bild-i-bild-funktionen ..........................26 Bildspel, Skärmmeny ...........................23 Bitrate, Skärmmeny .............................23 Brusreducering, SETUP-menyn ..........33 ■ C CLEAR, fjärrkontroll ....
Attenzione: prima di usare quest’unità. 1 2 3 4 5 Per assicurarsi le migliori prestazioni dell’unità, leggere questo manuale per intero. Conservarlo poi in un luogo sicuro per poterlo riutilizzare al momento del bisogno. Installare l’unità in una posizione ben ventilata, fresco asciutta e pulita - lontano da luce solare diretta, sorgenti di calore, vibrazioni, polvere, umidità e/o freddo. Per un’adeguata entilazione mantenere le seguenti distanze.
Sommario 1. Introduzione 1 5. Informazioni aggiuntive Cosa è possibile fare con questo lettore ......... 2 Risoluzione dei problemi ................................. 38 Ampia varietà di dischi e formati di file supportati........ 2 Funzioni di rete avanzate................................................ 2 Facile impostazione e funzionamento ............................ 2 Alimentazione ............................................................... 38 Funzionamento di base.............................
INTRODUZIONE Cosa è possibile fare con questo lettore Vari dischi Streaming di contenuti in rete 5# %& Contenuti su USB Rete wireless (supporto WPS) Contenuti su PC/NAS (DLNA) Contenuti su smartphone (Miracast) ■ Ampia varietà di dischi e formati di file supportati – Blu-ray Disc™, DVD, SA-CD e CD (p. 23) – Blu-ray 3D™ (p. 11), BONUSVIEW™ e BD-Live™ (p. 25) – File video, file musicali e foto su DVD-R/RW, CD-R/RW e dispositivi di memorizzazione USB (p.
1 Informazioni su dischi e file – In questo lettore è possibile riprodurre dischi da 12 cm e da 8 cm. Non utilizzare un adattatore da 8 cm a 12 cm. – Utilizzare dischi che rispettano gli standard di compatibilità come indicato dalla presenza dei loghi ufficiali sull’etichetta del disco. La riproduzione dei dischi non conformi a tali standard non è garantita. Inoltre non è garantita la qualità dell’immagine o del suono anche se fosse possibile riprodurre i dischi.
Informazioni su dischi e file Informazioni sulla gestione della regione Destinazione Australia BD video Codice regionale “B” o “ABC” DVD-Video Codice regionale “4” o “ALL” 4 Russia Codice regionale “C” o “ABC” ALL Codice regionale “5” o “ALL” 5 ALL Disco Super Audio CD (SA-CD) – Formato audio basato sugli standard CD correnti, ma che comprende una quantità maggiore di informazioni, offrendo così una qualità dell’audio più elevata.
Informazioni su dischi e file ■ Precauzioni per i dischi – I dischi Blu-ray, DVD e CD sono sensibili alla polvere, alle impronte digitali e soprattutto ai graffi. Un disco graffiato potrebbe non essere riproducibile. Maneggiare i dischi con cura e conservarli in un luogo sicuro. Conservazione appropriata dei dischi Collocare il disco al centro della sua custodia e conservare la custodia e il disco in posizione verticale.
Comandi e funzioni ■ Pannello anteriore 5# %& USB 1 2 34 1 p (On/Standby) Attiva il lettore/lo imposta in modalità Standby. Tenere premuto p sul pannello anteriore per più di 5 secondi per ripristinare il lettore (ripristino sistema). 5 6 7 8 4 Display del pannello anteriore visualizza diverse informazioni sullo stato di funzionamento del lettore.
Comandi e funzioni ■ Pannello posteriore 1 Introduzione AC IN DIGITAL OUT COAXIAL NETWORK AUDIO OUT OUT IN REMOTE CONTROL HDMI 1 2 OPTICAL 3 USB 4 5 6 7 1 AUDIO OUT (L/R) (p. 13) 5 NETWORK (p. 14) 2 HDMI (p. 11) 6 REMOTE CONTROL (OUT/IN) (p. 17) 3 DIGITAL OUT (COAXIAL/OPTICAL) (p. 13) 7 AC IN (p. 17) 4 USB (p.
Comandi e funzioni ■ Telecomando Nota 1 Trasmettitore a infrarossi: Fa uscire il segnale a infrarossi. Puntare questa finestra verso il sensore del telecomando (p. 10). – 2 p: Attiva il lettore o lo imposta in modalità Standby. viene visualizzato nell’angolo in alto a sinistra dello schermo quando il tasto premuto non è disponibile. ZOOM DVD VIDEO PHOTO : Ingrandisce/ rimpicciolisce. A ogni pressione del tasto le dimensioni dello schermo cambiano (ingrandimento/ rimpicciolimento: 3 fasi ognuna).
Comandi e funzioni Nota – A seconda del disco le operazioni specifiche potrebbero essere diverse. Seguire le istruzioni di ogni schermata di menu. B Tasti cursore (5/a/2/3): Spostano la selezione nella schermata del menu. ENTER: Seleziona il menu/la voce selezionata. C RETURN: Torna al menu o alla schermata precedente ecc. D Tasti di comando BD DVD CD VIDEO MUSIC PHOTO : Arresta la riproduzione. :Mette in pausa la riproduzione. : Riproduce i contenuti. / : Salta all’indietro/in avanti.
Comandi e funzioni Caricamento delle batterie nel telecomando 1 Campo operativo approssimativo del telecomando Sensore del telecomando 3 SA-CD USB 2 30° 30° 6m Note – Sostituire entrambe le batterie quando il campo operativo del telecomando diminuisce. – Utilizzare batterie AAA, R03, UM-4. – Assicurarsi che la polarità sia corretta. Vedere l’illustrazione all’interno del vano batterie. – Se il telecomando non verrà utilizzato per lungo tempo, rimuovere le batterie.
COLLEGAMENTI Collegamenti audio/video Effettuare i collegamenti audio/video a seconda dell’apparecchiatura che si desidera utilizzare. 2 Suggerimenti Riproduzione audio/video mediante TV e ricevitore AV Consultare “Collegamento a un TV via ricevitore AV” (p. 12) Collegamenti – Vedere pagina 35 per informazioni sui formati di uscita audio/video. – Preparare per i collegamenti i cavi disponibili in commercio. Il tipo e il numero di cavi necessari variano a seconda dell’apparecchiatura da collegare.
Collegamenti audio/video ■ Collegamento a un TV via ricevitore AV ■ Collegamento diretto a un TV Collegare il lettore al TV con un cavo HDMI. Collegare il lettore al ricevitore AV e quest’ultimo al TV tramite cavi HDMI. Per dettagli relativi al collegamento dei diffusori consultare i manuali di istruzioni in dotazione con il ricevitore AV e i diffusori. Attenzione! Attenzione! Non collegare il cavo di alimentazione di questo lettore fino a quando non sono stati completati tutti gli altri collegamenti.
Collegamenti audio/video ■ Collegamento a un TV e ad apparecchiature audio Collegare il lettore al TV con un cavo HDMI e all’apparecchiatura audio con un cavo audio (digitale ottico, digitale coassiale o cavo stereo). 2 Attenzione! Questo lettore Collegamenti Non collegare il cavo di alimentazione di questo lettore fino a quando non sono stati completati tutti gli altri collegamenti.
Collegamento di rete Collegando il lettore alla rete (wireless o cablata), è possibile utilizzare le seguenti funzioni: – Riproduzione dei contenuti da server DLNA (PC o NAS) (p. 19) – Riproduzione di contenuti da vari servizi di rete (p. 21) – Riproduzione di dischi compatibili BD-Live (p. 25) – Controllo remoto del lettore da dispositivi mobili (AV CONTROLLER) (p. 22) Note – Per utilizzare i servizi di rete o la funzione BD-Live, è necessaria una connessione Internet a banda larga.
Collegamento di rete ■ Impostazione del server DLNA Note – Per utilizzare le funzioni DLNA, tutti i dispositivi devono essere collegati alla stessa rete. – Per utilizzare un NAS come server DLNA, il NAS deve essere compatibile. 2 Collegamenti DLNA consente di condividere contenuti multimediali (come video, musica e foto) memorizzati sul server DLNA (PC o NAS) connesso alla rete e di riprodurli sul lettore.
Collegamento USB Collegando un dispositivo di archiviazione USB al connettore USB sul pannello anteriore o posteriore del lettore, è possibile riprodurre i file multimediali memorizzati sul dispositivo di archiviazione USB (p. 19). Note – Yamaha non può garantire che tutte le marche di dispositivi di archiviazione USB funzionino correttamente con il lettore. – Collegare un dispositivo di archiviazione USB a uno dei connettori USB (fronte/retro) del lettore quando si utilizza la funzione BD-Live (p. 26).
Altri collegamenti ■ Collegamento alle prese audio REMOTE CONTROL Attenzione! Non collegare il cavo di alimentazione di questo lettore fino a quando non sono stati completati tutti gli altri collegamenti. – Per dettagli relativi alla funzione SCENE, consultare il manuale di istruzioni in dotazione con il ricevitore AV Yamaha. – È possibile collegare un componente Yamaha (quale un lettore CD) che supporta la funzione SCENE alla presa REMOTE CONTROL (OUT) di questo lettore.
RIPRODUZIONE Impostazioni iniziali ■ Impostazione mediante Installazione rapida 3 Premere 2/3 per selezionare Sì, quindi premere ENTER. Installazione rapida consente l’agevole impostazione di lingua, risoluzione e rapporto di aspetto dello schermo. La schermata di Installazione rapida viene visualizzata quando il lettore viene attivato per la prima volta dopo l’acquisto. È possibile eseguire la stessa impostazione dal menu SETUP menu = Sistema = Installazione rapida.
Menu HOME Il menu HOME consente di eseguire le seguenti operazioni di base con il lettore. – Sfogliare e riprodurre file multimediali su vari dischi, dispositivi di archiviazione USB e server DLNA (PC o NAS). – Accedere a vari dispositivi di rete (p. 21) – Visualizzare il menu SETUP. (p. 27) – Per dettagli sui dischi e formati riproducibili, consultare pagina 3. – Per riprodurre sul lettore contenuti i contenuti multimediali del lettore, l’impostazione di condivisione multimediale (p.
Menu HOME Nota – Tenere presente che nella fase successiva verrà visualizzato solo il tipo di file selezionato in questa fase. Ad esempio, se in questa fase si seleziona la cartella Foto, da ora in poi verranno visualizzati solo file di foto. 4 Selezionare la cartella contenente il file che si desidera riprodurre. 5 Selezionare il file che si desidera riprodurre, quindi premere ENTER. Quando viene selezionato un file video, parte la riproduzione.
Uso dei servizi di rete È possibile riprodurre contenuti multimediali quali foto e video utilizzando i seguenti servizi di rete. – Dropbox – Picasa Web Albums – YouTube 3 Note 1 Premere HOME per passare alla schermata del menu HOME. Suggerimento – Per passare direttamente al menu YouTube, premere YouTube. 2 Premere 5/a per selezionare Servizi di rete, quindi premere ENTER.
Visualizzare foto e video dello smartphone sullo schermo TV (Miracast™) Miracast è una soluzione per visualizzare in maniera fluida video tra dispositivi senza bisogno di cavi o connessione di rete tramite un punto di accesso (Wi-Fi Direct). È possibile visualizzare immagini da un dispositivo compatibile Miracast (smartphone ecc.) sullo schermo del TV collegato al lettore. Note – Per verificare se il proprio dispositivo è conforme Miracast, consultare il relativo manuale.
Funzionamento di riproduzione avanzata Questo capitolo spiega la modalità di riproduzione dei dischi Blu-ray Disc disponibili in commercio, dei DVD, dei SA-CD e dei CD, nonché dei dischi registrati DVDRW/R. Nota ■ Menu a schermo (On Screen) Per visualizzare il menu a schermo, premere ON SCREEN. Successivamente, premere 5/a/2/3 per selezionare una voce, quindi premere ENTER per attivare la funzione desiderata.
Funzionamento di riproduzione avanzata ■ Menu di stato Mostra varie impostazioni, quali l’impostazione dei sottotitoli, dell’angolazione e il numero di titolo/capitolo/ traccia in corso di riproduzione. Per visualizzare il menu di stato, premere STATUS. Il menu di stato contiene i seguenti menu.
Funzionamento di riproduzione avanzata ■ Riproduzione programmata DVD CD Questa funzione consente di programmare l’ordine di riproduzione delle tracce di un disco audio o dei capitoli di un DVD. Premere PROGRAM durante la riproduzione per visualizzare la finestra PROGRAMMA per programmare l’ordine di riproduzione. È possibile programmare fino a 15 tracce/capitoli. 1 Premere PROGRAM durante la riproduzione.
Funzionamento di riproduzione avanzata ■ Uso della funzione Picture in Picture (riproduzione audio/video secondario) Un BD video che comprende audio e video secondari compatibili con la funzione Picture in Picture può essere riprodotto simultaneamente con audio e video secondario come video in miniatura nell’angolo. Video principale Video secondario – Se lo spazio di memoria è insufficiente i dati non verranno copiati/scaricati.
IMPOSTAZIONI Menu SETUP Il Menu SETUP abilita varie impostazioni e regolazioni audio/visive per le funzioni utilizzando il telecomando. Menu/Menu secondario Sistema Impostazione Generale Voce Attiva/disattiva la funzione di risparmio energetico. 30 Controllo HDMI Imposta la ricezione del segnale di comando del lettore dal telecomando del proprio TV o del proprio ricevitore AV.
Menu SETUP Menu/Menu secondario TV Impostazione Display Voce Funzione Pagina Uscita 3D Seleziona i video 3D o 2D. 32 Teleschermo Imposta il rapporto di aspetto dello schermo del TV collegato e regola l’uscita video. 32 Risoluzione HDMI Seleziona la risoluzione di uscita video HDMI. 33 Sistema TV Seleziona il Sistema TV tra NTSC/PAL/Multi. 33 Spazio colorato Seleziona lo Spazio colore YCbCr 4:4:4/YCbCr 4:2:2/Full RGB/RGB.
Menu SETUP ■ Esempio di funzionamento del menu SETUP È necessario richiamare la schermata del menu SETUP per eseguire le regolazioni sul lettore. Quella che segue è la spiegazione per il funzionamento di base del menu SETUP. 3. Selezionare una voce del menu. Premere 5/a per selezionare Auto Riproduzione disco, quindi premere ENTER o il tasto cursore 3. REPEAT A/B SUBTITTLE ANGLE CLEAR SEARCH MIRACAST 2ND AUDIO HOME TOP MENU Impostazioni PIP 4 AUDIO SETUP POP-UP MENU 4.
Menu SETUP ■ Impostazione Generale Caricare le impostazioni predefinite È possibile azzerare tutte le impostazioni del lettore ai valori di fabbrica ad eccezione dell’impostazione Sicurezza (p. 31). Per dettagli sulle impostazioni predefinite, vedere le pagine 27–34. Le impostazioni predefinite sono contrassegnate con “ * ”. Aggiornamento È possibile aggiornare il software manualmente tramite Archiviazione su chiave USB o Rete.
Menu SETUP Menu È possibile impostare la lingua prioritaria per il menu disco. English, Français, 中文 , Español, Deutsch, Italiano, Nederlandse, Portoghese, Danese, Svenska, Finlandese, Norvegese, Polski, Русский, Coreano, Giapponese, Altro Audio È possibile impostare la lingua prioritaria dell’audio per la riproduzione del Blu-ray Disc/DVD. Per dettagli sulle voci di impostazione, vedere “Menu” (p. 31). Sottotitolo È possibile impostare la lingua prioritaria per i sottotitoli.
Menu SETUP Informazioni È possibile visualizzare la schermata delle informazioni sulla rete. In questa schermata, è possibile visualizzare le informazioni di Interfaccia (Ethernet), Tipo di indirizzo, Indirizzo IP, Subnet Mask, Gateway predefinito e DNS. Prova connessione È possibile eseguire un test della connessione Internet. Se la prova non va a buon fine, verificare le “Impostazioni IP” (p. 32) e quindi eseguire nuovamente la prova. Impostazioni IP È possibile configurare le impostazioni di rete.
Menu SETUP Auto*, Disco nativo, 480i/576i, 480p/576p, 720p, 1080i, 1080p Nota – Per emettere audio in alta definizione (per esempio Dolby TrueHD o DTS-HD Master Audio) dal terminale , impostare Risoluzione HDMI su Auto o su un valore superiore a 720p. Sistema TV È possibile selezionare Sistema TV tra PAL, NTSC e Multi. Impostare lo stesso Sistema TV che è impostato nel TV. Per ulteriori dettagli sui formati di uscita, consultare la sezione “Informazioni sui formati di uscita video HDMI” (p. 36).
Menu SETUP ■ Impostazione Audio Le impostazioni predefinite sono contrassegnate con “ * ”. Uscita audio Coassiale / Ottico È possibile selezionare la modalità di uscita della presa COAXIAL e del terminale OPTICAL. Per ulteriori dettagli sui formati di uscita, consultare la sezione “Informazioni sui formati di uscita audio” (p. 35). Bitstream Fa uscire il segnale digitale senza alcuna elaborazione. Non avviene l’uscita dell’Audio secondario. PCM Emette il PCM a 2 canali.
Menu SETUP ■ Informazioni sui formati di uscita audio HDMI Formato sorgente PCM a 2 canali PCM a 2 canali Dolby Digital con SA* o BCS*1 Dolby TrueHD DTS Dolby Digital PCM fino a 5.1 canali Dolby Digital Plus PCM fino a 7.1 canali Dolby TrueHD PCM fino a 7.1 canali DTS PCM fino a 5.1 canali*2 DTS-HD High Resolution PCM fino a 7.1 canali*2 DTS-HD Master Audio PCM fino a 7.
Menu SETUP ■ Informazioni sui formati di uscita video HDMI Se Sistema TV è impostato su NTSC Sommario Risoluzione HDMI Auto Disco nativo 1080p 1080i 720p 480p/576p 480i/576i BD-Video con contenuto 1080p/24Hz *1 1080p 24Hz 1080p 24Hz/ 60Hz *3 1080i 60Hz 720p 60Hz 480p 480i BD-Video senza contenuto 1080p/24Hz *1 *2 1080p 60Hz 1080i 60Hz 720p 60Hz 480p 480i DVD-Video *1 *2 1080p 60Hz 1080i 60Hz 720p 60Hz 480p 480i Altri *1 *1 1080p 60Hz 1080i 60Hz 720p 60Hz 480p 480i Se
Aggiornamento del software Quando necessario, verrà rilasciato nuovo software con ulteriori funzioni o miglioramenti al prodotto. Consigliamo di aggiornare periodicamente il software del lettore all’ultima versione. Per verificare la disponibilità di aggiornamenti per il software, visitare http://download.yamaha.
INFORMAZIONI AGGIUNTIVE Risoluzione dei problemi Consultare la tabella qui di seguito nel caso il lettore non funzioni correttamente. Se il problema riscontrato non risultasse elencato qui di seguito o se le istruzioni fornite non fossero d’aiuto, spegnere il lettore, scollegare il cavo di alimentazione e contattare il più vicino rivenditore o centro di assistenza Yamaha autorizzato. ■ Alimentazione Problema Possibili cause e soluzioni Nessuna alimentazione.
Risoluzione dei problemi ■ Immagine Problema Possibili cause e soluzioni Nessuna immagine. – Accertarsi che i cavi siano stati collegati correttamente. (p. 11) – Accertarsi che il TV o il ricevitore AV collegato sia impostato sull’ingresso corretto. – Senza nessun disco inserito, o con la riproduzione interrotta, tenere premuto contemporaneamente e sul pannello anteriore per impostare la risoluzione video sui valori predefiniti.
Risoluzione dei problemi Problema Possibili cause e soluzioni Impossibile scaricare i contenuti BDLive. – Verificare che questo lettore possa collegarsi a Internet normalmente. Consultare “Prova connessione”. (p. 32) – Collegare correttamente il dispositivo di archiviazione USB Controllare che il dispositivo di archiviazione USB sia collegato al connettore USB del lettore. (p. 16) – Controllare che il Blu-ray Disc supporti BD-Live.
Glossario AVCHD AVCHD è un nuovo formato (standard) per le videocamere ad alta definizione utilizzabile per registrare e riprodurre immagini HD ad alta risoluzione. BD-Live™ BD-Live è uno standard che utilizza la connessione di rete, consentendo al lettore di accedere online per scaricare video promozionali e altri dati. BDMV Blu-ray 3D™ Blu-ray 3D consente di visualizzare le immagini 3D in alta definizione.
Glossario FLAC FLAC (Free Lossless Audio Codec) è un formato libero per la compressione di dati audio lossless. Benché inferiore a livello di tasso di compressione rispetto agli altri formati audio lossless, spesso è in grado di fornire una qualità audio superiore. HDMI HDMI (High-Definition Multimedia Interface = Interfaccia multimediale ad alta definizione) è un’interfaccia che supporta sia video che audio in un singolo collegamento digitale.
Dati tecnici ■ Dati generali ■ Prestazioni audio Livello di uscita audio (1 kHz, 0 dB) Blu-ray Disc/DVD/CD-DA.........................................................2 ± 0,3 V Rapporto segnale rumore Blu-ray Disc/DVD/CD-DA............................................................ 115 dB Gamma dinamica Blu-ray Disc/DVD ......................................................................... 105 dB CD-DA ...........................................................................................
Dati tecnici Java è un marchio di fabbrica registrato di Oracle e/o delle sue affiliate. DLNA™ e DLNA CERTIFIED™ sono marchi di fabbrica registrati di Digital Living Network Alliance. Tutti i diritti riservati. L’uso non autorizzato è severamente vietato. Il logo Wi-Fi CERTIFIED è un marchio di certificazione della Wi-Fi Alliance. Il marchio Wi-Fi Protected Setup Identifier è un marchio della Wi-Fi Alliance.
INFORMAZIONI AGGIUNTIVE Indice analitico ■ Numerics 2ND AUDIO, telecomando ...................8 ■ A ■ B BD-Live ...............................................26 Bitrate, menu a schermo (On Screen) ...........23 Brano/File, menu a schermo (On Screen) ...........23 ■ C Cambiare password, menu SETUP ......31 Capitolo, menu a schermo (On Screen) ...........23 Caricare le impostazioni predefinite, menu SETUP ...................................30 CLEAR, telecomando ............................
Precaución: lea las indicaciones siguientes antes de utilizar este aparato. 1 2 3 4 5 Para asegurar el mejor rendimiento de este aparato, lea atentamente este manual. Y luego guárdelo en un lugar seguro para poder consultarlo en el futuro en caso de ser necesario. Instale esta unidad en un lugar bien ventilado, fresco, seco y limpio, alejado de la luz directa del sol, fuentes de calor, vibración, polvo, humedad y/o frío.
Índice 1. Introducción 1 5. Información adicional Qué puede hacer con este reproductor ........... 2 Resolución de problemas................................ 38 Amplia variedad de discos y formatos de archivo admitidos... 2 Características de red mejoradas .................................... 2 Configuración y operaciones sencillas ........................... 2 Alimentación................................................................. 38 Funcionamiento básico ........................................
INTRODUCCIÓN Qué puede hacer con este reproductor Diversos discos Contenido de transferencia de red 5# %& Contenido USB Red inalámbrica (compatible con WPS) Contenido PC/NAS (DLNA) Contenido de teléfonos inteligentes (Miracast) ■ Amplia variedad de discos y formatos de archivo admitidos – Blu-ray Disc™, DVD, SA-CD y CD (pág. 23) – Blu-ray 3D™ (pág. 11), BONUSVIEW™ y BD-Live™ (pág. 25) – Archivos de vídeo, música y fotos en discos DVD-R/RW, discos CD-R/RW y dispositivos de memoria USB (pág.
1 Información sobre discos y archivos – En este reproductor se pueden reproducir discos de 12 cm y 8 cm. No utilice un adaptador de 8 cm a 12 cm. – Utilice discos que sean compatibles con los estándares que se indican con la presencia de logotipos oficiales en la etiqueta del disco. La reproducción de discos que no cumplan con estos estándares no está garantizada. Además, la calidad de imagen o sonido no está garantizada aunque puedan reproducirse estos discos.
Información sobre discos y archivos Información sobre la gestión de la región Destino Australia BD-Video Código de región “B” o “ABC” DVD-Video Número de región “4” o “ALL” 4 Rusia Código de región “C” o “ABC” ALL Número de región “5” o “ALL” 5 ALL Acerca de Super Audio CD (SA-CD) – Formato de audio basado en los estándares de CD actuales, pero con un mayor volumen de información y, por tanto, una mayor calidad del sonido. Hay tres tipos de discos: de una capa, de doble capa e híbridos.
Información sobre discos y archivos ■ Precauciones con los discos – Los discos Blu-ray Disc, DVD y CD son sensibles al polvo, a las huellas dactilares y especialmente a los arañazos. Es posible que no se pueda reproducir un disco con arañazos. Maneje los discos con cuidado y guárdelos en un lugar seguro. Almacenamiento apropiado de los discos Ponga el disco en el centro de la caja y almacene la caja y el disco en posición vertical.
Controles y funciones ■ Panel delantero 5# %& USB 1 2 34 1 p (Encendido/en espera) Pone en marcha el reproductor/activa el modo en espera. Mantenga pulsado p en el panel delantero durante más de 5 segundos para reiniciar el reproductor (se reiniciará el sistema). 5 6 7 8 4 Visor del panel delantero Muestra distintos tipos de información sobre el estado del dispositivo.
Controles y funciones ■ Panel trasero 1 Introducción AC IN DIGITAL OUT COAXIAL NETWORK AUDIO OUT OUT IN REMOTE CONTROL HDMI 1 2 OPTICAL 3 USB 4 5 6 7 1 AUDIO OUT (L/R) (pág. 13) 5 NETWORK (pág. 14) 2 HDMI (pág. 11) 6 REMOTE CONTROL (OUT/IN) (pág. 17) 3 DIGITAL OUT (COAXIAL/OPTICAL) (pág. 13) 7 AC IN (pág. 17) 4 USB (pág.
Controles y funciones ■ Mando a distancia 1 Transmisor de señales infrarrojas: Emite la señal infrarroja. Oriente esta ventana al sensor del mando a distancia (pág. 10). Nota – aparecerá en la esquina superior izquierda de la pantalla cuando la tecla pulsada no esté disponible.
Controles y funciones Nota – Las operaciones concretas pueden diferir dependiendo del disco. Siga las instrucciones de cada pantalla de menú. B Teclas de cursor (5/a/2/3): Permiten mover la selección en la pantalla de menú. ENTER: Selecciona el menú/opción resaltado. C RETURN: Permite volver al menú o pantalla anterior, etc. DVD CD VIDEO MUSIC PHOTO : Detiene la reproducción. : Pone la reproducción en pausa. : Reproduce el contenido. / : Permite saltar hacia atrás/hacia adelante.
Controles y funciones Instalación de las pilas en el mando a distancia 1 3 2 Notas – Cambie las dos pilas cuando note que disminuye el alcance del mando a distancia. – Utilice pilas AAA, R03, UM-4. – Asegúrese de que las polaridades son las correctas. Consulte la ilustración que encontrará en el interior del compartimento de las pilas. – Extraiga las pilas si no va a utilizar el mando a distancia durante un periodo de tiempo prolongado. – No mezcle pilas viejas con pilas nuevas.
CONEXIONES Conexiones de vídeo/audio Realice las conexiones de los cables de vídeo/audio correspondientes en el equipo que desee usar. 2 Consejos Uso de vídeo/audio con un televisor y un receptor de A/V Consulte “Conexión con un televisor a través de un receptor de A/V” (pág. 12). Conexiones – Consulte la página 35 para obtener información sobre los formatos de salida de audio/vídeo. – Prepare los cables de venta en el mercado necesarios para las conexiones.
Conexiones de vídeo/audio ■ Conexión con un televisor a través de un receptor de A/V ■ Conexión directa con un televisor Conecte este reproductor al televisor con un cable HDMI. Conecte este reproductor al receptor de A/V y el receptor de A/V al televisor con cables HDMI. Para más detalles sobre las conexiones de los altavoces, consulte los manuales de instrucciones del receptor de A/V y de los altavoces.
Conexiones de vídeo/audio ■ Conexión con un televisor y un equipo de audio Conecte este reproductor al televisor con un cable HDMI, y este reproductor al equipo de audio con un cable de audio (cable óptico digital, coaxial digital o de clavijas estéreo). 2 ¡Precaución! Este reproductor Conexiones No conecte el cable de alimentación del reproductor hasta haber realizado todas las conexiones.
Conexión de red Si conecta este reproductor a la red (inalámbrica o con cable), puede utilizar las funciones siguientes. – Reproducción de contenido de un servidor DLNA (PC o NAS) (pág. 19) – Reproducción de distintos contenidos del servicio de red (pág. 21) – Reproducción de discos compatibles con BD-Live (pág. 25) – Uso de este reproductor desde dispositivos móviles (AV CONTROLLER) (pág.
Conexión de red ■ Configuración de servidor DLNA Notas – Para utilizar funciones DLNA, todos los dispositivos deben estar conectados a la misma red. – Para utilizar un NAS como un servidor DLNA, el NAS debe ser compatible con DLNA. 2 Conexiones Mediante el uso de DLNA, puede compartir contenido multimedia (como vídeos, música y fotos) almacenado en su servidor DLNA (PC o NAS) conectado a su red, y disfrutar de ese contenido con el reproductor.
Conexión USB Si conecta un dispositivo de memoria USB al conector USB en el panel delantero o trasero de este reproductor, puede reproducir archivos multimedia almacenados en el dispositivo de memoria USB (pág. 19). Notas – Yamaha no puede garantizar que los dispositivos de memoria USB de todas las marcas funcionen con este reproductor. – Conecte un dispositivo de memoria USB a uno de los conectores USB (delantero/trasero) de este reproductor cuando utilice la función BD-Live (pág. 26).
Otras conexiones ■ Conexión con las tomas REMOTE CONTROL ¡Precaución! No conecte el cable de alimentación del reproductor hasta haber realizado todas las conexiones. – Para ver más detalles sobre la función SCENE, consulte el manual de instrucciones suministrado con su receptor de A/V Yamaha. – Puede conectar un componente Yamaha (como por ejemplo un reproductor de CD) que sea compatible con la función SCENE a la toma REMOTE CONTROL (OUT) de este reproductor.
REPRODUCCIÓN Ajustes iniciales ■ Configuración con la Configuración Sencilla 3 Pulse 2/3 para seleccionar Sí y, a continuación, pulse ENTER. La Configuración Sencilla le permite definir fácilmente el idioma, la resolución y la relación de aspecto de la pantalla. La pantalla de la Configuración Sencilla aparece la primera vez que enciende este reproductor después de comprarlo. La misma configuración se puede realizar desde el menú SETUP = Sistema = Configuración Sencilla.
Menú HOME El menú HOME le permite realizar las siguientes operaciones básicas de este reproductor. – Búsqueda y reproducción de archivos multimedia en distintos discos, dispositivos de memoria USB y sus servidores DLNA (PC o NAS) – Acceso a diversos servicios de red (pág. 21) – Visualización del menú SETUP (pág. 27) 3 – Para obtener información sobre los discos y formatos que se pueden reproducir, consulte la página 3.
Menú HOME Nota – Tenga en cuenta que en el siguiente paso solo se mostrarán los archivos del tipo que seleccione en este paso. Por ejemplo, si selecciona la carpeta Foto en este paso, solo se mostrarán archivos de fotos después de este paso. 4 Seleccione la carpeta que contiene el archivo que desea reproducir. 5 Seleccione el archivo que desea reproducir y, a continuación, pulse ENTER. Si selecciona un archivo de vídeo, se inicia la reproducción.
Uso de servicios de red Puede disfrutar de contenido multimedia (como fotos y vídeos) utilizando los siguientes servicios de red. – Dropbox – Álbumes Web de Picasa – YouTube 3 Notas Reproducción – El acceso a contenidos suministrados por terceros requiere una conexión a Internet de alta velocidad y, a veces, también un registro de cuenta y una suscripción de pago.
Uso de imágenes y vídeos de teléfonos inteligentes en la pantalla del televisor (Miracast™) Miracast es una solución para una perfecta visualización de vídeo entre dispositivos, sin cables ni una conexión de red a través de un punto de acceso (Wi-Fi Direct). Puede realizar distintas acciones, como ver imágenes desde un dispositivo compatible con Miracast (teléfono inteligente, etc.) en la pantalla del televisor conectado a este reproductor.
Funciones avanzadas de reproducción En este capítulo se explica la reproducción de discos Blu-ray Disc, DVD, SA-CD y CD de venta en el mercado, así como de discos DVD-RW/R grabados. Nota ■ Menú en pantalla Para mostrar el menú en pantalla, pulse ON SCREEN. A continuación, pulse 5/a/2/3 para seleccionar una opción y, después, pulse ENTER para utilizar la función deseada.
Funciones avanzadas de reproducción ■ Menú de estado Muestra varios ajustes, cómo los subtítulos, el ángulo y el número de título/capítulo/pista reproducido. Para mostrar el menú de estado, pulse STATUS. El menú de estado consta de los siguientes menús.
Funciones avanzadas de reproducción ■ Programación de la reproducción DVD CD ■ Uso de la búsqueda Esta opción le permite programar el orden de reproducción de las pistas de un disco de audio o de los capítulos de un DVD. Pulse PROGRAM durante la reproducción para mostrar la ventana PROGRAMA para programar el orden de reproducción. Puede programar hasta 15 pistas/capítulos. Esta opción le permite ir a un punto específico durante la reproducción. 1 Pulse PROGRAM durante la reproducción.
Funciones avanzadas de reproducción ■ Utilización de la función Imagen en Imagen (reproducción de audio/vídeo secundario) El Vídeo BD que incluye audio y vídeo secundario compatible con Imagen en Imagen se puede reproducir con audio y vídeo secundario simultáneamente como un vídeo pequeño en la esquina. Vídeo principal Vídeo secundario – Si el espacio de almacenamiento es insuficiente, los datos no se copiarán/descargarán. Elimine datos innecesarios o utilice un dispositivo de memoria USB nuevo.
AJUSTES Menú SETUP El menú SETUP permite realizar diversos ajustes y configuraciones audiovisuales en las funciones utilizando el mando a distancia. Menú/submenú Sistema Configuración General Reproducción Seguridad Red Función Página Activa o desactiva la función de ahorro de energía. 30 Control HDMI Configura el reproductor para que reciba la señal de control desde el mando a distancia de su televisor/receptor de A/V.
Menú SETUP Menú/submenú TV Configuración de pantalla Opción Función Página Salida 3D Selecciona vídeos en 3D o 2D. 32 Pantalla de TV Ajusta la relación de aspecto de la pantalla del televisor conectado y ajusta la salida de vídeo. 32 Resolución HDMI Permite seleccionar la resolución de salida de vídeo HDMI. 33 Sistema de TV Permite seleccionar el sistema de TV entre NTSC/PAL/ Multi. 33 Color Space Permite seleccionar Color Space entre YCbCr 4:4:4/YCbCr 4:2:2/Full RGB/RGB.
Menú SETUP ■ Ejemplo de funcionamiento del menú SETUP Debe acceder a la pantalla del menú SETUP para realizar ajustes en el reproductor. A continuación se explican las operaciones básicas del menú SETUP. 3. Seleccione una opción del menú. Pulse 5/a para seleccionar Reproducción Automática Disco y, a continuación, pulse ENTER o el cursor 3. REPEAT A/B SUBTITTLE ANGLE CLEAR SEARCH MIRACAST 2ND AUDIO HOME TOP MENU 4 Ajustes PIP AUDIO SETUP POP-UP MENU 4. Seleccione el ajuste deseado.
Menú SETUP ■ Configuración General Cargar configuracion por defecto Puede restablecer todos los ajustes de este reproductor al ajuste predefinido, excepto el ajuste Seguridad (pág. 31). Para obtener información sobre los ajustes predeterminados, consulte las páginas 27–34. Los ajustes predeterminados están marcados con “ * ”. Actualizar Puede actualizar el software manualmente desde Almacenamiento USB o Red.
Menú SETUP Menú Puede dar prioridad al idioma del menú del disco. English, Français, 中文 , Español, Deutsch, Italiano, Nederlandse, Portugués, Danés, Svenska, Finlandés, Noruego, Polski, Русский, Corea, Japonés, Más Audio Puede dar prioridad al idioma del audio para la reproducción de Blu-ray Disc/DVD. Para obtener información sobre la configuración de las opciones, consulte “Menú” (pág. 31). Subtítulo Puede dar prioridad al idioma de los subtítulos.
Menú SETUP Prueba de conexión Puede realizar una prueba de conexión a Internet. Si la prueba falla, compruebe la “Configuración IP” (pág. 32) y vuelva a realizar la prueba. Configuración IP Puede configurar los ajustes de red. Auto* Seleccione este valor para configurar automáticamente los ajustes de red de este reproductor con el servidor DHCP. Manual Seleccione este valor para realizar la configuración de red (Dirección IP, Máscara de subred, Default Gateway y DNS) manualmente.
Menú SETUP Auto*, Disco Original, 480i/576i, 480p/576p, 720p, 1080i, 1080p HDMI 1080p 24Hz Permite la salida de vídeo BD codificado con una relación de cuadro de 24 Hz en HDMI 1080p 24Hz. Con esta función es posible que disfrute de una reproducción de vídeo más fluida. Esta función está disponible si su televisor o receptor de A/V admite dicha función. Para obtener más información sobre los formatos de salida, consulte “Acerca de los formatos de salida de vídeo HDMI” (pág. 36).
Menú SETUP ■ Configuración de audio Los ajustes predeterminados están marcados con “ * ”. Salida de audio Coaxial / Optica Puede seleccionar el modo de salida de la toma COAXIAL y del terminal OPTICAL. Para obtener más información sobre los formatos de salida, consulte “Acerca de los formatos de salida de audio” (pág. 35). Bitstream Permite la salida de la señal digital sin ningún procesamiento. No se produce la salida del audio secundario. PCM Permite la salida de PCM de 2 canales.
Menú SETUP ■ Acerca de los formatos de salida de audio Formato de origen PCM 2 canales PCM 5.1 canales Dolby Digital con SA o BCS*1 DTS PCM 5.1 canales sin SA o BCS*1 PCM 7.
Menú SETUP ■ Acerca de los formatos de salida de vídeo HDMI Si Sistema de TV se define en NTSC Índice Resolución HDMI Auto Disco Original 1080p 1080i 720p 480p/576p 480i/576i BD-Video con contenido 1080p/24 Hz *1 1080p 24 Hz 1080p 24 Hz/ 60 Hz *3 1080i 60 Hz 720p 60 Hz 480p 480i BD-Video sin contenido 1080p/24 Hz *1 *2 1080p 60 Hz 1080i 60 Hz 720p 60 Hz 480p 480i DVD-Video *1 *2 1080p 60 Hz 1080i 60 Hz 720p 60 Hz 480p 480i Otros *1 *1 1080p 60 Hz 1080i 60 Hz 720p 60 Hz
Actualización de software El nuevo software que proporciona características adicionales o mejoras del producto se comercializará según sea necesario. Se recomienda actualizar periódicamente el software de este reproductor a la versión más reciente. Para comprobar la disponibilidad de una actualización de software, visite http://download.yamaha.
INFORMACIÓN ADICIONAL Resolución de problemas Consulte la tabla que aparece a continuación cuando el reproductor no funcione correctamente. Si el problema que tiene no aparece en la lista siguiente o las instrucciones no le sirven de ayuda, apague este reproductor, desenchufe el cable de alimentación y póngase en contacto con el centro de servicio o concesionario Yamaha autorizado más cercano. ■ Alimentación Problema Posibles causas y soluciones No hay alimentación.
Resolución de problemas ■ Imagen Problema Posibles causas y soluciones – Asegúrese de que los cables están correctamente conectados. (pág. 11) – Asegúrese de que el televisor o receptor de A/V conectado está ajustado a la entrada correcta. – Sin ningún disco cargado o con la reproducción parada, mantenga pulsados los botones y del panel delantero simultáneamente para restaurar el valor predeterminado de la resolución del vídeo.
Resolución de problemas Problema Posibles causas y soluciones No se pueden descargar contenidos BDLive. – Verifique que este reproductor se puede conectar a Internet normalmente. Consulte “Prueba de conexión”. (pág. 32) – Conecte el dispositivo de memoria USB correctamente. Compruebe que el dispositivo de memoria USB está conectado al conector USB del reproductor. (pág. 16) – Compruebe si el Blu-ray Disc admite BD-Live. – Conecte el dispositivo de memoria USB con formato FAT16, FAT32 o NTFS.
Glosario AVCHD AVCHD es un nuevo formato (estándar) para cámaras de vídeo de alta definición que se puede utilizar para grabar y reproducir imágenes de alta resolución HD. BD-Live™ BD-Live es un estándar de Blu-ray Disc que utiliza una conexión de red y permite al reproductor conectarse a Internet para descargar vídeos promocionales y otros datos. BDMV Blu-ray 3D™ Blu-ray 3D le permite ver imágenes 3D de alta definición completa.
Glosario FLAC FLAC (Free Lossless Audio Codec, Códec libre de comprensión de audio sin pérdida) es un formato de archivo abierto para la compresión de datos de audio sin pérdida. Aunque el grado de compresión es inferior al de otros formatos de audio comprimido con pérdida, normalmente el audio es de mayor calidad. HDMI HDMI (High-Definition Multimedia Interface, Interfaz Multimedia de Alta Definición) es una interfaz que admite vídeo y audio en una sola conexión digital.
Especificaciones ■ Información general ■ Rendimiento de audio Nivel de salida de audio (1 kHz, 0 dB) Blu-ray Disc/DVD/CD-DA.........................................................2 ± 0,3 V Relación señal/ruido Blu-ray Disc/DVD/CD-DA............................................................ 115 dB Rango dinámico Blu-ray Disc/DVD ......................................................................... 105 dB CD-DA ...........................................................................................
Especificaciones Java es una marca comercial registrada de Oracle y/o sus filiales. DLNA™ y DLNA CERTIFIED™ son marcas comerciales o marcas comerciales registradas de Digital Living Network Alliance. Todos los derechos reservados. Se prohíbe terminantemente el uso no autorizado. El logotipo Wi-Fi CERTIFIED es una marca de certificación de Wi-Fi Alliance. La marca de identificación Wi-Fi Protected Setup es una marca de Wi-Fi Alliance.
INFORMACIÓN ADICIONAL Índice ■ Dropbox ................................................21 ■ 2ND AUDIO, mando a distancia ...........8 ■ ■ ENTER, mando a distancia ....................9 Estilo subtítulos, menú en pantalla .......23 Red, menú SETUP ............................... 31 Reducción de ruido, menú SETUP ...... 33 REPEAT, mando a distancia ................. 8 Repetición Ins, menú en pantalla ......... 23 Reproducción Automática Disco, menú SETUP ...................................
Let op: lees het volgende voor u dit toestel in gebruik neemt. 1 2 3 4 5 Om er zeker van te kunnen zijn dat u de optimale prestaties uit uw toestel haalt, dient u deze handleiding zorgvuldig door te lezen. Bewaar de handleiding op een veilige plek zodat u er later nog eens iets in kunt opzoeken. Installeer dit toestel op een goed geventileerde, koele, droge en schone plek — uit de buurt van direct zonlicht, warmtebronnen, trillingen, stof, vocht, en/of kou.
Inhoudsopgave 1. Inleiding 5. Aanvullende informatie Wat kunt u doen met deze speler ..................... 2 Breed scala aan ondersteunde schijf- en bestandsformaten...... 2 Uitgebreide netwerkfuncties ..................................................... 2 Snelinstelling en bediening....................................................... 2 Bijgeleverde onderdelen ................................... 2 Over schijven en bestanden .............................
INLEIDING Wat kunt u doen met deze speler Diverse schijven Netwerkstreaminginhoud 5# %& USB-inhoud Draadloos netwerk (WPS wordt ondersteund) Pc/NAS-inhoud (DLNA) Smartphone-inhoud (Miracast) ■ Breed scala aan ondersteunde schijf- en bestandsformaten – Blu-ray Disc™, DVD’s, SA-CD’s en CD’s (p. 23) – Blu-ray 3D™ (p. 11), BONUSVIEW™ en BD-Live™ (p. 25) – Video-, muziek- en fotobestanden op DVD-R/RW-schijven, CD-R/RW-schijven en USB-geheugenapparaten (p.
1 Over schijven en bestanden – Schijven van 12 cm en 8 cm kunnen met deze speler worden afgespeeld. Gebruik geen 8 naar 12 cmadapter. – Gebruik schijven waarvan de compatibiliteit herkenbaar is aan het officiële logo op de schijf. Wij garanderen niet dat schijven die niet aan deze normen voldoen door deze speler kunnen worden afgespeeld. Bovendien kunnen wij voor dergelijke schijven geen goede beeld- en geluidskwaliteit garanderen.
Over schijven en bestanden Regiobeheerinformatie Bestemming Australië BD-Video Regiocode “B” of “ABC” DVD-Video Regionummer “4” of “ALL” 4 Rusland Regiocode “C” of “ABC” ALL Regionummer “5” of “ALL” 5 ALL Over Super Audio CD (SA-CD) – Audio-indeling gebaseerd op de huidige CDnormen, maar die een grotere hoeveelheid informatie bevat en dus een betere geluidskwaliteit biedt. Er zijn drie soorten schijven: schijven met één laag, schijven met twee lagen en hybride schijven.
Over schijven en bestanden ■ Voorzorgsmaatregelen voor schijven – Blu-ray Disc-, DVD- en CD-schijven zijn gevoelig voor stof, vingerafdrukken en vooral krassen. Een schijf met krassen kan onbruikbaar zijn voor afspelen. Wees voorzichtig met schijven en bewaar ze op een veilige plaats. Juiste opslag van schijven Plaats de schijf in het midden van het doosje en berg het doosje en de schijf verticaal op.
Bediening en functies ■ Voorpaneel 5# %& USB 1 2 34 1 p (aan/stand-by) Hiermee kunt u de speler inschakelen / de stand-bymodus activeren. Houd p op het voorpaneel langer dan 5 seconden ingedrukt om de speler te resetten (systeemherstel). 5 6 7 8 9 0 A 7 (achterwaarts zoeken/achterwaarts overslaan) Druk op deze knop om achterwaarts over te slaan en houd deze ingedrukt om achterwaarts te zoeken.
Bediening en functies ■ Achterpaneel 1 Inleiding AC IN DIGITAL OUT COAXIAL NETWORK AUDIO OUT OUT IN REMOTE CONTROL HDMI 1 2 OPTICAL 3 USB 4 5 6 7 1 AUDIO OUT (L/R) (p. 13) 5 NETWORK (p. 14) 2 HDMI (p. 11) 6 REMOTE CONTROL (OUT/IN) (p. 17) 3 DIGITAL OUT (COAXIAL/OPTICAL) (p. 13) 7 AC IN (p. 17) 4 USB (p.
Bediening en functies ■ Afstandsbediening Opmerking – wordt in de linkerbovenhoek van het scherm weergegeven als de ingedrukte knop niet beschikbaar is. 4 Kleurtoetsen BD : gebruik deze toetsen in overeenstemming met de instructies op het scherm. 1 2 ZOOM DVD VIDEO PHOTO : hiermee kunt u inen uitzoomen. Elke keer dat u de toets indrukt, verandert het formaat van het scherm (inzoomen/ uitzoomen: elk met 3 stappen).
Bediening en functies 0 HOME: geeft het HOME-menuscherm weer (p. 19). Opmerking – Afhankelijk van de schijf kunnen specifieke handelingen verschillend zijn. Volg de instructies op elk menuscherm. B Cursortoetsen (5/a/2/3): hiermee kunt u de markering op het menuscherm verplaatsen. ENTER: hiermee kunt u het gemarkeerde menu/item selecteren. C RETURN: hiermee kunt u terugkeren naar het vorige menu of scherm enz. D Bedieningstoetsen BD DVD CD VIDEO MUSIC PHOTO : hiermee kunt u het afspelen stoppen.
Bediening en functies De batterijen in de afstandsbediening plaatsen 1 Bedieningsbereik van de afstandsbediening Afstandsbedieningssensor 3 SA-CD USB 2 30° 30° 6m Opmerkingen – Vervang beide batterijen als de bedieningsafstand van de afstandsbediening verkleint. – Gebruik AAA-, R03-, UM-4-batterijen. – Houd bij het plaatsen van de batterijen rekening met de polariteit. Raadpleeg hiervoor de afbeelding in het batterijvak.
AANSLUITINGEN Video-/audioaansluitingen Sluit afhankelijk van de apparatuur die u wilt gebruiken de corresponderende video-/audiokabels aan. 2 Tips Genieten van video/audio door een tv en een AV-ontvanger te gebruiken Raadpleeg “Verbinding maken met een tv via een AV-ontvanger” (p. 12). Aansluitingen – Raadpleeg pagina 35 voor informatie over audio/video-uitgangsformaten. – Haal de los verkrijgbare kabels die voor de aansluitingen nodig zijn.
Video-/audioaansluitingen ■ Verbinding maken met een tv via een AV-ontvanger ■ Rechtstreeks verbinding maken met een tv Verbind met HDMI-kabels deze speler met de AVontvanger en de AV-ontvanger met de tv. Raadpleeg de gebruiksaanwijzing van uw AV-ontvanger en luidsprekers voor meer informatie over de luidsprekeraansluitingen. Sluit deze speler aan op de tv met een HDMI-kabel. Opgelet! Opgelet! Verbind het netsnoer van deze speler pas als alle aansluitingen gemaakt zijn.
Video-/audioaansluitingen ■ Verbinding maken met een tv en audioapparatuur Sluit deze speler aan op de tv met een HDMI-kabel en sluit deze speler aan op audioapparatuur met een audiokabel (digitale optische kabel, digitale coaxiale kabel of stereokabel). 2 Opgelet! Aansluitingen Verbind het netsnoer van deze speler pas als alle aansluitingen gemaakt zijn.
Netwerkaansluiting Door deze speler op het netwerk (draadloos of bekabeld) aan te sluiten, kunt u de volgende functies gebruiken. – DLNA-serverinhoud (pc of NAS) afspelen (p. 19) – Diverse netwerkserviceinhoud afspelen (p. 21) – Schijven afspelen die compatibel zijn met BD-Live (p. 25) – Deze speler vanaf andere mobiele apparaten bedienen (AV-controller) (p. 22) Opmerkingen – Een breedbandinternetverbinding is vereist om de netwerkservices of BD-Live-functie te gebruiken.
Netwerkaansluiting ■ Instellingen DLNA-server Opmerkingen – Alle apparaten moeten met hetzelfde netwerk verbonden zijn om DLNA-functies te gebruiken. – De NAS moet met DLNA compatibel zijn om een NAS als een DLNA-server te gebruiken. 2 Aansluitingen U kunt door DLNA multimedia-inhoud (zoals video’s, muziek en foto’s) delen die is opgeslagen op uw DLNA-server (pc of NAS) die verbonden is met uw netwerk en van deze inhoud genieten met deze speler.
USB-aansluiting U kunt op uw USB-geheugenapparaat opgeslagen multimediabestanden afspelen door een USB-geheugenapparaat aan te sluiten op een USB-poort op het voor- of het achterpaneel van deze speler (p. 19). Opmerkingen – Yamaha kan niet garanderen dat de USB-geheugenapparaten van alle merken functioneren op deze speler. – Sluit een USB-geheugenapparaat aan op een van de USB-poorten (voorkant/achterkant) van deze speler als u de BD-Live-functie gebruikt (p. 26).
Overige aansluitingen ■ Gebruik van de REMOTE CONTROL-aansluitingen Opgelet! – Raadpleeg de gebruiksaanwijzing van uw YamahaAV-ontvanger voor meer informatie over de SCENE-functie. – U kunt een Yamaha-component (zoals een CDspeler) die de SCENE-functie ondersteunt, aansluiten op de REMOTE CONTROL (OUT)aansluiting van deze speler. 2 Aansluitingen – U kunt de afstandsbedieningssignalen doorgeven en ontvangen door aan te sluiten op de REMOTE CONTROL (OUT/IN)-aansluitingen.
AFSPELEN Initiële instellingen ■ Instellingen doorvoeren met de Snelinstelling 3 Druk op 2/3 omJa te selecteren, druk daarna op ENTER. Met Snelinstelling kunt u eenvoudig de taal, resolutie en beeldverhouding instellen. Wanneer u deze speler voor het eerst gebruikt na de aankoop, wordt het scherm Snelinstelling weergegeven. U kunt dezelfde instelling uitvoeren via het menu SETUP = Systeem = Snelinstelling.
HOME-menu Het HOME-menu stelt u in staat om de volgende basisbedieningen van deze speler uit te voeren. – Het bekijken en afspelen van multimediabestanden op diverse schijven, USB-geheugenapparaten en uw DLNAservers (pc of NAS) – Toegang krijgen tot diverse netwerkservices (p. 21) – Het SETUP-menu weergeven (p. 27) – Meer informatie over afspeelbare schijven en indelingen vindt u op pagina 3. – De instelling Media delen (p.
HOME-menu Opmerking – Merk op dat alleen het type bestanden dat u in deze stap hebt geselecteerd, wordt weergegeven in de volgende stap. Als u bijvoorbeeld de Foto-map hebt geselecteerd in deze stap, worden in de volgende stap alleen fotobestanden weergegeven. 4 Selecteer de map met het bestand dat u wilt afspelen. 5 Selecteer het bestand dat u wilt afspelen en druk vervolgens op ENTER. Wanneer er een videobestand geselecteerd is, wordt het afspelen gestart.
Netwerkservices gebruiken U kunt genieten van multimedia-inhoud (zoals foto’s en video’s) door gebruik te maken van de volgende netwerkservices. – Dropbox – Picasa-webalbums – YouTube 3 Opmerkingen 1 Druk op HOME om over te schakelen naar het HOMEmenuscherm. Tip – Om naar het YouTube-menuscherm terug te keren, drukt u op YouTube. 2 Druk op 5/a om netwerkservices te selecteren en druk vervolgens op ENTER.
Genieten van smartphoneafbeeldingen en -video’s op het tv-scherm (Miracast™) Miracast is een oplossing om video’s naadloos tussen twee apparaten weer te kunnen geven, zonder kabels of een netwerkverbinding via een toegangspunt (Wi-Fi Direct). U kunt bijvoorbeeld afbeeldingen bekijken van een Miracastcompatibel apparaat (smartphone enz.) op het scherm van de tv die verbonden is met deze speler.
Geavanceerd afspelen In dit hoofdstuk vindt u meer informatie over het afspelen van in de handel verkrijgbare Blu-ray-schijven, DVD’s, SA-CD’s, CD’s en opgenomen DVD-RW/R-schijven. Opmerking ■ Schermmenu Om het schermmenu weer te geven, drukt u op ON SCREEN. Druk daarna op 5/a/2/3 om een item te selecteren en druk vervolgens op ENTER om de gewenste functie te bedienen.
Geavanceerd afspelen ■ Statusmenu Hier worden verschillende instellingen weergegeven, zoals ondertiteling, camerahoek en het nummer van de titel/het hoofdstuk/het spoor dat wordt afgespeeld. Om het statusmenu weer te geven, drukt u op STATUS. Het statusmenu bevat de volgende menu’s.
Geavanceerd afspelen ■ Programma afspelen DVD CD Hiermee kunt u de afspeelvolgorde van audioschijftracks of DVD-hoofdstukken programmeren. Druk op PROGRAM tijdens het afspelen om het venster PROGRAMMA weer te geven voor het programmeren van de afspeelvolgorde. U kunt tot 15 tracks/hoofdstukken programmeren. Voorbeeld: de afspeelvolgorde van CD-tracks programmeren BD DVD CD VIDEO MUSIC PHOTO Hiermee kunt u tijdens het afspelen overschakelen naar een gespecificeerd punt.
Geavanceerd afspelen ■ De beeld-in-beeldfunctie gebruiken (afspelen van secundaire audio/video) Een BD-Video die secundaire audio en video bevat die compatibel is met beeld-in-beeld, kan gelijktijdig worden afgespeeld met de secundaire audio en video in een klein venster in de hoek van het beeldscherm. Primaire video Secundaire video – Als er onvoldoende geheugenruimte is, zullen de gegevens niet worden gekopieerd/gedownload. Wis onnodige gegevens of gebruik een nieuw USBgeheugenapparaat.
INSTELLINGEN SETUP-menu Met het SETUP-menu kunt u met behulp van de afstandsbediening diverse geluids-/beeldinstellingen doorvoeren voor de functies. Menu/Submenu Systeem Instellingen Algemeen Item Energiebesparende functie in-/uitschakelen. 30 HDMI Control Stelt deze speler in om het bedieningssignaal van de afstandsbediening van uw TV/AV-ontvanger te ontvangen. 30 Ladingsfout Voor het terugzetten van alle instellingen op de standaardinstellingen, behalve de Veiligheid-instelling.
SETUP-menu Menu/Submenu TV Item Functie Pagina 3D Uitgang Hiermee kunt u 3D- of 2D-video’s selecteren. 32 TV Scherm Hiermee kunt u de beeldverhouding van de aangesloten tv instellen en de video-uitgang regelen. 32 HDMI Resolutie Hiermee kunt u de uitgevoerde HDMI-videoresolutie instellen. 33 TV-systeem Hiermee kunt u het tv-systeem instellen op NTSC/PAL/ Multi. 33 Kleurruimte Hiermee kunt u de kleurruimte instellen op YCbCr 4:4:4/ YCbCr 4:2:2/Full RGB/RGB.
SETUP-menu ■ Voorbeeld van de werking van het SETUP-menu U moet het SETUP-menuscherm oproepen om de instellingen voor deze speler door te voeren. Hieronder volgt de uitleg voor de basisbediening van het SETUPmenu. 3. Selecteer een menu-item. Druk op 5/a om Schijf Automatisch afspelen te selecteren en druk vervolgens op ENTER of 3. REPEAT A/B SUBTITTLE ANGLE CLEAR SEARCH MIRACAST 2ND AUDIO HOME TOP MENU SETUP POP-UP MENU 4. Selecteer een gewenste instelling.
SETUP-menu ■ Instellingen Algemeen Ladingsfout U kunt alle instellingen van de speler terugzetten op de standaardinstellingen, behalve de Veiligheid-instelling (p. 31). Raadpleeg pagina’s 27–34 voor meer informatie over de standaardinstellingen. De standaardinstellingen zijn aangegeven met “ * ”. Bijwerken U kunt de software handmatig bijwerken via USB Storage of Netwerk. Meer informatie over het bijwerken van software vindt u bij “Software-upgrade” (p. 37).
SETUP-menu Menu U kunt prioriteit geven aan de taal van het schijfmenu. English, Français, 中文 , Español, Deutsch, Italiano, Nederlandse, Portugees, Deens, Svenska, Fins, Noors, Polski, Pyccкий, Koreaans, Japans, Meer Audio U kunt prioriteit geven aan de audiotaal voor het afspelen van een Blu-ray Disc/DVD. Zie “Menu” (p. 31) voor meer informatie over instelitems. Ondertitel U kunt prioriteit geven aan de taal voor Ondertitel. (De standaardinstellingen bij [Taal] verschillen naargelang het model.
SETUP-menu Verbindingstest U kunt een internetverbindingstest uitvoeren. Als de test mislukt, controleert u “IP Setting” (p. 32) en voert u de test opnieuw uit. IP Setting U kunt de netwerkinstellingen configureren. Auto* Selecteer dit om de netwerkinstellingen van deze speler met de DHCP-server automatisch te configureren. Handm. Selecteer dit om de netwerkinstellingen (Ipadres, Subnetmasker, Standaardgateway en DNS) handmatig te configureren.
SETUP-menu Auto*, Instelling van disk, 480i/576i, 480p/576p, 720p, 1080i, 1080p HDMI 1080p 24Hz BD-Video gecodeerd met een framesnelheid van 24 Hz wordt uitgevoerd in HDMI 1080p 24Hz. Met deze functie kan een vloeiendere beeldweergave worden bereikt. Deze functie is beschikbaar wanneer uw tv/AV-ontvanger deze functie ondersteunt. Raadpleeg voor meer informatie over uitgangsformaten “Over de HDMI-videouitgangsformaten” (p. 36).
SETUP-menu ■ Audio Setting De standaardinstellingen zijn aangegeven met “ * ”. Audio Output Coaxial / Optical U kunt de uitvoermodus voor de COAXIAL-aansluiting en de OPTICAL-aansluiting selecteren. Raadpleeg voor meer informatie over uitgangsformaten "Over de audiouitgangsformaten" (p. 35). Bitstream Voert digitale signalen uit zonder verwerking. Secundaire audio wordt niet uitgevoerd. PCM Voert 2-kanaals-PCM uit. Reencode* Voert Bitstream uit met secundaire audio. Uit Het geluid wordt gedempt.
SETUP-menu ■ Over de audio-uitgangsformaten Bronformaat PCM 2-k PCM 5.1-k Dolby Digital met SA of KKG*1 DTS PCM 2-k zonder SA of KKG*1 PCM 5.1-k zonder SA of KKG*1 PCM 7.1-k zonder SA of KKG*1 zonder SA of KKG*1 PCM 2-k MIXED 2CH Reencode – Dolby Digital 2-k PCM 2-k Dolby Digital PCM 2-k 2-k Dolby Digital PCM 2-k Dolby Digital PCM 2-k 2-k 2-k Dolby Digital PCM 2-k 2-k 2-k PCM 2-k Dolby Digital 2-k Dolby Digital Dolby Digital PCM tot 7.
SETUP-menu ■ Over de HDMI-video-uitgangsformaten Wanneer TV-systeem ingesteld is op NTSC HDMI Resolutie Inhoudsopgave Auto Instelling van disk 1080p 1080i 720p 480p/576p 480i/576i 1080i 60Hz 720p 60Hz 480p 480i BD-Video met 1080p/24Hz-inhoud *1 1080p 24Hz 1080p 24Hz/ 60Hz *3 BD-Video zonder 1080p/24Hz-inhoud *1 *2 1080p 60Hz 1080i 60Hz 720p 60Hz 480p 480i DVD-Video *1 *2 1080p 60Hz 1080i 60Hz 720p 60Hz 480p 480i Overige *1 *1 1080p 60Hz 1080i 60Hz 720p 60Hz 480p 480i
Software-upgrade Indien nodig wordt er nieuwe software uitgebracht die extra functies of productverbeteringen levert. We raden aan om de software van deze speler regelmatig te upgraden naar de nieuwste versie. Om na te gaan of er een software-upgrade beschikbaar is, gaat u naar http://download.yamaha.com/ Opmerking – Terwijl de software-upgrade wordt uitgevoerd, mag u het USB-geheugenapparaat niet verwijderen, de speler niet in de stand-bystand zetten en het netsnoer/de netwerkkabel niet loskoppelen. 1.
AANVULLENDE INFORMATIE Problemen oplossen Raadpleeg de tabel hieronder wanneer de speler niet naar behoren functioneert. Als het probleem niet hieronder vermeld staat of als de aanwijzingen het probleem niet verhelpen, schakelt u de speler uit, haalt u de stekker uit het stopcontact en neemt u contact op met uw dichtstbijzijnde Yamaha-dealer of -servicecentrum. ■ Stroom Probleem Mogelijke oorzaken en oplossingen Geen stroom. – Sluit het netsnoer correct aan.
Problemen oplossen ■ Beeld Probleem Mogelijke oorzaken en oplossingen – Controleer of de kabels juist zijn aangesloten. (p. 11) – Controleer of de juiste ingang op de aangesloten tv of de AV-ontvanger is gekozen. – Houd op het voorpaneel en gelijktijdig ingedrukt als er geen schijf is geplaatst of het afspelen is gestopt om de standaardwaarde in te stellen voor de videoresolutie.
Problemen oplossen Probleem Mogelijke oorzaken en oplossingen Kan geen BD-Live-inhoud downloaden. – Controleer of de internetverbinding werkt op de speler. Raadpleeg “Verbindingstest”. (p. 32) – Sluit het USB-geheugenapparaat correct aan. Controleer of het USB-geheugenapparaat op de USB-poort van deze speler is aangesloten. (p. 16) – Controleer of de Blu-ray Disc BD-Live ondersteunt. – Sluit een USB-geheugenapparaat aan dat geformatteerd is in FAT16, FAT32 of NTFS.
Woordenlijst AVCHD AVCHD is een nieuw formaat (standaard) voor HDvideocamera’s dat gebruikt kan worden voor het opnemen en afspelen van HD-beelden met een hoge resolutie. BD-Live™ BD-Live is een Blu-ray Disc-standaard die gebruik maakt van een netwerkverbinding waarmee deze speler online kan gaan en promotionele video’s en andere gegevens kan downloaden. BDMV Blu-ray 3D™ Met Blu-ray 3D kunt u 3D-beelden volledig in HD weergeven.
Woordenlijst FLAC FLAC (Free Lossless Audio Codec) is een open bestandsformaat voor een verliesvrije compressie van audiogegevens. Dit formaat heeft een lagere compressieverhouding dan andere gecomprimeerde audioformaten waarbij wel gegevens verloren gaan, maar biedt vaak een betere audiokwaliteit. HDMI HDMI (High-Definition Multimedia Interface) is een interface die zowel video als audio ondersteunt via een enkele digitale verbinding.
Specificaties ■ Algemeen ■ Auteursrechten Opmerking – Audiovisueel materiaal kan bestaan uit materiaal met auteursrecht dat niet mag worden opgenomen zonder toestemming van de eigenaar van het auteursrecht. Raadpleeg de relevante wetten in uw land. “Blu-ray Disc™”, “Blu-ray™”, “Blu-ray 3D™”, “BDLive™”, “BONUSVIEW™” en de overeenstemmende logo’s zijn handelsmerken van de Blu-ray Disc Association. ■ Audioprestaties Audio-uitgangsniveau (1 kHz, 0 dB) Blu-ray Disc/DVD/CD-DA...................................
Specificaties Java is een gedeponeerd handelsmerk van Oracle en/of zijn dochterondernemingen. DLNA™ en DLNA CERTIFIED™ zijn handelsmerken of gedeponeerde handelsmerken van Digital Living Network Alliance. Alle rechten voorbehouden. Ongeoorloofd gebruik is strikt verboden. Het Wi-Fi CERTIFIED-logo is een certificaatmerk van Wi-Fi Alliance. Wi-Fi Protected Setup Identifier Mark is een merk van Wi-Fi Alliance.
AANVULLENDE INFORMATIE Index ■ Cijfers 2ch Downmix, SETUP-menu ..............34 2ND AUDIO, afstandsbediening ...........8 3D Playback bericht, SETUP-menu ....30 3D Uitgang, SETUP-menu ..................32 ■ A ■ B ■ I Informatie, SETUP-menu ....................31 Ins Spelen, schermmenu .......................23 Ins Zoeken, schermmenu .....................23 Instellingen Algemeen, SETUP-menu ...................................30 IP Setting, SETUP-menu .....................
Information about third party software licenses This product incorporates the following third party software. For information (copyright, etc) about each software, please read the terms and conditions stated below. By using this product, you will be deemed to have accepted the terms and conditions.
It is not the purpose of this section to induce you to infringe any patents or other property right claims or to contest validity of any such claims; this section has the sole purpose of protecting the integrity of the free software distribution system, which is implemented by public license practices.
To “convey” a work means any kind of propagation that enables other parties to make or receive copies. Mere interaction with a user through a computer network, with no transfer of a copy, is not conveying.
c) Prohibiting misrepresentation of the origin of that material, or requiring that modified versions of such material be marked in reasonable ways as different from the original version; or d) Limiting the use for publicity purposes of names of licensors or authors of the material; or e) Declining to grant rights under trademark law for use of some trade names, trademarks, or service marks; or f) Requiring indemnification of licensors and authors of that material by anyone who conveys the material (or modif
END OF TERMS AND CONDITIONS How to Apply These Terms to Your New Programs If you develop a new program, and you want it to be of the greatest possible use to the public, the best way to achieve this is to make it free software which everyone can redistribute and change under these terms. To do so, attach the following notices to the program.
GNU LESSER GENERAL PUBLIC LICENSE TERMS AND CONDITIONS FOR COPYING, DISTRIBUTION AND MODIFICATION 0. This License Agreement applies to any software library or other program which contains a notice placed by the copyright holder or other authorized party saying it may be distributed under the terms of this Lesser General Public License (also called “this License”). Each licensee is addressed as “you”.
10. Each time you redistribute the Library (or any work based on the Library), the recipient automatically receives a license from the original licensor to copy, distribute, link with or modify the Library subject to these terms and conditions. You may not impose any further restrictions on the recipients’ exercise of the rights granted herein. You are not responsible for enforcing compliance by third parties with this License. 11.
The precise terms and conditions for copying, distribution and modification follow. Pay close attention to the difference between a “work based on the library” and a “work that uses the library”. The former contains code derived from the library, while the latter only works together with the library. Note that it is possible for a library to be covered by the ordinary General Public License rather than by this special one.
It is not the purpose of this section to induce you to infringe any patents or other property right claims or to contest validity of any such claims; this section has the sole purpose of protecting the integrity of the free software distribution system which is implemented by public license practices.
The above copyright notice and this permission notice shall be included in all copies or substantial portions of the Software. THE SOFTWARE IS PROVIDED “AS IS”, WITHOUT WARRANTY OF ANY KIND, EXPRESS OR IMPLIED, INCLUDING BUT NOT LIMITED TO THE WARRANTIES OF MERCHANTABILITY, FITNESS FOR A PARTICULAR PURPOSE AND NONINFRINGEMENT.
■ About protobuf Copyright © 2008, Google Inc. All rights reserved. Redistribution and use in source and binary forms, with or without modification, are permitted provided that the following conditions are met: 1. Redistributions of source code must retain the above copyright notice, this list of conditions and the following disclaimer. 2.
Redistribution and use in source and binary forms, with or without modification, are permitted provided that the following conditions are met: 1. Redistributions of source code must retain the above copyright notice, this list of conditions and the following disclaimer. 2. Redistributions in binary form must reproduce the above copyright notice, this list of conditions and the following disclaimer in the documentation and/or other materials provided with the distribution.
Please replace with the value from the FreeType version you actually use. Legal Terms 0. Definitions Throughout this license, the terms ‘package’, ‘FreeType Project’, and ‘FreeType archive’ refer to the set of files originally distributed by the authors (David Turner, Robert Wilhelm, and Werner Lemberg) as the ‘FreeType Project’, be they named as alpha, beta or final release.
All Rights Reserved except as specified below. Permission is hereby granted to use, copy, modify, and distribute this software (or portions thereof) for any purpose, without fee, subject to these conditions: (1) If any part of the source code for this software is distributed, then this README file must be included, with this copyright and no-warranty notice unaltered; and any additions, deletions, or changes to the original files must be clearly indicated in accompanying documentation.
Information for Users on Collection and Disposal of Old Equipment and Used Batteries These symbols on the products, packaging, and/or accompanying documents mean that used electrical and electronic products and batteries should not be mixed with general household waste. For proper treatment, recovery and recycling of old products and used batteries, please take them to applicable collection points, in accordance with your national legislation and the Directives 2002/96/EC and 2006/66/EC.
Informazioni per gli utenti sulla raccolta e lo smaltimento di vecchia attrezzatura e batterie usate Questi simboli sui prodotti, sull’imballaggio, e/o sui documenti che li accompagnano significano che i prodotti e le batterie elettriche e elettroniche non dovrebbero essere mischiati con i rifiuti domestici generici.
The laser component in this product is capable of emitting radiation exceeding the limit for Class 1. De lasercomponent in dit product is in staat stralen te produceren die de limiet voor Klasse 1 overstijgen. LASER Specification: Class 1 LASER Product Wave length: 790 nm (CDs)/658 nm (DVDs)/405 nm (BDs) Laser output: max. 1 mW LASER specificatie: Klasse 1 LASER product Golflengte: 790 nm (CD’s)/658 nm (DVD’s)/405 nm (BD’s) Laservermogen: max.
CAUTION: INVISIBLE LASER RADIATION WHEN OPEN. DO NOT STARE INTO BEAM. DANGER: INVISIBLE LASER RADIATION WHEN OPEN. AVOID DIRECT EXPOSURE TO THE BEAM. CAUTION Use of controls or adjustments or performance of procedures other than those specified herein may result in hazardous radiation exposure. AVERTISSEMENT L’utilisation de commandes et l’emploi de réglages ou de méthodes autres que ceux décrits ci-dessous, peuvent entraîner une exposition à un rayonnement dangereux.
00_BD-S677_G_cv.