TLP MCR-750 Micro Component System OWNER’S MANUAL MANUAL DE INSTRUCCIONES © 2011 Yamaha Corporation Printed in China MCR-750_TLP-1
CAUTION Use of controls or adjustments or performance of procedures other than those specified herein may result in hazardous radiation exposure. The laser component in this product is capable of emitting radiation exceeding the limit for Class 1. El componente láser de este producto es capaz de emitir radiación que sobrepasa el límite establecido para la clase 1.
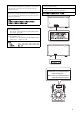
CAUTION: READ THIS BEFORE OPERATING YOUR UNIT. 1 2 3 4 5 6 7 8 9 10 11 12 13 14 15 16 To assure the finest performance, please read this manual carefully. Keep it in a safe place for future reference. Install this sound system in a well ventilated, cool, dry, clean place - away from direct sunlight, heat sources, vibration, dust, moisture, and/or cold. For proper ventilation, allow the following minimum clearances.
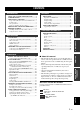
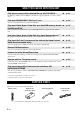
CONTENTS WHAT YOU CAN DO WITH THIS UNIT ......... 2 SUPPLIED PARTS ................................................ 2 ABOUT DISCS AND FILES ................................. 3 Types of discs/files that can be used with this unit ... 3 Loading a disc............................................................ 4 Disc precautions......................................................... 4 Notice for watching 3D video images ....................... 4 Installing the batteries in the remote control .............
INTRODUCTION WHAT YOU CAN DO WITH THIS UNIT \ p. 21 \ p. 24 Play back Video, Music, Photo files on a disc/USB memory device/ \ iPod/iPhone/iPad*1 p. 15 Play back a commercially-released Blu-ray Disc™/DVD/CD*1 In addition to a Blu-ray Disc™ (BD disc), this unit also supports playback of a variety of other discs. Play back BONUSVIEW™, BD-Live™, etc.*1 You can enjoy additional movies on the latest BD discs. Files recorded on discs/USB memory devices/iPod/iPhone/iPad can be played back with this unit.
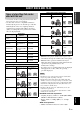
ABOUT DISCS AND FILES Destination Europe • 12 cm and 8 cm discs can be played back in this unit. Do not use an 8 cm to 12 cm adapter. • Use discs that conform to compatible standards as indicated by the presence of official logos on the disc label. Playback of discs not complying with these standards is not guaranteed. In addition, the image quality or sound quality is not guaranteed even if the discs can be played back.
ABOUT DISCS AND FILES Loading a disc • Insert the disc with the label facing up. • In case of the disc recorded on both sides, face down the side you want to play back. Notes • Playback may begin automatically, depending on the disc and setting of this unit. • The menu may be displayed first, depending on the disc. • The disc load time may vary depending on the disc. Disc precautions • Do not touch the surface of the disc. Hold a disc by its edge (and the center hole).
FRONT PANEL AND BASIC OPERATION This unit has an automatic standby function. • When the source is set to Disc/USB/Network, this unit automatically switches to standby mode if it is left turned on for 1 hour without playback or any other operation being performed. • When the source is NOT set to Disc/USB/Network, this unit automatically switches to standby mode if it is left turned on for between 1 to 8 hours without playback or any other operation being performed according to the setting in SETUP menu (p.
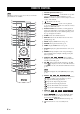
REMOTE CONTROL 1 Infrared signal transmitter (p. 9) Note will appear on the top left corner of the screen when the pressed button is not available. 1 2 G H 3 4 PROGRAM MARKER DIGEST ZOOM SLEEP TIMER 5 6 7 8 9 0 SURROUND CLEAR SEARCH DISPLAY MUTE SETUP VOLUME OPTION I J K L M N HOME TOP MENU POP-UP MENU O 2 MARKER DVD VIDEO : Sets Bookmark at a specified point of a movie (p. 23). After Bookmark is set, press DIGEST to select the set point you want to jump to.
REMOTE CONTROL I ZOOM DVD VIDEO PHOTO : Zooms in/out. The size of the screen will change each time you press the button (zoom in/out: 3 steps each). INTRODUCTION J Color buttons BD : Use these buttons according to onscreen instructions. K SLEEP: Sets to sleep mode (p. 29). L TIMER: Sets to timer mode (p. 28). M SURROUND: Turns on/off surround playback mode for the speakers (p. 16). (Does not affect headphone sound.) N Volume control buttons: Controls the volume level (p. 16).
REMOTE CONTROL T TOP MENU BD DVD : Displays the top menu screen (p. 49) if the disc contains a menu. Select the desired item using 5/a /2/3 and ENTER. PROGRAM MARKER DIGEST Note ZOOM Specific operations may be different depending on the disc. Follow the instructions of each menu screen. SLEEP U Cursor buttons (5/a /2/3): Moves to select the focused item. ENTER: Confirms the focused menu/item. TIMER SURROUND CLEAR SEARCH DISPLAY V RETURN: Returns to the previous menu or screen, etc.
REMOTE CONTROL Installing the batteries in the remote control 3 The remote control transmits a directional infrared beam. Be sure to aim the remote control directly at the remote control sensor on the front panel of this unit during operation. TIMER INPUT 2 VOLUME PHONES INTRODUCTION 1 Using the remote control USB iPod iPhone iPod PRESET Within 6 m (20 feet) 30˚ ■ Notes on batteries • Change both batteries when the operation range of the remote control decreases.
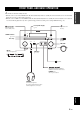
PREPARATIONS CONNECTION Connecting component system to this unit Make sure you read the following procedure and note carefully before connecting the system. ■ Connecting the system 1 Connect the speaker terminals (L) of this unit to the speaker terminals of the left speaker and the speaker terminals (R) of this unit to the speaker terminals of the right speaker using the speaker cables supplied with the speaker set (NS-BP150). 2 Connect the supplied FM antenna to the FM jack.
CONNECTION ■ Connecting the power cable CAUTION • Do not connect this unit or other components to the main power until all connections between components are complete. • Do not let the bare speaker wires touch each other or any metal part of this unit. This could damage the unit and/or the speakers. • All connections must be correct: L (left) to L, R (right) to R, “+” to “+” and “–” to “–”.
CONNECTION Connecting to a TV Make sure you refer the following illustration carefully so that connections between this unit and your TV are properly made. CAUTION Do not connect the power cable of this unit until all connections are completed. This unit Video cable (supplied) SPEAKERS TV L R VIDEO AV INPUT ANTENNA 6Ω MIN.
NETWORK AND USB CONNECTION Connecting to the NETWORK terminal • PC contents can be played back by connecting this unit to the network. • You can enjoy a variety of contents with interactive functions by connecting to the internet when playing BD-Live compatible discs. Refer to page 24 for information on BD-Live functions. Notes Firmly connect a network cable (commercially available) to the NETWORK terminal. Use only an STP (shielded twisted pair) network cable.
OPERATIONS INITIAL WIZARD/EASY SETUP Setting with the Initial Wizard/Easy Setup Initial Wizard/Easy Setup allows you to set language, resolution, and screen aspect ratio easily. Initial Wizard screen is displayed when you turn this unit on for the first time after purchase or upgrade. Same setting can be performed from SETUP menu = [System] = [Easy Setup] (p. 31). 1 When Easy Setup screen is displayed, press ENTER to start Easy Setup.
BASIC OPERATION y When the source is a CD/iPod/FM/TV, refer to “Basic operation without HOME/MEDIA menu” (p. 19). When the source is a BD/ DVD/USB/Network, read the following (a CD can also be played back with HOME/MEDIA menu). Basic operation using HOME/MEDIA menu Follow the procedures below to play back the source. 2 Switch the 1 Set the source input 3 Refer to the following pages for more operations Disc Front Rear DISPLAY SETUP OPTION HOME VOLUME TOP MENU USB*1 OPERATIONS p.
BASIC OPERATION ■ Controlling the volume level 1 ■ Common operations for playing back files in a selected folder Press the Volume control buttons (+/–) on the remote control to increase/decrease the volume level (p. 7). Example: Selecting a movie file on a USB memory device ■ Turning on/off surround playback mode Note 1 Stop the playback of the video before you move to MEDIA menu screen. Press SURROUND to turn on/off surround playback mode (p. 7).
BASIC OPERATION 4 Select the Photo, Music, Video or AVCHD folder you want to play back, then press ENTER. To return to the parent folder, press 2 or select . 6 Select the file you want to play back, then press ENTER. When a video file is selected, playback starts. When a music file is selected, Status menu is displayed and playback starts. When a photo file is selected, slide show starts. Note 5 Select the folder(s) containing the file you want to play back.
BASIC OPERATION Using network content ■ About DLNA This unit is a DLNA certified digital media player. You can manage photo, music and video contents stored on DLNA servers on your home network. DLNA (Digital Living Network Alliance) provides easy sharing of digital media through network in the home, and you can enjoy digital contents stored on your DLNAserver-software-installed PC or other DLNA compatible device with your TV via this unit.
BASIC OPERATION Basic operation without HOME/MEDIA menu Follow the procedures below to play back the source. 2 Switch the 1 Set the source input 3 Select music and start playback USB iPod iPhone iPod iPod*1 TUNING PRESET DIMMER STATUS PIP SUBTITLE AUDIO SHUFFLE REPEAT A B p. 11, 20 MEMORY OPERATIONS CD p. 20 For details on operation, refer to the instruction manual supplied with the device connected such as a MD player, etc.
BASIC OPERATION ■ Repeat play Operation for iPod You can repeat playback as you want. You can operate playback of your iPod by using the buttons on the remote control. DISPLAY DISPLAY SETUP OPTION HOME 1 Press REPEAT repeatedly for repeat play. Each press cycles as follows: VOLUME TOP MENU POP-UP MENU Operation for CDs ENTER RETURN ON SCREEN You can also operate playback of music for CDs.
ADVANCED PLAYBACK OPERATION This chapter explains playback of commercially available BD/DVD/CD discs, and recorded DVD-RW/R discs. DVD – – – – – – – Note For the basic playback operation, refer to page 6. On Screen menu Normal Shuffle CH (chapter) Shuffle TT (title) Shuffle All Random CH (chapter) Random TT (title) Random All VIDEO MUSIC PHOTO – Normal – Shuffle F (folder) – Random F (folder) To display On Screen menu, press ON SCREEN.
ADVANCED PLAYBACK OPERATION Status menu CD This shows various settings, such as subtitles, angle settings and the title/chapter/track number currently played back. To display Status menu, press STATUS. Status menu contains following menus. BD DVD MUSIC Example: Icons when playing a music file VIDEO Example: Icons when playing a BD disc 1 2 3 4 5 6 8 7 1 2 3 1 (Playback status) 2 (Disc type/video file icon) (Playback status) (Repeat mode): Shows current repeat mode (p. 6).
ADVANCED PLAYBACK OPERATION Using Bookmark 2 Press ENTER to program playback order. For audio disc, press 5/a to select a desired track, then press ENTER. For DVD-Video discs, select a desired title (shown as TT) and chapter (shown as CH) instead of a track. To clear a set track, select the track you want to clear, then press CLEAR. Press RETURN to cancel the Program play. 3 After programming is finished, press start program playback.
ADVANCED PLAYBACK OPERATION Using search This allows you to jump to the specified point during playback. BD DVD CD VIDEO MUSIC Enjoying BONUSVIEW™ and BDLive™ This unit supports BONUSVIEW (p. 48) (BD-ROM Profile 1 Version 1.1) and BD-Live (p. 48) (BD-ROM Profile 2) playback functions. Example: Searching to the specified point Note 1 Press SEARCH during playback. Status bar appears. 2 Press 5/a /2/3 to select one of the item below, then press ENTER.
ADVANCED PLAYBACK OPERATION ■ Using the feature of BD-Live™ 1 Set the Network setting (p. 35). 2 Connect the USB memory device to this unit (p. 13). • BD-Live data is saved in a USB memory device connected to this unit. • Connect a USB memory device (2 GB or greater and formatted with FAT 32/16) supporting USB 2.0 High Speed (480 Mbit/s) to the USB port that you select on Local Storage (p. 34). The default setting is the USB port on the rear panel.
LISTENING TO FM RADIO STATIONS ■ Manual preset tuning Tuning to radio stations 1 Select a favorite radio station by pressing << / >> (TUNING). 2 Press MEMORY. 3 Select the preset number you want to store to by pressing 5/a or < / > (PRESET). 4 Press ENTER. The manual preset is complete. TUNING <<, >> (TUNING) PRESET DIMMER STATUS PIP SUBTITLE AUDIO SHUFFLE REPEAT A B iPod TV AUX DISC USB NET MEMORY TUNER 1 Press TUNER. 2 Press and hold << / >> (TUNING). Automatic tuning starts.
USING USEFUL FUNCTIONS Using option menu on the front panel display The option menu appears on the front panel display by pressing OPTION. You can set various useful functions with option menu. Option menu Parameter or control range Reference page PRESET DEL (Displays only when the input source is set to FM.
USING USEFUL FUNCTIONS Setting the clock/timer and sleep timer PROGRAM MARKER DIGEST 4 Change the settings by pressing 5/a or Numeric buttons. 5 Press ENTER to confirm the setting. 6 Repeat steps 2 through 5 to set each setting item. y ZOOM SLEEP SLEEP TIMER TIMER SURROUND ■ Setting the clock • To clear the entry, press CLEAR. • The settings of the timer are retained. The following describes the flow of timer setting. (Clock) You can set the clock by using the remote control directly.
USING USEFUL FUNCTIONS Volume The volume level can be set between [1] [MAX] and [– – –]*1. When the timer is executed while this unit is in standby mode, the volume level you set at this point is applied. When the timer is executed while the unit is on, the volume level remains the same as the current volume level. *1 If you set your volume level to [– – –] and the timer is executed while this unit is in standby mode, the volume level is applied at the same level as input source.
USING USEFUL FUNCTIONS • In order to make the HDMI control function available, set up settings for the HDMI control function on ALL components (this unit, TV, and other components). Certain operation may also be required. • Each function may be set independently to activate/deactivate depending on the TV. • Refer to the operation manuals supplied with the TV for details regarding setup. ■ Setting the HDMI control function 1 Turn on all components connected to the TV with HDMI.
SETTINGS SETUP MENU The SETUP menu enables various audio/visual settings and adjustments for functions using the remote control unit. Menu/Submenu Item System Screen Saver Sets screen saver to On/Off. 34 Auto Power Off Disc/USB/Net: Sets auto power off mode to On/Off. Other Inputs: Sets auto power off mode to on by hours or Off. 34 Disc Auto Playback Sets this unit to start disc playback automatically. 34 HDMI Control Sets this unit to receive control signal from the remote control of your TV.
SETUP MENU Menu/Submenu TV Function Page Selects 3D or 2D videos. 36 TV Screen Sets the screen aspect ratio of the connected TV, and adjust the video output. 36 Video Out Select Selects the resolution of video output. 36 TV System Selects the TV System from NTSC/PAL/Multi. 36 Color Space Selects Color Space from YCbCr 4:4:4/YCbCr 4:2:2/ Full RGB/RGB. 36 HDMI Deep Color Selects HDMI Deep Color from 30 bits/36 bits/Off. 36 HDMI 1080p 24Hz Sets HDMI 1080p 24Hz to Auto/Off.
SETUP MENU Operation for SETUP menu 3 Select a menu item. Press 5/a to select [Parental Control], then press ENTER or cursor 3. 4 Enter your password with Numeric buttons. – The default password is 0000. – You cannot move to the next setting screen until you have input the correct password. – To change the password, refer to “[Change Password]” (p. 35). 5 Select a next item. Press 5/a to select the Parental Control Level for BD/DVD discs, then press ENTER. 6 Exit the menu screen.
SETUP MENU General Setting The default settings are marked with “ * ”. ■ System [Screen Saver] You can set the screen saver to [On]/[Off]. When set to [On], this unit will switch to screen saver mode if there is no operation for 3 minutes. [Local Storage] You can display Local Storage information, format Local Storage, and select [Front USB]/[Rear USB] to save the BD-Live data.
SETUP MENU ■ Playback [Closed Caption] You can set to display the closed caption (p. 48) when a BD/DVD disc with closed caption is played back. On, Off* [Angle Mark] You can set to display the Angle Mark ( ) when a BD/ DVD disc with multiple angles is played back. On*, Off [PIP Mark] You can set to display the PIP Mark ( ) when a BD disc with picture in picture (p. 24) is played back.
SETUP MENU Display Setting The default settings are marked with “ * ”. ■ TV [3D Output] You can select 3D or 2D video output from this unit. Auto* This unit automatically selects 3D or 2D videos. Off This unit always selects 2D videos. [Video Out Select] You can select the video output resolution from [Composite], [HDMI Auto], [HDMI 1080p], [HDMI 1080i], [HDMI 720p], [HDMI 480p/576p], and [HDMI 480i/576i].
SETUP MENU [HDMI 1080p 24Hz] This outputs the BD-Video encoded in 24Hz frame rate in HDMI 1080p 24Hz. Smoother video playback may be available with this function. This function is available when your TV supports this function, and this unit is connected with an HDMI cable. For more details on output formats, refer to “About the video output formats” (p. 39). Auto*, Off [Color Adjust] You can adjust Brightness/Saturation/Hue for each color (Red/Green/Blue/Yellow/Cyan/Magenta).
SETUP MENU Audio Setting The default settings are marked with “ * ”. ■ Audio Output [HDMI] You can select the output mode of the HDMI terminal. Bitstream, PCM, Off* Notes • To output sound from the speakers or headphones, select [Off]. • No sound of your iPod can be output from this unit to the TV through the HDMI cable. • To output HD audio (such as Dolby TrueHD or DTS-HD) from the HDMI terminal, set [Video Out Select] to [HDMI Auto] or more than [HDMI 720p] (p. 36).
SETUP MENU About the video output formats When [TV System] is set to [NTSC] Resolution Composite HDMI VIDEO Playback BD others Playback BD others HDMI Auto HDMI HDMI 480i/576i 480p/576p 480p Max 480i 480p 480i OFF 480i 480i HDMI 720p 720p 60 Hz HDMI 1080p HDMI 1080i 24Hz 1080i 60 Hz 1080p 24 Hz 1080p 60 Hz Others 1080p 60 Hz OFF When [TV System] is set to [PAL] Resolution Composite HDMI VIDEO Playback BD others Playback BD others HDMI Auto HDMI HDMI 480i/576i 480p/576p 576p Max 57
SOFTWARE UPGRADE Some of the newly released BD discs cannot be played back unless you upgrade this unit software to the latest version. We recommend upgrading the software of this unit with software upgrade so that the unit is operated based on the latest software. To check for the availability of a software upgrade, visit http://download.yamaha.com/ Note Do not remove the USB memory device, set this unit to standby mode or unplug the power cable/LAN cable while the software upgrade is being performed.
ADDITIONAL INFORMATION TROUBLESHOOTING Refer to the table below when this unit does not function properly. If the problem you are experiencing is not listed below or if the instruction below does not help, turn off this unit, disconnect the power cable, and contact the nearest authorized Yamaha dealer or service center. General Problem Cause No power. This unit fails to turn on or enters standby mode soon after the power is turned on. Remedy Press on the front panel to turn on the power.
TROUBLESHOOTING Problem The power is suddenly turned off. Cause Remedy Page The sleep timer is set. This is not malfunction. Turn on this unit and play the source again. 29 [Auto Power Off] is set to [On]. Set [Auto Power Off] to [Off]. 34 The clock setting has been cleared. The power cable has been disconnected. Connect the power cable, and set the clock again. — Sound is heard from the speaker on one side only. Incorrect cable connections. Connect the cables properly.
TROUBLESHOOTING iPod Note In case of a transmission error without a status message appearing on the front panel display of this unit, check the connection to your iPod (refer to page 11). Status message Cause Remedy Page READING This unit is in the middle of recognizing the connection with the iPod. If the message continues to appear on the front panel display and playback does not start, connect the iPod again. — UNKNOWN There is a problem with the signal path from the iPod to this unit.
TROUBLESHOOTING Problem The iPod does not charge up. Cause Remedy Page The iPod is not connected correctly. Connect the iPod and this unit by a USB cable correctly. 11 The iPod is not supported by this unit. Only iPod classic, iPod nano (2nd, 3rd, 4th, 5th and 6th generation), iPod touch (1st, 2nd, 3rd, and 4th generation), iPhone, iPhone 3G/3GS, iPhone 4, and iPad are supported.
TROUBLESHOOTING Problem Disc playback does not start. Cause Remedy Page The disc is not finalized. The CD-R/RW, DVD+R/RW/R DL, and DVD-R/ RW/R DL must be finalized. 3 Disc is loaded upside-down. Remove the disc and then load the disc with the labeled side facing up. — The disc is defective. Try playing back another disc. If this solves the problem, the disc you want to play back is defective. — The format of the file is not compatible with this unit.
TROUBLESHOOTING Remote control Problem The remote control does not work nor function properly. Cause Remedy Page The remote control is operated outside its operation range. For information on the remote control operation range, refer to “Using the remote control”. 9 The remote control sensor on this unit is exposed to direct sunlight or lighting. Change the lighting or orientation of this unit. — The battery is worn out. Replace the battery with new one.
TROUBLESHOOTING Messages on the screen The following messages appear on the TV screen in case the disc you tried to play back is not appropriate or the operation is not correct. Error message Cause Remedy Page Unsupported File The file is not supported by this unit. Refer to “Types of discs/files that can be used with this unit”. 3 Wrong region code! The disc is an incompatible region code. Refer to “Region management information”. 3 Network has FAILED.
GLOSSARY AIR SURROUND XTREME AVCHD This unit employs new technologies and algorithms that make it possible to achieve 5-channel surround sound with only front speakers, and without using wall reflections. Ordinarily, two front speakers, a center speaker, two surround speakers, and a subwoofer are necessary for enjoying 5.1 channel surround sound. AVCHD is a new format (standard) for high definition video cameras that can be used to record and play highresolution HD images.
GLOSSARY Dolby Digital Plus A sound system developed as an extension to Dolby Digital. This audio coding technology supports 7.1 multi-channel surround sound. Dolby TrueHD Dolby TrueHD is a lossless coding technology that supports up to 8 channels of multi-channel surround sound for the next generation optical discs. The reproduced sound is true to the original source bit-forbit.
SPECIFICATIONS PLAYER SECTION iPod/iPhone/iPad • Supported iPod/iPhone/iPad ....................................... iPod classic, iPod nano (2nd, 3rd, 4th, 5th and 6th generation), iPod touch (1st, 2nd, 3rd, and 4th generation), iPhone, iPhone 3G/3GS, iPhone 4, iPad disc and file formats • For supported disc and file formats, refer to page 3. AUX • Input connector AUX ........................................................................................ RCA AMPLIFIER SECTION • Maximum output power.....
SPECIFICATIONS ■ Copyright • iPad, iPhone, iPod, iPod classic, iPod nano, and iPod touch are trademarks of Apple Inc., registered in the U.S. and other countries. “Made for iPod,” “Made for iPhone,” and “Made for iPad” mean that an electronic accessory has been designed to connect specifically to iPod, iPhone, or iPad, respectively, and has been certified by the developer to meet Apple performance standards.
PRECAUCIÓN: LEA LAS INDICACIONES SIGUIENTES ANTES DE UTILIZAR ESTE APARATO 1 2 3 4 5 6 7 8 9 10 11 12 13 Para asegurar el mejor rendimiento de este aparato, lea atentamente este manual. Y luego guárdelo en un lugar seguro para poder consultarlo en el futuro en caso de ser necesario. Instale esta unidad en un lugar bien ventilado, fresco, seco y limpio, alejado de la luz directa del sol, fuentes de calor, vibración, polvo, humedad y/o frío.
CONTENIDO FUNCIONES DE ESTA UNIDAD........................ 2 PIEZAS INCLUIDAS ............................................ 2 INFORMACIÓN SOBRE DISCOS Y ARCHIVOS..................................................... 3 PANEL DELANTERO Y FUNCIONAMIENTO BÁSICO............................................................... 5 MANDO A DISTANCIA ....................................... 6 Colocación de las pilas en el mando a distancia........ 9 Utilización del mando a distancia..............................
INTRODUCCIÓN FUNCIONES DE ESTA UNIDAD \ pág. 21 \ pág. 24 \ pág. 15 \ pág. 18 \ pág. 18 \ pág. 26 \ pág. 14 \ pág. 29 Reproducir sonidos envolventes virtuales de alta calidad con AIR \ SURROUND XTREME pág. 16 Reproducir un Blu-ray Disc™/DVD/CD*1 comercializado en el mercado Además de un Blu-ray Disc™ (disco BD), esta unidad también admite la reproducción de muchos otros discos. Reproducir BONUSVIEW™, BD-Live™, etc.
INFORMACIÓN SOBRE DISCOS Y ARCHIVOS • En esta unidad se pueden reproducir discos de 12 cm y 8 cm. No utilice un adaptador de 8 cm a 12 cm. • Utilice discos que sean compatibles con los estándares que se indican con la presencia de logotipos oficiales marcados en la etiqueta del disco. La reproducción de discos que no cumplan con estos estándares no está garantizada. Además, la calidad de imagen o sonido no está garantizada incluso si tales discos se pueden reproducir.
INFORMACIÓN SOBRE DISCOS Y ARCHIVOS Para cargar un disco • Inserte el disco con la etiqueta hacia arriba. • En el caso de un disco grabado por ambas caras, ponga boca abajo el lado que desea reproducir. Notas • La reproducción puede iniciarse automáticamente, dependiendo del disco y la configuración de la unidad. • Es posible que el menú aparezca primero según el disco. • El tiempo necesario para cargar el disco puede variar dependiendo del disco.
PANEL DELANTERO Y FUNCIONAMIENTO BÁSICO Esta unidad cuenta con una función de espera automática. • Al utilizar Disco/USB/Red como fuente, se activa automáticamente el modo de espera si la unidad está encendida durante 1 hora sin reproducir contenidos ni realizar ninguna otra operación.
MANDO A DISTANCIA 1 Transmisor de señal infrarroja (pág. 9) Nota En la esquina superior izquierda de la pantalla aparecerá cuando la tecla pulsada no esté disponible. 1 2 G H 3 4 PROGRAM MARKER DIGEST ZOOM SLEEP TIMER 5 6 7 8 9 0 SURROUND CLEAR SEARCH DISPLAY VOLUME POP-UP MENU : abre/cierra la bandeja portadiscos. 4 PROGRAM DVD CD : establece el orden de reproducción (pág. 23). Puede configurar hasta 15 pistas de un disco de audio o títulos/capítulos de un DVD de vídeo.
MANDO A DISTANCIA G DIGEST PHOTO : muestra 12 fotografías en miniatura. Cuando se muestran las miniaturas, puede ir a la página siguiente o anterior con / . DVD VIDEO : muestra la barra de selección Marcador INTRODUCCIÓN (pág. 23). H : enciende la unidad o activa el modo de reposo. I ZOOM DVD VIDEO PHOTO : amplia/reduce la imagen. El tamaño de la pantalla cambiará cada vez que pulse la tecla (ampliar/reducir imagen: 3 pasos cada uno).
MANDO A DISTANCIA T TOP MENU BD DVD : muestra la pantalla del menú principal (pág. 49) si el disco contiene un menú. Seleccione la opción deseada con 5/a /2/3 y ENTER. PROGRAM MARKER DIGEST Nota ZOOM Las operaciones concretas pueden diferir dependiendo del disco. Siga las instrucciones de cada pantalla de menú. SLEEP U Botones de cursor (5/a /2/3): permiten desplazarse hasta la opción deseada. ENTER: confirma el menú o la opción señalado.
MANDO A DISTANCIA Colocación de las pilas en el mando a distancia 3 El mando a distancia transmite una señal mediante un haz infrarrojo. Oriente siempre el mando a distancia hacia el sensor del mando a distancia del panel delantero de esta unidad cuando lo utilice.
PREPARACIÓN CONEXIÓN Conexión de un sistema con distintos componentes a esta unidad Asegúrese de leer el siguiente procedimiento y la nota con atención antes de conectar el sistema. ■ Conexión del sistema 1 Conecte los terminales de los altavoces (L) de esta unidad a los terminales de los altavoces del altavoz izquierdo y los terminales de los altavoces (R) de esta unidad a los terminales de los altavoces del altavoz derecho con los cables de altavoz suministrados con el juego de altavoces (NS-BP150).
CONEXIÓN ■ Conexión del cable de alimentación PRECAUCIÓN Tras realizar todas las conexiones, conecte los cables de alimentación de esta unidad. SPEAKERS L R MAINS ANTENNA 6Ω MIN. /SPEAKER L AUX OUTPUT NETWORK VIDEO FM 75Ω HDMI R A una toma de CA AUDIO IN SUBWOOFER USB PREPARACIÓN • No conecte esta unidad ni los demás componentes a la alimentación hasta que todas las conexiones entre los componentes estén a punto.
CONEXIÓN Conexión de un televisor Es importante que tome nota de las indicaciones de esta ilustración para realizar correctamente las conexiones entre esta unidad y el televisor. PRECAUCIÓN No conecte el cable de alimentación de esta unidad hasta que haya realizado todas las conexiones. Esta unidad Cable de vídeo (suministrado) SPEAKERS Televisor L R VIDEO AV INPUT ANTENNA 6Ω MIN.
CONEXIÓN DE RED Y USB Conexión con el terminal NETWORK • El contenido del PC se puede reproducir conectando esta unidad a la red. • Puede disfrutar de numerosos contenidos con funciones interactivas gracias a la conexión a Internet al reproducir discos compatibles con BD-Live. Consulte página 24 para obtener más información sobre las funciones BD-Live. Notas Conecte con firmeza un cable de red (de venta en tiendas) al terminal NETWORK. Utilice únicamente un cable de red STP (par trenzado blindado).
FUNCIONAMIENTO ASISTENTE INICIAL/CONFIGURACIÓN SENCILLA Configuración con el Asistente inicial/Configuración Sencilla Asistente inicial/Configuración Sencilla le permite definir con facilidad el idioma, la resolución y la relación de aspecto de pantalla. La pantalla Asistente inicial se muestra cuando enciende la unidad por primera vez después de la compra o actualización. El mismo ajuste se puede realizar desde el menú SETUP = [Sistema] = [Configuración Sencilla] (pág. 31).
FUNCIONAMIENTO BÁSICO y Si la fuente es CD/iPod/FM/TV, consulte “Funcionamiento básico sin el menú HOME/MEDIA” (pág. 19). Si la fuente es BD/DVD/ USB/Red, lea el apartado siguiente (también es posible reproducir un CD con el menú HOME/MEDIA). Funcionamiento básico con el menú HOME/MEDIA Siga los procedimientos que se indican a continuación para reproducir la fuente.
FUNCIONAMIENTO BÁSICO ■ Control del nivel de volumen 1 Pulse los botones de control del volumen (+/–) en el mando a distancia para subir/bajar el nivel de volumen (pág. 7). ■ Activar/desactivar el modo de reproducción envolvente 1 Pulse SURROUND para activar o desactivar el modo de reproducción envolvente (pág. 7). Si está activado: – Se reproducen sonidos envolventes gracias a la tecnología AIR SURROUND XTREME exclusiva de Yamaha (pág.
FUNCIONAMIENTO BÁSICO 4 Seleccione la carpeta de Foto, Música, Vídeo o AVCHD que desea reproducir y, a continuación, pulse ENTER. Para volver a la carpeta principal, pulse 2 o seleccione . 6 Seleccione el archivo que desea reproducir y, a continuación, pulse ENTER. Cuando se selecciona un archivo de vídeo se inicia la reproducción. Cuando se selecciona un archivo de música, se muestra la pantalla de estado y se inicia la reproducción.
FUNCIONAMIENTO BÁSICO Uso del contenido de red ■ Acerca de DLNA 3 Seleccione el archivo que desee reproducir. Notas Esta unidad es un reproductor multimedia digital certificado para DLNA. Puede administrar contenido de fotos, música y vídeo almacenado en servidores DLNA en su red doméstica.
FUNCIONAMIENTO BÁSICO Funcionamiento básico sin el menú HOME/MEDIA Siga los procedimientos que se indican a continuación para reproducir la fuente. 2 Cambiar 1 Ajustar la fuente la entrada 3 Seleccionar la música e iniciar la reproducción USB iPod iPhone iPod iPod*1 TUNING PRESET DIMMER STATUS PIP SUBTITLE AUDIO SHUFFLE REPEAT A B pág. 11, 20 MEMORY FUNCIONAMIENTO CD pág.
FUNCIONAMIENTO BÁSICO ■ Repetición de reproducción Funcionamiento para iPod Puede repetir la reproducción como desee. Puede controlar la reproducción de un iPod a través de los botones del mando a distancia. DISPLAY DISPLAY SETUP OPTION HOME 1 VOLUME TOP MENU Pulse varias veces REPEAT para la repetición de reproducción. Con cada pulsación se avanza en la siguiente secuencia: POP-UP MENU ENTER RETURN ON SCREEN Operaciones con un CD También puede controlar la reproducción de los CD.
FUNCIONAMIENTO DE REPRODUCCIÓN AVANZADO En este capítulo se explica la reproducción de discos BD/DVD/CD comercializados en tiendas y discos DVD-RW/R grabados. DVD – – – – – – – Nota Para conocer el funcionamiento básico de reproducción, consulte la página 6. Normal Shuffle CH (capítulo) Shuffle TT (título) Shuffle All Aleatorio CH (capítulo) Aleatorio TT (título) Aleatorio All VIDEO Para mostrar el menú en pantalla, pulse ON SCREEN.
FUNCIONAMIENTO DE REPRODUCCIÓN AVANZADO Menú de estado CD Muestra varios ajustes, cómo los subtítulos, el ángulo y el número de título/capítulo/pista reproducido actualmente. Para mostrar el menú de estado, pulse STATUS. El menú de estado consta de los siguientes menús.
FUNCIONAMIENTO DE REPRODUCCIÓN AVANZADO Uso de Marcador Pulse ENTER para programar el orden de reproducción. Para un disco de audio, pulse 5/a para seleccionar una pista deseada y, a continuación, pulse ENTER. Para un disco DVD-Vídeo, seleccione un título deseado (mostrado como TT) y capítulo (mostrado como CH) en lugar de una pista. Para borrar una pista establecida, seleccione la pista que desea borrar y, a continuación, pulse CLEAR. Pulse RETURN para cancelar la reproducción del programa.
FUNCIONAMIENTO DE REPRODUCCIÓN AVANZADO Uso de la búsqueda Esta opción le permite saltar a un punto específico durante la reproducción. BD DVD CD VIDEO MUSIC Disfrutar de BONUSVIEW™ y BD-Live™ Esta unidad admite las funciones de reproducción de BONUSVIEW (pág. 48) (BD-ROM Perfil 1 Versión 1.1) y BD-Live (pág. 48) (BD-ROM Perfil 2). Ejemplo: buscar hasta el punto especificado Nota 1 Pulse SEARCH durante la reproducción. Aparece la barra de estado.
FUNCIONAMIENTO DE REPRODUCCIÓN AVANZADO ■ Utilización de la función BD-Live™ 1 Ajuste la configuración de Red (pág. 35). 2 Conecte el dispositivo de memoria USB a la unidad (pág. 13). 3 Reproducción del disco. 4 Ejecute BD-Live siguiendo las instrucciones del disco. FUNCIONAMIENTO • Los datos BD-Live se guardan en un dispositivo de memoria USB conectado a esta unidad. • Conecte un dispositivo de memoria USB (2 GB o superior y formateado con FAT 32/16) compatible con USB 2.
ESCUCHAR EMISORAS DE RADIO FM Sintonización de emisoras de radio ■ Presintonización manual 1 Seleccione una emisora de radio que le guste pulsando << / >> (TUNING). 2 Pulse MEMORY. 3 Seleccione el número de presintonía en la que desea guardarla pulsando 5/a o < / > (PRESET). 4 Pulse ENTER. El proceso de presintonización manual ha terminado.
UTILIZACIÓN DE FUNCIONES ÚTILES Utilización del menú de opciones del visor del panel delantero El menú de opciones aparece en el visor del panel delantero al pulsar OPTION. Desde el menú de opciones puede ajustar diversas funciones útiles. Menú de opciones Página de referencia Parámetro o rango de control PRESET DEL (Aparece únicamente cuando la fuente de entrada está ajustada en FM.
UTILIZACIÓN DE FUNCIONES ÚTILES Ajuste del reloj/temporizador y del temporizador de apagado PROGRAM MARKER DIGEST 4 Modifique los ajustes pulsando 5/a o los botones numéricos. 5 Pulse ENTER para confirmar el ajuste. 6 Repita los pasos del 2 al 5 para ajustar todas las opciones. ZOOM SLEEP SLEEP TIMER TIMER y • Para borrar la entrada, pulse CLEAR. • Los ajustes del temporizador se guardan. SURROUND ■ Configuración del reloj Puede ajustar el reloj directamente con el mando a distancia.
UTILIZACIÓN DE FUNCIONES ÚTILES Volume El nivel de volumen puede ajustarse entre [1] – [MAX] y [– – –]*1. Si el temporizador se activa con esta unidad en modo de espera, se aplica el nivel de volumen definido en este punto. Si se activa el temporizador mientras la unidad está encendida, el nivel de volumen no cambia. *1 Si ajusta el nivel de volumen en [– – –] y el temporizador se activa con la unidad en modo de espera, el nivel de volumen se aplica en el mismo nivel que la fuente de entrada.
UTILIZACIÓN DE FUNCIONES ÚTILES • Para que la función de control HDMI esté disponible, configure los ajustes de la función de control HDMI en TODOS los componentes (esta unidad, el televisor y otros componentes). Es posible que también sean necesarias determinadas operaciones. • Cada función se puede configurar de forma independiente para activar o desactivar según el televisor. • Consulte los detalles relacionados con la configuración en los manuales de instrucciones entregados con el televisor.
AJUSTES MENÚ SETUP El menú SETUP permite realizar diversos ajustes y configuraciones audiovisuales en las funciones utilizando el mando a distancia. Menú/submenú Sistema Elemento 34 Apagado Automático Disc/USB/Net: ajusta el modo de apagado automático en Activar/Desactivar. Otras Entradas: ajusta el modo de apagado automático por horas o en Desactivar. 34 Reproducción Automática Disco Ajusta esta unidad para que inicie automáticamente la reproducción del disco.
MENÚ SETUP Menú/submenú TV Configuración de pantalla Procesamiento de Video Salida de audio Configuración de audio Postprocesamiento Elemento Función Página Salida 3D Selecciona vídeos en 3D o 2D. 36 Pantalla de TV Ajusta la relación de aspecto de la pantalla del televisor conectado y ajusta la salida de vídeo. 36 Seleccionar Salida de Vídeo Selecciona la resolución de la salida de vídeo. Sistema de TV Permite seleccionar el Sistema de TV entre NTSC/PAL/ Multi.
MENÚ SETUP Utilización del menú SETUP 3 Seleccione un elemento del menú. Pulse 5/a para seleccionar [Control Paterno] y, a continuación, pulse ENTER o el cursor 3. 4 Introduzca la contraseña con los botones numéricos. – La contraseña predeterminada es 0000. – No puede ir a la siguiente pantalla de configuración hasta que no haya introducido la contraseña correcta. – Para cambiar la contraseña, consulte “[Cambiar Contraseña]” (pág. 35). 5 Seleccione otro elemento.
MENÚ SETUP Configuración General Los ajustes predeterminados están marcados con “ * ”. ■ Sistema [Protector de pantalla] Puede definir el protector de pantalla en [Activar]/ [Desactivar]. Cuando la opción [Activar] está seleccionada, esta unidad pasa al modo de protector de pantalla si no se utiliza durante 3 minutos. Activar*, Desactivar [Apagado Automático] Tiene la opción de configurar el modo de apagado automático en [Activar]/[Desactivar] cuando la entrada seleccionada es Disco/USB/Red.
MENÚ SETUP ■ Reproducción [Subtítulos] Puede ajustar que se visualicen los subtítulos (pág. 48) cuando se reproduce un disco BD/DVD con subtítulos. Activar, Desactivar* [Marca de Angulo] Puede ajustar la visualización de la Marca de Angulo ( ) cuando se reproduce un disco BD/DVD con ángulos múltiples. Activar*, Desactivar [Marca PIP] Puede ajustar la visualización de la Marca PIP ( ) cuando se reproduce un disco BD (pág. 24) con Imagen en imagen.
MENÚ SETUP Configuración de pantalla Los ajustes predeterminados están marcados con “ * ”. ■ TV [Salida 3D] Puede seleccionar salida de vídeo en 3D o 2D desde esta unidad. Auto* Esta unidad selecciona automáticamente vídeos en 3D o 2D. Desactivar Esta unidad siempre selecciona vídeos en 2D. [Seleccionar Salida de Vídeo] Puede seleccionar la resolución de salida de vídeo entre [Compuesta], [HDMI Auto], [HDMI 1080p], [HDMI 1080i], [HDMI 720p], [HDMI 480p/576p] y [HDMI 480i/576i].
MENÚ SETUP [HDMI 1080p 24Hz] Permite la salida del Vídeo BD codificado con una velocidad de fotogramas de 24 Hz en HDMI 1080p 24Hz. Con esta función es posible que disponga de una reproducción de vídeo más suave. Esta función está disponible si el televisor admite esta función y la unidad está conectada con un cable HDMI. Para obtener más información sobre los formatos de salida, consulte “Acerca de los formatos de salida de vídeo” (pág. 39).
MENÚ SETUP Configuración de audio Los ajustes predeterminados están marcados con “ *”. ■ Salida de audio [HDMI] Puede seleccionar el modo de salida del terminal HDMI. Bitstream, PCM, Desactivar* Notas • Para emitir sonido desde los altavoces o auriculares, seleccione [Desactivar]. • No se puede escuchar sonido del iPod en un televisor conectado a esta unidad a través del cable HDMI.
MENÚ SETUP Acerca de los formatos de salida de vídeo Si [Sistema de TV] se define en [NTSC] Resolución Compuesta HDMI Auto HDMI Reproducción de BD 480p Máx. HDMI HDMI 480i/576i 480p/576p 480i 480p HDMI 720p HDMI 1080p HDMI 1080i 24 Hz 720p 60 Hz 1080i 60 Hz otros VIDEO Reproducción de BD 1080p 24 Hz Otros 1080p 60 Hz 1080p 60 Hz 480i OFF 480i 480i OFF otros Si [Sistema de TV] se define en [PAL] Resolución Compuesta HDMI Auto HDMI Reproducción de BD 576p Máx.
ACTUALIZACIÓN DE SOFTWARE Algunos de los discos BD recién lanzados no se pueden reproducir a menos que actualice el software de la unidad a la versión más reciente. Le recomendamos la actualización para que la unidad funcione con el software más actual. Para comprobar la disponibilidad de una actualización de software, visite http://download.yamaha.
INFORMACIÓN ADICIONAL SOLUCIÓN DE PROBLEMAS Consulte la tabla de abajo cuando esta unidad no funcione correctamente. Si el problema no está en la lista de abajo o las instrucciones no sirven de ayuda, apague esta unidad, desconecte el cable de alimentación y póngase en contacto con el centro de servicio o concesionario autorizado de Yamaha más cercano. Problemas generales Problema Causa No hay alimentación. Remedio Página El cable de alimentación no está conectado o la clavija no está bien insertada.
SOLUCIÓN DE PROBLEMAS Problema La unidad se apaga de forma repentina. Causa Remedio Página Está configurado el temporizador de apagado. No se trata de ningún error. Encienda esta unidad y reproduzca la fuente de nuevo. 29 [Apagado Automático] está ajustado en [Activar]. Ajuste [Apagado Automático] en [Desactivar]. 34 Se ha borrado el ajuste del reloj. Se ha desconectado el cable de alimentación. Conecte el cable de alimentación y, a continuación, ajuste el reloj de nuevo.
SOLUCIÓN DE PROBLEMAS iPod Nota En caso de producirse un error de transmisión sin que aparezca un mensaje de estado en el visor del panel delantero de esta unidad, compruebe la conexión de su iPod (consulte la 11). Mensaje de estado Causa Remedio Página READING La unidad está reconociendo la conexión con el iPod. Si el mensaje sigue apareciendo en el visor del panel delantero y no comienza la reproducción, vuelva a conectar el iPod.
SOLUCIÓN DE PROBLEMAS Problema La batería del iPod no se carga. Remedio Página El iPod no está conectado correctamente. Causa Conecte el iPod con esta unidad mediante un cable USB. 11 El iPod no es compatible con esta unidad. Esta unidad solo es compatible con el iPod classic, iPod nano (2ª, 3ª, 4ª, 5ª y 6ª generación), iPod touch (1ª, 2ª, 3ª y 4ª generación), iPhone, iPhone 3G/3GS, iPhone 4 y iPad.
SOLUCIÓN DE PROBLEMAS Problema Remedio Página El disco no está finalizado. Los discos CD-R/RW, DVD+R/RW/R DL y DVD-R/ RW/R DL deben estar finalizados. 3 El disco está cargado al revés. Extraiga el disco y, a continuación, cárguelo con la cara de la etiqueta hacia arriba. — El disco es defectuoso. Intente reproducir otro disco. Si de esta forma se resuelve el problema, el disco que desea reproducir está defectuoso. — El formato del archivo no es compatible con esta unidad.
SOLUCIÓN DE PROBLEMAS Mando a distancia Problema El mando a distancia no funciona bien. Causa Remedio Página Está utilizando el mando a distancia fuera de la distancia de funcionamiento. Para obtener más información sobre la distancia de funcionamiento del mando a distancia, consulte “Utilización del mando a distancia”. 9 El sensor del mando a distancia de esta unidad está expuesto a la luz solar o iluminación directa. Cambie la iluminación u orientación de esta unidad. — La batería está agotada.
SOLUCIÓN DE PROBLEMAS Mensajes en pantalla Los mensajes siguientes aparecerán en la pantalla del televisor si el disco que intenta reproducir no es apropiado o la operación no es correcta. Mensaje de error Causa Remedio Página Fichero no compatible El archivo no es compatible con esta unidad. Consulte “Tipos de discos/archivos que se pueden utilizar con esta unidad”. 3 ¡Código de región erróneo! El disco tiene un código de región incompatible. Consulte “Información de gestión de la región”.
GLOSARIO AIR SURROUND XTREME AVCHD Esta unidad utiliza nuevas tecnologías y algoritmos que permiten obtener un sonido envolvente de cinco canales con solo altavoces frontales y sin necesidad de reflejar los haces en las paredes. Normalmente hacen falta dos altavoces frontales, un altavoz central, dos altavoces envolventes y un altavoz de graves para disfrutar de sonido envolvente de 5.1 canales. Sistema de altavoces de 5.
GLOSARIO Dolby Digital Un sistema de sonido desarrollado por Dolby Laboratories Inc. que da un ambiente de sala de cine a la salida de audio cuando el producto está conectado con un amplificador o procesador Dolby Digital. Dolby Digital Plus Un sistema de sonido desarrollado como una extensión de Dolby Digital. Esta tecnología de codificación de audio soporta sonido envolvente de 7.1 multicanales.
ESPECIFICACIONES SECCIÓN DEL REPRODUCTOR iPod/iPhone/iPad • Modelos de iPod/iPhone/iPad .................iPod classic compatibles, iPod nano (2ª, 3ª, 4ª, 5ª y 6ª generación), iPod touch (1ª, 2ª, 3ª y 4ª generación), iPhone, iPhone 3G/3GS, iPhone 4, iPad Formatos de disco y archivo • Para obtener más información sobre los formatos de disco y archivo compatibles, consulte página 3. AUX • Conector de entrada AUX ........................................................................................
ESPECIFICACIONES ■ Propiedad intelectual • iPad, iPhone, iPod, iPod classic, iPod nano y iPod touch son marcas comerciales de Apple Inc., registradas en EE.UU. y otros países. “Made for iPod”, “Made for iPhone” y “Made for iPad” significan que un accesorio electrónico se ha diseñado para conectarse específicamente a un iPod, iPhone o iPad, respectivamente, y que el desarrollador ha certificado que cumple con los estándares de rendimiento de Apple.
注意:在操作本机之前请阅读此部分。 1 2 3 4 5 6 7 8 9 10 11 12 13 14 15 16 17 18 19 20 要确保最好的性能,请仔细阅读此手册。请将它保存在 安全的地方以备将来参考。 请将本声音系统安装在通风良好,凉爽并且干燥,干净 的地方 - 应远离直射阳光,热源,振动,灰尘,潮湿 和 / 或寒冷的地方。为了使通风良好,请在周围至少留 出以下间隙。 顶部:10 cm 背面:10 cm 侧面:10 cm 请将本机远离其它电子设备、马达或变压器以避免嗡嗡 声。 请勿使本机经受于从冷到热的突然温度改变,勿将本机 放置于高湿度的环境中 (例如有加湿器的房间)以防止 本机内部发生结露,否则可能导致触电、火灾,损害本 机,和 / 或人体伤害。 请避免在外部物体可能落入本机的地方或本机可能遭遇 液体滴落或飞溅的地方安装本机。在本机的顶部,请勿 放置: – 其它组件机,因为它们可能对本机表面造成损坏和 / 或导致变色。 – 燃烧物体 (例如蜡烛),因为它们可能导致火灾,对 本机造成损害和 / 或造成人体伤害。 – 内部装有液体的容器,因为它们可能会摔落并且液体 可能引起用户触电损坏
目录 简介 设定 本机可使用的碟片 / 文件类型 ............... 装入碟片 ................................. 碟片注意事项 ............................. 观看 3D 视频图像注意事项 .................. 3 4 4 4 安装遥控器电池 ........................... 9 使用遥控器 ............................... 9 设置菜单操作 ............................ 通用设置 ................................ 显示设定 ................................ 音频设定 ................................ 关于视频输出格式 ........................ 33 34 36 38 39 软件升级 ................................40 升级软件 ........................
简介 本机的功能 播放市售 Blu-ray Disc™/DVD/CD*1 \ 第 21 页 \ 第 24 页 \ 第 15 页 \ 第 18 页 \ 第 26 页 \ 第 14 页 \ 第 29 页 \ 第 16 页 除 Blu-ray Disc™ (BD 碟片)之外,本机还支持其他各种碟片的播放。 播放 BONUSVIEW™、BD-Live™ 等 *1 可欣赏最新 BD 碟片上的电影花絮。 播放碟片 /USB 存储设备 /iPod/iPhone/iPad 上的视频、音乐、图片文 件 *1 用本机可播放碟片 /USB 存储设备 /iPod/iPhone/iPad 上记录的文件。 播放家庭网络服务器上的视频、音乐、图片文件 *1,2 通过将本机连接到网络服务器可用电视机播放电脑内容。 接收 FM 无线电台 您可以用本机收听 FM 无线电台。 执行初始向导 / 简易设置 可通过初始向导 / 简易设置画面轻松设定语言、分辨率和画面纵横比。 用电视机遥控器操作 通过用 HDMI 电缆连接设备,可使用 HDMI 控制功能用一个遥控器控制多个设备。 通过 AIR SURR
关于碟片和文件 区域管理信息 本机可使用的碟片 / 文件类型 目的地 碟片类型 录制格式 -- DVD-ROM DVD 视频 -- DVD-R/DVD-R DL/ DVD-RW DVD 视频 /DVD-VR/ AVCHD/ 数据碟片 WMV/MP3/WAV/WMA/ JPEG DVD+R/DVD+R DL/ DVD+RW DVD 视频 /DVD+VR/ AVCHD/ 数据碟片 WMV/MP3/WAV/WMA/ JPEG CD-ROM CDDA/HDCD -- CD-R/CD-RW CDDA/ 数据碟片 WMV/MP3/WAV/WMA/ JPEG USB -- WMV/MP3/WAV/WMA/ JPEG 网络 -- WMV/MP3/WMA/WAV/ JPEG DVD 视频 区码 “5”或 “ALL” 5 中国 数据格式 BD-ROM/BD-R/BD-RE BD 视频 BD 视频 区码 “C”或 “ALL” 区码 “C”或 “ALL” 简介 • 本机可播放 12 cm 和 8 cm 碟片。请勿使用 8 cm 至 12 cm 适配器。 • 使用符合碟
关于碟片和文件 装入碟片 • 标签面朝上插入碟片。 • 如果碟片为双面录制,则播放面朝下。 注意 • 视碟片和本机的设定而定,可能会自动开始播放。 • 视碟片而定,可能首先显示菜单。 • 视碟片而定,碟片载入时间可能不同。 碟片注意事项 • 请勿触碰碟片表面。持拿碟片 边缘 (和中心孔)。 • 请勿使用铅笔或记号笔在碟片 上书写。 • 请勿将胶带、封条、胶水等粘 在碟片上。 • 请勿使用保护盖以防刮伤。 • 请勿一次将一张以上碟片装入本机。否则会造成本 机和碟片损坏。 • 请勿将任何异物插入碟片插槽。 • 请勿装入破裂、弯曲或粘有胶水的碟片。 • 请勿将碟片暴露于直射 注意 阳光、高温、高湿或多 尘环境。 • 如果碟片变脏,请用干 净的干布从中心向外缘 擦拭。请勿使用唱片清 洁剂或油漆稀释剂。 • 为避免故障,请勿使用 市售的激光头清洁剂。 4 Zh 观看 3D 视频图像注意事项 • 有些人观看 3D 视频图像时可能会出现不适(如眼睛 疲劳、疲乏或恶心)。建议所有的观众在观看 3D 视 频图像期间定时休息。 • 如果您出现任何不适,请停止观看 3D 视频图像,直 至不适症状消退。如果出现严重的不适
前面板和基本操作 y : 前面板显示屏: (开机 / 待机): 打开 / 关闭碟片托盘。 ( 第 27 页 ) 打开本机 / 设定为待机模式。 简介 本机具有自动待机功能。 • 当源设定为碟片 /USB/ 网络时,在本机处于开机状态下如果 1 小时未进行播放或任何其它操作,本机将自动切换为待机模 式。 • 当源未设定为碟片 /USB/ 网络时,在本机处于开机状态下如果 1 至 8 小时未进行播放或任何其它操作,本机将根据设置菜单 (第 34 页)中的设定自动切换为待机模式。 TIMER TIMER 指示灯 : ( 第 28、29 页 ) 碟片托盘 : INPUT 开始 / 暂停播放。 VOLUME PHONES USB VOLUME iPod iPhone iPod PRESET 低 高 INPUT: USB 端口: 选择输入源。 ( 第 11、13 页 ) : 停止播放。 / : 向后和向前跳跃 / 按住可快退和 快进。 PRESET < >: 选择预设电台。 PHONES: 连接耳机 连接耳机时扬声器不会输出声音。 中文 5 Zh
遥控器 1 红外线信号发射器 (第 9 页) 注意 如果按下的按钮不可使用,画面的左上角会出现 1 2 3 4 PROGRAM MARKER DIGEST ZOOM SLEEP TIMER 5 6 7 8 9 0 SURROUND CLEAR SEARCH DISPLAY SETUP OPTION HOME 2 MARKER DVD VIDEO :在电影的指定点设定书签 (第 23 页)。书签设定后,请按下 DIGEST 选择想要跳 到的设定点。最多可设定 12 个书签。 G H 3 I J K L M MUTE VOLUME TOP MENU 。 POP-UP MENU :打开 / 关闭碟片托盘。 4 PROGRAM DVD CD :设定播放顺序 (第 23 页)。最多 可设定音频碟片的 15 个曲目或 DVD 视频碟片的 15 个标 题 / 章节。 5 数字按钮:输入数字,或播放时跳到与所输入数字对应 的曲目 / 章节。根据碟片类型和播放条件的不同,这些 按钮可能不可用。 6 CLEAR:清除输入的数字 / 设定的项目。 7 DISPLAY:切换前面板
遥控器 I ZOOM DVD VIDEO PHOTO :放大 / 缩小。每按一次 按钮,画面尺寸将改变 (放大 / 缩小:各 3 级)。 J 彩色按钮 BD :根据画面上的说明使用这些按钮。 K SLEEP:设定为睡眠模式 (第 29 页)。 L TIMER:设定为定时器模式 (第 28 页)。 简介 M SURROUND:打开 / 关闭扬声器的环绕播放模式 (第 16 页)。(不影响耳机声音。) N 音量控制按钮:控制音量 (第 16 页)。 按 MUTE 关闭音量。再次按将恢复音量。 O SEARCH BD DVD CD VIDEO MUSIC :播放过 程中跳到指定点。有关此功能的详细说明,请参阅 “使 用搜索”(第 24 页)。也可从状态菜单选择此项目 (第 22 页)。 P AUDIO BD DVD :更改音频语言或格式。也可从屏幕 菜单选择 (第 21 页)。 Q FM 控制按钮 TUNING << / >>:开始手动调谐。按住将开始自动调谐 (第 26 页)。 PRESET < / >:选择预设电台 (第 26 页)。 MEMORY:开始预设调谐和保存预设电台 (第 26 页)。 R A/
遥控器 T TOP MENU BD DVD :如果碟片包含菜单,则显示顶部 菜单画面 (第 49 页)。使用 5/a /2/3 和 ENTER 选择 所需项目。 PROGRAM MARKER DIGEST 注意 ZOOM 具体操作可能视碟片而异。请按照各菜单画面的说明进 行操作。 SLEEP U 光标按钮 (5/a /2/3):移动以选择突出的项目。 ENTER:确认突出的菜单 / 项目。 TIMER SURROUND V RETURN:返回上一个菜单或画面等。 CLEAR SEARCH DISPLAY SETUP OPTION HOME MUTE W POP-UP/MENU BD DVD :显示弹出菜单。显示的菜单 内容因碟片而异。有关如何查看和操作弹出菜单的详细 说明,请参阅碟片的说明书。视碟片而定,通过按 POP-UP/MENU 可能会显示顶部菜单画面。 VOLUME t TOP MENU POP-UP MENU U V W ENTER RETURN ON SCREEN TUNING PRESET DIMMER STATUS PIP SUBT
遥控器 安装遥控器电池 1 3 使用遥控器 遥控器发射具有方向性的红外光束。请务必在操作期 间将遥控器直接对着本机前面板上的遥控感应器。 简介 TIMER INPUT VOLUME PHONES 2 USB iPod iPhone iPod PRESET 6 m 以内 30˚ 30˚ ■ 关于电池的注意事项 • • • • • • • • • • • 当遥控器的操作范围缩小时,请同时更换 2 节电池。 使用 AAA、R03、UM-4 电池。 请确保极性正确。请参考电池舱中的图示。 如果长时间不使用遥控器,请取出电池。 请勿混用新旧电池。 请勿混用不同类型的电池 (例如碱性电池和锰电池)。因 为这些类型不同的电池的形状和颜色可能相同,所以请仔 细阅读包装上的说明。 如果电池漏液,请立即丢弃。请勿触摸漏出的液体,也不 要让其接触衣物等。安装新电池以前,请彻底清洁电池 舱。 请勿将电池与普通家庭垃圾一起丢弃;请根据当地法规正 确丢弃。 将电池远离儿童放置。如果误吞电池,请立即就医。 长期不打算使用遥控器时,请从遥控器中取出电池。 请勿对附送的电池充电或进行拆解。 注意 遥控器和本
准备工作 连接 将组件系统连接到本机 连接系统以前,请务必阅读以下步骤并仔细记录。 ■ 连接系统 1 通过扬声器组件 (NS- BP150)附送的扬声器电缆,将本机的扬声器端子 (L)连接到左扬声器的扬声器端 子,将本机的扬声器端子 (R)连接到右扬声器的扬声器端子。 2 将附送的 FM 天线连接到 FM 插孔。 右扬声器 (NS-BP150) 左扬声器 (NS-BP150) MD 播放器等 RCA 立体声电缆 务必取下各扬声器电缆末端的绝缘套 管。 SPEAKERS L R 超低音扬声器 ANTENNA 6Ω MIN.
连接 ■ 连接电源线 注意 进行所有连接以后,连接本机的电源线。 • 完成所有设备之间的连接以前,切勿将本机或其它组件连 接到总电源。 • 切勿让裸露的扬声器导线互相接触或接触到本机的任何金 属部分。否则可能损坏本机和 / 或扬声器。 • 必须正确进行所有连接:L (左)到 L,R (右)到 R,“+” 到 “+”,“-”到 “-”。如果连接错误,则扬声器将不发 出声音,并且如果扬声器连接的极性不正确,则声音将不 自然且缺少低音。另外,请参阅各组件的使用说明书。 注意 SPEAKERS L R ANTENNA 6Ω MIN.
连接 连接到电视机 务必仔细参阅以下图示,以便正确进行本机和电视机之间的连接。 注意 请在所有连接完成之后,再连接本机的电源线。 本机 视频电缆 (附送) SPEAKERS 电视机 L R VIDEO AV INPUT ANTENNA 6Ω MIN.
网络和 USB 连接 连接到 NETWORK 端子 • 通过将本机连接到网络可播放电脑内容。 • 播放 BD-Live 兼容碟片时,通过连接到互联网可欣赏具有互动功能的各种内容。有关 BD-Live 功能的信息,请 参阅第 24 页。 注意 将网线 (市售)牢固连接到 NETWORK 端子。 仅使用 STP (屏蔽双绞线)网线。 使用互联网时,需要如下所示进行宽带互联网连接。 将网线的其他连接器连接到集线器 / 宽带路由器。 使用宽带互联网连接时,需要与互联网服务提供商签订合同。有关更多详情,请联系附近的互联网服务提供商。 由于所连接设备和连接方法可能因互联网环境而异,请参阅您设备的使用说明书。 使用支持 10BASE-T/100BASE-TX 的网线 / 路由器。 准备工作 • • • • • • • 本机 连接到 USB 端口 SPEAKERS • 可将 BD 本地存储的 USB 存储设备(2 GB 或更大且以 FAT 32/16 格式化)连接到本机后面板 (或前面 板)上的 USB 端口,以保存 BD-Live 数据 (第 25 页)或升级本机的软件 (第 40 页)。 • 将 USB 存储
操作 初始向导 / 简易设置 用初始向导 / 简易设置进行设置 初始向导 / 简易设置可轻松设定语言、分辨率和画面 纵横比。购买或升级后首次打开本机时会显示初始向 导画面。可从设置菜单 = [ 系统 ] = [ 简易设置 ] 中 执行相同的设定 (第 31 页)。 1 2 3 显示简易设置画面时,按 ENTER 开始简易设置。 4 按 5/a 选择画面纵横比,然后按 ENTER。有关设 定项目的详细说明,请参阅 “[ 电视屏幕 ]” (第 36 页)。 简易设置完成。 5 按 ENTER 退出简易设置。 按 5/a 选择想要在画面上显示的语言,然后按 ENTER。 按 5/a 选择分辨率,然后按 ENTER。有关设定项 目的详细说明,请参阅 “[ 视频输出选择 ]” (第 36 页)。 注意 当通过 VIDEO 插孔连接电视机和本机时,请选择 [ 模拟 视频 ]。 注意 • 初始向导 / 简易设置完成后如果未显示图像,请参阅 “故 障排除”(第 41 页)。 • 打开本机时,会出现关于 3D 视频播放的警告信息。按 ENTER 取消信息或按 CLEAR 将其停用 (第 34 页)。
基本操作 y 当源为 CD/iPod/FM/ 电视机时,请参阅 “不使用 HOME/MEDIA 菜单的基本操作”(第 19 页)。当源为 BD/DVD/USB/ 网络时, 请阅读以下内容 (也可通过 HOME/MEDIA 菜单播放 CD)。 使用 HOME/MEDIA 菜单的基本操作 按照以下步骤播放源。 1 放置源 2 切换输入 3 参阅以下页面获得更多操作信息 碟片 第 16 页 前 后 DISPLAY SETUP OPTION HOME VOLUME USB*1 操作 TOP MENU POP-UP MENU NETWORK USB ENTER iPod iPhone iPod USB RETURN ON SCREEN 第 13、16 页 TUNING PRESET DIMMER STATUS 网络 (电脑内 容) 第 13、18 页 *1 ·某些设备即使符合要求也可能工作不正常。 ·不保证可以播放所有类型的 USB 设备以及对其进行供电。 ·视文件 / 文件夹数量而定,读取时间可能超过 30 秒。 ·Yamaha 及其供应商对于连接到本机的 USB
基本操作 ■ 控制音量 ■ 播放所选文件夹中文件的共同操作 1 示例:选择 USB 存储设备上的电影文件 按遥控器上的音量控制按钮(+/-)调高 / 降低音 量 (第 7 页)。 ■ 打开 / 关闭环绕播放模式 1 注意 移动到 MEDIA 菜单画面之前,请停止播放视频。 按 SURROUND 打开 / 关闭环绕播放模式(第 7 页)。 1 设定为开时: – 如果源为 BD 等环绕播放源,则使用 Yamaha 独有 的 AIR SURROUND XTREME (第 48 页)播放环 绕声。 – 如果源为音频 CD 等立体声播放源,则再现更加 宽广的立体声。 按 HOME 移动到 HOME 菜单画面。 HOME 播放图片 / 音乐 / 视频 䗝ᢽ HOME 和 MEDIA 菜单可浏览和播放数据碟片、USB 存储 设备和网络上的多媒体文件。 ⹂䅸 y 注意 HOME 菜单画面可能因机型而异。 有关可播放碟片和文件的详细说明,请参阅第 3 页。 2 ■ 基本操作 DISPLAY 按 2/3/5 选择 [MEDIA],然后按 ENTER。 MEDIA 画面显示。 乍Ⳃ 1
基本操作 4 选择想要播放的图片、音乐、视频或 AVCHD 文件 夹,然后按 ENTER。 若要返回父文件夹,请按 2 或选择 。 乍Ⳃ 3 / 4 6 MEDIA 乍Ⳃ 1 / 3 86% 选择想要播放的文件,然后按 ENTER。 选择了视频文件时,播放开始。 选择了音乐文件时,显示状态菜单且播放开始。 选择了图片文件时,开始播放幻灯片。 ㉏ൟ ᭛ӊ། ⠛ .. ䷇Ф 20100101_001 㾚乥 20100101_002 AVCHD 20100101_003 HOME MEDIA USB1/㾚乥/WINTER VACATION ㉏ൟ :09 䗔ߎ HOME 注意 y 请注意,以下步骤中仅显示此步骤中所选择的文件类型。例 如,如果在此步骤中选择了图片文件夹,则此步骤之后仅显 示图片文件。想要播放图片以外的文件时,请返回此步骤并 重新选择文件类型。 MEDIA USB1/㾚乥 ..
基本操作 使用网络内容 3 注意 ■ 关于 DLNA 本机为 DLNA 认证的数字媒体播放器。可以管理存储 在家庭网络的 DLNA 服务器上的图片、音乐和视频内 容。 DLNA (Digital Living Network Alliance)通过家 庭网络轻松共享数字媒体,您可以通过本机用电视机 欣赏存储在安装 DLNA 服务器软件的电脑或其他 DLNA 兼容设备上的数字内容。若要将本机连接到 DLNA 服 务器,需要进行 DLNA 服务器或设备的某些设定。详 细说明,请参阅 DLNA 服务器软件或 DLNA 设备。 ■ 播放共享的内容 注意 若要在电脑上播放文件,请安装 DLNA 服务器软件,如 Windows Media Player 12,并共享要播放的文件。 1 打开安装有 DLNA 服务器软件的电脑或连接到家庭 网络的 DLNA 设备。 2 按 HOME 显示 HOME 菜单画面,然后选择 [MEDIA] 移 动到 MEDIA 菜单。 画面上列出连接到网络的 DLNA 服务器。 乍Ⳃ 2 / 3 DLNA᧰㋶ MEDIA ㉏ൟ:DLNA XX-0000xx : DLNA Me
基本操作 不使用 HOME/MEDIA 菜单的基本操作 按照以下步骤播放源。 1 放置源 2 切换输入 3 选择音乐并开始播放 USB iPod iPhone iPod iPod*1 TUNING PRESET DIMMER STATUS PIP SUBTITLE AUDIO SHUFFLE REPEAT A B 第 11、20 页 MEMORY CD 操作 第 20 页 有关操作的详细说明,请参阅 MD 播放器等所连 接设备附送的使用说明书。 AUX 至 AUX FM 若要接收 FM 无线电台,请参阅第 26 页。 电视机 若要输出电视机声音,请参阅第 12 页进行连接并将输入源选择为电视机 (第 7 页)。 *1 ·视 iPod 的型号或软件版本而定,某些功能可能无法使用。 ·播放 iPod 时,会启用 Music Enhancer 功能,通过重新生成压缩时丢失的音乐元素增强压缩音乐的声音。(仅适用于 iPod。) ■ 控制音量 ■ 打开 / 关闭环绕播放模式 1 1 按遥控器上的音量控制按钮(+/-)调高 / 降低音 量 (第 7 页)。
基本操作 ■ 重复播放 iPod 操作 可根据需要重复播放。 通过使用遥控器上的按钮可以操作 iPod 的播放。 DISPLAY DISPLAY 1 SETUP VOLUME OPTION 反复按 REPEAT 进行重复播放。 每按一次,如下循环: HOME TOP MENU POP-UP MENU ENTER RETURN CD 操作 ON SCREEN 您也可以操作 CD 的音乐播放。 TUNING , REPEAT SHUFFLE PRESET DIMMER STATUS PIP SUBTITLE AUDIO SHUFFLE REPEAT A B , MEMORY 注意 视 iPod 的型号或软件版本而定,某些功能可能不兼容。 ■ 播放控制 1 播放时按以下任意按钮。 :停止播放。 :暂停播放。 :向前跳跃。 :向后跳跃。 若要开始 / 恢复播放,请按 ■ 播放控制 , 1 播放时按以下任意按钮。 :停止播放。 :暂停播放。 :向前跳跃。 :向后跳跃。 :向前搜索。 :向后搜索。 :按下可即时搜索。即时搜索跳过 30 秒音乐。 :
高级播放操作 本章节介绍市售 BD/DVD/CD 碟片和录制的 DVD-RW/R 碟片的播放。 DVD – – – – – – – 注意 有关基本播放操作的说明,请参阅第 6 页。 屏幕菜单 一般 章节乱序 (章节) 标题乱序 (标题) 全部随机 章节随机 (章节) 标题随机 (标题) 全部随机 VIDEO MUSIC PHOTO – 一般 – 乱序 F (文件夹) – 随机 F (文件夹) 若要显示屏幕菜单,请按 ON SCREEN。接着,按 5/a /2/3 选择项目,然后按 ENTER 操作所需功能。 声音 BD DVD VIDEO :显示当前所选 BD/DVD 碟 片的音频语言 / 信号。可选择所需音频类型。 BDMV 01 / 23 01 / 16 角度 BD DVD :显示当前所选的角度编号。如果视 频是以多角度录制,则可以更改角度。 00:03:30 English Dol...
高级播放操作 状态菜单 CD 该菜单会显示各种设定,如字幕、角度设定和当前播 放的标题 / 章节 / 曲目编号。若要显示状态菜单,请 按 STATUS。状态菜单包含以下菜单。 MUSIC 示例:播放音乐文件时的图标 123 4 5 6 1 / 13 BD DVD 00 :01 :13 VIDEO 示例:播放 BD 碟片时的图标 1 7 2 3 4 5 6 ㉏ൟ MP3 ᘏᯊ䯈 03:52 ᷛ乬 Dawn 㗙 No name ϧ䕥 1st album ᔶᓣ ݊Ҫ 8 7 8 1 2 1 (播放状态) (碟片类型 / 视频文件图标) 2 3 4 (碟片类型 / 音乐文件图标) 4(封面) MUSIC :如果文件中包含封面,则显示该 封面。 5 (正在播放的章节编号):可用 SEARCH 按钮跳 到指定章节 (第 7 页)。 6(信息) MUSIC :如果文件中包含音乐信息,则显 (当前所选的标题):可用 SUBTITLE 按钮更改 字幕语言 (第 6 页)。 6 (已播放时间):可用 SEARCH 按钮跳到指定点 (第 7 页)
高级播放操作 使用书签 2 可在视频的指定点设定书签。书签设定后,可移动到 使用此功能设定的点。最多可设定 12 个书签。 DVD VIDEO 示例:播放电影时设定书签。 1 播放电影时按 MARKER 设定书签。将显示书签编号 和状态。 кㅒ 2 ᷛ乬 1/12 1 ゴ㡖 ᯊ䯈 1 㡖Ⳃ 00:01:26 кㅒ CLEAR ⏙䰸 按 2/3 选择想要播放的书签,然后按 ENTER。 按 CLEAR 删除所选的书签。 注意 ),书签被自动 13 1 ᳆Ⳃ: 12 6 -- -- -- -- 11 -- -- -- -- 2 ᳆Ⳃ: 05 7 -- -- -- -- 12 -- -- -- -- 3 ᳆Ⳃ: 00 8 -- -- -- -- 13 -- -- -- -- 4 -- -- -- -- 9 -- -- -- -- 14 -- -- -- -- 5 -- -- -- -- 10 -- -- -- -- 15 -- -- -- -- ⏙䰸 RETURN ᪁ᬒ CLEAR 3 编程结束
高级播放操作 使用搜索 欣赏 BONUSVIEW™ 和 BD-Live™ 本机支持 BONUSVIEW(第 48 页)(BD-ROM Profile 1 Version 1.
高级播放操作 ■ 使用 BD-Live™ 的功能 1 设定网络设定 (第 35 页)。 2 将 USB 存储设备连接到本机 (第 13 页)。 • BD-Live 数据保存在本机所连接的 USB 存储设备中。 • 将支持 USB 2.
聆听 FM 无线电台 ■ 手动预设调谐 调到无线电台 1 通过按 << / >> (TUNING)选择某个喜欢的无线 电台。 2 按 MEMORY。 3 通过按 5/a 或 < / >(PRESET)选择想要存储的 预设编号。 4 按 ENTER。 手动预设完成。 TUNING <<,>> (TUNING) PRESET DIMMER STATUS PIP SUBTITLE AUDIO SHUFFLE REPEAT A B iPod TV AUX DISC USB NET 1 按 TUNER。 2 按住 <> (TUNING)。 开始自动调谐。 MEMORY TUNER TUNER y y 如果从想要选择的电台接收到的信号微弱,您也可以反复按 << / >> (TUNING)手动调入无线电台。在此情况下,声音 将为单声道。 • 最多可以预设 30 个 FM 电台。 • 若要在选择预设编号时取消手动预设,请再次按 MEMORY。 • 您可以通过按 OPTION → S/T → ENTER 选择 [PRESET DEL] 来删除预设电台 (
使用实用功能 使用前面板显示屏上的选项菜单 按 OPTION 时前面板显示屏上会出现选项菜单。您可以通过选项菜单设定多种有用的功能。 选项菜单 参数或控制范围 参考页 PRESET DEL (只有当输入源设定为 FM 时才会显示。) 26 TREBLE -10 dB 至 +10 dB 下面 BASS -10 dB 至 +10 dB 下面 BALANCE L+5 - CENTER - R+5 下面 BASS BOOST ON/OFF 下面 CLEAR CLEAR DISPLAY SEARCH ■ 设定音调 / 平衡 MUTE SETUP VOLUME OPTION OPTION HOME TOP MENU POP-UP MENU 5 [TREBLE]*2:调节高频响应。 [BASS]*2:调节低频响应。 [BALANCE]:调节每个左、右扬声器声道的音量。 [BASS BOOST]:设定为 [ON] 时增强低频响应。 3 ENTER RETURN 操作 *2 使用耳机时同样有效。 ENTER 2 ON SCREEN a 1 按 O
使用实用功能 设定时钟 / 定时器和睡眠定时器 PROGRAM MARKER DIGEST ZOOM 4 通过按 5/a 或数字按钮更改设定。 5 按 ENTER 确认设定。 6 重复步骤 2 至 5 设定各设定项目。 y SLEEP SLEEP TIMER TIMER SURROUND ■ 设定时钟 • 若要清除输入,请按 CLEAR。 • 将保留定时器的设定。 以下说明定时器设定的流程。 (时钟) 可通过遥控器直接设定时钟。前面板显示屏上出现时 钟。 1 按 TIMER。 2 按 ENTER。 3 通过按 5/a 设定小时和分钟。 按 2/3 切换小时或分钟设定。 4 按 ENTER 完成设定。 y 设定时钟时,您也可以使用数字按钮输入小时和分钟。若要 确认输入,请按 ENTER。若要清除输入,请按 CLEAR。 注意 如果从墙壁插座拔出电源线,时间设定将会丢失。 ■ 设定定时器 定时器可以将本机设定为在到达设定的时间时播放 源。 1 按 TIMER。 2 通过按 5/a 选择所需设定项目 (OnTime/ Period/Source
使用实用功能 Volume 可以在 [1] - [MAX] 和 [---]*1 之间设定音 量电平。如果在本机处于待机模式中时执行 定时器,将采用此时设定的音量电平。如果 在本机开启时执行定时器,音量电平将与当 前音量电平保持一致。 *1 如果您将音量设定为 [---] 且当本机在待机模 式中时执行定时器,将采用与输入源相同的音 量电平。 通过电视机遥控器操作本机 (HDMI 控制功能) 如果电视机支持 HDMI 控制功能且连接到本机的 HDMI 端子,则可使用电视机遥控器操作本机。 电视机的遥控器 (示例) 同时打开 / 关闭电视机和本 机。 定时器设定完成。 通过按 2/3 将定时器切换为 [OFF]/ [ONCE]/[EVERY]。定时器设定为 [ONCE] 或 [EVERY] 时,TIMER 指示灯将在前面板中点 亮。 注意 • 必须预先设定时钟。 • 设定了定时器时,TIMER 指示灯将在前面板中点亮。电源开 启时,随着定时器临近设定时间,TIMER 指示灯将会闪烁。 控制本机的音量。 睡眠定时器可在经过指定的时间后将本机设定为待机 模式。 1 操作 ■ 设定睡眠定时器 选择本机
使用实用功能 ■ 设定 HDMI 控制功能 1 打开所有以 HDMI 连接到电视机的组件。 2 检查所有以 HDMI 连接的组件并在各组件上启用 HDMI 控制功能。 对于本机,将 [HDMI 控制 ] 设定为 [ 开 ] (第 34 页)。 对于外接组件,请参阅各组件附送的说明书。 y • 本机 [HDMI 控制 ] 的默认设定为 [ 关 ]。 • 电视机设定示例 – 从电视机的设定菜单,选择 “链接设定” = “HDMI 控制设定”(示例),然后将 “HDMI 控制功 能”等设定设为 “开”(示例)。 – “扬声器优先级”等设定应设为 “AV 放大器”。 3 关闭电视机,然后重新打开。 ■ 将 HDMI 组件注册到电视机 1 选择本机作为电视机的输入源。 2 选择碟片 /USB/ 网络作为本机的输入源。 3 检查来自本机的图像是否正确显示在电视机上。 4 检查 HDMI 控制功能是否工作(使用电视机遥控器 打开本机或调节音量电平)。 y 对于某些 HDMI 组件,只需设定 HDMI 控制功能。在此情况 下,无需将 HDMI 组件注册到电视机。 30 Zh 如果 HDM
设定 设置菜单 设置菜单启用各种音频 / 视频设定和调节使用遥控器的功能。 菜单 / 子菜单 系统 通用设置 语言 播放 网络 功能 页码 屏幕保护 将屏幕保护设定为开 / 关。 34 自动关机 Disc/USB/Net:将自动关机模式设定为开 / 关。 其他输入:将自动关机模式设定为定时打开或关。 34 碟片自动播放 将本机设定为自动开始碟片播放。 34 HDMI 控制 将本机设定为从电视机的遥控器接收控制信号。 34 加载预设值 将安全设定以外的所有设定复位到默认设定。 34 升级 执行本机的升级。 34 简易设置 设定语言、分辨率、画面纵横比。 34 本地存储 显示本地存储的状态、格式化本地存储,并选择本地存 储的前 / 后 USB 端口。 34 3D 播放信息 打开本机时,会显示关于 3D 视频播放的警告信息。 34 屏幕显示 选择屏幕显示的语言。 34 菜单 区分碟片菜单语言的优先顺序。 34 声音 区分音频语言的优先顺序。 34 34 字幕 区分字幕语言的优先顺序。 隐藏字幕 将隐藏字幕设定为开 / 关。
设置菜单 菜单 / 子菜单 TV 显示设定 视频处理 音频输出 后级处理 项目 功能 页码 3D 输出 选择 3D 或 2D 视频。 36 电视屏幕 设定所连接电视机的画面纵横比,并调节视频输出。 36 视频输出选择 选择视频输出的分辨率。 36 电视系统 从 NTSC/PAL/ 多制式中选择电视系统。 36 彩色空间 从 YCbCr 4:4:4/YCbCr 4:2:2/ 全 RGB/RGB 中选择彩色 空间。 36 HDMI 深色 从 30 比特 /36 比特 / 关中选择 HDMI 深色。 36 HDMI 1080p 24Hz 将 HDMI 1080p 24Hz 设定为自动 / 关。 37 唇形同步 调整视频和音频之间的延迟,如当嘴部动作与声音不同 步时。 37 影片模式 调整视觉图像。 37 色彩调整 调整每种颜色的亮度 / 饱和度 / 色调。 37 杂讯降低 设定杂讯降低的级别。 37 去交错模式 设定如何检测视频信号。 37 HDMI 从比特流 /PCM/ 关中选择 HDMI 端子的输出模式。 38 动态范
设置菜单 设置菜单操作 3 选择菜单项目。 按 5/a 选择 [ 父母锁 ],然后按 ENTER 或光标 3。 4 用数字按钮输入密码。 – 默认密码为 0000。 – 输入正确的密码后,您才能移动到下一个设 定画面。 – 若要更改密码,请参阅 “[ 更改密码 ]” (第 35 页)。 5 选择下一个项目。 按 5/a 选择 BD/DVD 碟片的父母锁等级,然后按 ENTER。 您需要显示设置菜单画面来执行本机的设定。以下说 明设置菜单的基本操作。 SLEEP 数字按钮 TIMER SURROUND CLEAR SEARCH MUTE SETUP DISPLAY SETUP OPTION OPTION HOME HOME VOLUME VOLUME TOP MENU POP-UP MENU 5 ENTER 2 3 ENTER RETURN ON SCREEN a 示例:设定 [ 父母锁 ] 注意 • 当设定为碟片 /USB/ 网络以外的输入源时,无法设定某些项 目。在此情况下,请将输入源设定为碟片 /USB/ 网络。 • 播放时无法设定某些项目。在此情况
设置菜单 通用设置 默认设定标有 “*”。 ■ 系统 [ 屏幕保护 ] 可将屏幕保护设定为 [ 开 ]/[ 关 ]。 设定为 [ 开 ] 时,如果 3 分钟无操作,本机将切换到 屏幕保护模式。 开 *,关 [ 自动关机 ] 当输入选择为碟片 /USB/ 网络时,可以将自动关机模 式设定为 [ 开 ]/[ 关 ]。当选择其他输入时,自动关 机模式可按小时设定或设定为 [ 关 ]。 Disc/USB/Net: 开 *,关 其他输入 : 1 小时,2 小时,4 小时,8 小时 *,关 [ 碟片自动播放 ] 可将 [ 碟片自动播放 ] 设定为 [ 开 ]/[ 关 ]。设定为 [ 开 ] 时,碟片装入后将自动播放。 [ 本地存储 ] 可以显示本地存储信息、格式化本地存储,并选择 [ 前置 USB]/[ 后置 USB] 以保存 BD-Live 数据。 若要格式化 (清空)USB 存储设备中的 “BUDA”文件 夹,请选择 [ 信息 ],并在画面上突出显示 [ 格式 化 ] 时按 ENTER。 前置 USB,后置 USB* y 本地存储在播放 BD 碟片时用作辅助存储器。 [3D 播放信息 ] 可以打开或关闭
设置菜单 ■ 播放 [ 隐藏字幕 ] 可设定为当播放带有隐藏字幕的 BD/DVD 碟片时显示 隐藏字幕 (第 48 页)。 [ 国家区域 ] 可设定居住地的国家区域。设定国家区域之前,需要 输入密码 (请参阅第 35 页上的 “[ 更改密码 ]”)。 此设定可以用于父母锁的评级和碟片播放。 开,关 * ■ 网络 [ 角度标记 ] 设定为播放具有多角度的 BD/DVD 碟片时显示角度标 记( )。 [ 互联网 ] 通过网络使用 BD-Live (第 24 页)、DLNA (第 18 页)和软件升级时,可以设定为 [ 启用 ] (第 40 页)。 开 *,关 [ 画中画标记 ] 设定为播放具有画中画 (第 24 页)的 BD 碟片时显示 画中画标记 ( )。 开 *,关 [ 第二音频标记 ] 设定为播放具有第二音频的 BD 碟片时显示第二音频 标记 ( )。 开 *,关 [ 记忆播放 ] 可以将本机设定为当设为待机模式或打开碟片托盘 时,是否记忆碟片的上次播放位置。 开 *,关 注意 某些碟片与此功能不兼容。 ■ 安全 注意 • 默认密码为 0000。 • 如果忘记了密码,请参阅 “故障
设置菜单 显示设定 默认设定标有 “*”。 ■ TV [3D 输出 ] 可以选择来自本机的 3D 或 2D 视频输出。 自动 * 本机自动选择 3D 或 2D 视频。 关 本机总是选择 2D 视频。 [ 视频输出选择 ] 可从 [ 模拟视频 ]、[HDMI 自动 ]、[HDMI 1080p]、 [HDMI 1080i]、[HDMI 720p]、[HDMI 480p/576p] 和 [HDMI 480i/576i] 中选择视频输出分辨率。设定为 [HDMI 自动 ] 时,分辨率将根据所连接的电视机设定 为最大分辨率。有关输出格式的详细说明,请参阅 “关于视频输出格式”(第 39 页)。 模拟视频,HDMI 自动 *,HDMI 1080p,HDMI 1080i,HDMI 720p,HDMI 480p/576p,HDMI 480i/576i 注意 注意 即使将 [3D 输出 ] 设定为 [ 自动 ] 并播放 BD 3D 碟片,本机 也会根据电视机等的连接和设定选择 2D 图像 (第 12 页)。 [ 电视屏幕 ] 可设定所连接电视机的画面纵横比,并调节视频输 出。 如果您更换电视机 (即,因为买了台
设置菜单 [HDMI 1080p 24Hz] 此项输出以 HDMI 1080p 24Hz 中 24Hz 帧频编码的 BD 视频。使用此功能可能会使视频播放更加流畅。当您 的电视机支持此功能,且本机用 HDMI 电缆连接时, 此功能可用。有关输出格式的详细说明,请参阅 “关 于视频输出格式”(第 39 页)。 [ 色彩调整 ] 可以调整每种颜色 (红色 / 绿色 / 蓝色 / 黄色 / 青色 / 红紫色)的亮度 / 饱和度 / 色调。若要使用此 功能,请将 [ 影片模式 ] 设定为 [ 自定 ]。有关设定 项目的详细说明,请参阅 “[ 影片模式 ]” (第 37 页)。 自动 *,关 默认设定为 0。 注意 [ 杂讯降低 ] 可以将杂讯降低设定为等级 0 到 3。0 为关闭,3 为最 大等级。 当输出分辨率非 1080p 时,此设定被停用。 [ 唇形同步 ] 可以设定 / 调整唇形同步 (第 49 页)功能。 自动 * 本机自动调节唇形同步功能。 手动 可以手动调整唇形同步功能。可以分别设定 2D 和 3D 内容的音频延迟。 2D 3D 关 0*,1,2,3 [ 去交错模式 ] 可以
设置菜单 音频设定 默认设定标有 “*”。 ■ 音频输出 [HDMI] 可选择 HDMI 端子的输出模式。 比特流,PCM,关 * 注意 • 若要从扬声器或耳机输出声音,请选择 [ 关 ]。 • 无法通过 HDMI 电缆将 iPod 的声音从本机输出到电视机。 • 若要从 HDMI 端子输出 HD 音频 (如 Dolby TrueHD 或 DTS-HD),请将 [ 视频输出选择 ] 设定为 [HDMI 自动 ] 或 大于 [HDMI 720p] (第 36 页)。 [ 动态范围控制 ] 可将动态范围控制 (动态范围压缩)(第 49 页)设 定为 [ 开 ]/[ 关 ]/[ 自动 ]。设定为 [ 自动 ] 时,对 于带动态范围控制信息的 Dolby TrueHD 格式来源, 动态范围控制将自动打开。动态范围控制可使爆破声 等响声降低,而使谈话声更加清楚。在夜晚观看电影 时此功能很有用。 关 *,开,自动 ■ 后级处理 [UpMix] 可以为 2 声道音频信号建立多声道 (对 HDMI 输出有 效)。若要建立多声道,请选择 [DTS NEO:6],然后 选择 [ 电影 ] 或 [ 音乐 ]。 关 *、D
设置菜单 关于视频输出格式 [ 电视系统 ] 设定为 [NTSC] 时 分辨率 模拟视频 HDMI 自动 HDMI HDMI HDMI 720p HDMI 1080i 480i/576i 480p/576p 播放 BD HDMI 480p 最大 480i 480p 480i 关 480i 480i 720p 60 Hz 其他 VIDEO 播放 BD 其他 HDMI 1080p 24Hz 1080p 24 Hz 1080i 60 Hz 1080p 60 Hz 其他 1080p 60 Hz 关 [ 电视系统 ] 设定为 [PAL] 时 分辨率 模拟视频 HDMI 自动 HDMI HDMI HDMI 720p HDMI 1080i 480i/576i 480p/576p 播放 BD HDMI 576p 最大 576i 576p 576i 关 576i 576i 其他 VIDEO 播放 BD 其他 720p 50 Hz HDMI 1080p 24Hz 1080p 24 Hz 1080i 50 Hz 1080p 50 Hz 其他 1080
软件升级 如果不将本机软件升级到最新版本,可能无法播放某 些新发售的 BD 碟片。建议用软件升级功能升级本机 的软件,以便能基于最新软件操作本机。 若要检查软件升级的可用性,请访问 http://download.yamaha.
附加信息 故障排除 当本机运作不正常时,请参阅以下表格。如果您所遇到的问题未在以下表格中列出或如果以下说明没有帮助, 请关闭本机,断开电源线的连接,然后联系附近授权的 Yamaha 经销商或服务中心。 常规 问题 原因 不通电。 本机电源无法打开或电 源打开后立刻进入待机 模式。 解决方法 按前面板上的 打开电源。 页码 5 请牢固连接电源线。 11 本机可能已经受到强烈的外部电击 (例如闪电或很强静电)。 将本机设定为待机模式,断开电源线的连接, 30 秒后再连接电源线,然后正常使用本机。 — 本机需要重启。 按住前面板上的 约 5 秒钟以重启本机。若要 完全重启,请从交流插座上拔下电源线 5 至 10 秒钟,再重新将电源线插到交流插座上,然 后打开本机。 5 无法播放碟片。 未设定初始向导。 购买或升级后首次打开本机时设定初始向导。 14 没有声音。 选择了不合适的输入源。 用前面板上的 INPUT (或遥控器上的输入选择按 钮)选择合适的输入源。 5 扬声器连接不牢固。 确保牢固连接。 10 静音功能开启。 取消静音功能。 7 音量调低了。
故障排除 问题 电源突然关闭。 原因 解决方法 页码 设定了睡眠定时器。 这不是故障。打开本机并重新播放源。 29 [ 自动关机 ] 设定为 [ 开 ]。 将 [ 自动关机 ] 设定为 [ 关 ]。 34 时钟设定被清除。 断开了电源线连接。 连接电源线,并重新设定时钟。 — 仅从一侧的扬声器听到 声音。 电缆连接不正确。 正确连接电缆。如果问题仍然无法解决,电缆可 能已损坏。 10 数字或无线电频率设备 产生噪音干扰。 本机太靠近数字或高频设备。 将本机远离此种设备放置。 — 这些声音并非本机故障,而是正常操作状态。 — 本机开始播放或载入碟 片时发出劈啪声。 超低音扬声器没有声 音。 超低音扬声器未正确连接。 检查超低音扬声器是否正确连接。 10 系统设定自动改变。 当 [HDMI 控制 ] 设定为 [ 开 ] 时,电 视机的操作 (例如,更改频道等)会 改变系统设定。 将 [HDMI 控制 ] 设定为 [ 关 ] 或通过使用系统的 遥控器重新设定系统。 34 HDMI 控制功能无法正确 工作。 [HDMI 控制 ] 设定为 [ 关 ]。
故障排除 iPod 注意 在发生发送错误,但本机的前面板显示屏中未出现状态信息的情况下,请检查与 iPod 的连接 (请参阅第 11 页)。 状态信息 原因 解决方法 页码 READING 本机正处在识别与 iPod 的连接过程 中。 如果此信息持续出现在前面板显示屏中并且不开 始播放,请重新连接 iPod。 — UNKNOWN 从 iPod 到本机的信号路径有问题。 重新连接 iPod。 11 本机不支持正在使用的 iPod。 仅支持 iPod classic、iPod nano (第 2 代、第 3 代、第 4 代、第 5 代和第 6 代)、iPod touch (第 1 代、第 2 代、第 3 代和第 4 代)、 iPhone、iPhone 3G/3GS、iPhone 4 和 iPad。 11 iPod 软件版本较老。 将 iPod 的软件版本升级到最新。 — 通过 USB 电缆正确连接 iPod 和本机。 11 STOP iPod 播放结束。 例如,所选专辑中的所有歌曲已经结 束播放。 NO iPod iPod 与本机断开连接。 问题 没有声音。 原
故障排除 问题 iPod 不充电。 原因 解决方法 页码 iPod 未正确连接。 通过 USB 电缆正确连接 iPod 和本机。 11 本机不支持此 iPod。 仅支持 iPod classic、iPod nano (第 2 代、第 3 代、第 4 代、第 5 代和第 6 代)、iPod touch (第 1 代、第 2 代、第 3 代和第 4 代)、 iPhone、iPhone 3G/3GS、iPhone 4 和 iPad。 11 USB 注意 在发生发送错误,但本机的前面板中未出现状态信息的情况下,请检查与 USB 设备的连接 (请参阅第 13 页)。 状态信息 USB ERROR 原因 解决方法 页码 连接的 USB 设备在本机上不可播放。 断开 USB 设备的连接。改变 USB 以外的输入源并 重新选择 USB 作为输入源。然后重新连接可播放 的 USB 设备。 13 解决方法 页码 USB 设备歪曲连接。 问题 USB 设备中的文件不播 放。 原因 USB 设备未被识别。 重新连接 USB 设备。 13 如果设备附带交流电源适配器,则连接交流电源
故障排除 问题 碟片播放没有开始。 解决方法 页码 碟片没有最终化。 原因 CD-R/RW、DVD+R/RW/R DL 和 DVD-R/RW/R DL 必须 被最终化。 3 装入的碟片上下颠倒。 取出碟片并重新装入,确保标签面朝上。 — 碟片有缺陷。 尝试播放另一张碟片。如果问题解决,表示您要 播放的碟片有缺陷。 — 文件格式与本机不兼容。 检查文件格式是否与本机兼容。 3 有些按钮操作不起作 用。 本机装入的碟片不兼容。 使用本机支持的碟片。 3 按本机上的 或 遥控器上的 后,播 放未立即开始。 碟片脏污。 取出碟片并擦拭干净。 4 本机装入的碟片不兼容。 使用本机支持的碟片。 3 如果将本机从寒冷处带到温暖处,碟 片读取激光头上就形成了结露。 等待一或两个小时,直到本机调整到室温后再重 试。 — 本机装入的碟片不兼容。 使用本机支持的碟片。 3 碟片脏污。 取出碟片并擦拭干净。 4 装入的碟片上下颠倒。 取出碟片并重新装入,确保标签面朝上。 — 此碟片受版权保护。 对于某些录制有版权保护内容的碟片,可能无法 输出音频或无法
故障排除 遥控器 问题 遥控器不工作或功能不 正常。 原因 解决方法 页码 遥控器在其操作范围之外操作。 有关遥控器操作范围的信息,请参阅 “使用遥 控器”。 9 本机的遥控感应器暴露于直射阳光或 灯光下。 改变照明或本机的方向。 — 电池电量耗尽。 更换新电池。 9 本机的感应器和遥控器之间有障碍 物。 移除障碍物。 — 网络 问题 无法连接到互联网。 无法下载 BD-Live 内 容。 无法检测到 DLNA 服务 器。 无法播放家庭网络服务 器上的文件。 46 Zh 原因 解决方法 页码 电缆连接不正确。 正确连接网线。 13 所连接设备的电源关闭。 打开所连接设备,如宽带路由器或调制解调器。 — 宽带路由器和 / 或调制解调器的连接 不正确。 正确连接宽带路由器和 / 或调制解调器。 — 网络设定不正确。 在网络设定中设定正确的值。请参阅 “网络”。 35 电缆连接不正确。 正确连接网线。 13 USB 设备连接不正确。 正确连接 USB 存储设备。检查 USB 存储设备是否 连接到本机的 USB 端口。 13 BD
故障排除 画面上的信息 如果您试图播放的碟片不适合或操作不正确,电视屏幕上会出现以下信息。 出错信息 原因 解决方法 页码 不对应文件 本机不支持此文件。 请参阅 “本机可使用的碟片 / 文件类型”。 区码错误! 碟片为不兼容区码。 请参阅 “区域管理信息”。 3 网络出错 本机无法连接到网络。 检查连接和网络设定。 13 35 网络 OK, 代理服务器出 错。 本机无法连接到代理服务器。 请参阅 “[ 代理服务器设置 ]”。 35 在安装菜单中 BD-Live 连接禁用。 BD-Live 连接被禁止。 请参阅 “[BD-Live 连接 ]”。 35 没有检测到有效的升级 文件! 无法找到升级的文件。 检查升级文件是否在正确的文件夹中。 — 升级失败! 升级失败。 检查升级文件是否损坏或不可读。 — 3 其他 问题 忘记了密码。 原因 解决方法 页码 未插入碟片并且播放停止时,同时按住前面板上 的 和 约 5 秒钟将本机的所有安全设定 (第 35 页)设定为默认设定。电源自动关闭后, 再次按 打开电源。 — 附加信息 中文 47
术语表 AIR SURROUND XTREME AVCHD 本机采用新技术和运算法则,仅使用前置扬声器即 可达到 5 声道环绕声,而无需使用墙壁反射。 通常,欣赏 5.1 声道环绕声需要两个前置扬声器、 一个中置扬声器、两个环绕扬声器和一个超低音扬 声器。 AVCHD 是可用于录制和播放高分辨率 HD 图像的高清 摄像机的新格式 (标准)。 BD-Live™ BD-Live 是一种利用网络连接的 BD 标准,本机使用 该标准可上网下载宣传视频和其他数据。 BDMV 典型 5.1 声道扬声器系统 前置扬声器 超低音扬声器 BDMV (Blu-ray 碟片电影、BD-MV)是用于 BD-ROM (Blu-ray Disc 规格之一)的应用程序格式之一。 BDMV 是相当于 DVD 规格的 DVD 视频的录制格式。 Blu-ray 3D™ 使用 Blu-ray 3D 可观看全高清 3D 图像。 BONUSVIEW™ 中置扬 声器 环绕扬声器 BONUSVIEW 兼容碟片可让您同时欣赏两个画面的视 频子信道、音频子信道和字幕。播放时小画面显示 在主画面内 (画中画)。 隐藏字幕 虚拟 5.
术语表 Dolby Digital Plus 一种对 Dolby Digital 扩展而研发的声音系统。此 音频编码技术支持 7.1 多声道环绕声。 Dolby TrueHD Dolby TrueHD 是一种无损编码技术,最多可为下一 代光碟支持 8 声道多声道环绕声。再现的声音与原 始音源如出一辙。 动态范围控制 动态范围控制调节最响亮和最轻柔声音之间的范围 (动态范围)以便以均衡音量播放。当难以听到对 话或播放可能会干扰邻居时使用此功能。 DTS 这是由 DTS, Inc. 研发的数字声音系统,用于电影 院。 DTS-HD High Resolution Audio Mac 地址 Mac 地址是分配到网络设备的唯一值以便识别。 全景 (PS 4:3) 一种画面尺寸,将切掉图像边缘以便在所连接的 4:3 电视机上观看宽屏 (16:9)资料。 字幕 画面底部出现文字行,翻译或誊写对话内容。众多 DVD 和 BD 碟片上均录制有字幕。 顶部菜单 在 BD 视频 /DVD 视频中,这是用于选择要播放章节 和字幕语言等内容的菜单。在某些 DVD 视频中,顶 部菜单也称作 “标题菜单”。 x.v.
规格 播放器部分 输入 / 输出 iPod/iPhone/iPad • 支持的 iPod/iPhone/iPad ................ iPod classic、 iPod nano (第 2 代、第 3 代、第 4 代、第 5 代和第 6 代)、 iPod touch (第 1 代、第 2 代、第 3 代和第 4 代)、 iPhone、iPhone 3G/3GS、iPhone 4、iPad 碟片和文件格式 • 有关支持的碟片和文件格式,请参阅第 3 页。 AUX • 输入连接器 AUX.............................................. RCA 放大器部分 • 最大输出功率............................. 30 W + 30 W (1 kHz,10% THD,6 Ω) • 输入灵敏度 / 输入阻抗 AUX..................................... 400 mV/47 kΩ • 总谐波失真 AUX 1 kHz/10 W................................ 0.
规格 ■ 版权 • iPad、iPhone、iPod、iPod classic、iPod nano 和 iPod touch 是 Apple Inc.
Information about software This product uses the following software. For information (copyright, etc) about each software, read the original sentences stated below. ■ About Linux, Busybox, SquashFS, LIRC, U-boot GNU GENERAL PUBLIC LICENSE Version 2, June 1991 Copyright (C) 1989, 1991 Free Software Foundation, Inc. 51 Franklin St, Fifth Floor, Boston, MA 02110-1301 USA Everyone is permitted to copy and distribute verbatim copies of this license document, but changing it is not allowed.
This section is intended to make thoroughly clear what is believed to be a consequence of the rest of this License. 8. If the distribution and/or use of the Program is restricted in certain countries either by patents or by copyrighted interfaces, the original copyright holder who places the Program under this License may add an explicit geographical distribution limitation excluding those countries, so that distribution is permitted only in or among countries not thus excluded.
GNU LESSER GENERAL PUBLIC LICENSE TERMS AND CONDITIONS FOR COPYING, DISTRIBUTION AND MODIFICATION 0. This License Agreement applies to any software library or other program which contains a notice placed by the copyright holder or other authorized party saying it may be distributed under the terms of this Lesser General Public License (also called “this License”). Each licensee is addressed as “you”.
9. You are not required to accept this License, since you have not signed it. However, nothing else grants you permission to modify or distribute the Library or its derivative works. These actions are prohibited by law if you do not accept this License. Therefore, by modifying or distributing the Library (or any work based on the Library), you indicate your acceptance of this License to do so, and all its terms and conditions for copying, distributing or modifying the Library or works based on it. 10.
Original SSLeay License Copyright (C) 1995-1998 Eric Young (eay@cryptsoft.com) All rights reserved. This package is an SSL implementation written by Eric Young (eay@cryptsoft.com). The implementation was written so as to conform with Netscapes SSL. This library is free for commercial and non-commercial use as long as the following conditions are aheared to. The following conditions apply to all code found in this distribution, be it the RC4, RSA, lhash, DES, etc., code; not just the SSL code.
■ About Expat Copyright (C) 1998, 1999, 2000 Thai Open Source Software Center Ltd and Clark Cooper Copyright (C) 2001, 2002, 2003, 2004, 2005, 2006 Expat maintainers.
Communications of the ACM, April 1991 (vol. 34 no. 4), pp. 30-44. (Adjacent articles in that issue discuss MPEG motion picture compression, applications of JPEG, and related topics.) If you don’t have the CACM issue handy, a PostScript file containing a revised version of Wallace’s article is available at http://www.ijg.org/files/ wallace.ps.gz. The file (actually a preprint for an article that appeared in IEEE Trans.
Greg Roelofs Tom Tanner libpng versions 0.5, May 1995, through 0.88, January 1996, are Copyright (C) 1995, 1996 Guy Eric Schalnat, Group 42, Inc. For the purposes of this copyright and license, “Contributing Authors” is defined as the following set of individuals: Andreas Dilger Dave Martindale Guy Eric Schalnat Paul Schmidt Tim Wegner The PNG Reference Library is supplied “AS IS”. The Contributing Authors and Group 42, Inc.
Any Modification created by You will be provided to the Initial Developer in Source Code form and are subject to the terms of the License. 3.3. Description of Modifications. You must cause all Covered Code to which You contribute to contain a file documenting the changes You made to create that Covered Code and the date of any change.
Software distributed under the License is distributed on an “AS IS” basis, WITHOUT WARRANTY OF ANY KIND, either express or implied. See the License for the specific language governing rights and limitations under the License. The Original Code of the gSOAP Software is: stdsoap.h, stdsoap2.h, stdsoap.c, stdsoap2.c, stdsoap.cpp, stdsoap2.cpp, soapcpp2.h, soapcpp2.c, soapcpp2_lex.l, soapcpp2_yacc.y, error2.h, error2.c, symbol2.c, init2.c, soapdoc2.html, and soapdoc2.pdf, httpget.h, httpget.c, stl.h, stldeque.
TLP MCR-750 Micro Component System OWNER’S MANUAL MANUAL DE INSTRUCCIONES © 2011 Yamaha Corporation Printed in China MCR-750_TLP-1