サ イレ ントピ アノ S G シリー ズ 取 扱 説 明 書
ごあいさつ このたびは、ヤマハサイレントピアノをお買い上げいただきまして、まことにありがとうございま す。本製品を正しくお使いいただくために、お使いになるまえに、この取扱説明書を必ずお読みく ださい。 ◆ この取扱説明書と保証書は大切に保管し、使い方がわからないときや調子が悪いときにお役立て ください。 ◆ お買い上げいただいた際、保証書は「お買い上げ日、販売店名」などの記入を必ずお確かめのう え、販売店からお受け取りください。 本機の特長 ヤマハ独自の消音システム ヤマハ独自の技術を投入し、アコースティックピアノ演奏時のタッチをほとんど変えることなく、 優れた消音演奏性能を実現。ハンマーシャンクストッパーが打鍵直前でハンマーの動きを止め、光 センサーが打鍵情報を正確にキャッチします。打鍵情報は内蔵電子音源に伝えられ、フルコンサー トグランドピアノからサンプリングされたピアノ音を豊かに奏でます。 豊かな表現を可能にする非接触式センサーを搭載 鍵盤の微妙な動きを、どこにも接点がない非接触式の光センサーが忠実に検出。さらにグランドピ アノでは、ハンマーの動きを的確に捉えるハンマーセンサーを搭載しています。タッチ
目次 ごあいさつ ......................................................... 2 内蔵メモリーに録音した曲を再生する ....... 15 本機の特長 ......................................................... 2 USB メモリーを接続する............................. 16 付属品................................................................. 3 録音した曲を USB メモリーに保存する ..... 17 設置について ..................................................... 3 USB メモリーの曲を再生する ..................... 18 安全上のご注意 ................................................. 4 試聴曲を再生する(試聴モード).............
安全上のご注意 ここに示した注意事項は、製品を正しくご使用いただき、あなたや他の人々への危害や損害を未然に防止する ためのものです。 注意事項は危害や損害の大きさと切迫の程度を明示するために、誤った取り扱いをすると、生じることが想定 される内容を「警告」と「注意」に区分しています。いずれもお客様の安全や機器の保全に関する重要な内容 ですので、必ずお守りください。 お子様がご使用になる場合は、保護者の方が以下の内容をお子様にご徹底くださいますようお願い致します。 記号表示について この機器に表示されている記号や取扱説明書に表示されている記号には、次のような意味があります。 記号は、危険、警告または注意を示します。上記の場合、 は機器の内部に絶縁されていない「危険な電 圧」が存在し、感電の危険があることを警告しています。また、 は注意が必要なことを示しています。 記号は、禁止行為を示します。記号の中に具体的な内容が描かれているものもあります。 ● 記号は、行為を強制または指示することを示します。記号の中に具体的な内容が描かれているものもあり ます。 ※ お読みになったあとは、使用される方がいつでも見られ
注意 この表示内容を無視した取り扱いをすると、傷害を負う可能性または物的損害が発生する可能 性が想定されます。 電源コードをストーブなどの熱器具に近づけたり、 本機を移動するときは、必ず電源コードなどの接続 無理に曲げたり、傷つけたりしない。また、電源 ケーブルをすべて外したうえで行う。 コードに重いものを乗せない。 コードを傷めたり、お客様が転倒したりするおそれ 電源コードが破損して、感電や火災の原因になりま があります。 す。 本機を移動するときは、引きずらない。 電源プラグを抜くときは、電源コードを持たずに、 床を傷つけるおそれがあります。 必ず電源プラグを持って引き抜く。 電源コードが破損して、感電や火災が発生するおそ 本機を移動するときは、手や足を挟まないようにす れがあります。 る。 ケガをするおそれがあります。 タコ足配線をしない。 音質が劣化したり、コンセント部が異常発熱したり 本機を使用しないときは、鍵盤蓋を閉める。鍵盤蓋 することがあります。 の開閉は、両手で静かに行う。また、お客様や周り の方が、不用意に鍵盤蓋に触れないようにする。 電源コードやプ
1 章 はじめに 各部の名称 ■ ピアノ本体 〈グランドピアノ〉 スイッチボックス (7 ページ) 〈アップライトピアノ〉 スイッチボックス (7 ページ) 1 1 消音レバー ピアノを消音状態にします。 ■ ペダル 〈グランドピアノ〉 3 〈アップライトピアノ〉 2 1 1 ダンパーペダル このペダルを踏むと、鍵盤から指を離して も、音を長く響かせることができます。ピ アノ音色で演奏しているときにこのペダ ルを踏むと、アコースティックピアノで得 られる弦の共鳴効果(ダイナミックダン パーエフェクト)が加わります。 2 ソステヌートペダル(グランドピアノ) このペダルを踏むと、そのとき押していた 鍵盤の音のみ、長く響かせることができま す。 消音ペダル(アップライトピアノ) このペダルを踏んで左側にスライドさせ ると、ピアノが消音状態になります。 6 3 2 1 3 シフトペダル(グランドピアノ) ソフトペダル(アップライトピアノ) このペダルを踏むと、ソフトな音になりま す。ピアノ以外の音色を選んでいるときに このペダルを踏むと、ノーマル音色とバリ エーション音色とを切り替
■ スイッチボックス スイッチボックス底面 / 背面 7 2 3 4 5 6 8 MIDI IN 1 USB スイッチボックス前面 MIDI OUT PDL KEY DC IN 12V IN AUX OUT 9 10 11 12 1 電源スイッチ(POWER) 電源をオン/オフします。 7 USB 端子(USB TO DEVICE) USB メモリーを接続します。 2 録音ボタン(REC) 本機を録音待機の状態にします。ボタンと ランプ兼用で、ランプの点灯の種類により 録音状態を表示します。 8 MIDI IN/MIDI OUT 端子 外部 MIDI 機器の出力端子/入力端子と接 続します。 3 再生/停止ボタン(PLAY/STOP) 再生を開始/停止します。ボタンとランプ 兼用で、ランプの点灯の種類により本機の 状態を表示します。 4 リバーブ調整ツマミ(REVERB) リバーブの深さ(かかり具合)を調節しま す。 5 音量ツマミ(VOLUME) ヘッドフォン端子からの出力の音量を調 節します。 6 ヘッドフォン端子 (PHONES:標準ジャック) ヘッドフォンを接
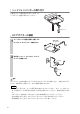
ヘッドフォンハンガーの取り付け 必要に応じて、付属の取り付けネジ(2 個)でス イッチボックス底面に取り付けてください。 B US M DI MIDI X OUT AU IN N OU T ドライバー(+) AC アダプターの接続 1 スイッチボックス背面の電源入力端子(DC IN 12V)に AC アダプターを接続します。 電源入力端子 (DC IN 12V) X T T 2 家庭用コンセント(AC100V)に AC ア ダプターを接続します。 PA-5D または PA-150 警告 AC アダプターは必ず付属のもの(PD-5D または PA-150)をご使用ください。指定以外の AC ア ダプターを使用すると発熱や火災、または故障の原因になります。 ご注意 ・ コードを引っ張ったり、コードの根元部分を曲げたりしないでください。また、コードがピンと 張った状態やコードの根元部分が曲がった状態で使用しないでください。断線の原因になりま す。 ・ AC アダプターを抜き差しするときは、必ず本体の電源を切ってから行ってください。 ・ 本体を移動させるときは、AC アダプターをコンセン
2 演奏時の操作 章 消音演奏をする 1 〈グランドピアノの場合〉 消音レバーを「カチッ」と音がするまで手 前に引きます。 〈アップライトピアノの場合〉 消音ペダルを踏みながら左側にスライドさ せます。 ピアノの音が消えます。 2 ヘッドフォン端子(PHONES:標準ジャッ ク)にヘッドフォンを接続します。 ヘッドフォンは2本同時に接続できますの で、演奏をもう一人の方が確認したり、連 弾したりすることも可能です。 PE 3 1 0 電源スイッチ(POWER)を押して電源を 入れます。 緑色のランプが点灯します。 4 音量ツマミ(VOLUME)を回して音量を 調節します。 右に回すと音量は大きく、左に回すと小さ くなります。実際に鍵盤を弾きながら音量 を調節してください。 ご注意 ・ ヘッドフォンを 2 本接続するときは、同じ仕様のもの(推奨品:ヤマハ HPE-170)をご用意く ださい。違う仕様のものを使用すると、音量、音質が異なって聴こえる場合があります。 ・ 消音演奏時でもアコースティックピアノ特有の打鍵音は残ります。 ・ 耳の保護のため、音量の上げすぎにはご注意ください。また長
音色を選ぶ 消音演奏では、本機の内蔵音色を使ってピアノ以外の音色で演奏することができます。 音色の種類 設定方法 ピアノ(初期設定) A-1、A#-1、B-1 を押しながら、C4 を押す。 ハープシコード A-1、A#-1、B-1 を押しながら、D4 を押す。 ビブラフォン A-1、A#-1、B-1 を押しながら、E4 を押す。 パイプオルガン A-1、A#-1、B-1 を押しながら、F4 を押す。 チェレスタ A-1、A#-1、B-1 を押しながら、G4 を押す。 ストリングス A-1、A#-1、B-1 を押しながら、A4 を押す。 エレクトリックピアノ 1 A-1、A#-1、B-1 を押しながら、C#4 を押す。 エレクトリックピアノ 2 A-1、A#-1、B-1 を押しながら、D#4 を押す。 ジャズオルガン A-1、A#-1、B-1 を押しながら、F#4 を押す。 クワイア(合唱) A-1、A#-1、B-1 を押しながら、G#4 を押す。 メモ ・ 音色の選択は電源を入れてから行ってください。 ・ 選んだ音色は電源を切ると解除され、次に電源を入れたときはピア
■ デュアルボイス 2 つの音色を重ねて演奏する機能です。 同時に 2 つの鍵盤を押して、2 つの音色を選びます。 ご注意 デュアルボイス演奏では 2 つの音を重ねるため、同時発音数が半分に減ります。 ブリリアンスを調整する メロー(柔らかくまろやかな音)からブライト(明るく鋭い音)の間で音質を調整します。 操作 設定方法 ブリリアンスを調整する A-1、A#-1、B-1 を押しながら、C1/D1/E1/F1/G1 のいずれかを押す。 (E1 が標準 (5 段階可変) で、C1 側はよりメローに、G1 側はよりブライトになります。初期設定は E1 です。) メモ この設定はすべての音色に共通で反映され、電源を切っても保存されます。 A#-1 A-1 B-1 メロー ←標準→ ブライト ブリリアンス C1〜G1 11
リバーブをかける リバーブとは、音に残響をつけて音の響きを豊かにする ことです。リバーブの深さ(かかり具合)をリバーブ調 整ツマミ(REVERB)で調節します。オフにしたい場合 はツマミを左一杯まで絞ってください。 リバーブの種類を選ぶこともできます。 リバーブの種類 効果 設定方法 ルーム 響きやすい部屋の中で弾いたときのような音 A-1 と A#-1 と B-1 を押しながら C2 を押す。 ホール 1 ( 初期設定 ) 小さなコンサートホールにいるような響き A-1 と A#-1 と B-1 を押しながら D2 を押す。 ホール 2 大きなコンサートホールにいるような響き A-1 と A#-1 と B-1 を押しながら E2 を押す。 ステージ ステージにいるような響き A-1 と A#-1 と B-1 を押しながら F2 を押す。 メモ リバーブの種類の設定は電源を切ると解除され、次に電源を入れたときはホール 1 に戻ります。 A#-1 A-1 B-1 ルーム (C2) ステージ (F2) ホール1:初期設定 (D2) ホール2 (E2) ピッチを合わせる 本
DDE(ダイナミック・ダンパー・エフェクト)をかける DDE(ダイナミック・ダンパー・エフェクト)とは、アコースティックピアノのダンパーペダルを 踏んだときのような共鳴効果のことです。 操作 DDE をオフにする DDE をオンにする (5 段階可変) 設定方法 A-1 と A#-1 と B-1 を押しながら C6 を押す。 A-1 と A#-1 と B-1 を押しながら、D6、E6、F6、G6、A6 いずれかの鍵盤を押す。 ( 効果は A6 が最も深く、D6 が最も浅くなります。初期設定は E6 です。) メモ ・ DDE の設定は、電源を切っても保存されます。 ・ DDE をオフにしても、ダンパーペダルを踏んだときのように音は伸びますが、共鳴効果はあり ません。 A#-1 A-1 B-1 C6 D6〜A6 すべての設定を工場出荷時の値に戻す(オールリセット) すべての設定を、一度に工場出荷時の値に戻すこと(オールリセット)ができます。 A-1とA#-1とB-1を押しながらC7(いちばん右の白鍵)を約1秒間押して、一斉に鍵盤を戻します。 音色のバリエーション、ブリリアンス、リバーブの種類、ピッチ、
3 録音と再生 章 演奏を録音する 本機は、内蔵メモリーに 1 曲分の録音ができます。 メモ ・ 録音の容量は約 65 キロバイト(約 21,000 音符)分で、目安としては標準的な曲で約 25 分、 音符の密度の高い(激しい)曲で 5 分です。 ・ 録音には演奏時に選ばれている音色の情報も保存されます。 ・ 録音した曲は、電源を切っても、オールリセットをしても内蔵メモリーに残ります。 ご注意 ・ 新規録音時には以前に録音した曲は消去されます。ただし、録音待機状態で何も演奏せずにキャ ンセルしたとき(下記手順1)は、以前に録音した曲は消去されません。消去したくない曲の データは、USB メモリーで必ずバックアップを取ってください。詳細は 17 ページ「録音した曲 を USB メモリーに保存する」をご参照ください。 ・ USB メモリー接続時は録音できません。あらかじめ外しておいてください。 1 録音ボタン(REC)を押します。 本機は録音待機状態になり、REC ランプが赤く点灯、PLAY/ STOP ランプが緑色に点滅します。 メモ ここでもう一度録音ボタン(REC)を押すと、録音待機は キャンセル
内蔵メモリーに録音した曲を再生する 本機は内蔵メモリーに録音した曲を再生できます。 再生/停止ボタン(PLAY/STOP)を押します。 PLAY/STOP ランプが緑色に点灯し、再生を開始します。 再生を停止するには 再生中に再生/停止ボタン(PLAY/STOP)を押します。 一時停止するには 再生中に C7 を押します。PLAY/STOP ランプが点滅します。 再生を再開するには、C7 か再生/停止ボタン(PLAY/STOP)を押します。 早送りするには 再生中または一時停止中に、G#6 を押しながら A#6 を押します。A#6 を押している間早送りにな り、PLAY/STOP ランプが速く点滅します。 A#6 を離すと操作前の状態(再生または一時停止)に戻ります。 G#6, A#6 C7 メモ ・ 再生、一時停止中には録音ボタン(REC)は反応しません。 ・ USB メモリーが接続されている場合は USB メモリーに保存されている曲を再生します。詳細は 18 ページ「USB メモリーの曲を再生する」をご参照ください。 ・ 再生する曲がない場合は、3 連のチャイム音が鳴ります。 15
USB メモリーを接続する 本機に市販の USB メモリーを接続して、内蔵メモリーに録音した曲を保存したり、USB メモリー 内に保存した曲を再生したりすることができます。 スイッチボックス底面左手の USB 端子に 接続します。 自動的に USB メモリーのチェックが始ま ります。チェック中は PLAY/STOP ラン US M DI M DI B IN OU い橙色に変わります。 X OUT AU IN プが橙色の早い点滅になり、終了すると薄 T USBメモリー ご注意 ・ ヤマハでは、市販の USB メモリーの動作保証はいたしません。動作確認済みの製品については 弊社ウェブサイト(http://jp.yamaha.
録音した曲を USB メモリーに保存する 大切な曲のデータは、USB メモリーでバックアップを取ったうえで、コンピューターなどに保存 することをおすすめします。USB メモリーに保存しておくと衝撃などでデータが消えるおそれが あります。 1 本機に USB メモリーを接続します。 PLAY/STOP ランプが橙色に点滅し、メモリーの内容チェックが終わると薄い橙色に点灯し ます。 2 録音ボタン(REC)を押します。 本機は転送待機状態になり、REC ランプが赤く点灯、PLAY/ STOP ランプが橙色に点滅します。 メモ ここでもう一度録音ボタン(REC)を押すと、転送待機は キャンセルされ、通常の状態に戻ります。 3 再生/停止ボタン(PLAY/STOP)を押します。 PLAY/STOP ランプが速い点滅になり、内蔵メモリーから USB メモリーへのデータの保存を開始します。データ形式を 変換しながら転送するため時間がかかります(65 キロバイ トのフルサイズで約 3 〜 4 分)。転送が終了すると REC ラン プは消灯し、PLAY/STOP ランプは薄い橙色に戻ります。 メモ ・ 曲のデー
USB メモリーの曲を再生する 本機に USB メモリーを接続した状態で再生の操作(15 ページ)をすると、USB メモリーに最後 に保存した曲を 1 曲のみ再生します。複数保存されている曲を最初から再生したり、選んで再生し たりすることもできます。 ■ 本機で最後に保存した曲を 1 曲のみ再生するには USB メモリーを本機に接続した状態で、再生/停止ボタン (PLAY/STOP)を押します。 USB メモリー内に保存したファイルが見つからないときは、 ほかに再生可能な曲(スタンダード MIDI ファイル)を再生し ます。再生可能な曲がない場合は、停止状態に戻ります。 ■ 複数保存されている曲を再生するには 1 USB メモリーを本機に接続した状態で、B6 と C7(右端の白鍵 2 つ)を同時に押しながら電 2 電源を入れてから約 1 〜 2 秒後に鍵盤を戻します。 源を入れます。 自動的に USB メモリーに最初に保存した曲から再生が始まります。 B6 C7 複数曲の再生を終了するには 電源を入れなおします。 聴きたい曲を選ぶには(ダイレクト選曲) A-1 を押しながら、C0 から C
一時停止するには 次に再生するときに、一時停止したところから再生を始めたいときに使用します。 再生中に C7 を押します。また、再開するときも C7 を押します。一時停止中は再生の再開/停止 以外の操作はできません。 停止するには 次に再生するときに、1 曲目から再生を始めたいときに使用します。 再生中に B6 またはスイッチボックス前面の再生/停止ボタン(PLAY/STOP)を押します。再開 するときは再生/停止ボタン(PLAY/STOP)を押します。 リピート(繰り返し)モードを設定するには 1 曲リピートするには F6 を、全曲リピートするには G6 を、ランダム(任意の曲順で)リピート するには A6 を押します。初期設定は全曲リピートです。 1曲進む (A#6) 早送り (G#6, A#6) 1曲戻る (F#6) A-1 C0〜C#4 1曲リピート (F6) 全曲リピート (G6) ダイレクト選曲 ランダムリピート (A6) 停止 (B6) 一時停止 (C7) メモ ・ USB メモリー内の曲を最大 50 曲まで再生します。 ・ 曲順は、USB メモリーの「USER FILES」フォルダ
試聴曲を再生する(試聴モード) 本機に内蔵されている試聴曲(ピアノ名曲 50 選)を再生できます。再生の際は、ヘッドフォンま たは市販のアンプ内蔵スピーカー(外部出力)をご使用ください。 1 B6 と C7(右端の白鍵 2 つ)を同時に押しながら電源を入れます。 2 電源を入れてから約 1 〜 2 秒後に鍵盤を戻します。 自動的に第 1 曲目から再生が始まります。 B6 C7 試聴モードを終了するには 電源を入れなおします。 聴きたい曲を選ぶには(ダイレクト選曲) A-1 を押しながら、C0 から C#4 間の聴きたい曲番号に相当する鍵盤を押します。 ・ 各曲に対応する鍵盤は 27 ページ「試聴曲一覧」をご参照ください。 ・ 上記以外の鍵盤も同時に押してしまうと選曲されません。 ・ 停止中に曲を選ぶと、次に再生するときに選んだ曲から始まります。 曲間を移動するには ひとつ前の曲を選ぶには F#6 を、ひとつ後の曲を選ぶには A#6 を押します。 早送りするには 再生中または一時停止中に、G#6 を押しながら A#6 を押します。音を出しながら早送りができま す。 一時停止するには 次に再生するとき
リピート(繰り返し)モードを設定するには 1 曲リピートするには F6 を、全曲リピートするには G6 を、ランダム(任意の曲順で)リピート するには A6 を押します。初期設定は全曲リピートです。 1曲進む (A#6) 早送り (G#6, A#6) 1曲戻る (F#6) A-1 C0〜C#4 1曲リピート (F6) 全曲リピート (G6) ダイレクト選曲 ランダムリピート (A6) 停止 (B6) 一時停止 (C7) メモ ・ 試聴曲モードにしたあと、再生・停止はスイッチボックスの再生/停止ボタン(PLAY/STOP) でも操作できます。 ・ 鍵盤を戻すタイミングによっては、試聴モードにならないことがあります。 ・ 試聴モードでは録音や USB メモリーへの保存はできません。電源を入れなおしてください。 ・ 試聴曲を USB メモリーに転送することはできません。 21
章 他の機器との接続 他のオーディオ機器と接続する ご注意 本機と他の機器との接続は、必ず両方の電源を切った状 態で行ってください。 メモ 本機の AUX IN/AUX OUT 端子はステレオミニジャックです。端子に対応したケーブルでない場 合は変換アダプターが必要になります。ケーブル、アダプターは抵抗の無いものをお使いください。 ■ AUX OUT 端子の使用例 各種コンポ、カセットデッキや IC レコーダーに接続すると 本機の消音演奏を録音できます。 アンプ内蔵スピーカーやステレオに接続すると 本機の消音演奏をスピーカーで聴くことができます。この端子からはヘッドフォンで聴くものと同 じ音声信号が出力されます。 スイッチボックス底面 USB 各種コンポ カセットデッキ ICレコーダー など MIDI IN MIDI OUT PDL KEY DC IN 12V または IN AUX OUT 4 AUX OUT端子へ (ステレオミニジャック) アンプ内蔵スピーカー ステレオ など オーディオケーブル ご注意 AUX OUT 端子をアナログ録音機器の入力端子に接続したときは、同時に
■ AUX IN 端子の使用例 他の音源モジュールや再生機器(CD プレーヤーなど)に接続すると 接続機器からの入力音声に合わせて消音演奏ができます。 本機の音量ツマミ(VOLUME)は AUX IN 端子から入力された音と、本機の電子音の両方を調整 できます。2 つの音声のバランスは、接続機器の出力音量で調整してください。 スイッチボックス底面 USB 他の音源モジュール (エレクトーンなど) MIDI IN または MIDI OUT PDL KEY DC IN 12V IN CDプレーヤー など AUX IN端子へ (ステレオミニジャック) オーディオケーブル 23 AUX OUT
他の MIDI 機器と接続する ■ MIDI OUT 端子の使用例 他の MIDI 楽器に接続すると 本機の消音演奏を、シンセサイザーなど他の MIDI 機器の音源モジュールで再生できます。 スイッチボックス底面 USB MIDI IN MIDI OUT端子へ 他のMIDI楽器 M DI OUT PDL KEY DC IN 12V IN AUX OUT MIDIケーブル ■ MIDI IN 端子の使用例 シーケンサーやコンピューターに接続すると 接続機器から演奏情報を受け取り、本機の音源で再生できます。 スイッチボックス底面 USB MIDI IN端子へ シーケンサー コンピューター など MIDI N MIDI OUT PDL KEY DC IN 12V N AUX OUT MIDIケーブル メモ 鍵盤、ペダルの演奏情報の他、音色切り替え、リバーブの深さの情報を送受信します。MIDI 送信は 1 チャンネル、受信は 1、2 チャンネルの両方となります。 24
5 その他の情報 章 故障かな?と思ったら 本機が正常に動作しない場合は、以下の項目をご確認ください。下記を試しても改善されなかった り、下記以外の異常がある場合は、お買い上げ店または最寄のヤマハ特約楽器店までご連絡くださ い。ご自分で本機および AC アダプターの内部を開けたり、分解、改造したりしないでください。 ☞ 電源を入れても音がしない。 − AC アダプターが抜けているかもしれません。確実に差し込んでください。 − 音量ツマミが左一杯の位置になっているかもしれません。適正位置に調整してください。標準音量は、音 量ツマミが時計の 3 時の位置になるように設定されています。 ☞ 電源ランプはつくが音が出ない、ペダルがきかない。 − スイッチボックス背面にあるキーセンサーとペダルセンサー端子の接続が抜けているかもしれません。ス イッチボックス下側の印字 (KEY、PDL) にそれぞれ対応する端子 (KEY、PDL) を確実に差し込んでくだ さい(7 ページ)。 ☞ 消音演奏時にもアコースティックピアノの音が出る。 − 極度に強く打鍵するとアコースティックピアノの音が出ることがありま
エラー通知について 本機では、以下のようなエラーが発生したときに 3 回連続のチャイム音と 2 つのランプの速い点滅 でお知らせします。エラー通知は、録音ボタン(REC)か再生/停止ボタン(PLAY/STOP)を 押すと停止します。 ・ USB メモリーが壊れているのでアクセスできません。 ・ 曲のデータが壊れています。 ・ 曲のデータ容量が大きすぎて読み込みできません。 ・ 処理中に電源が切られたため、内蔵メモリーが初期化されました。ご自身で録音した曲が消去さ れています(初期化中は、エラー通知を停止することはできません)。 ・ USB メモリーの容量がいっぱいで、曲を保存できません。 ・ USB メモリーがライトプロテクト(書き込み禁止)されているようです。 音色一覧 音色名 26 指定鍵盤 音色の特長 バリエーション ピアノ C4 フルコンサートグランドピアノCFIIISからサ ピアノではバリエーション設定はありませ ンプリングしました。繊細なピアニシモか ん。左ペダルは、ソフト(シフト)ペダルの ら、迫力あるフォルテシモまで、幅広い表現 効果がかかります。 が可能です。ダンパーペダル使
試聴曲一覧 曲番号(鍵盤) 曲名/作曲者名 曲番号(鍵盤) 曲名/作曲者名 1(C0) インベンション第 1 番/バッハ 26(C#2) 革命のエチュード/ショパン 2(C#0) インベンション第 8 番/バッハ 27(D2) 小犬のワルツ/ショパン 3(D0) ガボット/バッハ 28(D#2) ワルツ第 7 番/ショパン 4(D#0) 前奏曲(平均律第 1 巻第 1 番)/バッハ 29(E2) ワルツ第 9 番「告別」/ショパン 5(E0) メヌエットト長調/バッハ 30(F2) 夜想曲第 2 番変ホ長調/ショパン 6(F0) かっこう/ダカン 31(F#2) トロイメライ/シューマン 7(F#0) ピアノソナタ第 15 番第 1 楽章/モーツァ ルト 32(G2) 楽しき農夫/シューマン 乙女の祈り/バダジェフスカ 8(G0) トルコ行進曲/モーツァルト 33(G#2) 9(G#0) メヌエットト長調/モーツァルト 34(A2) 人形の夢と目覚め/オースティン 10(A0) リトル・セレナーデ/ハイドン 35(A#2) ア
各音色の MIDI データ(プログラムチェンジナンバー) 音色名 MSB LSB P.C.# ピアノ 0 112 1 ハープシコード 0 112 7 同上(バリエーション) 0 113 7 ビブラフォン 0 112 12 エレクトリックピアノ 1 0 112 6 エレクトリックピアノ 2 0 112 5 パイプオルガン 0 112 20 同上(バリエーション) 0 113 20 チェレスタ 0 112 9 同上(バリエーション) 0 113 9 ジャズオルガン 0 112 17 ストリングス 0 112 49 同上(バリエーション) 0 113 49 クワイア 0 112 53 同上(バリエーション) 0 113 53 MSB, LSB (Bank Select), 0 〜 127 P.C.# = Program Change Number, 1 〜 128 MIDI ファイルの再生順序 以下は、 「USERSONG**.
仕様 グランドピアノ アップライトピアノ 鍵盤数 88 鍵 ペダル ダンパーペダル、ソステヌート ダンパーペダル、消音ペダル、ソ ペダル、シフトペダル フトペダル センサーユニット 消音システム 音源/音色 ハンマーセンサー 非接触 2点検出 光ファイバーセ ンサー キーセンサー 非接触 連続検出 光センサー ペダルセンサー ダンパーペダル:連続検出 ダンパーペダル:連続検出 ソステヌートペダル:ON/OFF ソフトペダル:ON/OFF 検出 検出 シフトペダル:ON/OFF 検出 消音方式 ハンマーシャンクストッパー方 ハンマーシャンクストッパー方 式(消音レバー) 式(消音ペダル) アクション クイックエスケープ方式 音源方式 AWM 音源 最大同時発音数 ※ 64 音、ステレオサンプリング 32 音、16 音(ダンパーペダル共 鳴効果あり) 音色数 10 音色 ピアノ、ハープシコード、ビブラフォン、パイプオルガン、チェ レスタ、ストリングス、エレクトリックピアノ 1、エレクトリック ピアノ 2、ジャズオルガン、クワイア 機能 ー 非接触 連続検出
取り扱いについて ここに記載されているイラストは、お客様が購入された製品と形状が異なる場合があります。 ■ 電源について 必ず AC100V(50HZ または 60Hz)のコンセント に接続してください。AC100V 以外のコンセントに は接続しないでください(本機は日本国内仕様です)。 長期間ご使用にならないときは、AC アダプターの電 源プラグをコンセントから抜いてください。 ■ AC アダプター、ヘッドフォン等のコード類について コードの上に物を置いたり、ピアノのふたに挟みこんだりしないでください。 コードを抜き差しするときは、必ず電源を切ってから行ってください。 コードを抜くときは、断線やショートを防ぐため、必ずプラグを持って行っ てください。 ■ 落雷のおそれがあるときは? ■ 水に濡れたときは? 早めにコンセントから AC アダプターの電源 プラグを抜き取ってく ださい。 万一雨がかかったり、水をこぼしてしまったときは、 すぐ電源プラグを抜き、販売店にご連絡ください。ま た、煙やスプレーなどがかからないよう、ご注意くだ さい。 ■ 他の電気機器への影響は? 本機の近くでラジオ・テレ
鍵盤操作一覧 ■ 音色を選ぶ 音色の種類 設定方法 ピアノ(初期設定) A-1、A#-1、B-1 を押しながら、C4 を押す。 ハープシコード A-1、A#-1、B-1 を押しながら、D4 を押す。 ビブラフォン A-1、A#-1、B-1 を押しながら、E4 を押す。 パイプオルガン A-1、A#-1、B-1 を押しながら、F4 を押す。 チェレスタ A-1、A#-1、B-1 を押しながら、G4 を押す。 ストリングス A-1、A#-1、B-1 を押しながら、A4 を押す。 エレクトリックピアノ 1 A-1、A#-1、B-1 を押しながら、C#4 を押す。 エレクトリックピアノ 2 A-1、A#-1、B-1 を押しながら、D#4 を押す。 ジャズオルガン A-1、A#-1、B-1 を押しながら、F#4 を押す。 クワイア(合唱) A-1、A#-1、B-1 を押しながら、G#4 を押す。 A#-1 A-1 B-1 C4〜A4 ⇒詳しくは 10 ページをご覧ください。 ■ ブリリアンスを調整する 操作 設定方法 ブリリアンスを調整する A-1、A#-1、B-
■ リバーブをかける リバーブの種類 効果 設定方法 ルーム 響きやすい部屋の中で弾いたときのような音 A-1 と A#-1 と B-1 を押しながら C2 を押す。 ホール 1 ( 初期設定 ) 小さなコンサートホールにいるような響き A-1 と A#-1 と B-1 を押しながら D2 を押す。 ホール 2 大きなコンサートホールにいるような響き A-1 と A#-1 と B-1 を押しながら E2 を押す。 ステージ ステージにいるような響き A-1 と A#-1 と B-1 を押しながら F2 を押す。 A#-1 A-1 B-1 ルーム (C2) ステージ (F2) ホール1:初期設定 (D2) ホール2 (E2) ⇒詳しくは 12 ページをご覧ください。 ■ ピッチを合わせる 操作 設定方法 ピッチを上げる A-1 と B-1 を押しながら、C3 から B3 までのいずれかの鍵盤を押す。 ピッチを下げる A-1 と A#-1 を押しながら、C3 から B3 までのいずれかの鍵盤を押す。 工場出荷時のピッチに戻す A-1 と A#-1 と B-
■ すべての設定を工場出荷時の値に戻す(オールリセット) A-1 と A#-1 と B-1 を押しながら C7(いちばん右の白鍵)を押す。 A#-1 A-1 B-1 C7 ⇒詳しくは 13 ページをご覧ください。 ■ 内蔵メモリーに録音した曲を再生する 再生をするには 再生/停止ボタン(PLAY/STOP)を押す。 再生を停止するには 再生中に再生/停止ボタン(PLAY/STOP)を押す。 一時停止するには 再生中に C7 を押す。 早送りするには 再生中または一時停止中に、G#6 を押しながら A#6 を押す。 G#6, A#6 C7 ⇒詳しくは 15 ページをご覧ください。 ■ USB メモリーの曲を再生する 〈本機で最後に保存した曲を 1 曲のみ再生する場合〉 USB メモリーを本機に接続した状態で、再生/停止ボタン (PLAY/STOP)を押す。 ⇒詳しくは 18 ページをご覧ください。 33
〈複数保存されている曲を再生する場合〉 1 USB メモリーを本機に接続した状態で、B6 と C7(右端の白鍵 2 つ)を同時に押しながら電 2 電源を入れてから約 1 〜 2 秒後に鍵盤を戻します。 源を入れます。 自動的に USB メモリーに最初に保存した曲から再生が始まります。 B6 C7 複数曲の再生を終了するには 電源を入れなおす。 聴きたい曲を選ぶには(ダイレクト選曲) A-1 を押しながら、C0 から C#4 間の聴きたい曲番号に相当する鍵盤を押す。 曲間を移動するには ひとつ前の曲を選ぶには F#6 を、ひとつ後の曲を選ぶには A#6 を押す。 早送りするには 再生中または一時停止中に、G#6 を押しながら A#6 を押す。 一時停止するには 再生中に C7 を押す。また、再開するときも C7 を押す。 停止するには 再生中に B6 または再生/停止ボタン(PLAY/STOP)を押す。再開するときは再生/停止ボタン (PLAY/STOP)を押す。 リピート(繰り返し)モードを設定するには 1 曲リピートするには F6 を、全曲リピートするには G6 を、ランダム(任意の曲順で)
■ 試聴曲を再生する(試聴モード) 1 B6 と C7(右端の白鍵 2 つ)を同時に押しながら電源を入れます。 2 電源を入れてから約 1 〜 2 秒後に鍵盤を戻します。 自動的に第 1 曲目から再生が始まります。 B6 C7 試聴モードを終了するには 電源を入れなおす。 聴きたい曲を選ぶには(ダイレクト選曲) A-1 を押しながら、C0 から C#4 間の聴きたい曲番号に相当する鍵盤を押す。 曲間を移動するには ひとつ前の曲を選ぶには F#6 を、ひとつ後の曲を選ぶには A#6 を押す。 早送りするには 再生中または一時停止中に、G#6 を押しながら A#6 を押す。 一時停止するには 再生中に C7 を押す。また、再開するときも C7 を押す。 停止するには 再生中に B6 または再生/停止ボタン(PLAY/STOP)を押す。再開するときは再生/停止ボタン (PLAY/STOP)を押す。 リピート(繰り返し)モードを設定するには 1 曲をリピートするには F6 を、全曲をリピートするには G6 を、ランダム(任意の曲順で)リピー トするには A6 を押す。 1曲進む (A#6) 早送り (G#
MIDI インプリメンテーションチャート Date: 2011.03.18 Version: 1.
保証とサービスについて 本機の保証期間は、保証書に記入されたお買い上げ の日付から1ヵ年です(現金、ローン、月賦などによ る区別はございません) 。また保証は、日本国内にて のみ有効といたします。 保証書 保証書をお受け取りのときは、お客様のご住所、お 名前、お買い上げの年月日、販売店名などを必ずご 確認ください。無記名の場合は無効となりますので、 くれぐれもご注意ください。 保証書は大切に保管しましょう 保証書は弊社が、本機をご購入いただいたお客様 に、保証規定に則り、お買い上げの日から向こう1ヵ 年の無償サービスをお約束申し上げるものですが、 万一紛失なさいますと保証期間中であっても実費を 頂戴させていただくことになります。いつでもご提 示いただけますように、十分ご配慮のうえで保管し てください。また、後々のサービスに際しての機種 の判別や、サービス依頼店の確認などにも役立ちま す。保証期間が切れましても、お捨てにならないで ください。 保証期間中のサービス 保証期間中に万一故障が発生した場合、お買い上げ 店にご連絡いただきますと、技術者が修理・調整い たします。この際、必ず保証書をご提示ください。
ピアノ事業部 営業部 〒436-0038 静岡県掛川市領家1480 Copyright 2011 by Yamaha Corporation A カタログコード PPT513 YC632B0 Mar-11 ○