iPhone/iPod touch/iPad 用アプリケーション Disklavier Controller 試用版 ユーザーガイド ディスクラビア E3 ディスクラビアコントロールユニット DKC-850
はじめに Disklavier Controller をダウンロードいただき、ありがとうございます。 本アプリケーションを使って、ディスクラビアのさまざまな機能をコントロールすることが できます。お使いになるまえに、本書をよくお読みください。 ※ 本アプリケーションは試用版であり、サポート対象外となります。また、本アプリケーショ ンのサービスは予告なく変更されたり、終了することがあります。 対象機器(2010 年 9 月 1 日現在) 本アプリケーションは、以下のアップル社製の製品でご使用いただけます(iOS 3 以降が必要 です)。 • iPhone • iPod touch • iPad 必要条件 • お手持ちのディスクラビアの機種によって、必要なプログラムのバージョンが異なります。 取扱説明書をご覧のうえ、プログラムをアップデートしてください。 - ディスクラビア E3 をお使いの場合:Version 3.00 以上 - ディスクラビアコントロールユニット DKC-850 をお使いの場合:Version 3.
目次 第 1 章 準備 2 ページ 3 ページ 4 ページ 5 ページ 6 ページ 7 ページ 8 ページ メニュー画面の構成 アプリケーションを起動する ピアノを検索する ピアノに接続する パスコードを入力する ピアノをスタンバイモードにする スタンバイモードを解除する 第 2 章 ソングの再生 10 ページ 13 ページ ソングを選ぶ ソング再生中の操作 第 3 章 DisklavierRadio の再生 16 ページ 18 ページ チャンネルを選ぶ DisklavierRadio 再生中の操作 第 4 章 ソングの録音 20 ページ 21 ページ 22 ページ 録音を開始する 録音を停止する 録音したソングにタイトルをつける 第 5 章 その他の機能 24 ページ 25 ページ 26 ページ 27 ページ 28 ページ 音源の音量バランスを調整する ソングを移調する ソングのテンポを変更する パートをキャンセルする ショートカットを実行する 第 6 章 関連情報 30 ページ 31 ページ 32 ページ パスコードの設定について 困ったときは 商標について 目次 iii
第 準 1 章 備 はじめに 1
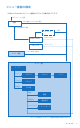
メニュー画面の構成 Disklavier Controller のメニュー画面は以下のように構成されています。 アプリケーション起動 起動 すでに接続したことがある場合 はじめて接続する場合 パスコード※ [Piano Search] Piano Search スタンバイ メイン(横) 認証 [スタンバイ] デバイスの向きを変更 メイン(縦) トップ [セレクト] [バランス] [その他] メディア アルバム ソング バランス その他 [録音] [再生設定] [ショートカット] 録音 再生設定 ショートカット ※ パスコードが設定されているピアノに接続する場合にのみ表示されます。 第 1 章 準備 2
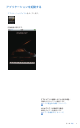
アプリケーションを起動する アプリケーションアイコンをタップします。 起動画面が開きます。 すでにピアノに接続したことがある場合: 自動的にそのピアノに接続します。 ソング再生中の操作(13 ページ) はじめてピアノに接続する場合: 接続先のピアノを検索します。 ピアノを検索する(4 ページ) 第 1 章 準備 3
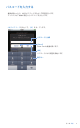
ピアノを検索する はじめてピアノと接続するときは、まず接続するピアノを探す必要があります。 [Piano Search]をタップします。 言語切り替えスイッチ この画面に表示される言語を切り替えます(日本 語または英語)。 [Piano Search] ピアノの検索を開始します。 検索が終わったら、 接続するピアノを選びます。 ピアノに接続する(5 ページ) 第 1 章 準備 4
ピアノに接続する 見つかったピアノが一覧表示されます。 接続したいピアノを一覧から選んでください。 接続したいピアノをタップします。 ピアノ一覧 [Demo Mode] ※ デモモードに切り替えます。デモモードでは、ピア ノに接続していない状態でも、Disklavier Controller の操作を実際に触りながら確認できます。 ※ デモモード中の操作内容は、海外仕様のディスクラビアの ものになります。国内仕様のディスクラビアとは操作内容 や表示が異なりますので、あらかじめご了承ください。 必要に応じて、パスコードによる認証を行い ます。 パスコードを入力する(6 ページ) パスコードを設定する(30 ページ) パスコード認証が不要な場合は、ソングを再 生します。 ソング再生中の操作(13 ページ) 第 1 章 準備 5
パスコードを入力する 接続が終わったら、4 桁のパスコードを入力して認証を行います。 ディスクラビア本体に設定したパスコードを入力します。 4 桁のパスコードを入力して、[OK]をタップします。 パスコード入力欄 [Cancel] Piano Search 画面に戻ります。 [OK] パスコードによる認証を開始します。 数字キー 第 1 章 準備 6
ピアノをスタンバイモードにする ツールバーの[その他]をタップし、表示された「その他」画面で[スタンバイ]をタップします。 再度電源を入れるには・・・ スタンバイモードを解除する(8 ページ) 第 1 章 準備 7
スタンバイモードを解除する ディスクラビアがスタンバイモードのときは、下記画面からスタンバイモードを解除します。 スイッチを右にスライドさせます。 スイッチ スタンバイモードを解除します。 第 1 章 準備 8
第 2 章 ソングの再生 はじめに 9
ソングを選ぶ ツールバーの[セレクト]をタップします。 再生したいメディアをタップします。 メディア一覧 次に、再生したいアルバムを選びます。 アルバムを選ぶ(11 ページ) 第 2 章 ソングの再生 10
ソングを選ぶ(つづき) 再生したいアルバムをタップします。 [メディア] メディア選択画面に戻ります。 アルバム一覧 次に、再生したいソングを選びます。 ソングを選ぶ(12 ページ) 第 2 章 ソングの再生 11
ソングを選ぶ(つづき) 再生したいソングをタップします。 [アルバム] アルバム選択画面に戻ります。 ソング一覧※ ※ ソングが多数保存されている場合は、一覧表示に時間が かかることがあります。 選んだソングが再生されます。 ソング再生中の操作(13 ページ) 第 2 章 ソングの再生 12
ソング再生中の操作 ソング再生中に画面をタップすると、ソングコントロールパネルが表示されます。ソングコ ※ 画面をタップするたびに、ソングコント ントロールパネルではさまざまな操作が可能です。 ロールパネルの表示/非表示が切り替わります。 ソング再生中に画面をタップします。 ソングタイトル [ ](次の曲へスキップ/早送り) 短く(1 秒以下)タップすると、次の曲にスキッ プします。 長く(1 秒以上)タップすると、再生中のソング を早送りします。 [ ](再生/一時停止) 再生を開始/一時停止します。 ソングポジション ソングの再生時間(位置)を表示します。 ](前の曲へスキップ/早戻し) [ 短く(1 秒以下)タップすると、前の曲にスキッ プします。 長く(1 秒以上)タップすると、再生中のソング を早戻しします。 ※ 操作に対して、ディスクラビア本体がすぐに反応しない ことがあります。 第 2 章 ソングの再生 13
ソング再生中の操作(つづき) ソング再生中に画面をタップします。 リピートモード リピートモードを切り替えます。 : リピートオフ(解除) : 1 曲リピート : 全曲リピート : ランダムリピート メインボリューム ディスクラビア全体の音量を調節します。 消音演奏モード※1 ディスクラビアの消音演奏モードを表示します。 : アコースティックモード : Quiet モード : Headphone モード※2 ※1 ディスクラビア E3 グランドピアノでは、消音演奏モー ド表示をタップして、アコースティックモードと Quiet モードを切り替えることができます。ディスクラビア コントロールユニット DKC-850 を MIDI 接続している 場合は、常にアコースティックモードが表示されます。 ※2 ディスクラビア E3 グランドピアノのみ、このモードが 表示されます。ディスクラビア E3 グランドピアノでは、 ヘッドフォンを接続すると、Headphone モードに固定 されます。 第 2 章 ソングの再生 14
第 3 章 DisklavierRadio の再生 はじめに 15
チャンネルを選ぶ ツールバーの[セレクト]をタップします。 [D-Radio]をタップします。 [D-Radio] 次に、再生したいチャンネルを選びます。 チャンネルを選ぶ(17 ページ) 第 3 章 DisklavierRadio の再生 16
チャンネルを選ぶ(つづき) 再生したいチャンネルをタップします。 [メディア] メディア選択画面に戻ります。 チャンネル一覧※ ※ 有料チャンネルを再生するには、事前にディスクラビア 本体でインターネットダイレクトコネクション(IDC) サービスにログインする必要があります。 選んだチャンネルが再生されます。 DisklavierRadio 再生中の操作(18 ページ) 第 3 章 DisklavierRadio の再生 17
DisklavierRadio 再生中の操作 DisklavierRadio 再生中に画面をタップすると、ソングコントロールパネルが表示されます。 ※1 画面をタップするたびに、ソ ソングコントロールパネルではさまざまな操作が可能です。 ングコントロールパネルの表示/非表示が切り替わります。 DisklavierRadio 再生中に画面をタップします。 チャンネルタイトル/ソングタイトル [ミュートオフ]/[ミュートオン] ミュート機能のオン/オフを切り替えます。 メインボリューム ディスクラビア全体の音量を調節します。 [戻る] チャンネル選択画面に戻ります。 消音演奏モード※2 ディスクラビアの消音演奏モードを表示します。 : アコースティックモード : Quiet モード : Headphone モード※3 ※1 操作に対して、ディスクラビア本体がすぐに反応しな いことがあります。 ※2 ディスクラビア E3 グランドピアノでは、消音演奏モー ド表示をタップして、アコースティックモードと Quiet モードを切り替えることができます。ディスクラビア コントロールユニット DKC-850 を M
第 4 章 ソングの録音 はじめに 19
録音を開始する ツールバーの[その他]をタップし、表示された「その他」画面で[録音]をタップします。 [録音開始]をタップし、演奏をはじめます。 カウンター表示 [録音開始] 録音を開始します。 [キャンセル] 録音をキャンセルします。 演奏の開始とともに録音がはじまり、カウン ター表示が進みはじめます。 録音を停止する(21 ページ) 第 4 章 ソングの録音 20
録音を停止する [録音停止]をタップします。 [録音停止] 録音を停止します。 次に、録音したソングにタイトルをつけます。 録音したソングにタイトルをつける(22 ページ) 第 4 章 ソングの録音 21
録音したソングにタイトルをつける 録音が終わったら、ソングにタイトルをつけます。 タイトルは英数字で入力することをおすすめします。英数字以外の文字を使って入力すると、 ディスクラビア本体側で正常に表示されない場合があります。 録音したソングのタイトルを入力して、[OK]をタップします。 タイトル入力欄 [Cancel] タイトル入力をキャンセルします。 [OK] 入力したタイトルを確定します。 キーボード 第 4 章 ソングの録音 22
第 5 章 その他の機能 はじめに 23
音源の音量バランスを調節する ツールバーの[バランス]をタップします。 スライダーを使って、各音源の音量バランスを調節します。 [ボイス] 鍵盤演奏のピアノパートの音量を調節します。 [TG] 内蔵音源で発音されるアンサンブルパートの音量 を調節します。 [オーディオ] 音楽 CD などのソフトウェアの音量を調節します。 第 5 章 その他の機能 24
ソングを移調する ツールバーの[その他]をタップし、表示された「その他」画面で[再生設定]をタップします。 [ 移調 ] / [ 移調 ] を使って、ソングを移調します。 [ 移調 ] / [ 移調 ] - 24 ~+ 24(2 オクターブ)の範囲を半音単位 でソングを移調します。 第 5 章 その他の機能 25
ソングのテンポを変更する ツールバーの[その他]をタップし、表示された「その他」画面で[再生設定]をタップします。 スライダーを使って、テンポを変更します。 [テンポ] - 50%~+ 50% の範囲でテンポを調節します。 [リセット] 元のテンポ(0%)に戻します。 第 5 章 その他の機能 26
パートをキャンセルする ツールバーの[その他]をタップし、表示された「その他」画面で[再生設定]をタップします。 [パートキャンセル]を使って、各パートのオン/オフを切り替えます。 [パートキャンセル] 左手パート(L)または右手パート(R)のオン/ オフを切り替えます。 第 5 章 その他の機能 27
ショートカットを実行する ツールバーの[その他]をタップし、表示された「その他」画面で[ショートカット]をタッ プします。 実行したいショートカットをタップします。 ショートカットリスト※ ※ ショートカットはディスクラビア本体でのみ登録、編集、 削除ができます。 第 5 章 その他の機能 28
第 6 章 関連情報 はじめに 29
パスコードの設定について ディスクラビア本体にパスコードを設定しておくと、ほかの Disklavier Controller からの不用 意な操作を防止することができます。 初期設定 初期設定ではパスコードは設定されていませんので、どの Disklavier Controller からでもディ スクラビアを操作することができます。 パスコードの設定方法 パスコードはディスクラビアのパスコード設定画面で設定します。リモコンの[セットアップ] ボタンを押し、カーソルボタンで “ パスコード ” を選ぶと、パスコード設定画面が表示され ます。詳しくはディスクラビアの取扱説明書をご覧ください。 4 桁のパスコードを設定してください。 この画面で設定したパスコードを Disklavier Controller で入力する(6 ページ)と、Disklavier Controller からディスクラビアを操作できるようになります。 パスコードを忘れたときは パスコードを削除するか、新しいパスコードを設定してください。 第 6 章 関連情報 30
困ったときは 本アプリケーションが正常に動作しない場合は、以下の項目をご確認ください。 Disklavier Controller がまったく作動しない。 ♫♫ iPhone/iPod touch/iPad およびディスクラビアが無線ルーター経由で接続されているかご 確認ください。また、iPhone/iPod touch/iPad がディスクラビアと同一のネットワーク上 にある WiFi アクセスポイントに接続されているかご確認ください。 ♫♫ ディスクラビアのプログラムバージョンをご確認ください。お手持ちのディスクラビアの 機種によって、必要なプログラムのバージョンが異なります。必要に応じて、プログラム をアップデートしてください。 - ディスクラビア E3 をお使いの場合:Version 3.00 以上 - ディスクラビアコントロールユニット DKC-850 をお使いの場合:Version 3.
商標について • 本書の著作権は、すべてヤマハ株式会社が保有します。 • ヤマハおよびディスクラビアは、ヤマハ株式会社の登録商標です。 • アップル、iPod touch、および iPhone は、米国および他の国々で登録された Apple Inc. の 商標です。iPad は、Apple Inc.
ピアノ事業部 営業部 〒 436-0038 静岡県掛川市領家 1480 Copyright © 2011 by Yamaha Corporation Jul-11